7
www.pifco.co
Assembling the Base and Pole:
Before using, there is some assembly required
as follows:
1
2
A
B
C
1.
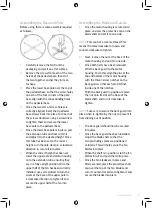
Carefully remove the fan from the
packaging and set it on a flat surface.
2.
Remove the screws from each of the two
halves of the pedestal base, then slot
the two together so that they form an
X-shape.
3.
Place the lower base pole over the top of
the pedestal base, so that the screw holes
on each of the four corners of the pole
base align with the corresponding holes
on the pedestal base.
4.
Once the two sets of screw-holes are
correctly aligned, insert the 4 pedestal
base screws back into place. Turn each of
the screws clockwise using a screwdriver
to tighten them and secure the lower
base pole to the pedestal base.
5.
Once the lower base pole is in place, pull
the extension tube out from within it
and adjust it to the desired height. Once
this tube has been set to the correct
height, turn the pole clamp in a clockwise
direction to secure it into place.
6.
When the correct height has been set,
lower the upper pole and motor housing
onto the extension tube, ensuring they
are in a fully upright position. Once the
upper half of the fan has been correctly
installed, use a screwdriver to turn the
screw at the back of the upper pole in
a clockwise direction to tighten it and
secure the upper half of the fan into
place.
Assembling the Blade and Guards:
1.
Once the motor housing is secured into
place, unscrew the protective cap on the
blade shaft and set it to one side.
NOTE:
This cap has a reverse thread. This
means it rotates clockwise to loosen and
counter-clockwise to tighten.
2.
Next, remove the nut at the back of the
motor housing and put it to one side.
3.
Once both parts have been removed,
affix the back guard to the motor
housing. To do this, align the pins at the
top and bottom of the motor housing
with the three narrow notches on the
back guard, so that each pin sits flush
inside one of the notches.
4.
With the back guard in position, replace
the nut onto its slot at the base of the
blade shaft, and turn it clockwise to
tighten.
NOTE:
Take care to secure the back guard into
place when re-tightening the nut, to prevent it
from slipping out of position.
5.
The back guard should now be secured
into place.
6.
Once the back guard has been installed,
adjust the blade shaft so that the
two protruding spikes are positioned
vertically. This will help secure the fan
blades into place.
7.
When the shaft is in position, slot the fan
blades into it and push them into place.
8.
Once the fan blades are in place and
firmly secured, place the protective shaft
cap over the top of the fan blades and
turn it counter-clockwise to tighten it and
secure the blades into place.
Summary of Contents for BHFP51001
Page 11: ...11 www pifco co Notes ...

