background image


15 


S

ta

rtKi

t1

_

2

.E

.1

.1

3


RELAY’s PadPulse M2 

 
Note: 
The PadPulse M2 gateway is by default configured for an energy pulse meter (Wh * 0001). To change 
the gateways configuration, please see the PadPulse M2’s manual. 
 
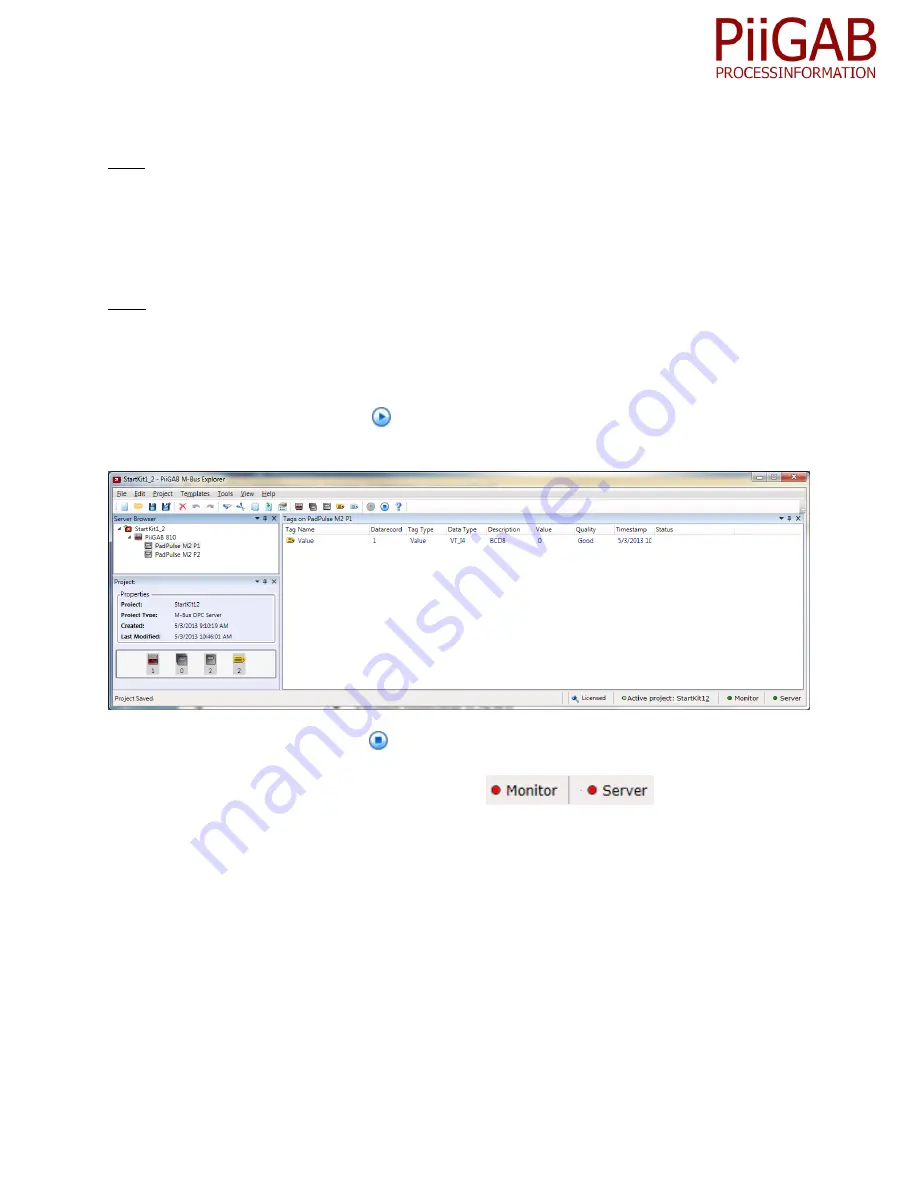
The configuration in PiiGAB Explorer for the PadPulse M2 is the most default and generic as possible. 
The two accumulators in the PadPulse M2 are represented as 

Value

 in PiiGAB Explorer. 

 
Note: This section expects the pulse meters have their own primary addresses set to 0 and 1. 
 

Monitor one of the pulse meters 

 
1.


Click the 

PadPulse M2 P1

 node or 

PadPulse M2 P2

 node in PiiGAB Explorers tree structure 

2.


Press the 

Start Monitor

 button 

 or go to 

Tools

 and press 

Start monitor


3.


Wait for the 

Quality

 field to change to 

Good


4.


Press the 

Stop Monitor

 button 

 or go to 

Tools

 and press 

Stop monitor

 to terminate the 

monitor function 

5.


Wait for the server to properly terminate 


Summary of Contents for 810/20

Page 1: ...Manual for PiiGAB Start Kit 1 2 ...

Page 2: ... IP configuration for your PiiGAB 810 6 Configure the PiiGAB 810 8 PiiGAB M Bus Setup Wizard M Bus communication 10 M Bus communication with RELAY PadPulse M2 11 Change primary address of PadPulse M2 12 Read both primary and secondary address from RELAY PadPulseM2 13 Further RELAY PadPulse M2 configuration 13 PiiGAB Explorer M Bus OPC server M Bus communication 14 Try the StartKit1_2 example proje...

Page 3: ...the M Bus load configuration of the PiiGAB 810 gateway The configuration of both StartKits is the same StartKit1 PiiGAB 810 5 five M Bus loads StartKit2 PiiGAB 810 20 twenty M Bus loads Requirments One PiiGAB 810 gateway One RELAY PadPulse M2 gateway One 24VAC or 24VDC power supply A local area network LAN with DHCP PiiGAB M Bus Setup Wizard 3 1 0 or later PiiGAB Explorer M Bus OPC server PiiGAB S...

Page 4: ...StartKit1_2 zip to a local folder 4 Connect PiiGAB 810 gateway to the LAN 5 Make sure your computer is connected to the same LAN 6 Connect PiiGAB 810 gateway to a 24V AC or DC power supply 7 Connect PadPulse M2 to the PiiGAB 810 gateway see picture below 8 Turn the power supply on 9 Wait for PiiGAB 810 s Pwr LED to go steady red ...

Page 5: ...B 810 with PiiGAB M Bus Setup software The MAC address starts with 00 20 4A or 00 80 A3 Find your PiiGAB 810 on your network 1 Start PiiGAB M Bus Setup Wizard and go to the main menu 2 Select Find gateways on your network 3 Press Next to continue 4 Your PiiGAB 810 gateway should be listed 5 Find your PiiGAB 810 by the MAC address column 6 Select your PiiGAB 810 gateway and press Next ...

Page 6: ...able between your computer and the PiiGAB 810 gateway To be safe you can use a network switch between your computer and your PiiGAB 810 gateway Alter the IP configuration for your PiiGAB 810 1 Set your computer to a static IP address 2 Exit and restart PiiGAB M Bus Setup Wizard and go to the main menu 3 Select Change gateway IP settings 4 Press Next to continue 5 Select Setup IP using network UDP ...

Page 7: ...ould have to match your computer s IP address 10 Press Next to continue 11 Press Apply to set the IP configuration 12 Wait for the PiiGAB 810 gateway to reboot 13 Press Next to continue 14 Go back to Find your PiiGAB 810 on your network section and see if you can find your PiiGAB 810 gateway with the IP address you specified ...

Page 8: ... should be configured for M Bus communication 1 In PiiGAB M Bus Setup Wizard s main menu click the Change gateway parameters 2 Press Next to continue 3 Select Connect using network Note Make sure the PiiGAB 810 gateway s IP address is shown in IP address DNS field 4 Press Next to continue ...

Page 9: ...StartKit1_2 E 1 13 5 Configure the PiiGAB 810 with these settings 6 Press the Apply button to continue 7 Wait for the program to finish the configuration of the PiiGAB 810 gateway 8 Press Next to continue ...

Page 10: ...cation 1 In the main menu select Test search and configure meters 2 Press Next to continue 3 Select Connect using network and configure the connection as shown in the picture below Note Your PiiGAB 810 s IP address may not be 192 168 10 122 PiiGAB M Bus Setup Wizard only fill in the IP address automatically as you selected in Find your PiiGAB 810 on your network step 6 4 Click Next to continue ...

Page 11: ...ult according to EN13757 both M Bus connections have primary address set to 0 The image above displays the search window in PiiGAB M Bus Setup Wizard You can use it to search M bus meters on the M Bus loop In the image above you can see that the PadPulse M2 has two primary addresses both set to 0 Part of the Identify value can also be found inside the PadPulse M2 itself ...

Page 12: ... meter one of them must have their primary address changed When changing the primary address on one of the pulse meter the other one will remain on primary address 0 1 Configure these options as seen in the picture below 2 Press the Set button to change the primary address on one of the pulse meters ...

Page 13: ...s under 2 Press the Find button to test primary address 0 or 1 3 Try both primary address and make sure there is a working connection to both of them Further RELAY PadPulse M2 configuration To further configure RELAY s PadPulse M2 you ll require their configuration software MBConf Please also see the manual for the PadPulse M2 how configure it You can find both the manual and the software in the R...

Page 14: ...GAB Explorer 1 Start PiiGAB Explorer 2 Go to File menu and press the Open button 3 Browse to the local folder and open PiiGABStartKit1_2 xml 4 Go to File menu and press Set As Active Project This will set the PiiGABStartKit1_2 xml as the active project for the OPC server You may look around in this project and see a default configuration of RELAY s PadPulse M2 For instance look at the configuratio...

Page 15: ...adPulse M2 are represented as Value in PiiGAB Explorer Note This section expects the pulse meters have their own primary addresses set to 0 and 1 Monitor one of the pulse meters 1 Click the PadPulse M2 P1 node or PadPulse M2 P2 node in PiiGAB Explorers tree structure 2 Press the Start Monitor button or go to Tools and press Start monitor 3 Wait for the Quality field to change to Good 4 Press the S...

Reviews: