background image

10

NOTICE: 

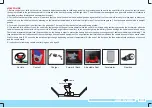
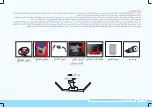
The product is shipped together with 2 front wheel rims and 2 small center points attached to front wheels, and with 2 rear wheel rims and 2 big center points 

attached to rear wheels. Please check while assembling the product whether these pieces dropped into the bag during transportation, and if so, please place them to their slots.

MODE OF ASSEMBLY

Warning!


The assembly of the product should be done by an adult. 

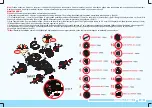
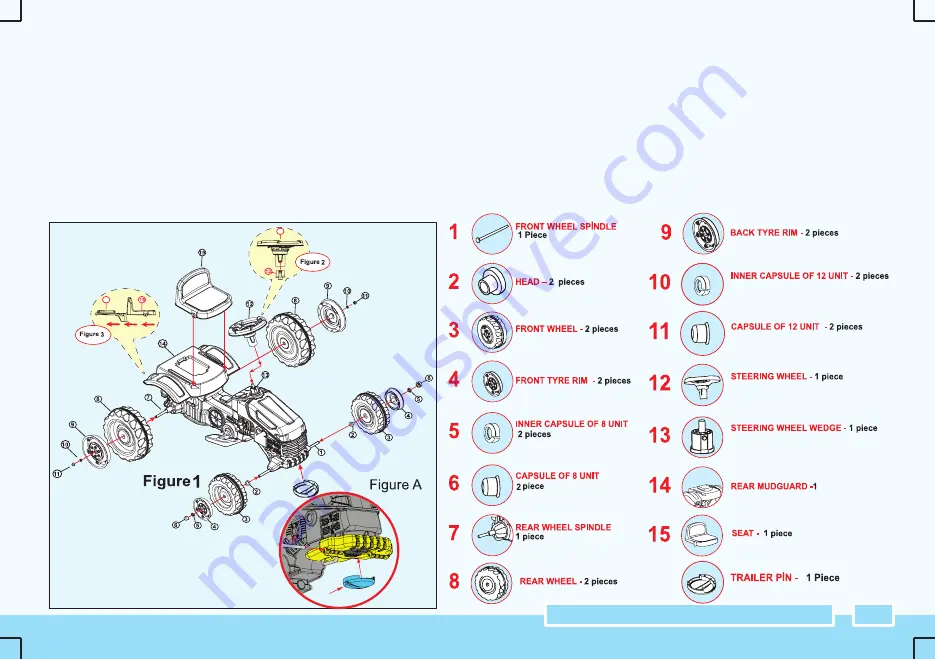
1)Bevor applying step 1 of the installation make sure that the axle cap is on axle no 16 and continue with the installation. (Fıgure A)

2) Assembly of the front tyres: Respectively attach the disc (no2), the front tyres (It is delievered as attached to the tyre) (no.3), front tyre rim (no.4) as in  (Figure 1) to the front tyre shaft 

and place the capsule of 8 (no.5) into the hole (no.6) in the shaft and attach the capsule of 8 by pushing. (Figure 1)

3) Assembly of the back tyre: Respectively attach the back tyre (no.8) and back tyre rim (no.9) to the back tyre shaft (no.7) as in Figure 1. and place the  capsule of 12 (no.10) into the 

hole (no.11) in the shaft and attach the capsule of 12 by pushing. (Figure 1)

4) Assembly of the Wheel: Place the holes under the Wheel (no.12) on the grips which are on Wheel wedge (no.13) on the body, by pushing until they are locked. (Figure 2)

5) Assembly of the seat: Push the grips which are on the both side of the seat (no.15) inward. Place it by pushing backward from the front part of the seat  connection hole on the mud-

guard (no.14). (Figure 3)

Attention! 

Make sure that the assembly parts are in their appropriate places before using the product after finishing assembly.

ASSEMBLY

16

14

14

16

1

Summary of Contents for 05-116

Page 1: ...arnings Advertencias Remarques Avvertenze Hinweise K k par alar i erdi inden 3 ya alt ocuklar i in uygun de ildir Bo ulma tehlikesi Not intended for children under 3 years of age as this product conta...

Page 2: ...z Sayg lar m zla P LSAN A Dear PILSAN Friend Pilsan importantly reminds that you must carefully read this manual before using the product and keep it for consulting when necessary in order to be satis...

Page 3: ...tak lmas na ve ters tak lmamas na dikkat ediniz Arac n z n kablo soketleri kablo ba lant lar vb aksamlar yla oynamay n z ve de i iklik yapmay n z r n temizlemek i in sadece nemli bir bez ile silerek...

Page 4: ...anz man motorundan sa lar Di er tekerler bo ta d ner Max Ta ma kapasitesi 50 Kg Kullan m Ya 3 Ya H z 3 5 Km h Korna Haval Korna arj cihaz nput 220 240 VAC 50 60 Hz Output 6V DC 1000 mA Kullan m s resi...

Page 5: ...eki yuvas na oturtup 6 nolu 8 lik kaps l bast rarak tak n z Ayn i lemi di er taraf i in uygulay n z ekil 1 3 Arka Tekerin Montaj 7 nolu arka teker miline 8 nolu arka teker 9 nolu arka teker jant n eki...

Page 6: ...ik volt ve amperde ba ka bir ak kullanmay n z 8 Arac n al mamas durumunda ilk olarak ak kutusu st k sm nda bulunan soketlerin k p kmad n kontrol ediniz Soketleri takarken kontak A KAPA anahtar n n kap...

Page 7: ...n hareket pedal na basarak ara hareket ettirilir 3 Frenleme i in aya n gazdan ekilmesi gerekir elektronik frenleme sistemi sayesinde ara durur 4 Ara hareket halinde iken durdurmadan ani olarak vites k...

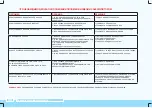
Page 8: ...2 KONTAK DE ECEK TEKERLER D NM YOR 1 MOTOR KABLOSU SOKETTEN IKMI TIR 2 LER GER KOLUNUN ALTINDAN SOKETLER IKMI TIR 3 A IRI ZORLAMADAN MOTOR YANMI TIR 1 SOKET TAKILACAK 2 SOKETLER TAKILACAK 3 MOTOR DE...

Page 9: ...be carried out by an adult If these checks have not been made the vehicle may overturn or may cause the falling of the child Pay attention that sockets on the tip of the vehicle battery and cable of...

Page 10: ...f the rear wheels has the gearbox other wheels do not have Max Carrying capacity 50 Kg Ages 3 Age Speed 3 5 Km h Horn Air Horn Charger nput 220 240 VAC 50 60 Hz Output 6V DC 1000 mA Duration of use 40...

Page 11: ...n Figure 1 to the front tyre shaft and place the capsule of 8 no 5 into the hole no 6 in the shaft and attach the capsule of 8 by pushing Figure 1 3 Assembly of the back tyre Respectively attach the b...

Page 12: ...danger 7 Dot not use another battery with different voltage and amperage instead of the original 8 In case the vehicle does not operate first check the fuse located at the top part of the battery box...

Page 13: ...raking system 4 It is required for a child not to use the vehicle by tampering with the gear levers sharply while the vehicle is moving and by continuing pressing the accelerator when the vehicle crus...

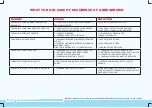
Page 14: ...ELS DO NOT ROTATE 1 ENGINE CABLES ARE DISLOCATED FROM THE SOCKET 2 SOCKETS ARE DISLOCATED FROM FORWARD BACKWARD LEVER 3 MOTOR IS BROKEN DUE TO OVERSTRAINING 1 SOCKET WILL BE FIXED 2 SOCKET WILL BE FIX...

Page 15: ...14 Pilsan 10 P LSAN P LSAN P LSAN...

Page 16: ...15 3 Act ve Tractor 05 116 6 V 1 6 50 3 3 5 nput 220 240 50 60 Hz Output 6 1000 mA 40 35...

Page 17: ...16 2 2 2 2 1 1 16 2 1 2 3 4 1 8 5 8 6 1 3 7 8 9 1 12 10 12 11 1 4 12 13 2 5 15 14 16 16 1...

Page 18: ...17 1 10 10 2 15 6 6 3 4 5 6 7 8 9 10 11 12...

Page 19: ...18 1 2 3 4 5 20...

Page 20: ...19 1 1 1 2 1 2 1 2 1 2 1 2 3 1 2 3 1 2 1 2 1 2 1 2 1 1...

Page 21: ...20 AR...

Page 22: ...21...

Page 23: ...22 16 16 1 12 A...

Page 24: ...23...

Page 25: ...24...

Page 26: ...25...

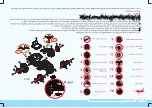
Page 27: ...26 1 AK 2 TERM K S GORTA 3 SOKET 4 KONTAK 5 GAZ PEDALI 6 V TES 7 MOTOR ELEKTR K DEVRES ELECTRIC CIRCUIT 1 BATTERY 2 THERMIC FUSE 3 SOCKET 4 CONTACT 5 GAS PEDAL 6 GEAR 7 ENGINE 1 2 3 4 5 6 7...

Page 28: ...27 50 kg 3 3 m...

Page 29: ...WARNINGS arj i lemi mutlaka bir yeti kin taraf ndan yap lmal d r Ak n z doldu unda adapt r prizde tak l b rakmay n z Ak y arj ederken r n n kontak anahtar kapal pozisyonda olmas gerekmektedir arj i le...

Page 30: ...29...

Page 31: ...30...

Page 32: ...polar G rece Cumhuriyet Mh S leyman Demirel Blv No 44 9 Menderes ZM R Tel Phone 0232 281 58 12 282 58 13 Faks Fax 0232 281 58 14 E mail ankara pilsan com tr MALAT I F RMA MANUFACTURER Yeni Mahalle Mer...

Reviews: