background image

- 11 -

Montaje

Montaje del dispositivo base sin bloque de 
ampliación de contactos:

`

Asegúrese de que la clavija de terminación 
se ha enchufado en el lateral del dispositivo.

Conexión de dispositivo base y bloque de 
ampliación de contactos PNOZsigma:

`

Desenchufar la clavija de terminación del la-
teral del dispositivo y del bloque de amplia-
ción de contactos.

`

Conectar el dispositivo base y el bloque de 
ampliación de contactos mediante el conec-
tor suministrado antes de montar los 
equipos en la guía normalizada.

Montaje en el armario de distribución

`

Montar el dispositivo dentro de un armario 
de distribución con un grado de protección 
de IP54 como mínimo.

`

Fijar el dispositivo a una guía normalizada 
con ayuda del elemento de encaje de la parte 
trasera. 

`

Asegurar el dispositivo en una guía normali-
zada vertical (35 mm) mediante un elemento 
de sujeción (por ejemplo un soporte o un án-
gulo final).

`

Deslizar el dispositivo hacia arriba o abajo 
antes de separarlo de la guía.

Montaggio

Montaggio dispositivo base senza modulo di 
espansione contatti:

`

accertarsi che sia inserito il connettore termi-
nale sul lato del dispositivo.

Collegamento dispositivo base e modulo di 
espansione contatti PNOZsigma:

`

rimuovere il connettore terminale sul lato del 
dispositivo base e sul modulo di espansione 
contatti.

`

Collegare il dispositivo base e il modulo di 
espansione contatti con il connettore in do-
tazione prima di montare i dispositivi sulla 
guida DIN.

Montaggio nell'armadio elettrico

`

Il modulo di sicurezza deve essere montato 
in un armadio elettrico con un tipo di prote-
zione corrispondente almeno al grado IP54.

`

Fissare il dispositivo su una guida DIN con 
l'aiuto dell'elemento a scatto situato sul re-
tro. 

`

In fase di montaggio, fissare il dispositivo su 
una guida DIN verticale (35 mm) mediante 
supporti (ad es. staffe di fissaggio o angoli 
terminali).

`

Prima di estrarlo dalla guida DIN, spingere il 
dispositivo verso l'alto o verso il basso.

Montage

Basisrelais zonder contactuitbreidingsrelais 
monteren:

`

Zorg dat de afsluitconnector op de zijkant 
van het apparaat is geplaatst.

Basisrelais en contactuitbreidingsrelais 
PNOZsigma verbinden:

`

Verwijder de afsluitstekker van de zijkant van 
het basisrelais en het contactuitbreidingsre-
lais.

`

Verbind het basisrelais en het contactuitbrei-
dingsrelais met de meegeleverde verbin-
dingsstekker voordat u de apparaten op de 
DIN-rail monteert.

Montage in schakelkast

`

Monteer het veiligheidsrelais in een schakel-
kast met een beschermingsgraad van mini-
maal IP54.

`

Bevestig het apparaat met behulp van de re-
laisvoet op de achterzijde op een DIN-rail. 

`

Zet het apparaat op een verticale draagrail 
(35 mm) vast met een eindsteun.

`

Schuif voordat u de DIN-rail opheft het appa-
raat omhoog of omlaag.

Cableado

Tenga en cuenta: 

`

Respetar sin falta las especificaciones del 
capítulo "Datos técnicos". 

`

Las salidas 13-14, 23-24, 33-34 son contac-
tos de seguridad, la salida 41-42 es un con-
tacto auxiliar (por ejemplo, para 
visualización). 

`

Conectar un fusible (ver datos técnicos) an-
tes de los contactos de salida para evitar que 
se suelden los contactos. 

`

Cálculo de la longitud de línea máxima I

máx.


en el circuito de entrada: 

R

lmáx.

 = resistencia total máxima de la línea 

(ver datos técnicos) 
R

l

 / km = resistencia de la línea/km 

`

Utilizar material de alambre de cobre con una 
resistencia a la temperatura de 60/75 °C para 
las líneas. 

`

Asegure un conexionado de protección 
suficiente para cargas capacitivas e inducti-
vas en todos los contactos de salida. 

Cablaggio

Prestare attenzione: 

`

attenersi assolutamente alle indicazioni ri-
portate al capitolo "Dati Tecnici". 

`

Le uscite 13-14, 23-24, 33-34 sono contatti 
di sicurezza, l'uscita 41-42 è un contatto au-
siliario (ad es. per segnalazione). 

`

Per evitare la saldatura dei contatti, collegare 
un fusibile (v. Dati Tecnici) a monte dei con-
tatti di uscita. 

`

Calcolo della lunghezza max. del conduttore 
I

max

nel circuito di ingresso: 

R

lmax

 = resistenza max. conduttore (v. Dati 

Tecnici) 
R

l

/ km = resistenza del conduttore/km 

`

Per i cavi utilizzare fili di rame con una resi-
stenza termica di 60/75° C. 

`

Per i carichi capacitivi e induttivi occorre do-
tare tutti i contatti di uscita di un circuito pro-
tezione adeguato. 

Bedrading

Let u op het volgende: 

`

Volg altijd de aanwijzingen in de paragraaf 
"Technische gegevens". 

`

De uitgangen 13-14, 23-24, 33-34 zijn veilig-
heidscontacten; de uitgang 41-42 is een 
hulpcontact (b.v. voor signalering). 

`

Zeker de uitgangscontacten af (zie techni-
sche gegevens) om verkleving van de con-
tacten te voorkomen. 

`

Berekening van de max. kabellengte I

max 

in 

het ingangscircuit: 

R

lmax

 = max. weerstand totale kabel (zie 

techn. gegevens) 
R

l

/ km = kabelweerstand/km 

`

Kabelmateriaal van koperdraad met een 
temperatuurbestendigheid van 60/75 °C ge-
bruiken. 

`

Zorg bij capacitieve of inductieve belasting 
van de uitgangscontacten voor adequate 
contactbeschermingsmaatregelen. 

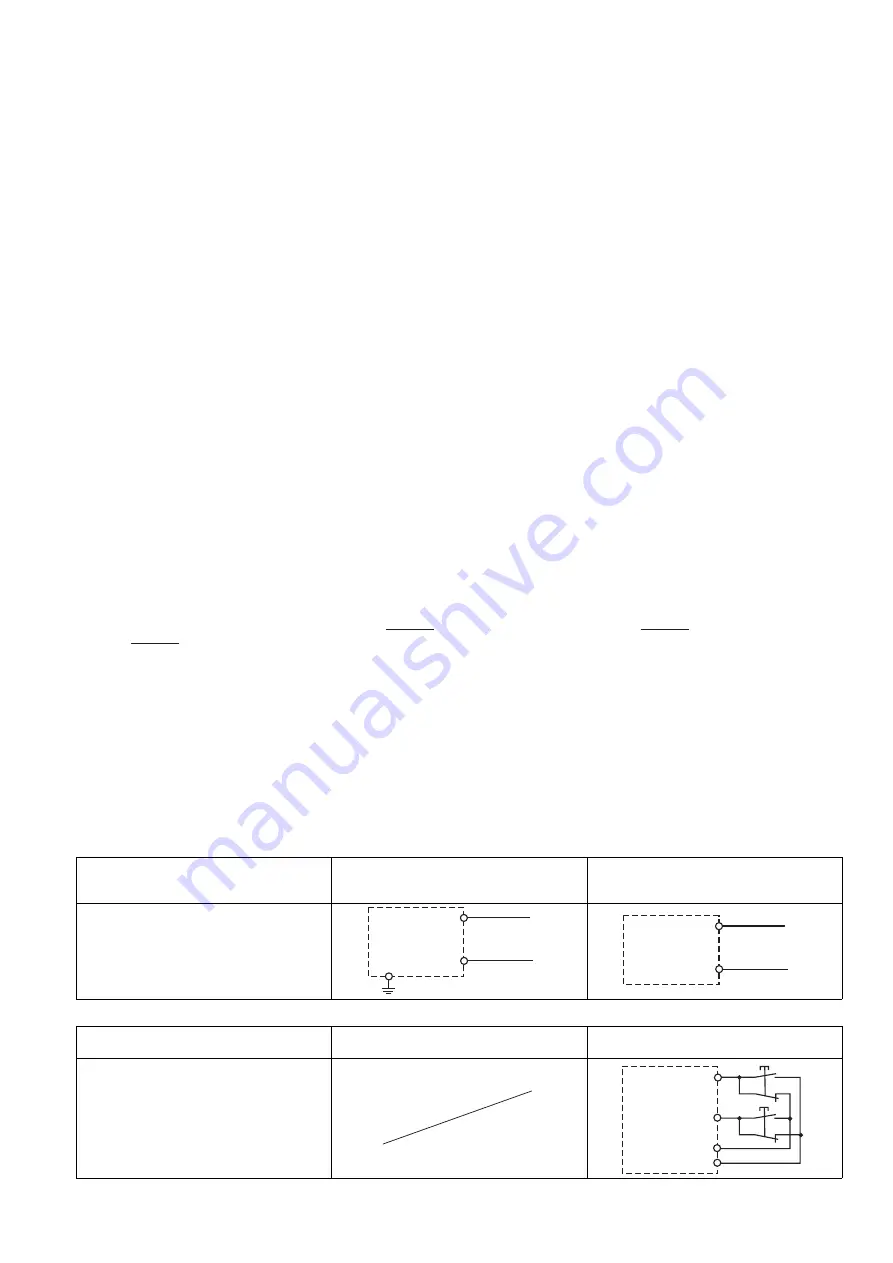
Disposición para el funcionamiento

Preparazione all'uso del dispositivo

Bedrijfsklaar maken

Conexión

Collegamento

Aansluiting

`

Tensión de alimentación

`

Tensione di alimentazione

`

voedingsspanning

tensión de alimentación/
tensione di alimentazione/
voedingsspanning

AC

DC

`

Circuito de entrada

`

Circuito di ingresso

`

Ingangscircuit

Circuito de entrada/ circuito di ingresso/in-
gangscircuit

monocanal/monocanale/eenkanalig

bicanal/bicanale/tweekanalig

Pulsador de mando a dos manos
con detección de derivación/
Pulsante a due mani
con riconoscimento del cortocircuito/
Tweehandenbedieningsknop
met detectie van onderlinge sluiting

R

lmax

R

/ km

I

max

 =

R

lmax

R

/ km

I

max

 =

R

lmax

R

/ km

I

max

 =

A1

L

A2

N

S22

A1

L+

A2

L-

S12(+)

S11

S21

S22(-)

S1

S2

Summary of Contents for 750136

Page 1: ...hand circuit and the connected parts of the press control must conform to the relevant safety standards EN 574 EN 692 and EN 693 The supply voltage for the two hand relay must only be connected after the shutdown device in accordance with 9 VBG 7n5 1 2 To avoid inductive and capacitance cou pling the cables between the two hand relay and the pushbuttons must be run separately to any power cables O...

Page 2: ...r bei UB 48 240 V AC DC only with UB 48 240 VAC DC uniquement lorsque UB 48 240 V AC DC Mitte Frontansicht mit Abdeckung Rechts Frontansicht ohne Abdeckung Centre Front view with cover Right Front view without cover Schéma du milieu vue frontale avec capot de protection A droite vue frontale sans capot de protection Funktionsbeschreibung Das Zweihandbediengerät muss durch gleichzeitiges Betätigen ...

Page 3: ...etirer l appareil du rail DIN pous sez l appareil vers le haut ou vers le bas Verdrahtung Beachten Sie Angaben im Abschnitt Technische Daten unbedingt einhalten Die Ausgänge 13 14 23 24 33 34 sind Si cherheitskontakte der Ausgang 41 42 ist ein Hilfskontakt z B für Anzeige Vor die Ausgangskontakte eine Sicherung s techn Daten schalten um das Ver schweißen der Kontakte zu verhindern Berechnung der m...

Page 4: ...tension d alimentation est présente In1 Taster an S11 ist betätigt In1 Pushbutton on S11 is operated In1 Le poussoir sur S11 est actionné In2 Taster an S21 ist betätigt In2 Pushbutton on S21 is operated In2 Le poussoir sur S21 est actionné Out Sicherheitskontakte sind geschlossen und Halbleiterausgang Y32 führt High Signal Out Safety contacts are closed and semicon ductor output Y32 carries a high...

Page 5: ...12 and S22 simultaneously and then close again In2 Fault Diagnostic dépassement de la simultanéité canal 2 en retard ou blocage du relais à cause d une coupure aléatoire sur S21 les circuits d entrée ne sont pas actionnés simultanément Remède ouvrir ensemble les deux cir cuits d entrée S12 et S22 puis les refer mer Fehler Störungen Fehlfunktionen der Kontakte Bei ver schweißten Kontakten ist nach ...

Page 6: ... EN 60947 5 1 Protection des contacts en externe IK 1 kA selon EN 60947 5 1 Schmelzsicherung flink Blow out fuse quick Fusible rapide Sicherheitskontakte Safety contacts Contacts de sécurité UB 48 240 V AC DC 6 A UB 24 V DC 10 A Hilfskontakte Auxiliary contacts Contacts d information UB 48 240 V AC DC 6 A UB 24 V DC 10 A Schmelzsicherung träge Blow out fuse slow Fusible normal Sicherheitskontakte ...

Page 7: ...sing material Matériau du boîtier Gehäuse Housing Boîtier PC Front Front Face avant PC Max Querschnitt des Außenleiters bei Schraubklemmen Max cross section of external con ductors with screw terminals Capacité de raccordement des bor niers à vis 1 Leiter flexibel 1 core flexible 1 câble flexible 0 25 2 50 mm 24 12 AWG 2 Leiter gleichen Querschnitts flexi bel 2 core same cross section flexible 2 c...

Page 8: ...r Strom Conventional thermal current Courant thermique convention nel Anzahl der Kontakte Number of contacts Nombre de contacts Ith A pro Kontakt bei UB DC 1 1 1 UB 48 240 V AC DC 6 00 A UB 24 V DC 8 00 A 2 2 2 UB 48 240 V AC DC 6 00 A UB 24 V DC 8 00 A 3 3 3 UB 48 240 V AC DC 4 50 A UB 24 V DC 6 00 A ...

Page 9: ...ive di protezione Il comando bimanuale e le parti del coman do della pressa collegate devono rispettare le disposizioni e le norme di sicurezza EN 574 EN 692 e EN 693 La tensione di alimentazione del comando bimanuale può essere collegata solo a valle del dispositivo d interruzione Non posare i cavi di collegamento tra il co mando bimanuale e i pulsanti nelle immedia te vicinanze dei cavi di corre...

Page 10: ...to dei morsetti Blokschema klembezetting sólo con UB 48 240 V AC DC solo per UB 48 240 V AC DC alleen bij UB 48 240 V AC DC Centro Vista frontal con cubierta Derecha Vista frontal sin cubierta Al centro vista frontale con copertura A destra vista frontale senza copertura Midden Vooraanzicht met afscherming Rechts Vooraanzicht zonder afscherming Descripción de funciones El dispositivo de mando a do...

Page 11: ...Schuif voordat u de DIN rail opheft het appa raat omhoog of omlaag Cableado Tenga en cuenta Respetar sin falta las especificaciones del capítulo Datos técnicos Las salidas 13 14 23 24 33 34 son contac tos de seguridad la salida 41 42 es un con tacto auxiliar por ejemplo para visualización Conectar un fusible ver datos técnicos an tes de los contactos de salida para evitar que se suelden los contac...

Page 12: ...r tensione di alimentazione presente Power Voedingsspanning aanwezig In1 Pulsador de S11 accionado In1 Il pulsante su S11 è azionato In1 Knop op S11 is bediend In2 Pulsador de S21 accionado In2 Il pulsante su S21 è azionato In2 Knop op S21 is bediend Out Los contactos de seguridad están cerrados y la salida por semiconductor Y32 lleva señal High Out i contatti di sicurezza sono chiusi e sull uscit...

Page 13: ...trambi i circuiti di in gresso S12 ed S22 In2 Fault Diagnose Gelijktijdigheidsoverschrijding Kanaal 2 te laat of inschakelblokkade we gens kortdurende onderbreking op S21 in gangscircuits niet gelijktijdig bediend Oplossing Beide ingangscircuits S12 en S22 gelijktijdig openen en weer sluiten Errores Fallos Funcionamiento defectuoso de los contac tos En caso de contactos soldados después de abrir e...

Page 14: ... 5 1 Contactafzekering extern IK 1 kA volgens EN 60947 5 1 Fusible de acción rápida Fusibile rapido Smeltzekering snel Contactos de seguridad Contatti di sicurezza Veiligheidscontacten UB 48 240 V AC DC 6 A UB 24 DC 10 A Contactos auxiliares Contatti ausiliari Hulpcontacten UB 48 240 V AC DC 6 A UB 24 DC 10 A Fusible de acción lenta Fusibile ritardato Smeltzekering traag Contactos de seguridad Con...

Page 15: ...icos Dati meccanici Mechanische gegevens Material de la carcasa Materiale custodia Behuizingsmateriaal Carcasa Custodia Behuizing PC Frontal Parte frontale Front PC Sección máx del conductor exter no con bornes de tornillo Sezione max dei cavi con morsetti a vite Max doorsnede van de aansluitka bels bij schroefklemmen 1 conductor flexible 1 cavo flessibile 1 draad flexibel 0 25 2 50 mm 24 12 AWG 2...

Page 16: ...a convencional Corrente termica convenzionale Conventionele thermische stroom Número de contactos Numero dei contatti Aantal contacten Ith A para UB DC 1 1 1 UB 48 240 V AC DC 6 00 A UB 24 DC 8 00 A 2 2 2 UB 48 240 V AC DC 6 00 A UB 24 DC 8 00 A 3 3 3 UB 48 240 V AC DC 4 50 A UB 24 DC 6 00 A ...

Reviews: