background image

Installation

Operating Manual PNOZ m B0 
1002660-EN-02

16

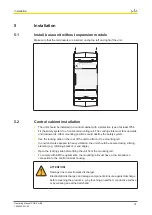
Information

Please note that at the stated minimum distance, it will be difficult to swap 
the chip card from above. If you cannot leave a greater distance, remove 
the unit from the mounting rail to swap the chip card.

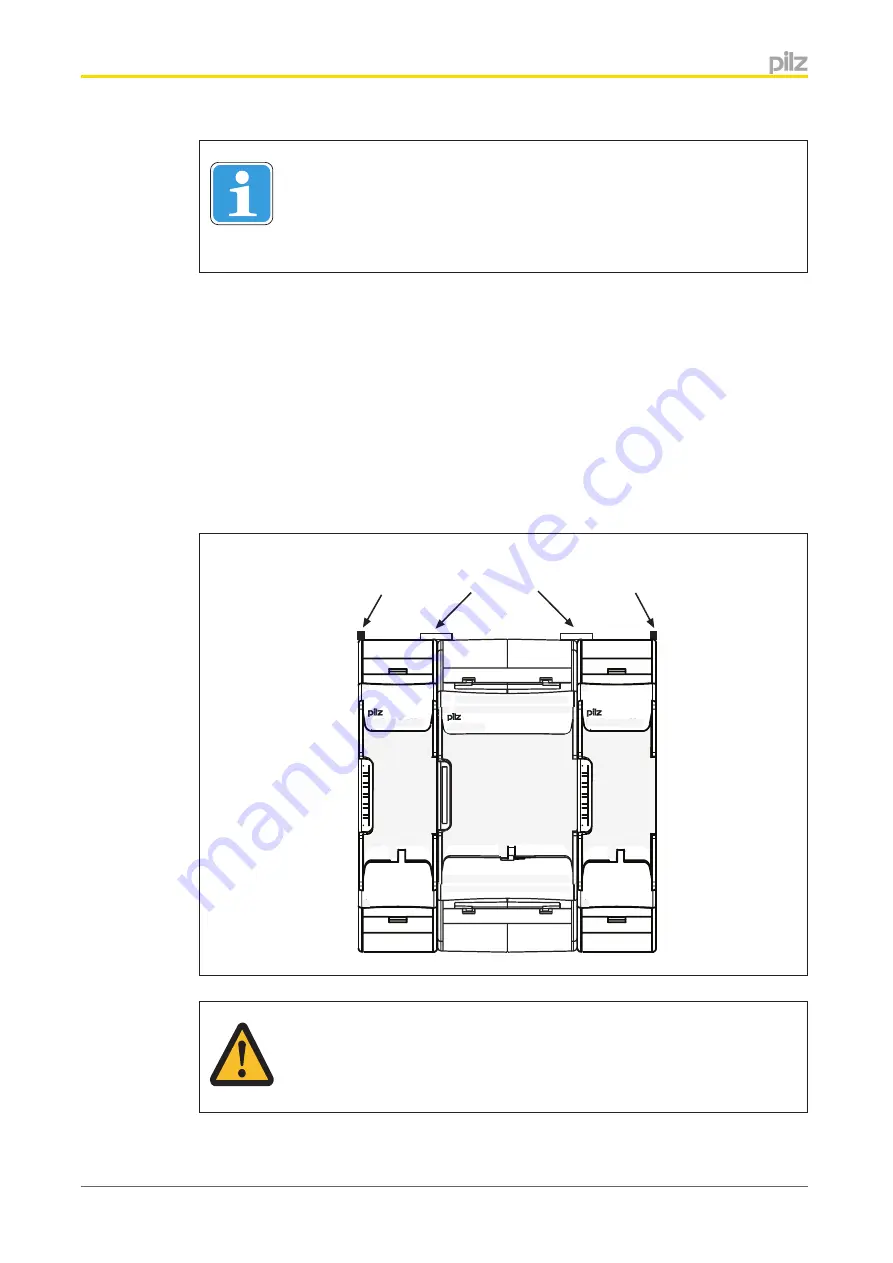
Connecting the base unit and expansion modules

Please refer to the document "System Expansion" for details of the number of modules that 
can be connected to the base unit and the module types.
The modules are linked via jumpers.

}

  Remove the terminator on the side of the base unit and on the expansion module.

}

  Install the base unit and expansion modules on the mounting rail and connect the units 

using the jumper supplied

}

  Fit the terminator to the unconnected interfaces on the base unit and expansion mod-

ule.


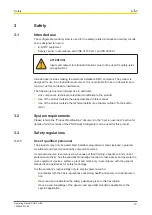
ATTENTION!

Only connect the base unit and expansion modules when the supply voltage 
is switched off.

5.3

Summary of Contents for 772 100

Page 1: ...PNOZ m B0 Operating Manual 1002660 EN 02 Configurable Control System PNOZmulti...

Page 2: ...es may be made for internal purposes Suggestions and comments for improving this documentation will be gratefully received Pilz PIT PMI PNOZ Primo PSEN PSS PVIS SafetyBUS p SafetyEYE SafetyNET p the s...

Page 3: ...on description 12 4 1 Integrated protection mechanisms 12 4 2 Operation 12 4 3 System reaction time 12 4 4 Block diagram 12 4 5 Diagnostics 13 Section 5 Installation 14 5 1 Install base unit without e...

Page 4: ...ction 8 Technical details 30 8 1 Safety characteristic data 33 Section 9 Supplementary data 34 9 1 Maximum capacitive load C F with load current I A at the semiconduc tor outputs 34 9 2 Maximum permit...

Page 5: ...rder of this manual 2 Overview This chapter provides information on the product s most important features 3 Safety This chapter must be read as it contains important information on safety and intended...

Page 6: ...that could lead to serious injury and death and indicates preventive measures that can be taken ATTENTION This refers to a hazard that can lead to a less serious or minor injury plus material damage a...

Page 7: ...Depending on the application up to PL e of EN ISO 13849 1 and up to SIL CL 3 of EN IEC 62061 12 inputs for connecting for example Emergency stop pushbuttons Two hand pushbuttons Safety gate limit swi...

Page 8: ...Plug in connection terminals Either spring loaded terminal or screw terminal available as an accessory see order reference Rotary knob for menu control Expansion modules can be connected please refer...

Page 9: ...nd without cover Key X1 Inputs I8 I15 X2 Configurable test pulse auxiliary outputs T0M20 T3M23 Semiconductor outputs O0 O3 X3 Configurable inputs outputs IM0 IM3 Inputs I4 I7 X4 Configurable inputs ou...

Page 10: ...tled Technical De tails System requirements Please refer to the Product Modifications document in the Version overview section for details of which versions of the PNOZmulti Configurator can be used f...

Page 11: ...ed applications please comply with the mission time tM in the safety relat ed characteristic data When decommissioning please comply with local regulations regarding the disposal of electronic devices...

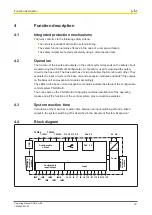
Page 12: ...oad the safety circuit to the base unit The base unit has 2 microcontrollers that monitor each other They evaluate the input circuits on the base unit and expansion modules and switch the outputs on t...

Page 13: ...al PNOZ m B0 1002660 EN 02 13 Diagnostics The status and error messages displayed by the LEDs are saved in an error stack This error stack can be shown on the display or can be read from the PNOZmulti...

Page 14: ...roy the safety system Use the locking slide on the rear of the unit to attach it to a mounting rail In environments exposed to heavy vibration the unit should be secured using a fixing element e g ret...

Page 15: ...ntain a certain distance from the top and bottom as well as to other heat producing devices see diagram The values stated for the mounting distances are minimum specifications The ambient temperature...

Page 16: ...ocument System Expansion for details of the number of modules that can be connected to the base unit and the module types The modules are linked via jumpers Remove the terminator on the side of the ba...

Page 17: ...uts must exclusively be used to test the inputs They must not be used to drive loads Do not route the test pulse lines together with actuator cables within an unprotected multicore cable Function test...

Page 18: ...ject was created Please check this information Load the project by pressing the rotary knob For the project to be downloaded the rotary knob must be held down for between 3 and 8 seconds Once the proj...

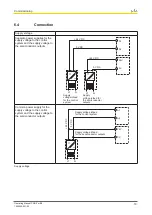
Page 19: ...upply voltage Separate power supplies for the supply voltage to the control system and the supply voltage to the semiconductor outputs Common power supply for the supply voltage to the control system...

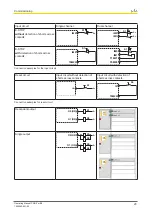
Page 20: ...ection of shorts across contacts E STOP with detection of shorts across contacts Connection examples for the input circuit Reset circuit Input circuit without detection of shorts across contacts Input...

Page 21: ...hrough separate multicore cables Please note that in the event of an error in the feedback loop the safety system switches to a safe condition and shuts down all the outputs Feedback loop Redundant ou...

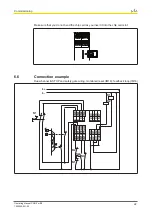
Page 22: ...anual PNOZ m B0 1002660 EN 02 22 Make sure that you do not bend the chip card as you insert it into the chip card slot Connection example Dual channel E STOP and safety gate wiring monitored reset IM1...

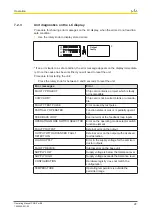
Page 23: ...ading to a safe condition e g chip card not inserted External error on the base unit outputs e g short across the contacts leading to a safe condition Internal error on the base unit Internal error on...

Page 24: ...a message bottom right ERROR Status and error messages Line 1 4 Status and error messages as short text DISPLAY MESSAGE Display messages Line 1 4 Customised messages that are created in the PNOZmulti...

Page 25: ...terface only appears on base units to which a communication module is connected Show selected interface on expandable base units Select interface STOP Device Stop device Bring device to a STOP conditi...

Page 26: ...acted back into the unit Press the latch on the side of the rotary knob 1 towards the centre of the knob This releases the rotary knob Press the knob downwards 2 while keeping the latch held down Rota...

Page 27: ...CE INFO SHOW ERROR STACK EXIT MENU ERROR STACK RUN NEXT ERROR STACK 1 2 RESET PROJECT RUN INTERFACE STOP DEVICE 2 s 4 s 4 s DISPLAY MESSAGE NEXT DISPLAY MESSAGE 1 Further information on error messages...

Page 28: ...ip card is not inserted blank or unreada ble FAULTY TEST PULSE Error caused by test pulse PARTIALLY OPERATED Function element was or is partially operat ed FEED BACK LOOP Exernal error at the feedback...

Page 29: ...the LC display Sequential number of an error stack entry A new error stack entry is stored in first place Error class EC and error information EI Error number EN and five error parameters PA Procedure...

Page 30: ...external power supply must provide 8 0 A Potential isolation Yes Supply voltage Module s current consumption 32 mA Module s power consumption 0 8 W Max power dissipation of module 7 40 W Status indica...

Page 31: ...micon ductor outputs 4 Switching capability Voltage 24 V Current 2 0 A Permitted current range 0 00 2 50 A Residual current at 0 signal 0 05 mA Max transient pulsed current 12 A Max capacitive load 1...

Page 32: ...a 772100 Mounting position Horizontal on top hat rail Protection type In accordance with the standard EN 60529 Mounting e g cabinet IP54 Housing IP20 Terminals IP20 DIN rail Top hat rail 35 x 7 5 EN 5...

Page 33: ...t SC inputs 1 channel PL d Cat 2 SIL CL 2 3 85E 09 20 SC inputs 2 channel PL e Cat 4 SIL CL 3 7 95E 11 20 SC inputs 1 ch pulsed light beam device PL e Cat 4 SIL CL 3 3 85E 10 20 Output SC outputs 1 ch...

Page 34: ...aximum capacitive load C F with load current I A at the semiconductor outputs Maximum permitted total current of the semiconductor outputs ICfg Total current of the configurable semiconductor outputs...

Page 35: ...Supplementary data Operating Manual PNOZ m B0 1002660 EN 02 35 Maximum permitted humidity Max relative humidity operation Max relative humidity storage 9 3 9 3 1 9 3 2...

Page 36: ...PNOZ s Set1 spring load ed terminals 1 set of spring loaded terminals 751 008 PNOZ s Set1 screw terminals 1 set of screw terminals 750 008 Order reference Terminator jumper Product type Features Order...

Page 37: ...aNET p Pilz PIT PMCprotego PMI PNOZ Primo PSEN PSS PVIS SafetyBUS p SafetyEYE SafetyNET p the spirit of safety are registered and protected trademarks of Pilz GmbH Co KG in some countries We would poi...

Reviews: