background image


61                                       

DIGITAL VIDEO RECORDER


INSTALLATION


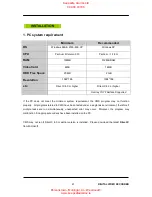
1. PC system requirement 


Minimum 

Recommended 

OS 

Windows 98SE, 2000, ME, XP 

Windows XP 

CPU 

Pentium II Celeron 333 

Pentium 

  2.8 G 

RAM 

128MB 

512MB RAM 

Video Card 

4MB 

16MB 

HDD Free Space 

20MB   

2 GB   

Resolution 

1024*768 

1024*768 

etc 

Direct X 6.0 or higher 

Direct X 8.0 or higher 


Overlay YUY2 Surface Supported 


If  the PC  does  not  meet  the  minimum  system  requirement,  the  CMS  program  may  not function 
properly.   All programs related to CMS have been tested under a single task environment; therefore if 
multiple  tasks  are  run  simultaneously,  unexpected  error  may  occur.   Moreover,  the  program  may 
malfunction if inappropriate codecs have been installed on the PC. 


CMS may not run if DirectX 6.0 or earlier version is installed.   Please download the latest 

Direct  X


from Microsoft. 


Keepsafe Alarms Ltd 

044 93 72168

Parsonstown, Mullingar, Co. Westmeath. 

www.keepsafealarms.ie

Summary of Contents for PDR-M1008

Page 1: ...re that you read and understand the User Guide Please store the User Guide at an easily accessible location Before connecting and installing any third party cameras monitors alarms and computers pleas...

Page 2: ...d dangerous voltage within the product s enclosure that may be of sufficient magnitude to constitute a risk of electric shock to persons The exclamation point within an equilateral triangle is intende...

Page 3: ...ord Alarm inputs and Alarm outs Pan Tilt Zoom Connections PC system requirement for NETWORK Connection Quick start page 16 Live Viewing Display Overview 18 Operation Main Menu Overview 20 Display Opti...

Page 4: ...up 54 Built in CD RW 54 External USB HDD 56 USB Flash Memory 57 Client Program 61 Installation 62 Features 65 DVR Control 76 Virtual DVR 99 Specification 118 Keepsafe Alarms Ltd 044 93 72168 Parsonst...

Page 5: ...lectrical shock Qualified service personnel authorized by your equipment distributor should conduct internal inspections alterations and repairs Stop operating the equipment immediately if it emits sm...

Page 6: ...uipment may lead to overheating distortion of the equipment fire electrical shock or other hazards Do not place the batteries near a heat source or expose them to direct flame or heat Neither should y...

Page 7: ...magnetic fields may cause malfunctions or corrupt image data Avoid Condensation Related Problems Moving the equipment rapidly between hot and cold temperatures may cause condensation water droplets to...

Page 8: ...r immediately If the unit must be returned it must be shipped in the original packing box CONTENTS QUANTITY REMARK DIGITAL VIDEO RECORDER 1 UNIT CLIENT SOFTWARE CD 1 REMOTE CONTROLLER 1 Audio In Cable...

Page 9: ...a number of functions to enter data and to make selections They are used to enter numerical data when prompted for the password to make channel camera selection to choose the day in schedule option an...

Page 10: ...s button to start recording MENU Button ENTER Press this button to save menu settings CANCEL Press this button to exit menu without saving Direction In Menu setup mode used to move the cursor In Zoom...

Page 11: ...UDIO Input 1 4 8 Output 1 connectors RCA 8 ALARM IN OUT For connecting alarm inputs 1 4 8 and alarm out relays 2 9 VGA out connector 10 RS 422 Connector For connecting to PTZ camera 11 USB 2 0 connect...

Page 12: ...n 7 AUDIO Input 1 8 Output 1 connectors RCA 8 Camera Outputs 8ch Individual BNC output 16ch Looping connectors 9 VGA out connector 10 RS 422 Connector For connecting to PTZ camera 11 USB 2 0 connector...

Page 13: ...R ID MENU LOG FAST FORWARD DISPLAY MODE SCHEDULE REC ON OFF ENTER INFORMATION CANCEL OSD OFF EXT SEARCH REWIND NUMBERS ALPHABET TIME SEARCH ZOOM STEP RECORD BUTTON BUTTON PAN TILT ZOOM Keepsafe Alarms...

Page 14: ...1 PC system requirement for Network connection a 500MHz CPU b 128MB RAM c 4MB Video Card d Windows 98SE 2000 ME e Spare 10 100 BaseT Ethernet Port f RJ 45 Network Cable g CAT 5 UTP Cable for LAN Cross...

Page 15: ...RECORDER QUICK START PAGE The Factory Default password for the unit is 000000 The Default password to run the CMS software is 0 Keepsafe Alarms Ltd 044 93 72168 Parsonstown Mullingar Co Westmeath www...

Page 16: ...ortant to setup the time and the date Please refer to page 36 for setting the time and the date on the DVR Screen Position Adjustment The screen position is adjustable during live view only when CRT m...

Page 17: ...ce is connected on Front panel It s changed to blue color while it s doing backup 3 Indicate an USB Device is connected on Rear panel It s changed to blue color while it s doing backup 4 Indicate Audi...

Page 18: ...the digital zoom select the full screen display of the camera you want to zoom 2 Then press Zoom button in IR remote controller 3 Press button in remote controller to enlarge or decrease the image 4...

Page 19: ...ommended to change the PASSWORD when you install the DVR Refer to System Setup Use Direction buttons to select the desired menu Items selected in the menu are represented in color Press ENTER button t...

Page 20: ...AMERA Select On Screen Display information for Camera Number and Title BORDER LINE Select Border Line color between cameras WHITE GRAY DARK GRAY BLACK BACKGROUND Select Background color on NO VIDEO st...

Page 21: ...splay Press DISPLAY buttons to activate the multi screen display The sequence mode and dwell times are programmable If the sequence mode is not activated it moves to Quad mode instead of Sequencing No...

Page 22: ...SS 50 The brightness of each camera can be adjusted by pressing buttons CONTRAST 50 The contrast of each camera can be adjusted by pressing buttons COLOR 50 The color of each camera can be adjusted by...

Page 23: ...1st 2nd 3rd 1 A B 1 9 Q R 9 2 C D 2 10 0 S T 10 3 E F 3 11 U V 11 4 G H 4 12 W X 5 I J 5 13 Y Z 6 K L 6 14 7 M N 7 15 _ 8 O P 8 16 SPACE Number button to insert characters Keepsafe Alarms Ltd 044 93 7...

Page 24: ...tion of recording when motion is detected 20SEC 240SEC CAMERA SECTION Use Left Right buttons or Number button to select the Camera you wish to configure MOTION LEVEL Level 1 Low sensitivity Level 20 H...

Page 25: ...after motion recording time is end Camera does not record under normal conditions Note Motion Duration will be extended if there is another motion detection while motion recording Note There may be c...

Page 26: ...pecify the record picture quality for each camera ULTRA SUPER HIGH MIDDLE LOW RATE Select recording speed for each camera Three types of recording modes are available Frame Field and CIF mode Refer to...

Page 27: ...Item at first line to apply all setting for the rest channel Approximate File Size Quality NTSC PAL UNIT 720 480 720 240 360 240 720 576 720 288 360 288 LOW 7 4 5 2 5 8 4 5 4 3 0 KB MIDDLE 14 8 5 4 5...

Page 28: ...igure 4 Use button to change the value ITEM ADJUSTMENT USE Enable or Disable Alarm Recording on a per camera QUALITY Specify the record picture quality for each camera on Alarm Recording ULTRA SUPER H...

Page 29: ...sound for the duration of the RECORD TIME This buzzer related with Alarm Out Please configure Alarm Out ON for Alarm buzzer OFF Disables the ALARM BUZZER function ALARM OUT1 2 Configure which relay wi...

Page 30: ...rm Resulting Actions Normal Motion USE Normal OFF OFF ON ON Press the REC button then Alarm recording starts according to configured Recording Quality Super Frame Rate 15F S and Audio when Alarm is tr...

Page 31: ...cording duration time is end Example 3 RECORD Alarm Resulting Actions Normal Motion USE Normal ON ON ON ON Press the REC button then Motion recording starts with High picture quality at 3F S without A...

Page 32: ...tton to select any Day you wish to configure Press Enter button you wish to configure The detailed menu pops up for selected Day as shown below Enter the beginning and end time then select Record mode...

Page 33: ...00 08 59 MODE 1 To activate the schedule recording after setting press the SCHEDULE button The SCHEDULE indicator illuminates When a program covers the current time the unit begins recording When the...

Page 34: ...ALARM OFF OFF ON ON OFF OFF Schedule SCHEDULE OFF OFF OFF OFF OFF ON Schedule Motion SCHEDULE OFF ON OFF OFF OFF ON Normal and Alarm RECORD ALARM ON OFF ON ON OFF OFF Motion and Alarm RECORD ALARM ON...

Page 35: ...o display Network Use Down button to specify the detail Use button to change the value Save changes and exit the menu press ENTER button Exit the menu without making changes press CANCEL button ITEM A...

Page 36: ...CK No response for Auto Scan from CMS Default by OFF Note How to connect the DVR via Network in the case of DHCP 1 Select DHCP 2 Please check Serial No on System Menu 3 Enter host name ex http M10020E...

Page 37: ...rver SMTP then Setup below SMTP menu SMTP Server Select Highlight SMTP Server and then press numeric buttons to define an e mail server PORT Define the port that the SMTP server will communicate throu...

Page 38: ...ile holding the DVR ID button press the appropriate DVR ID number For example enter 05 for DVR ID 05 enter 43 for DVR ID 43 and such Set the ID of IR controller on 00 to control DVRs at the same time...

Page 39: ...Field resolution 720 240 720 288 Frame 720 480 720 576 REC CHANNEL You can setup maximum recording speed for each channel as below charts PB DEINTERLACE ON Reducing image flickering but less picture...

Page 40: ...set as the Slave Clock OFF Default Master Clock or The unit which does not use Time Sync Function TIME SERVER Enter the IP of Master clock DVR or PC when the unit is set as ON on Time Sync Menu DATE T...

Page 41: ...dividually under user settings Monitoring Playback Back up Network Configuration Main Menu Setup Shutdown Power off Enter the 6 numbers for the new password and then re enter the same password under C...

Page 42: ...l display COMPLETE and also SUCCESS at the bottom of the window INTERNAL HDD Select the record policy of the internal hard disk drive By default the hard disk drive will overwrite from the beginning w...

Page 43: ...ERSION Shows the Application version of this unit INTERNAL HDD Displays numbers of HDD and total HDD size RACK DEVICE Displays what kind of device is installed into RACK DVD or CD HDD USB FRONT Displa...

Page 44: ...ss this button to display HELP Menu Press ENTER Button again or CANCEL button to cancel Help Menu CANCEL Button Press this button to cancel PAN TITL Operation MENU Button PTZ camera control interface...

Page 45: ...ll of these features can be stored as a preset 1 PRESET SPOT OUT on remote controller 1 After moving the PTZ camera to the desired position then press PRESET button 2 Select the Preset number then pre...

Page 46: ...u can run PATTERN 4 POWER FF on remote controller For particular PTZ you can power on off PTZ 5 MENU REC on remote controller For particular PTZ you can go into PTZ menu directly But it can be used fo...

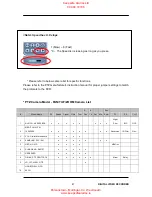
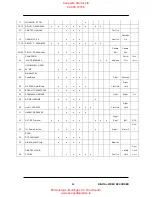
Page 47: ...Model Name 3X Speed Preset Goto Tour A Pan A Tilt Pat Me Esc Enter C1 C2 Cus3 1 NUVICO NV 9600 BPS o o o o o o o o Night Shot BLC WDR 2 MERIT LILIN PIH 7000 7600 o o o o o o o o Reversion IR Filter W...

Page 48: ...e o o o o o D N Zero Lux 26 DY ELEC SmartDome o o o o o Left Limit Right Limit 27 BOSCH TC8560 TC700 o o o o 28 SYSMANIA ORX1000 Light Wiper Aux 29 AD DELTADOME o o o o o 30 HUNT HTZ 2300 o o o o o o...

Page 49: ...shown as a graphical representation of the recorded video stored on the DVR 4 Select Hour and Minutes or the camera you wish to playback Then press ENTER button Note1 It will not be changed if there...

Page 50: ...1 Playback will be stopped after 30minutes if there is no change of playback mode Note2 In the case of full screen still mode the channel cannot be switched to the other channels Keepsafe Alarms Ltd 0...

Page 51: ...events since the initial power on procedure of DVR SYSTEM It shows All Event except for Alarm Motion and Video Loss ALARM It shows All Alarm List MOTION It shows Motion List VIDEO LOSS It shows Video...

Page 52: ...a into Built in CD DVD 2 Press EXT SEARCH button Then External Search menu will appear 3 Please select the device to search then press ENTER button The search of CD ROM backup is not available Time se...

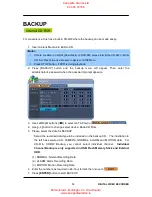
Page 53: ...ght buttons to select on TAP menu 4 Use button to change select device Rack CD Rom 5 Please select the data for BACKUP Select the recorded data type to be included on the backup CD The illustration to...

Page 54: ...atus 8 When finished the CD icon will changed to Grey color and then eject the media If there is not enough space on the media the DVR will automatically eject the disk when it s full then will resume...

Page 55: ...ase connect to external HDD to USB port on Front or Rear 2 The USB indicator will be appeared after connection which takes about 5sec USB Port on Rear USB Port on Front 3 Press BACKUP button and the b...

Page 56: ...aid are tested and recommended Proware DP 405CI http www proware com tw products catalog_pdf dp 405ci pdf Proware SB 2805CI http www proware com tw products catalog_pdf sb 2805ci pdf Keepsafe Alarms L...

Page 57: ...Use button to change select device USB Memory Stick 5 Please select the data for BACKUP A Camera 1 16 This menu is activated only Memory Stick and external USB HDD is connected B NORMAL Normal Recordi...

Page 58: ...and recommended Brand Model Name Memorive Memorive 256MB ELECOM MF FU2512B2GT 512MB BUFFALO Clip Drive 512MB LOGITEC LMC 512UD2L 512MB LG X TICK 602RUTJ00545 256MB LG X TICK 602RUTJ00545 256MB Keepsaf...

Page 59: ...earch Menu by Month Date Hour Minute Press button to set backup Start time press button to set End Selected time will be changed Light Grey Color Selected backup time from 15 05 15 15 will be displaye...

Page 60: ...60 DIGITAL VIDEO RECORDER CLIENT PROGRAM Central Management Software Keepsafe Alarms Ltd 044 93 72168 Parsonstown Mullingar Co Westmeath www keepsafealarms ie...

Page 61: ...e PC does not meet the minimum system requirement the CMS program may not function properly All programs related to CMS have been tested under a single task environment therefore if multiple tasks are...

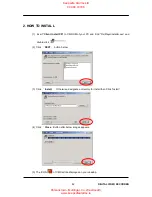
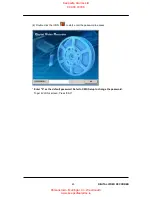
Page 62: ...r exe and double click 2 Click NEXT button below 3 Click Install Otherwise designate a directory for Install then Click Install 4 Click Close Button after below images appears 5 The ICON of CMS will b...

Page 63: ...ICON to start enter the password to access Enter 0 as the default password Refer to CMS Setup to change the password To get rid of this screen Press ESC Keepsafe Alarms Ltd 044 93 72168 Parsonstown M...

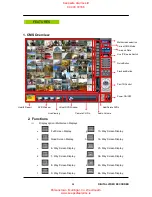
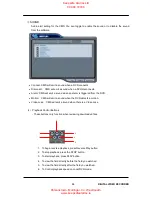
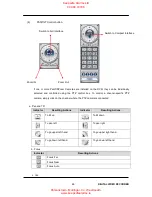
Page 64: ...een Display j 36 Way Screen Display e 8 Way Screen Display k 49 Way Screen Display f 9 Way Screen Display l 64 Way Screen Display Multiscreen selection Current CMS Mode Time and Date Live PB mode Swit...

Page 65: ...Quick Button a Save the current live images When the remote recording is in progress the record button will change its color to cyan Default Location C Program Files DvrPlayer Download b Save a snap...

Page 66: ...r Camera Name Frame Rates for each camera b OVERLAY Default It is recommended to use OVERLAY for transmission speed up Please cancel the Overlay function if there is broken screen caused by Invalid Vi...

Page 67: ...op up for alarm event Password Changing the password a Old Password Enter your current password b New Password Enter the NEW password c Confirm Password Enter the New password to confirm Press APPLY b...

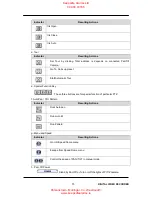
Page 68: ...tects a motion Video Loss CMS will emit a sound when there is a Video Loss 5 Playback Control Buttons These buttons only function when reviewing downloaded files 1 2 3 4 6 5 1 To begin reverse playbac...

Page 69: ...PTZ camera is connected a Pan and Tilt Indicator Resulting Actions Indicator Resulting Actions To tilt up To tilt down To pan left To pan right To go upper left hand To go upper right hand To go down...

Page 70: ...hese three buttons are for special function of particular PTZ f Auto Pan Tilt Pattern Indicator Resulting Actions Runt Auto pan Run Auto tilt Run Pattern g Menu and Speed Indicator Resulting Actions G...

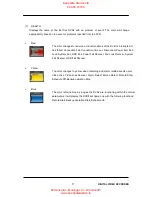
Page 71: ...System Fail HDD Fail Power Fail Recover Fan Lock Recover System Fail Recover HDD Fail Recover The color changes to yellow when recording and alarm related events occur Video Loss Video Loss Recover Al...

Page 72: ...RED Current event or a problem Solid Yellow Current status of the DVR Note In case of network connection error or power failure DVR Number and DVR Name will blink in red a HDD FAIL Notify Hard Drive D...

Page 73: ...ording channel d ALARM Configure current Alarm recording channel e MOTION Configure current Motion recording channel f VIDEO LOSS Configure current Video Loss channel g HDD SIZE Available HDD Total HD...

Page 74: ...r each DVR please refer to DVR Log list DVR LOG LIST It shows the same log list with DVR Set It has a list of all the events since the initial power on procedure of DVR Selected message or time will b...

Page 75: ...me Type on DVR title to display on Monitoring window Health window and DVR Window 2 IP Enter the IP address ex 192 168 0 52 or DNS name ex demo dvrhost com 3 Port 7000 Default 4 Password Select from t...

Page 76: ...m CMS List 4 SETUP It shows the menu setting of selected DVR 5 PROPERTY This menu provides information such as DVR Name IP number port Software version and what kind of DVR is Keepsafe Alarms Ltd 044...

Page 77: ...ge colored DVR means CMS is trying to connect to the DVR through network When you click this icon it shows the message Connecting Please stand by with try again and cancel button Pink colored DVR mean...

Page 78: ...s the status of individual cameras The cameras are displayed according to the channel 1 Click the desired DVR 2 then it shows the information of camera 3 Each Icon means listed below 1 Blue Video Inpu...

Page 79: ...lays REC Network connection Video Loss Event and Current Status Indicator Condition REC Normal Recording Wait At the initial connecting Loss Video Loss Close Disconnected from DVR Alarm Alarm Recordin...

Page 80: ...previous Live viewing mode please double click again 2 Select any camera for Full Screen display by clicking Right Mouse button 6 Dual Display Simultaneous Playback with Live Viewing Individual chann...

Page 81: ...sired DVR and Time Date for Playback To begin playback click Play button See Playback section Note If there are no minutes data for the selected time it means there is no recorded video for the select...

Page 82: ...ns playback during live viewing 5 To stop playback Right clicking 6 Then Context Menu will appear Select Live Live viewing Playback Motion Recording Playback Keepsafe Alarms Ltd 044 93 72168 Parsonsto...

Page 83: ...menus allow access to various features for each individual submenu type 1 There are three types of Context Menu during Live Viewing Right Clicking to display Context Menu 1 SEARCH Remote Search for Pl...

Page 84: ...2 LIVE To stop playback and come back to live viewing 3 FULL SCREEN Full Screen Display 3 There are seven types of Context Menu on each DVR 1 LIVE Live display for selected DVR 2 PROPERTY DVR informa...

Page 85: ...o download the files onto the remote PC Unlike the live mode only one DVR can be accessed at a time 1 To start playback press PB button 2 It will be switched to Playback Mode as shown below 3 When but...

Page 86: ...ed DVR Remote Search shows a graphical representation of the recorded video stored on the DVR The Data are color coded by category Alarm Red Motion Green Normal Yellow Select desired Date and Time By...

Page 87: ...video stored on the DVR Select desired date and time and click button to start save It will be saved on C Program Files DvrPlayer Download Download directory can be changed on CMS Setup Menu a BEGIN E...

Page 88: ...downloaded from a DVR through CMS Select button Local Search shows a graphical representation of the stored file on the PC Select desired DVR Date and time then click button to start playback Deleted...

Page 89: ...essing it s menu Select any DVR for Menu setup Context Menu will appear on screen by Right clicking DVR SETUP Menu pops up as shown below 1 Display 1 Display Setup a Status bar Show or Hide b Camera S...

Page 90: ...Adjust Brightness Contrast and Color 0 99 Enter the camera title up to 12 characters Select P T Z Camera a Sequential Interval 1 30 sec b Select Sequential Mode c Select camera for Full Screen Mode se...

Page 91: ...Select Motion Record ON OFF Record Time Adjust Post Event Duration Camera Select camera for Motion Level Adjust Motion Sensitivity 1 20 Motion Grid Select the desired motion grids by left click or del...

Page 92: ...triggered when an alarm is activated per camera Motion to Alarm Select ON to use Motion detection like Alarm is triggered Select Enable or Disable to Record Adjust Picture Quality Adjust Filed rate Ac...

Page 93: ...cord Enable Select the usage of the Alarm Record Mode 1 4 means for Schedule recording Mode 1 4 6 Schedule Setup Select any Day for Schedule Setup Keepsafe Alarms Ltd 044 93 72168 Parsonstown Mullinga...

Page 94: ...nter the beginning and end time and then select Record Mode to record Schedule Menu shows a graphical representation of the defined record Mode Mode 1 4 However the Schedules are only displayed if a c...

Page 95: ...limit or blocking options a Enter e mail address for alerts from the DVR up to 5 users b Select Mail server and set up SMTP server if you want to use your own mail server Keepsafe Alarms Ltd 044 93 72...

Page 96: ...Lock ON OFF c Key Tone Key tone ON OFF d Select overwrite HDD e Camera Record Fps Select Max Recording Frame rate a Time Sync Select Master or slave clock b Configure Time server c Enter the date and...

Page 97: ...ER 3 Password Changed the user Password up to 5 users 4 Control d Stop Recording e Schedule On Off f Alarm Activated through Network Keepsafe Alarms Ltd 044 93 72168 Parsonstown Mullingar Co Westmeath...

Page 98: ...ed pulling one camera from each DVR to be displayed The Virtual DVR behaves in the same way a DVR would except for the warning notifications 2 Virtual Set List Manager Virtual Set List Manager is used...

Page 99: ...k those options to have the cameras with alarm motion triggers or Video Loss to be prioritized and arranged automatically in either Auto Arrange or Auto Insert Arrange 2 ADD VIRTUAL DVR Click Add Virt...

Page 100: ...e is Whole DVR and the other is selected camera on each DVR 1 Whole cameras of desired DVR Click the desired DVR to directly drag the desired channel The camera will be added in numeric order from sel...

Page 101: ...re are two way of delete the camera from CMS 1 Select any camera for delete during live monitoring Context Menu will appear on screen by Right clicking Select REMOVE 2 Select any camera for delete and...

Page 102: ...nstalled client software We provide client software in a CD 1 Connect modem to the back of DVR RS 232C MODEM 2 Follow the below steps Start Programs Accessories Communications Network and Dial up Conn...

Page 103: ...DIGITAL VIDEO RECORDER 3 Double click Make New Connection 4 Click Next at the window of network connection wizard Keepsafe Alarms Ltd 044 93 72168 Parsonstown Mullingar Co Westmeath www keepsafealarms...

Page 104: ...IDEO RECORDER 5 Check Dial up to private network and click Next 6 Enter the telephone number which is connected to the DVR Keepsafe Alarms Ltd 044 93 72168 Parsonstown Mullingar Co Westmeath www keeps...

Page 105: ...O RECORDER 7 Check For all user and click Next 8 Type DVR at the parameter check Add a shortcut to my desktop and click Finish Keepsafe Alarms Ltd 044 93 72168 Parsonstown Mullingar Co Westmeath www k...

Page 106: ...ction is succeed and see the speed of this connection at the bottom tool bar The highest speed of analog modem is 33 6kbps between DVR and the Computer At the ISP Internet Service Provider and digital...

Page 107: ...k Set list manager 12 Type on DVR title to display on monitoring window enter 192 168 1 1 in IP and set port default 80 and password Click Add to List button and OK to save the configuration Keepsafe...

Page 108: ...u will see the picture if connected successfully 14 To disconnect modem place the cursor on the this Icon and right click and click Disconnect Keepsafe Alarms Ltd 044 93 72168 Parsonstown Mullingar Co...

Page 109: ...109 DIGITAL VIDEO RECORDER 15 To connect modem to the DVR just double click on the DVR Icon Keepsafe Alarms Ltd 044 93 72168 Parsonstown Mullingar Co Westmeath www keepsafealarms ie...

Page 110: ...NET EXPLORER Enter the IP address of the unit in the address pane of the Internet Explorer For example type in http 192 168 0 250 7000 Above illustrates example of a unit when it is utilizing port 700...

Page 111: ...ad unsigned ActiveX controls Click on OK You are now ready to automatically download our ActiveX application 1 2 LOG IN PROCEDURE You can either sign in with admin or user Next enter the password for...

Page 112: ...n on CMS overlay A small icon will appear on the upper left corner of the internet explorer indicating the user for the presence of Active X Click on Install ActiveX Control Click on Install Wait unti...

Page 113: ...TAL VIDEO RECORDER When the Image Loading is done the WEB CMS version should appear along with the images from the DVR Keepsafe Alarms Ltd 044 93 72168 Parsonstown Mullingar Co Westmeath www keepsafea...

Page 114: ...14 DIGITAL VIDEO RECORDER APPENDIX 3 VIEW ONLY Click on Web viewer to connect to the DVR only purpose for view Keepsafe Alarms Ltd 044 93 72168 Parsonstown Mullingar Co Westmeath www keepsafealarms ie...

Page 115: ...ivx 4 0 Video Codec It is used for only MPEG4 DVR CMS file and back up file How to change CMS file to AVI file 1 Click the ConvAVi exe to start convert 2 Browse the target file through on next Input f...

Page 116: ...ame avi file 4 Select FOURCC Video Resolution Video Channel Audio Channel This is automatically displayed 5 Click Convert button to start The status will be displayed at the bottom of left Keepsafe Al...

Page 117: ...isplay Resolution NTSC 720 480 PAL 720 576 Recording Rate NTSC 30fps 720 480 60 fps 720 240 120fps 360 240 PAL 25fps 720 576 50 fps 720 288 120fps 360 288 Alarm In Relay Out 4 2 8 2 16 2 External Reco...

Reviews: