background image

READ INSTRUCTIONS

— All the safety and 

operating instructions should be read before the 
product is operated.

RETAIN INSTRUCTIONS

— The safety and 

operating instructions should be retained for 
future reference.

HEED WARNINGS 

— All warnings on the product 

and in the operating instructions should be 
adhered to.

FOLLOW INSTRUCTIONS 

— All operating and use 

instructions should be followed.

CLEANING

— The product should be cleaned only 

with a polishing cloth or a soft dry cloth. Never 
clean with furniture wax, benzine, insecticides 
or other volatile liquids since they may corrode 
the cabinet.

ATTACHMENTS 

— Do not use attachments not 

recommended by the product manufacturer as 
they may cause hazards.

WATER AND MOISTURE 

— Do not use this 

product near water — for example, near a 
bathtub, wash bowl, kitchen sink, or laundry 
tub; in a wet basement; or near a swimming 
pool; and the like.

ACCESSORIES

— Do not place this product on an 

unstable cart, stand, tripod, bracket, or table. 
The product may fall, causing serious injury to a 
child or adult, and serious damage to the 
product. Use only with a cart, stand, tripod, 
bracket, or table recommended by the 
manufacturer, or sold with the product. Any 
mounting of the product should follow the 
manufacturer’s instructions, and should use a 
mounting accessory recommended by the 
manufacturer.

CART 

— A product and cart combination should be 

moved with care. Quick stops, excessive force, 
and uneven surfaces may cause the product 
and cart combination to overturn.

VENTILATION 

— Slots and openings in the cabinet 

are provided for ventilation and to ensure 
reliable operation of the product and to protect 
it from overheating, and these openings must 
not be blocked or covered. The openings should 
never be blocked by placing the product on a 
bed, sofa, rug, or other similar surface. This 
product should not be placed in a built-in 
installation such as a bookcase or rack unless 
proper ventilation is provided or the 
manufacturer’s instructions have been adhered 
to.

POWER SOURCES 

— This product should be 

operated only from the type of power source 
indicated on the marking label. If you are not 
sure of the type of power supply to your home, 
consult your product dealer or local power 
company.

LOCATION 

– The appliance should be installed in a 

stable location.

NONUSE PERIODS 

– The power cord of the 

appliance should be unplugged from the outlet 
when left un-used for a long period of time.

GROUNDING OR POLARIZATION

•  If this product is equipped with a polarized 

alternating current line plug (a plug having one 
blade wider than the other), it will fit into the 
outlet only one way. This is a safety feature. If 
you are unable to insert the plug fully into the 
outlet, try reversing the plug. If the plug should 
still fail to fit, contact your electrician to replace 
your obsolete outlet. Do not defeat the safety 
purpose of the polarized plug.

•  If this product is equipped with a three-wire 

grounding type plug, a plug having a third 
(grounding) pin, it will only fit into a grounding 
type power outlet. This is a safety feature. If you 
are unable to insert the plug into the outlet, 
contact your electrician to replace your obsolete 
outlet. Do not defeat the safety purpose of the 
grounding type plug.

POWER-CORD PROTECTION 

— Power-supply 

cords should be routed so that they are not likely 
to be walked on or pinched by items placed 
upon or against them, paying particular 
attention to cords at plugs, convenience 
receptacles, and the point where they exit from 
the product.

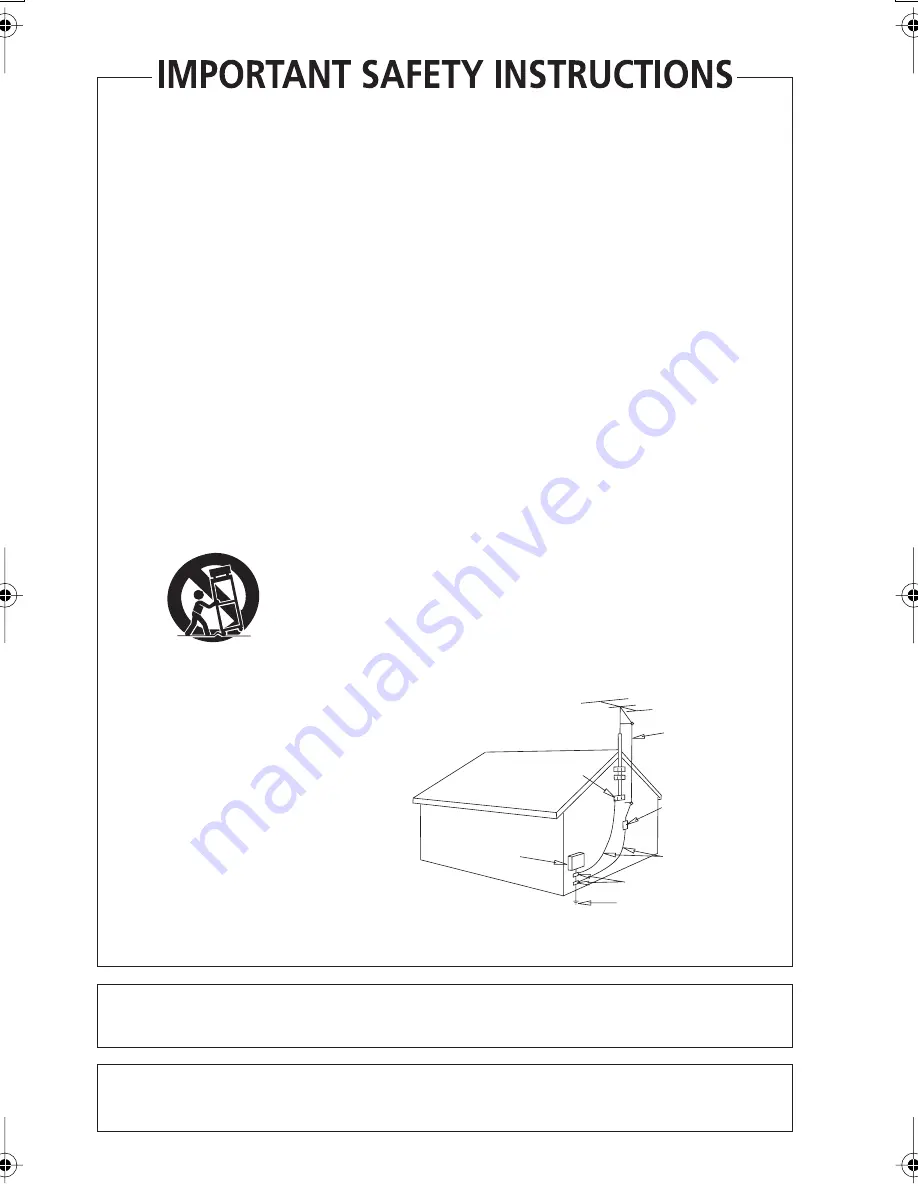
OUTDOOR ANTENNA GROUNDING 

— If an 

outside antenna or cable system is connected to 
the product, be sure the antenna or cable 
system is grounded so as to provide some 
protection against voltage surges and built-up 
static charges. Article 810 of the National 
Electrical Code, ANSI/NFPA 70, provides 
information with regard to proper grounding of 
the mast and supporting structure, grounding of 
the lead-in wire to an antenna discharge unit, 
size of grounding conductors, location of 
antenna-discharge unit, connection to 
grounding electrodes, and requirements for the 
grounding electrode. See Figure A.

LIGHTNING

— For added protection for this 

product during a lightning storm, or when it is 
left unattended and unused for long periods of 
time, unplug it from the wall outlet and 
disconnect the antenna or cable system. This 
will prevent damage to the product due to 
lightning and power-line surges.

POWER LINES 

— An outside antenna system 

should not be located in the vicinity of overhead 
power lines or other electric light or power 
circuits, or where it can fall into such power 
lines or circuits. When installing an outside 
antenna system, extreme care should be taken 
to keep from touching such power lines or 
circuits as contact with them might be fatal.

OVERLOADING

— Do not overload wall outlets, 

extension cords, or integral convenience 
receptacles as this can result in a risk of fire or 
electric shock.

OBJECT AND LIQUID ENTRY 

— Never push 

objects of any kind into this product through 
openings as they may touch dangerous voltage 
points or short-out parts that could result in a 
fire or electric shock. Never spill liquid of any 
kind on the product.

SERVICING 

— Do not attempt to service this 

product yourself as opening or removing covers 
may expose you to dangerous voltage or other 
hazards. Refer all servicing to qualified service 
personnel.

DAMAGE REQUIRING SERVICE 

— Unplug this 

product from the wall outlet and refer servicing 
to qualified service personnel under the 
following conditions:

•  When the power-supply cord or plug is 

damaged.

•  If liquid has been spilled, or objects have fallen 

into the product.

•  If the product has been exposed to rain or water.
•  If the product does not operate normally by 

following the operating instructions. Adjust only 
those controls that are covered by the operating 
instructions as an improper adjustment of other 
controls may result in damage and will often 
require extensive work by a qualified technician 
to restore the product to its normal operation.

•  If the product has been dropped or damaged in 

any way.

•  When the product exhibits a distinct change in 

performance — this indicates a need for service.

REPLACEMENT PARTS 

— When replacement parts 

are required, be sure the service technician has 
used replacement parts specified by the 
manufacturer or have the same characteristics 
as the original part. Unauthorized substitutions 
may result in fire, electric shock, or other 
hazards.

SAFETY CHECK 

— Upon completion of any service 

or repairs to this product, ask the service 
technician to perform safety checks to 
determine that the product is in proper 
operating condition.

WALL OR CEILING MOUNTING 

— The product 

should not be mounted to a wall or ceiling.

HEAT 

— The product should be situated away from 

heat sources such as radiators, heat registers, 
stoves, or other products (including amplifiers) 
that produce heat.

GROUND
CLAMP

ELECTRIC
SERVICE
EQUIPMENT

ANTENNA
LEAD IN 
WIRE

ANTENNA
DISCHARGE UNIT
(NEC SECTION 810-20)

GROUNDING CONDUCTORS
(NEC SECTION 810-21)

GROUND CLAMPS

POWER SERVICE GROUNDING
ELECTRODE SYSTEM
(NEC ART 250, PART H)

NEC — NATIONAL ELECTRICAL CODE

Fig. A

D1-4-2-2_En

This Class B digital apparatus complies with Canadian ICES-003.

Cet appareil numérique de la Classe B est conforme à la norme NMB-003 du Canada. 

D8-10-1-3_EF

CAUTION:

This product satisfies FCC regulations when shielded cables and connectors are used to connect the 

unit to other equipment. To prevent electromagnetic interference with electric appliances such as radios and 
televisions, use shielded cables and connectors for connections. 

D8-10-3a_En

DV400V_KUC_EN.book 3 ページ 2007年3月14日 水曜日 午後8時8分

Summary of Contents for 400V-K

Page 1: ...RegisterYour Product at http www pioneerelectronics com US http www pioneerelectronics ca Canada DVD Player DV 400V S DV 400V K Operating Instructions ...

Page 2: ... connected Consult the dealer or an experienced radio TV technician for help D8 10 1 2_En Information to User Alteration or modifications carried out without appropriate authorization may invalidate the user s right to operate the equipment D8 10 2_En WARNING Handling the cord on this product or cords associated with accessories sold with the product will expose you to lead a chemical known to the...

Page 3: ...s and built up static charges Article 810 of the National Electrical Code ANSI NFPA 70 provides information with regard to proper grounding of the mast and supporting structure grounding of the lead in wire to an antenna discharge unit size of grounding conductors location of antenna discharge unit connection to grounding electrodes and requirements for the grounding electrode See Figure A LIGHTNI...

Page 4: ...20 feet sewing machine 70 Vacuum cleaner hair dryer noisy restaurant 80 Average city traffic garbage disposals alarm clock at two feet THE FOLLOWING NOISES CAN BE DANGEROUS UNDER CONSTANT EXPOSURE 90 Subway motorcycle truck traffic lawn mower 100 Garbage truck chain saw pneumatic drill 120 Rock band concert in front of speakers thunderclap 140 Gunshot blast jet plane 180 Rocket launching pad Infor...

Page 5: ... 4 AAC DivX video WMV and JPEG files with the Disc Navigator 26 Looping a section of a disc 27 Using repeat play 27 Using random play 27 Creating a program list 28 Searching a disc 29 Switching subtitles 29 Switching audio language channels 30 Zooming the screen 30 Switching camera angles 30 Displaying disc information 30 06 USB playback Using the USB interface 31 07 Audio Settings and Video Adjus...

Page 6: ...iovisual devices is also supported PureCinema Progressive Scan video When connected to a progressive scan compatible TV or monitor using the component video outputs you can enjoy extremely stable flicker free images with the same frame refresh rate as the original movie New Disc Navigator with moving pictures The new Disc Navigator enables you play the first few seconds of each title or chapter in...

Page 7: ...environmental public instruction s rules that apply in your country area Do not use or store batteries in direct sunlight or other excessively hot place such as inside a car or near a heater This can cause batteries to leak overheat explode or catch fire It can also reduce the life or performance of batteries Hints on installation We want you to enjoy using this product for years to come so please...

Page 8: ...The non DVD audio side of the disc is not compliant with the CD Audio specification and therefore may not play The DVD side of a DualDisc plays in this product DVD Audio content will not play For more detailed information on the DualDisc specification please refer to the disc manufacturer or disc retailer CD R RW compatibility Compatible formats CD Audio Video CD ISO 9660 CD ROM containing MP3 WMA...

Page 9: ...used depend on the application used to encode the AAC file This unit plays back AAC files encoded by iTunes bearing the extension m4a DRM protected files will not play and files encoded with some versions of iTunes may not play or filenames may display incorrectly Apple and iTunes are trademarks of Apple Computer Inc registered in the U S and other countries WMA Windows Media Audio compatibility T...

Page 10: ... Corporation WMV content can be encoded by using Windows Media Encoder This player is compatible with WMV9 files that are encoded by using the Windows Media Encoder 9 Series with wmv as an extension Compatible with size under 720 x 480 pixels Advanced Profile is not supported DRM protected video files will not play in this player JPEG file compatibility Compatible formats Baseline JPEG and EXIF 2 ...

Page 11: ...the VIDEO OUT and AUDIO OUT L R jacks to a set of A V inputs on your TV Use the supplied audio video cable connecting the red and white plugs to the audio outputs and the yellow plug to the video output Make sure you match up the left and right audio outputs with their corresponding inputs for correct stereo sound See below if you want to use a component or S video for the video connection 2 Plug ...

Page 12: ...t available Use a component video cable not supplied to connect the COMPONENT VIDEO OUT jacks to a component video input on your TV monitor or AV receiver Watching progressive scan video from the component video outputs This player can output progressive scan video from the component video output Compared to interlace video progressive scan video effectively doubles the scanning rate of the pictur...

Page 13: ...layer to an AV receiver using the digital audio output In addition to a digital connection we recommend also connecting using the stereo analog connection You ll probably also want to connect a video output to your AV receiver You can use any of the video outputs available on this player the illustration shows a standard composite connection 1 Connect the DIGITAL AUDIO OUT COAXIAL jack on this pla...

Page 14: ...his unit has been designed to be compliant with HDMI High Definition Multimedia Interface Depending on the component you have connected using a DVI connection may result in unreliable signal transfers When you change the component connected to the HDMI output you will also need to change the HDMI settings to match the new component see HDMI Out on page 35 HDMI Resolution on page 36 and HDMI Color ...

Page 15: ...compliant displays HDMI has the capability to support standard enhanced or high definition video plus standard to multi channel surround sound audio HDMI features include uncompressed digital video a bandwidth of up to five gigabytes per second with HDTV signals one connector instead of several cables and connectors and communication between the AV source and AV devices such as DTVs Resetting the ...

Page 16: ...7 HOME MENU page 18 8 Display 9 OPEN CLOSE page 20 10 page 21 11 page 21 12 page 21 13 and page 21 14 HDMI indicator Lights when this player is recognized by another HDMl or DVI HDCP compatible component 15 DVD USB page 31 16 USB port Type A page 31 17 RW Compatible page 8 USB DVD USB HDMI MENU TOP MENU STANDBY ON OPEN CLOSE HOME MENU ENTER RETURN 2 3 4 5 1 7 6 8 10 9 17 14 15 16 11 12 13 ...

Page 17: ...owing when using the remote control Make sure that there are no obstacles between the remote and the remote sensor on the unit The remote has a range of about 7 m 23 ft Remote operation may become unreliable if strong sunlight or fluorescent light is shining on the unit s remote sensor Remote controllers for different devices can interfere with each other Avoid using remotes for other equipment lo...

Page 18: ...saver starts If the disc tray is closed but no disc is playing and no control is pressed for about 30 minutes the player automatically goes into standby Using the on screen displays For ease of use this player makes extensive use of graphical on screen displays OSDs All the screens are navigated in basically the same way using the cursor buttons to change the highlighted item and pressing ENTER to...

Page 19: ...tput settings on page 35 for more details 4 Press HOME MENU to exit the menu screen Setting the language of this player s on screen displays This sets the language of the player s on screen displays 1 Press HOME MENU and select Initial Settings 2 Select OSD Language from the Display settings 3 Select a language The on screen language will change according to your selection 4 Press HOME MENU to exi...

Page 20: ... the disc if you re loading a double sided DVD disc load it with the side you want to play face down 4 Press play to start playback If you re playing a DVD or Video CD an on screen menu may appear See DVD Video and DivX disc menus on page 22 and Video CD PBC menus on page 22 for more on how to navigate these If you re playing a containing DivX video WMV files or MP3 WMA MPEG 4 AAC audio files it m...

Page 21: ... loaded you can resume playback Note The Last Memory function doesn t work with VR format DVD R RW If you don t need the Last Memory function when you stop a disc you can press OPEN CLOSE to stop playback and open the disc tray Button What it does Starts playback If the display shows RESUME or LAST MEM playback starts from the resume or last memory point see also Resume and Last Memory below Pause...

Page 22: ...t having to navigate the PBC menu by starting playback using a number button to select a track rather than the play button Button What it does TOP MENU Displays the top menu of a DVD disc this varies with the disc MENU Displays a DVD disc or DivX media files menu this varies with the disc and may be the same as the top menu Moves the cursor around the screen ENTER Selects the current menu option R...

Page 23: ...when I play some discs Some movie formats are such that even when played on a widescreen TV black bars are necessary at the top and bottom of the screen This is not a malfunction I have a standard 4 3 TV and set the player to show widescreen DVDs in pan scan format so why do I still get black bars top and bottom with some discs Some discs override the display preferences of the player so even if y...

Page 24: ... PBC mode or a MP3 WMA MPEG 4 AAC track playback automatically resumes at the end or beginning of the track Depending on the disc normal playback may automatically resume when a new chapter is reached on a DVD disc Playing in slow motion You can play DVD Videos and DVD R RW at four different slow motion speeds forwards and backwards Video CDs and DivX video WMV can be played at four different forw...

Page 25: ...on The options available depend on the kind of disc loaded and whether the disc is playing or not but include Title Titles from a DVD Video disc Chapter Chapters from the current title of a DVD Video disc Track Tracks from a Video CD disc Time Thumbnails from a Video CD disc at 10 minute intervals Original Title Original titles from a VR mode DVD R RW disc Play List Title Play List titles from a V...

Page 26: ...eturn to the parent folder by going to the top of the list to the folder then pressing ENTER When a JPEG file is highlighted a thumbnail image is displayed on the right 3 To play the highlighted track or DivX video WMV file or display the highlighted JPEG file press ENTER When a MP3 WMA MPEG 4 AAC or DivX video WMV file is selected playback begins starting with the selected file and continues unti...

Page 27: ...ndom play at the same time 1 During playback press PLAY MODE and select Repeat from the list of functions on the left 2 Select a repeat play option If program play is active select Program Repeat to repeat the program list or Repeat Off to cancel The repeat options available depend on the kind of disc loaded For example for DVD Video and DVD RW discs you can select Title Repeat or Chapter Repeat o...

Page 28: ...unctions on the left 2 Select Create Edit from the list of program options 3 Use the cursor buttons and ENTER to select a title chapter or track for the current step in the program list For a DVD Video disc you can add a title or a chapter to the program list For a CD or Video CD select a track to add to the program list After pressing ENTER to select the title chapter group track the step number ...

Page 29: ... PBC mode or with MP3 WMA MPEG 4 AAC discs 1 Press PLAY MODE and select Search Mode from the list of functions on the left 2 Select a search mode The search options available depend on the kind of disc loaded The disc must be playing in order to use time search 3 Use the number buttons to enter a title chapter or track number or a time For a time search enter the number of minutes and seconds into...

Page 30: ... by a factor of 2 or 4 while watching a DVD DivX video WMV title or Video CD or playing a JPEG disc 1 During playback use the ZOOM button to select the zoom factor Normal 2x or 4x Since DVD Video CD DivX video WMV title and JPEG pictures have a fixed resolution picture quality will deteriorate especially at 4x zoom This is not a malfunction 2 Use the cursor buttons to change the zoomed area You ca...

Page 31: ... front panel display 2 Connect your USB device The USB terminal is located on the front panel Disc Navigator is automatically displayed 3 Press ENTER to start playback The method of playback for files saved on a USB device is the same as for other discs For more information see Basic playback controls on page 21 and Playing discs on page 24 4 Turn off this player and remove the USB device The next...

Page 32: ...tal audio sources Audio DRC is only effective through the digital output when Digital Out is set to On and Dolby Digital Out is set to Dolby Digital PCM see Digital Audio Out settings on page 35 The effect of Audio DRC also depends on your speakers and AV receiver settings Virtual Surround Settings On Off default Switch on Virtual Surround to enjoy realistic surround sound effects from just two sp...

Page 33: ...HOME MENU and select Video Adjust from the on screen display 2 Make settings using the cursor buttons and ENTER You can adjust the following picture quality settings Sharpness Adjusts the sharpness of edges in the picture Fine Standard default Soft Brightness Adjusts the overall brightness 20 to 20 Contrast Adjusts the contrast between light and dark 16 to 16 Gamma Adjusts the warmth of the pictur...

Page 34: ...talics The Digital Audio Out settings only need to be set if you have connected the digital output of this player to an AV receiver or other equipment Check the operating instructions supplied with your other equipment to see which digital audio formats it s compatible with Some settings such as TV Screen Audio Language and Subtitle Language may be overridden by the DVD disc Often these settings c...

Page 35: ...o PCM audio for digital output HDMI Out LPCM 2CH Set if your monitor or device only accepts stereo input On this setting multichannel audio is downmixed to 2 channels for stereo linear PCM output Auto Dolby Digital DTS and MPEG sources are processed according to how they were encoded and linear PCM sources are heard as is Off No digital audio output Choose this option when you want to change the D...

Page 36: ...80i Set if your TV supports 720 x 480 pixel interlace video HDMI Color Full range RGB If colors are weak this gives brighter colors and deeper black RGB Use this setting if colors appear overly rich on the Full Range RGB setting Component Outputs component video format default setting for HDMI compatible devices Setting Option What it means Setting Option What it means Audio Language English If th...

Page 37: ...age 44 Subtitle Display On Subtitles are displayed according to your selected subtitle language see above Off Subtitles are always off by default when you play a DVD disc note that some discs override this setting Setting Option What it means Setting Option What it means OSD Language English On screen displays of the player are in English Languages as displayed On screen displays are shown in the ...

Page 38: ...ect Options then Password 2 Use the number buttons to enter a 4 digit password The numbers you enter show up as asterisks on screen 3 Press ENTER to register the password You will return to the Options menu screen Changing your password To change your password confirm your existing password then enter a new one 1 Select Password Change 2 Use the number buttons to enter your existing password then ...

Page 39: ...r Use cursor up down to change the Country Area code Select by code number Press cursor right then use the number buttons to enter the 4 digit Country Area code The new Country Area code is set and you will return to the Options menu screen Note that the new Country Area code doesn t take effect until the next disc is loaded or the current disc is reloaded DTS Downmix Default setting STEREO If you...

Page 40: ... digit registration code is displayed Make a note of the code as you will need it when you register with a DivX VOD provider Playing DivX VOD content Some DivX VOD content may only be playable a fixed number of times When you load a disc containing this type of DivX VOD content the remaining number of plays is shown on screen and you then have the option of playing the disc thereby using up one of...

Page 41: ... 2CH Auto DVD Linear PCM1 1 These formats include DVD RW discs Left Right Left Right MPEG1 Left Right MPEG2 2 If the HDMI device you are using is not compatible with these compressed formats the signal is output as linear PCM Dolby Digital Karaoke Left Right Dolby Digital2 Dolby Digital1 2ch downmix Dolby Digital2 DTS 2ch downmix DTS2 CD CD MP3 WMA MPEG 4 AAC Left Right Left Right Video CD Left Ri...

Page 42: ... using a soft dry cloth wiping the disc lightly from the center to the outside edge as shown below If necessary use a cloth soaked in alcohol or a commercially available CD DVD cleaning kit to clean a disc more thoroughly Never use benzine thinner or other cleaning agents including products designed for cleaning vinyl records Cleaning the unit s exterior Unplug the unit before cleaning Use a dry c...

Page 43: ...e TV controls to select how the picture is presented Your TV may offer various zoom and stretch options see the instructions that came with your TV for details Please note that some movie aspect ratios are wider than 16 9 so even though you have a widescreen TV these discs will still play in a letter box style with black bars at the top and bottom of the screen Standard TV users If you have a stan...

Page 44: ...omplete list of languages and codes Troubleshooting Incorrect operation is often mistaken for trouble or malfunction If you think that there is something wrong with this component check the points below Sometimes the trouble may lie in another component Inspect the other components and electrical appliances being used If the trouble cannot be rectified after checking the items below ask your neare...

Page 45: ...sensor is too wide Use the remote within its operating range page 17 The batteries are exhausted Put in new ones page 7 No picture No color Incorrect video connections Check that connections are correct and that plugs are inserted fully Also check the video cable for damage TV monitor or AV amplifier settings are incorrect Check the instruction manual of the connected equipment The video output is...

Page 46: ...nction Cannot play multi channel audio Check that the Dolby Digital DTS and MPEG Out settings page 35 are suitable for your amplifier receiver check the instruction manual that came with your amplifier receiver Check the audio options available from the disc menu Cannot listen to high sampling rate audio through the digital output Make sure that 96 kHz PCM Out is set to 96 kHz As a copy protection...

Page 47: ...al of the component to do this Check that the HDMI cable is connected properly and that the cable isn t damaged Check that components connected using the HDMI interface are switched on and HDMI compatible This unit has been designed to be compliant with HDMI High Definition Multimedia Interface Depending on the component you have connected using a DVI connection may result in unreliable signal tra...

Page 48: ... of a TV screen relative to its height Conventional TVs are 4 3 widescreen models are 16 9 Digital audio Indirect representation of sound using numbers See also Sampling frequency and Analog audio DivX DivX is a digital video format created by DivX Inc Dolby Digital A multi channel audio encoding system developed by Dolby Laboratories that enables far more audio to be stored on a disc than PCM enc...

Page 49: ...used on Video CDs and some DVD discs PBC PlayBack Control A system of navigating a Video CD through on screen menus recorded onto the disc PCM Pulse Code Modulation Digital audio encoding system found on CDs Good quality but requires a lot of data compared to Dolby Digital DTS and MPEG encoded audio See also Digital audio Progressive scan video All the lines that make up a video picture are update...

Page 50: ...alagasy mg 1307 Maori mi 1309 Macedonian mk 1311 Malayalam ml 1312 Mongolian mn 1314 Moldavian mo 1315 Marathi mr 1318 Malay ms 1319 Maltese mt 1320 Burmese my 1325 Nauru na 1401 Nepali ne 1405 Norwegian no 1415 Occitan oc 1503 Oromo om 1513 Oriya or 1518 Panjabi pa 1601 Polish pl 1612 Pashto Pushto ps 1619 Quechua qu 1721 Rhaeto Romance rm 1813 Kirundi rn 1814 Romanian ro 1815 Kinyarwanda rw 1823...

Page 51: ...level 286 mVp p 75 Ω Jack 4 pin mini DIN Video output Output level 1 Vp p 75 Ω Jack RCA Audio output 1 stereo pair Output level During audio output 200 mVrms 1 kHz 20 dB Number of channels 2 Jacks RCA HDMI output HDMI output 19 pin Digital audio characteristics Frequency response 4 Hz to 44 kHz S N ratio 115 dB Dynamic range 88 dB Total harmonic distortion 0 0065 Wow and flutter Limit of measureme...

Page 52: ...guro ku Tokyo 153 8654 Japan PIONEER ELECTRONICS USA INC P O BOX 1540 Long Beach California 90801 1540 U S A TEL 800 421 1404 PIONEER ELECTRONICS OF CANADA INC 300 Allstate Parkway Markham Ontario L3R 0P2 Canada TEL 1 877 283 5901 905 479 4411 PIONEER EUROPE NV Haven 1087 Keetberglaan 1 B 9120 Melsele Belgium TEL 03 570 05 11 PIONEER ELECTRONICS ASIACENTRE PTE LTD 253 Alexandra Road 04 01 Singapor...

Reviews: