background image

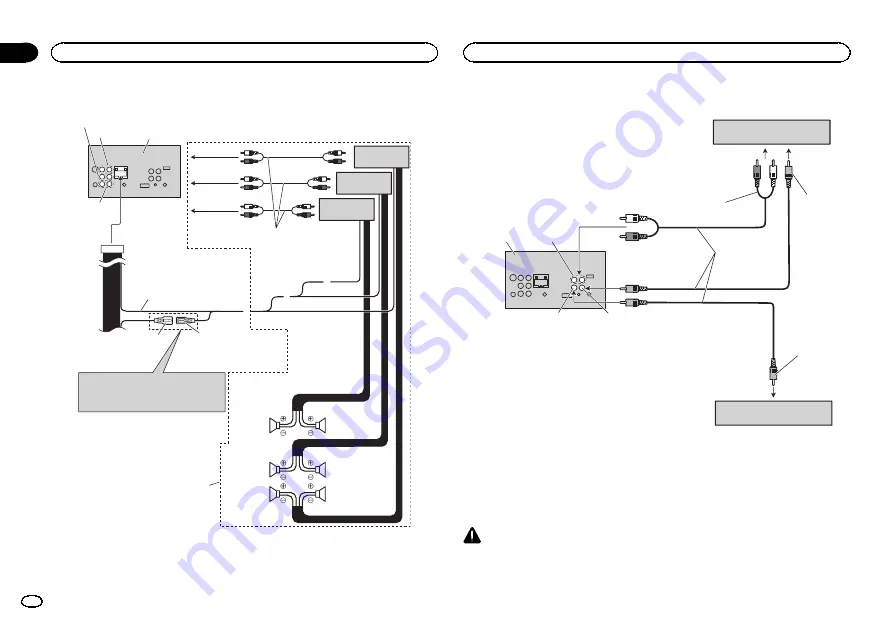
When connecting to separately sold power amp

Right

Subwoofer

Subwoofer

This product

Blue/white (5*)

System remote control

The pin position of the ISO connector will differ 
depending of the type of vehicle. Connect 5* and 
6* when Pin 5 is an antenna control type. In 
another type of vehicle, never connect 5* and 6*.

Blue/white (6*)
Connect to auto-antenna 
relay control terminal 
(max. 300 mA 12 V DC).

Perform these connections when 
using the optional amplifier.

Front speaker

Front speaker

Rear speaker

Rear speaker

Left

Blue/white
Connect to system control 
terminal of the power amp 
(max. 300 mA 12 V DC).

Connect with RCA cables 
(sold separately)

Subwoofer 
output

Front output

Rear output

To front output

To rear output

To subwoofer 
output

Power amp 
(sold separately)

Power amp 
(sold separately)

Power amp 
(sold separately)

When connecting the external video component and the display

External video component 
(sold separately)

Audio inputs
(

R IN

L IN

Display with RCA input 
jacks (sold separately)

To video 
input

To video 
output

To audio outputs

This product

RCA cables 
(sold separately)

Rear monitor output 
(

V OUT

)

Video input (

V IN

)

!

It is necessary to change

AV Input

in the

system menu when connecting the external
video component.

This product

s rear video output is for connec-

tion of a display to enable passengers in the rear
seats to watch the DVD, etc.

WARNING

!

Never install a rear display in a location that is
visible to the driver while the vehicle is in motion.

Connecting the units

4

Section

Connecting the units

En

01

Summary of Contents for AVH-2500BT

Page 1: ...nstallationsanleitung Installatiehandleiding DVD RDS AV RECEIVER AUTORADIO AV RDS LECTEUR DE DVD SINTOLETTORE DVD RDS CON AV RADIO AV RDS CON DVD DVD RDS AV EMPFÄNGER DVD RDS AV ONTVANGER AVH X5500BT AVH X3500DAB AVH X2500BT AVH X1500DVD English Nederlands Deutsch Español Italiano Français ...

Page 2: ...owing could result in fire or malfunction Vehicles with a 12 volt battery and negative grounding Speakers with 50 W output value and 4 W to 8 W impedance value To prevent a short circuit overheating or mal function be sure to follow the directions below Disconnect the negative terminal of the bat tery before installation Secure the wiring with cable clamps or adhe sive tape Wrap adhesive tape arou...

Page 3: ...4 may be different In this case be sure to connect 1 to 4 and 3 to 2 1 3 2 4 Yellow 2 Back up or accessory Yellow 1 Connect to the constant 12 V supply terminal Connect leads of the same color to each other Red 4 Accessory or back up Red 3 Connect to terminal controlled by ignition switch 12 V DC Black chassis ground Connect to a clean paint free metal location This product Microphone Function of ...

Page 4: ...ont output Rear output To front output To rear output To subwoofer output Power amp sold separately Power amp sold separately Power amp sold separately When connecting the external video component and the display External video component sold separately Audio inputs R IN L IN Display with RCA input jacks sold separately To video input To video output To audio outputs This product RCA cables sold s...

Page 5: ...utput Rear view camera sold separately Rear view camera input R C IN Violet white Of the two lead wires connected to the back lamp connect the one in which the voltage changes when the gear shift is in the REVERSE R position This connection enables the unit to sense whether the car is moving forwards or backwards This product RCA cable sold separately Connecting the system When connecting with opt...

Page 6: ...es so they are not block ing the vents 5cm cm Leave ample space 5 cm 5 cm Before installing this unit Remove the holder 1 1 Holder factory supplied part Installation with the holder 1 Install the holder into the dashboard After inserting the holder into the dashboard se lect and bend the tabs appropriate to the thick ness of the dashboard material Install this unit as firmly as possible using the ...

Page 7: ...microphone lead into the groove 1 2 1 Microphone lead 2 Groove 2 Install the microphone clip on the sun visor With the sun visor up install the microphone clip Lowering the sun visor reduces the voice recognition rate 1 2 1 Microphone clip 2 Clamp Use separately sold clamps to secure the lead where necessary inside the vehicle When installing the microphone on the steering column 1 Detach the micr...

Page 8: ... la masse du négatif Haut parleurs avec une puissance de sortie de 50 W et une impédance de 4 W à 8 W Pour éviter un court circuit une surchauffe ou un dysfonctionnement assurez vous de respecter les instructions suivantes Déconnectez la borne négative de la batterie avant l installation Fixez le câblage avec des serre fils ou de la bande adhésive Pour protéger le câblage en roulez dans du ruban a...

Page 9: ...iolet noir Arrière droit ou caisson de grave Connecteur ISO Remarque En fonction du type de véhicule la fonction de 2 et de 4 peut différer Sans ce cas assurez vous de connecter 1 à 4 et 3 à 2 1 3 2 4 Jaune 2 Secours ou accessoire Jaune 1 Connectez à une prise d alimentation constante 12 V Connectez les câbles de la même couleur les uns aux autres Rouge 4 Accessoire ou secours Rouge 3 Connectez à ...

Page 10: ...rément Amplificateur de puissance vendu séparément Caisson de grave Caisson de grave À la sortie avant À la sortie arrière À la sortie du caisson de grave Cet appareil Sortie arrière Sortie avant Sortie du caisson de grave Lors de la connexion du composant vidéo externe et de l écran Appareil vidéo externe vendu séparément Entrée audio R IN L IN Écran muni de prises d entrée Cinch RCA vendu séparé...

Page 11: ...us près ou plus loin qu ils ne le sont en réalité À la sortie vidéo Caméra de recul vendu séparément Entrée de la caméra de recul R C IN Violet blanc Des deux conducteurs connectés au feu de recul connectez celui pour lequel la tension change quand le sélecteur de vitesse est sur la position REVERSE R Cette connexion permet à l appareil de détecter si la voiture se déplace vers l avant ou vers l a...

Page 12: ... laisser un espace important derrière la face arrière et enroulez les câbles volants de façon qu ils ne bloquent pas les orifices d aération 5cm cm Laissez suffisamment d espace 5 cm 5 cm Avant l installation de cet appareil Retirez le support 1 1 Support pièce fournie Installation avec le support 1 Installez le support dans le tableau de bord Une fois le support installé dans le tableau de bord s...

Page 13: ...qui utilise le système Si vous installez le microphone sur le pare soleil 1 Insérez le fil du microphone dans la fente 1 2 1 Fil du microphone 2 Rainure 2 Installez le clip microphone sur le pare soleil Avec le pare soleil relevé installez le clip micro phone Abaisser le pare soleil réduit le taux de reconnaissance vocale 1 2 1 Clip microphone 2 Serre fils Utilisez des serre fils vendus séparément...

Page 14: ...cendi o malfunzionamenti Veicoli dotati di batteria da 12 volt e messa a terra negativa Altoparlanti con uscita nominale da 50 W e impedenza nominale compresa tra 4 W e 8 W Per evitare rischi di cortocircuito surriscalda mento o malfunzionamento accertarsi di se guire le indicazioni riportate di seguito Prima dell installazione scollegare il morset to negativo della batteria Assicurare i cavi con ...

Page 15: ...woofer Viola nero Posteriore destro o subwoofer Nota In alcuni veicoli il connettore ISO potrebbe essere separato in due In tal caso è necessario collegare entrambi Nota In funzione del tipo di veicolo le funzione di 2 e di 4 potrebbe differire In tal caso collegare 1 a 4 e 3 a 2 1 3 2 4 Giallo 2 Retromarcia o accessorio Giallo 1 Da collegare al terminale costantemente alimentato a 12 V Collegare ...

Page 16: ...otenza venduto a parte Amplificatore di potenza venduto a parte Subwoofer Subwoofer All uscita posteriore All uscita anteriore All uscita per subwoofer Questo apparecchio Uscita posteriore Uscita anteriore Uscita per subwoofer Collegamento di un componente video esterno e del display Componente video esterno venduto a parte Ingresso audio R IN L IN Schermo con prese di ingresso di tipo RCA venduto...

Page 17: ... o distanti di quanto non siano in realtà All uscita video Ingresso alla videocamera di retromarcia R C IN Violetto bianco Dei due fili isolati collegati alla spia posteriore collegare quello nel quale cambia il voltaggio quando la leva del cambio è in posizione di REVERSE R Questo collegamento consente all unità di rilevare se l automobile si sta muovendo in avanti o all indietro Questo apparecch...

Page 18: ...unità accertarsi di lasciare ampio spazio dietro il pannello posteriore e avvolgere even tuali cavi allentati in modo che non ostrui scano le aperture 5cm cm Lasciare ampio spazio 5 cm 5 cm Prima dell installazione dell unità Rimuovere il supporto 1 1 Supporto componente montato in fabbrica Installazione utilizzando il supporto 1 Installare il supporto nel cruscotto Dopo aver inserito il supporto ...

Page 19: ...ofono sull aletta parasole 1 Inserire il cavo del microfono nella scana latura 1 2 1 Cavo del microfono 2 Scanalatura 2 Installare la clip del microfono sull aletta parasole Con l aletta parasole piegata verso l alto instal lare la clip del microfono Abbassare l aletta pa rasole riduce la percentuale di riconoscimento della voce 1 2 1 Clip del microfono 2 Morsetto Utilizzare i morsetti venduti sep...

Page 20: ...a miento Vehículos con una batería de 12 voltios y co nexión a tierra negativa Altavoces con 50 W valor de salida y 4 W a 8 W valor de impedancia Para evitar cortocircuitos sobrecalentamien to o fallos de funcionamiento asegúrese de seguir las siguientes instrucciones Desconecte el terminal negativo de la batería antes de la instalación Asegure el cableado con pinzas para cables o cinta adhesiva E...

Page 21: ...rasera o altavoz de subgraves Violeta negro Derecha trasera o altavoz de subgraves Nota En algunos vehículos puede que el conector ISO esté dividido en dos En este caso asegúrese de conectar a ambos conectores Nota Dependiendo del tipo de vehículo la función de 2 y 4 puede ser diferente En este caso asegúrese de conectar 1 a 4 y 3 a 2 1 3 2 4 Amarillo 2 Reserva o accesorio Amarillo 1 Conecte el te...

Page 22: ...aves Este producto Salida trasera Salida delantera Salida de altavoz de subgraves Amplificador de potencia vendido separadamente Amplificador de potencia vendido separadamente Altavoz de subgraves Altavoz de subgraves Conexión con el componente de vídeo externo y el display Componente de vídeo externo vendido separadamente Entrada de audio R IN L IN Pantalla con tomas de entrada RCA vendida separa...

Page 23: ...da para cámara de vista trasera R C IN Violeta blanco De los dos conductores conectados a la lámpara trasera conecte el conductor cuyo voltaje cambia cuando se desplaza la palanca de cambio de marcha a la posición REVERSE R Esta conexión permite que la unidad detecte si el vehículo está se moviendo hacia delante o hacia atrás Este producto Cable RCA vendido separadamente Cámara de vista trasera ve...

Page 24: ...ueltos de modo que no bloqueen las aberturas de ventilación 5cm cm Deje un amplio espacio 5 cm 5 cm Antes de instalar esta unidad Retire el soporte 1 1 Soporte pieza suministrada de fábrica Instalación con el soporte 1 Instale el soporte en el panel Después de insertar el soporte en el panel se leccione las pestañas que se acoplen al espesor del material del panel y dóblelas instale esta unidad ta...

Page 25: ...del micrófono 2 Ranura 2 Instale la abrazadera del micrófono en el parasol Levante el parasol e instale la pinza del micrófo no si lo baja reduce la capacidad del reconoci miento de voz 1 2 1 Pinza 2 Abrazadera Use las abrazaderas compradas por separado para fijar el cable en los lugares del interior del vehículo donde sea necesario Instalación del micrófono en la columna de dirección 1 Suelte la ...

Page 26: ...Lautsprecher mit 50 W Ausgabe und 4 W bis 8 W Impedanz Um Kurzschluss Überhitzung oder Funk tionsstörungen zu vermeiden halten Sie sich stets an die nachstehend aufgeführten An weisungen Trennen Sie die Verbindung zur negativen An schlussklemme der Fahrzeugbatterie bevor Sie das Gerät installieren Sichern Sie die Kabel mit Kabelklemmen oder Klebeband Zum Schutz der Verkabe lung sollten die Kabel a...

Page 27: ...is Bei einigen Fahrzeugen kann der ISO Steckverbinder in zwei Hälften geteilt sein In diesem Fall ist der Anschluss unbedingt an beiden Steckverbindern vorzunehmen Hinweis Je nach Art des Fahrzeugs besitzen 2 und 4 u U unterschiedliche Funktionen Verbinden Sie in einem solchen Fall 1 mit 4 und 3 mit 2 1 3 2 4 Gelb 2 Reserve oder Zubehör Gelb 1 An eine Stromversorgung anschließen die immer Gleichst...

Page 28: ...ennt erhältlich Leistungsverstärker getrennt erhältlich Subwoofer Subwoofer Zum hinteren Ausgang Zum vorderen Ausgang Zum Subwoofer Ausgang Dieses Produkt Hinterer Ausgang Vorderer Ausgang Subwoofer Ausgang Bei Anschluss der externen Videokomponente mit dem Display Externe Video Komponente getrennt erhältlich Audio Eingang R IN L IN Display mit RCA Eingangsbuchsen getrennt erhältlich Zu Video Eing...

Page 29: ... tatsächlich sind Zu Video Ausgang Rückwärtskamera getrennt erhältlich Rückwärtskamera Eingang R C IN Violett Weiß Von den beiden Zuleitungskabeln die an den Rückfahrscheinwerfer angeschlossen sind schließen Sie das an bei dem sich die Spannung ändert wenn der REVERSE R eingelegt wird Durch diesen Anschluss kann die Einheit erkennen ob der Wagen vorwärts oder rückwärts fährt Dieses Produkt RCA Kab...

Page 30: ...en ist bei der Installation genügend Freiraum hinter der Rückseite vorzusehen Lose Kabel sind aufzuwickeln damit sie die Lüftung nicht behindern 5cm cm Reichlich Platz lassen 5 cm 5 cm Vor dem Anbringen dieser Einheit Nehmen Sie die Halterung ab 1 1 Halterung werkseitig mitgelieferte Teile Installation mit Halterung 1 Bringen Sie die Halterung am Armaturen brett an Wählen und biegen Sie nach dem E...

Page 31: ...er Stimme der das System bedienenden Person ermöglicht Befestigen des Mikrofons an der Sonnenblende 1 Führen Sie das Mikrofonkabel durch die Nute 1 2 1 Mikrofonkabel 2 Nute 2 Befestigen Sie den Mikrofonclip an der Sonnenblende Bringen Sie den Mikrofonclip bei hochgeklapp ter Sonnenblende an Durch das Herunterklap pen der Sonnenblende wird die Erfassungsrate bei der Sprachbedienung reduziert 1 2 1 ...

Page 32: ...heden dan de volgende kan leiden tot brand of storingen Voertuigen met een accu van 12 volt en nega tieve aarding Luidsprekers van 50 W uitgangswaarde en 4 W tot 8 W impedantiewaarde Om kortsluiting oververhitting en storingen te voorkomen moet u onderstaande aanwij zingen opvolgen Koppel de negatieve aansluiting van de accu los voordat u het toestel installeert Gebruik kabelklemmen of plakband om...

Page 33: ... sommige voertuigen kan de ISO stekker in twee stukken gedeeld zijn Sluit in een dergelijk geval beide stekkers aan Opmerking Afhankelijk van het soort voertuig is het mogelijk dat de functies van 2 en 4 verschillen Let er in een dergelijk geval op dat u 1 op 4 en 3 op 2 aansluit 1 3 2 4 Geel 2 Back up of accessoire Geel 1 Verbinden met de continue 12 V stroomaansluiting Sluit in het algemeen drad...

Page 34: ...os verkrijgbaar Eindversterker los verkrijgbaar Subwoofer Subwoofer Naar vooruitgang Naar achteruitgang Naar subwoofer uitgang Dit product Achteruitgang Vooruitgang Subwoofer uitgang Het externe videoapparaat op het scherm aansluiten Externe videocomponent los verkrijgbaar Audio ingang R IN L IN Display met RCA tulp ingangsaansluitingen los verkrijgbaar Naar de video ingangsaansluiting Naar video ...

Page 35: ...etjes Voorwerpen in het achteruitzicht lijken moge lijk dichterbij of verder weg dan ze in werke lijkheid zijn Ingang achteruitkijk camera R C IN Paars wit Van de twee draden van de achteruitrijlamp moet u de draad verbinden waarvan het voltage verandert wanneer de versnellingspook in REVERSE R wordt gezet Middels deze verbinding kan het apparaat waarnemen of de auto vooruit of achteruit rijdt Dit...

Page 36: ...armte goed wordt afgevoerd tijdens gebruik van het toestel 5cm cm Laat voldoende ruimte vrij 5 cm 5 cm Voordat u het toestel monteert Verwijder de houder 1 1 Houder meegeleverd onderdeel Installatie met de houder 1 Monteer de houder in het dashboard Nadat u de houder in het dashboard geplaatst hebt kiest en buigt u lipjes die geschikt zijn voor de dikte van het dashboardmateriaal Monteer dit toest...

Page 37: ... 1 Zet de microfoonkabel vast in de groef 1 2 1 Microfoonkabel 2 Groef 2 Plaats de microfoonklem op de zonne klep Installeer de microfoonklem terwijl de zonneklep omhoog staat Als u de zonneklep lager zet ver mindert de herkenning bij stemopdrachten 1 2 1 Microfoonklem 2 Klem Gebruik waar nodig los verkrijgbare klemmen om de kabel in het voertuig vast te zetten Als u de microfoon op de stuurkolom ...

Page 38: ...38 Nl ...

Page 39: ...Nederlands 39 Nl ...

Page 40: ...co Lane Heatherton Victoria 3202 Australia TEL 03 9586 6300 PIONEER ELECTRONICS OF CANADA INC 340 Ferrier Street Unit 2 Markham Ontario L3R 2Z5 Canada TEL 1 877 283 5901 TEL 905 479 4411 PIONEER ELECTRONICS DE MEXICO S A de C V Blvd Manuel Avila Camacho 138 10 piso Col Lomas de Chapultepec Mexico D F 11000 TEL 55 9178 4270 先鋒股份有限公司 台北市內湖區瑞光路407號8樓 電話 886 0 2 2657 3588 先鋒電子 香港 有限公司 香港九龍長沙灣道909號5樓 電...

Reviews: