AVH-P5150DVD/XN/RC
80
1
2
3
4
1
2
3
4
C
D
F
A
B
E
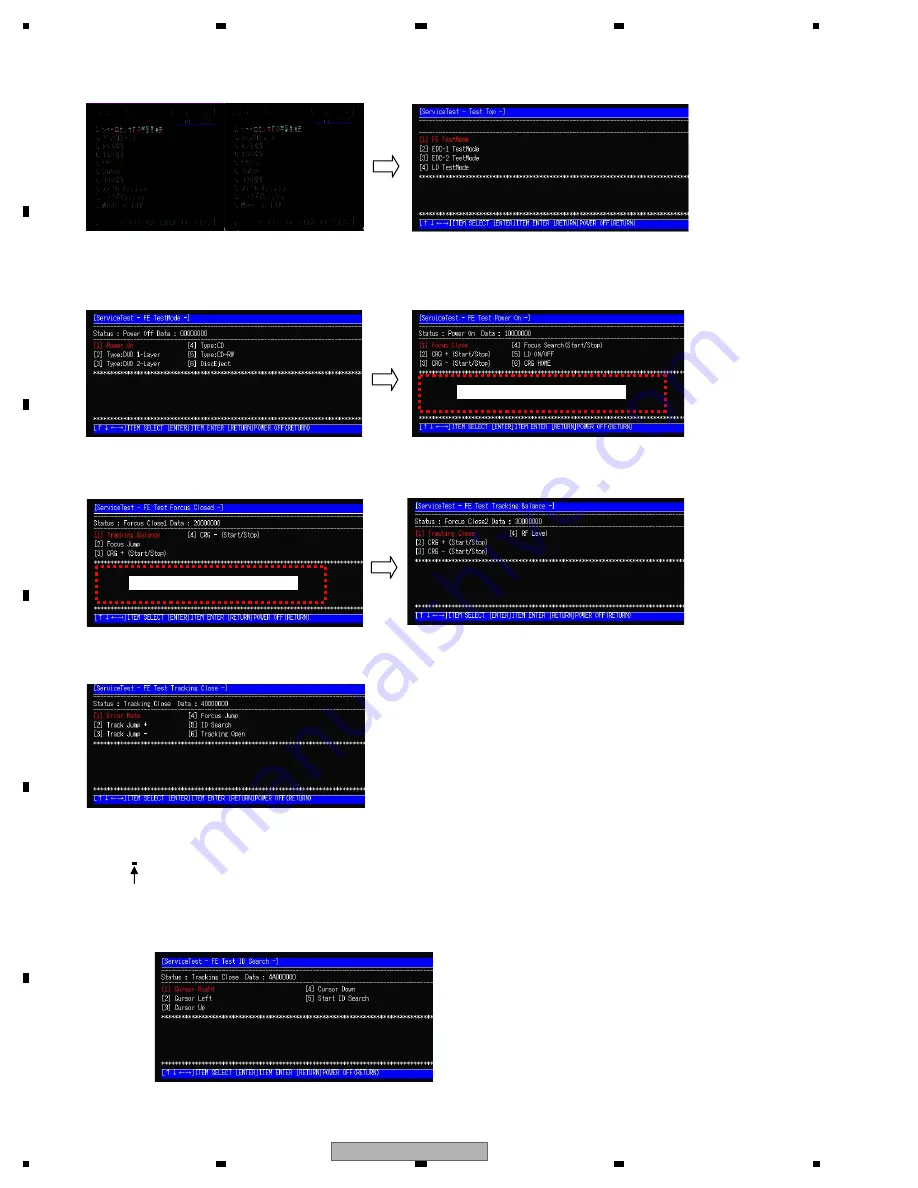
4. From ServMecha , select DVD-1 layer in FE Test Mode (Front End Test Mode).
(For the details of the test mode, refer to ServMecha in the test mode menu in "6. Test Mode")
5. Select Power On, and after the automatic offset adjustment is completed, move the pickup to the inner
periphery (CRG-Home).
After turning on LD by selecting LD ON/OFF, select Focus Close to close the focus.
6. After the automatic adjustment is completed in FE Test Focus Close screen, select T.Bal.
After the automatic adjustment, select Tracking Close to close the tracking.
7. Use ID Search to perform middle periphery (ID: 100000) search to move PU to the middle periphery.
Explanation of ID Search
ID: 4A000000
[Example]
To search ID: 40000, select [2] Cursor Left and press [Enter] for 5 times to move
the cursor to the 5th digit, and select [3] Cursor Up and press [Enter] for 4 times.
When the display is changed to ID: 40000, select [5] Start ID Search and press [Enter].
* If Search operation is failed, please restart from the top menu of ServMecha in the test mode.
The value after the automatic offset adjustment is displayed.
The value after the automatic adjustment is displayed.
Summary of Contents for AVH-P5150DVD
Page 21: ...AVH P5150DVD XN RC 21 5 6 7 8 5 6 7 8 C D F A B E ...
Page 60: ...AVH P5150DVD XN RC 60 1 2 3 4 1 2 3 4 C D F A B E ...
Page 61: ...AVH P5150DVD XN RC 61 5 6 7 8 5 6 7 8 C D F A B E ...
Page 114: ...AVH P5150DVD XN RC 114 1 2 3 4 1 2 3 4 C D F A B E 9 4 EXTERIOR 3 C C B A I C B A ...
Page 143: ...AVH P5150DVD XN RC 143 5 6 7 8 5 6 7 8 C D F A B E D b D a D a 1 2 D b1 2 CWW1763 ...
Page 147: ...AVH P5150DVD XN RC 147 5 6 7 8 5 6 7 8 C D F A B E ...
Page 165: ...AVH P5150DVD XN RC 165 5 6 7 8 5 6 7 8 C D F A B E L K J K SWITCH PCB UNIT L VOLUME PCB UNIT ...
Page 175: ...AVH P5150DVD XN RC 175 5 6 7 8 5 6 7 8 C D F A B E D SIDE A 0 50 60 70 80 90 A CN801 UNIT E ...
Page 176: ...AVH P5150DVD XN RC 176 1 2 3 4 1 2 3 4 C D F A B E D D DVD CORE UNIT 50 60 70 80 90 E ...


