< CRD4846-A >
English
9
En
Leave ample
space
5 cm
5 cm
■
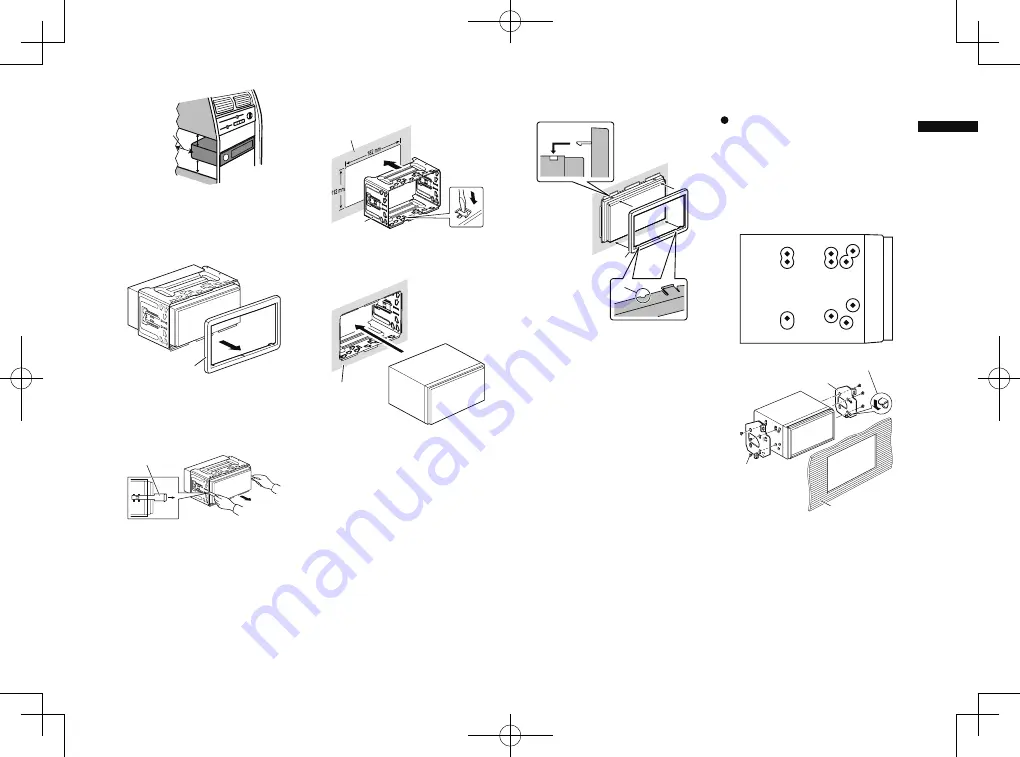
Before installing this product
1 Remove the trim ring.
Extend top and bottom of the trim ring
outwards to remove the trim ring.
1
1
Trim ring
2 Insert the supplied extraction keys
into both sides of the unit until
they click into place.
3 Pull the unit out of the holder.
1
1
Extraction key
■
Installation with the holder
1 Install the holder into the
dashboard.
2 Secure the mounting sleeve by
using a screwdriver to bend the
metal tabs (90°) into place.
1
2
1
Dashboard
2
Holder
3 Install this product into the holder.
1
1
Dashboard
4 Attach the trim ring.
1
2
1
Trim ring
2
Groove
Attach the trim ring with the side with a
groove facing downward.
■
Installation using the screw
holes on the side of this product
Fastening this product to the fac-
tory radio-mounting bracket.
Position this product so that its screw holes
are aligned with the screw holes of the
bracket, and tighten the screws at three
locations on each side.
Use either the truss head screws (5 mm
× 8 mm) or flush surface screws (5 mm
× 9 mm), depending on the shape of the
bracket’s screw holes.
If the pawl interferes with installation,
you may bend it down out of the way.
1
2
3
1
Factory radio-mounting bracket
2
Dashboard or console
3
Truss head screw or flush surface screw
Be sure to use the screws supplied with
this product.
CRD4846-A̲9
Summary of Contents for AVH-X8700BT
Page 11: ... CRD4846 A English 11 En CRD4846 A 11 ...
Page 21: ... CRD4846 A Français 11 Fr CRD4846 A 21 ...
Page 31: ... CRD4846 A Italiano 11 It CRD4846 A 31 ...
Page 41: ... CRD4846 A Español 11 Es CRD4846 A 41 ...
Page 61: ...Nederlands 11 Nl CRD4846 A 61 ...
Page 62: ...CRD4846 A 62 ...
Page 63: ...CRD4846 A 63 ...


