English
English
WARNING
• Keep the lithium battery out of reach of children.
Should the battery be swallowed, immediately consult
a doctor.
• Avoid installing this unit where it could interfere with
the operation of the steering wheel or gearshift lever or
an accident could result.
• Do not operate this unit while handling the steering
wheel. Or it might result in an accident.
• If you must operate this unit while driving, do not take
your eyes off the road or an accident could result.
• If any of the following problems occur, immediately
stop using this unit and consult your dealer from
whom you purchased this unit:
– smoke coming from the unit.
– abnormal odors or smells.
– a foreign object has entered the unit.
– liquid has been spilled on or into the unit.
If you continue to use the unit when it is not operating
properly, damage could result in an accident or fire.
CAUTION
• Do not recharge, disassemble, heat or dispose of
battery in fire.
• Use a CR2032 (3 V) lithium battery only. Never use
other types of battery with this unit.
• Do not handle the battery with metallic tools.
• Do not store the lithium battery with metallic materi-
als.
• When disposing of used batteries, please comply with
governmental regulations or environmental public
institution’s rules that apply in your country/area.
• Always check carefully that you are loading battery
with its (+) and (–) poles facing in the proper direc-
tions.
• Install this unit using only the parts supplied with this
unit. If other parts are used, this unit may be damaged
or dismounted itself, which leads to an accident or
trouble.
• Install this unit as required by this manual. Failure to
do so may cause an accident.
• Do not install this unit near the doors where rainwater
is likely to be spilled on the unit. Incursion of water
into the unit may cause smoking or fire.
• Keep the volume of the car audio at a level so that
sounds from outside the car can still be heard. If you
cannot hear sounds from outside the car your chances
of being involved in an accident are increased.
• Do not leave this unit free inside the car. When the car
stops or turns a curve, the unit might drop on the floor.
If the unit rolls and gets under the brake pedal, it
might prevent the driver from braking well, causing a
serious trouble. Be sure to fix this unit to the steering
wheel.
• Do not disassemble or modify this unit. To do so may
cause a fault.
WARNING
Handling the cord on this product or cords associated with accessories sold with the product may
expose you to chemicals listed on proposition 65 known to the State of California and other govern-
mental entities to cause cancer and birth defects or other reproductive harm.
Wash hands after han-
dling.
This device complies with part 15 of the FCC Rules. Operation is subject to the following two condi-
tions:
(1) This device may not cause harmful interference, and (2) this device must accept any interference
received, including interference that may cause undesired operation.
Information to User
Alteration or modifications carried out without appropriate authorization may invalidate the user's
right to operate the equipment.
w
q
r
t
i
u
y
e
Fig. 1
Abb. 1
Afb. 1
êËÒ. 1
Fig. 2
Abb. 2
Afb. 2
êËÒ. 2
PIONEER CORPORATION
4-1, MEGURO 1-CHOME, MEGURO-KU, TOKYO 153-8654, JAPAN
PIONEER ELECTRONICS (USA) INC.
P.O. Box 1540, Long Beach, California 90801-1540, U.S.A.
TEL: (800) 421-1404
PIONEER EUROPE NV
Haven 1087, Keetberglaan 1, B-9120 Melsele, Belgium
TEL: (0) 3/570.05.11
PIONEER ELECTRONICS ASIACENTRE PTE. LTD.
253 Alexandra Road, #04-01, Singapore 159936
TEL: 65-6472-7555
PIONEER ELECTRONICS AUSTRALIA PTY. LTD.
178-184 Boundary Road, Braeside, Victoria 3195, Australia
TEL: (03) 9586-6300
PIONEER ELECTRONICS OF CANADA, INC.
300 Allstate Parkway, Markham, Ontario L3R OP2, Canada
TEL: 1-877-283-5901
PIONEER ELECTRONICS DE MEXICO, S.A. de C.V.
Blvd. Manuel Avila Camacho 138 10 piso
Col. Lomas de Chapultepec, Mexico, D.F. 11000
TEL: 55-9178-4270
Published by Pioneer Corporation.
Copyright © 2006 by Pioneer Corporation.
All rights reserved.
Publication de Pioneer Corporation.
Copyright © 2006 Pioneer Corporation.
Tous droits de reproduction et de traduction
réservés.
Printed in China
Imprimé en Chine
<CZR5048-A> E
< KOKNX > < 06B00000 >
STEERING REMOTE CONTROLLER
TELECOMMANDE AU VOLANT
Owner’s Manual
Mode d’emploi
CD-SR1
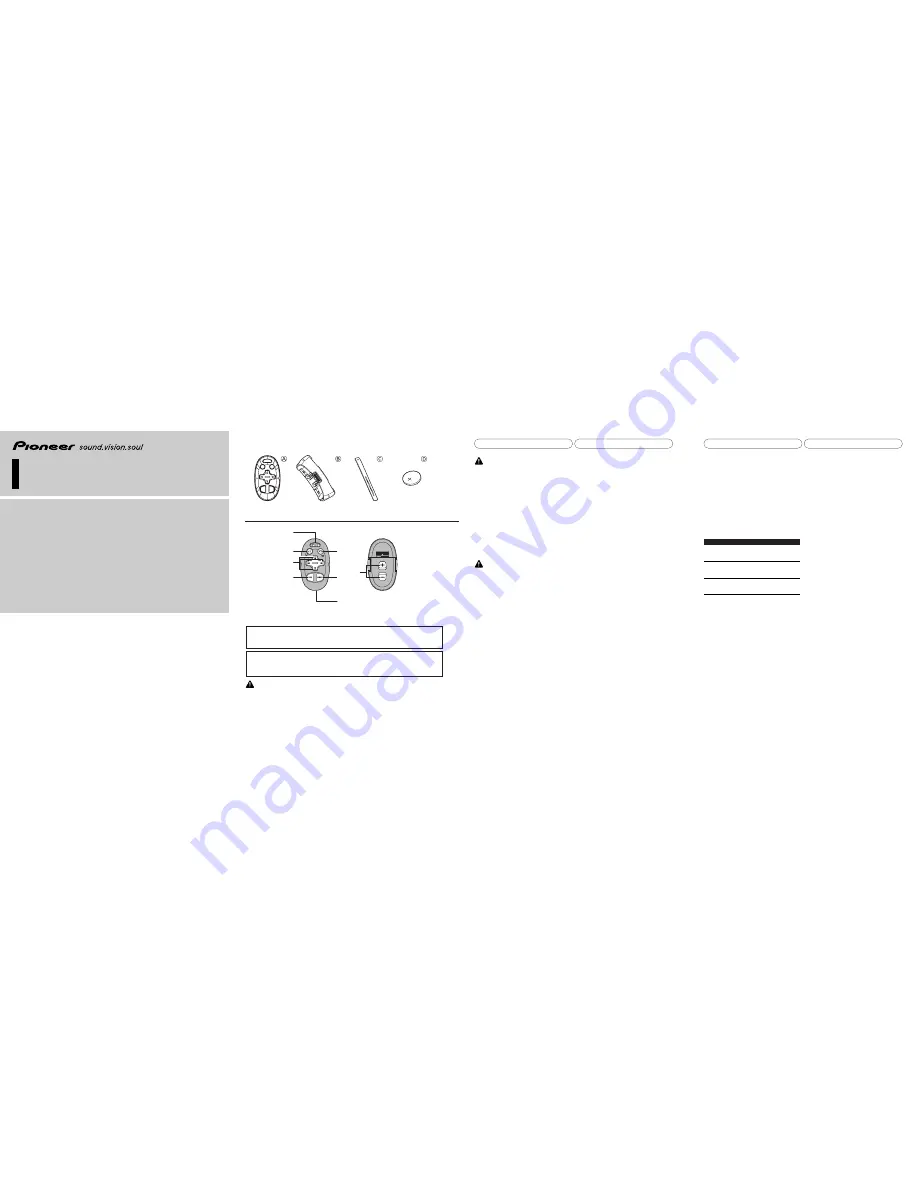
Accessories (Fig. 1)
A
Remote control unit
×
1
B
Holder
×
1
C
Belt
×
2
D
Lithium battery (CR2032, 3V)
×
1
Key Finder (Fig. 2)
PHONE MENU button*
MODE 1:
Switches to the mode to operate a Bluetooth unit.
(Refer to the operation manual of your navigation
system.)
MODE 3:
Press to select the phone as the source.
VR ACTIVATION / OFF HOOK button*
MODE 1:
• Starts voice recognition.
• Sets the phone function to the OFF HOOK status.
(Refer to the operation manual of your navigation
system.)
MODE 3:
Press to start talking on the phone while operating a
phone source.
VR CANCEL / ON HOOK button*
MODE 1:
• Cancels voice recognition.
• Sets the phone function to the ON HOOK status.
(Refer to the operation manual of your navigation
system.)
MODE 3:
While operating a phone source, press to end a phone
call or reject an incoming call.
5
/
∞
/
2
/
3
button
Operates the same as the Head Unit‘s or Navigation
Unit‘s
5
/
∞
/
2
/
3
button or the Joystick.
BAND/ESC button
This functions as the BAND button (or BAND touch
key) when using different sources.
SOURCE button
Switches between sources and switches power
ON/OFF. (Depending on the connected units, opera-
tion may differ slightly.)
Transmitter
This transmits the remote control signals.
+/– button
The Pioneer audio source sound volume can be
adjusted.
* The phone function is available only when a Bluetooth
unit is connected.
Operation mode
By switching the Operation mode (MODE 1, MODE 2,
MODE 3) you can use one remote control to operate
different equipment.
MODE 1 :
Used when you operate HDD navigation systems (e.g.
AVIC-HD1BT, AVIC-Z1).
MODE 2 :
Will be used in future products.
MODE 3 :
Used when you operate the Pioneer Head Unit.
Before you begin, set the Operation mode switching
method.
The Operation mode switching changes in accordance
with the settings below.
Switching method
Setting method
MODE 1*
Press the VR CANCEL/ON
HOOK button while pressing
the
2
button.
MODE 2
Press the VR CANCEL/ON
HOOK button while pressing
the SOURCE button.
MODE 3
Press the SOURCE button
while pressing the
2
button.
* Default


