background image

Connections

WARNING

!

Use speakers over 50 W (output value) and be-
tween 4

W

to 8

W

(impedance value). Do not

use 1

W

to 3

W

speakers for this unit.

!

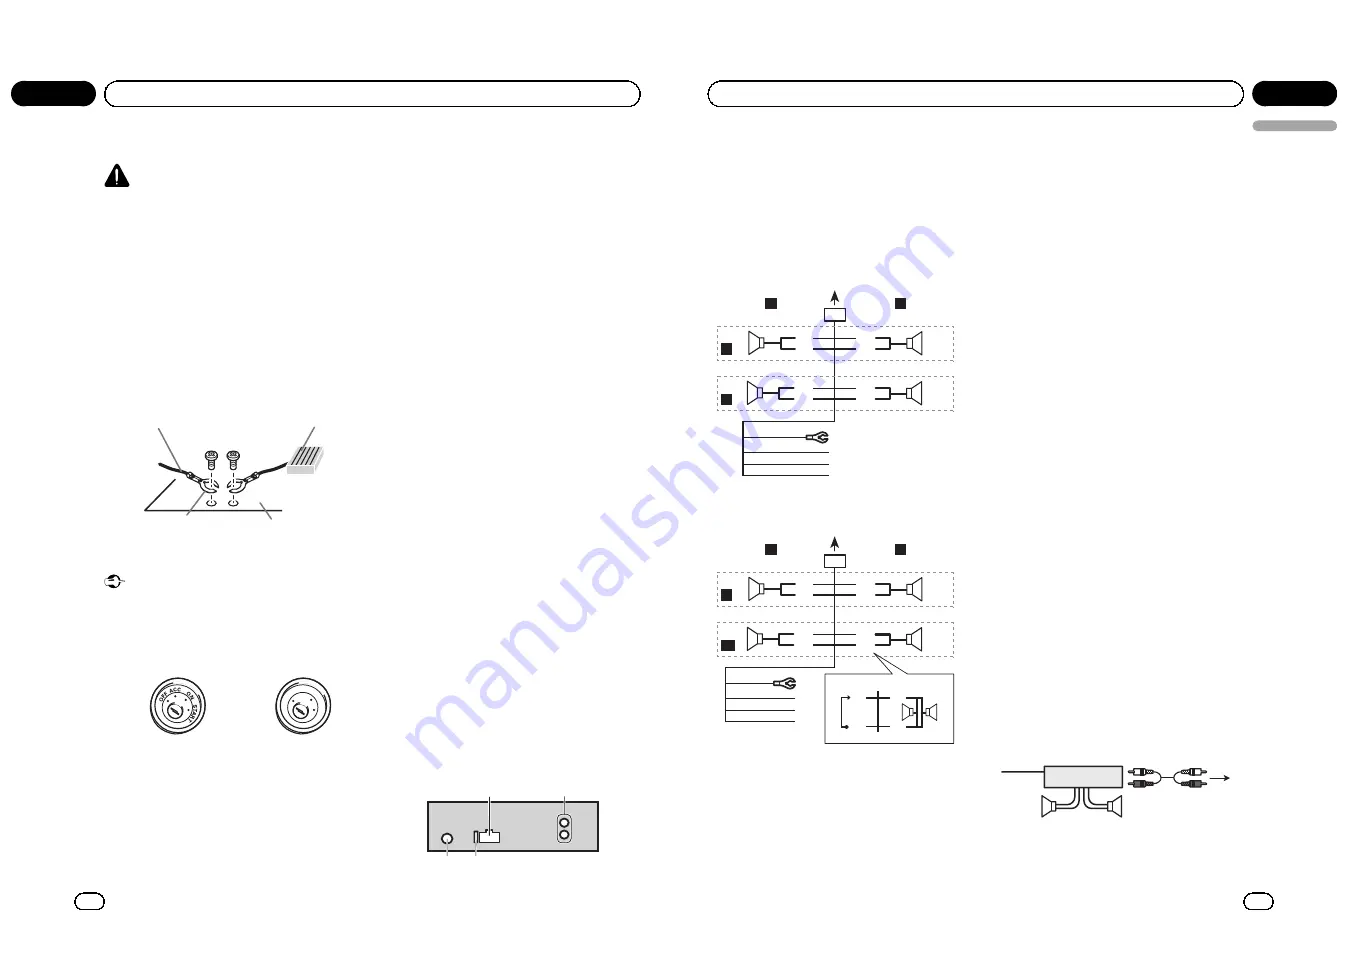
The black cable is ground. When installing
this unit or power amp (sold separately), make
sure to connect the ground wire first. Ensure
that the ground wire is properly connected to
metal parts of the car

s body. The ground wire

of the power amp and the one of this unit or
any other device must be connected to the car
separately with different screws. If the screw
for the ground wire loosens or falls out, it
could result in fire, generation of smoke or
malfunction.

Ground wire

Metal parts of car’s body

POWER AMP

Other devices
(Another electronic
 device in the car)

Important

!

When installing this unit in a vehicle without
an ACC (accessory) position on the ignition
switch, failure to connect the red cable to the
terminal that detects operation of the ignition
key may result in battery drain.

ON

S

T

A

R

T

O

FF

ACC position

No ACC position

!

Use this unit with a 12-volt battery and nega-
tive grounding only. Failure to do so may result
in a fire or malfunction.

!

To prevent a short-circuit, overheating or mal-
function, be sure to follow the directions
below.

Disconnect the negative terminal of the
battery before installation.

Secure the wiring with cable clamps or ad-
hesive tape. Wrap adhesive tape around
wiring that comes into contact with metal
parts to protect the wiring.

Place all cables away from moving parts,
such as the gear shift and seat rails.

Place all cables away from hot places,
such as near the heater outlet.

Do not connect the yellow cable to the bat-
tery by passing it through the hole to the
engine compartment.

Cover any disconnected cable connectors
with insulating tape.

Do not shorten any cables.

Never cut the insulation of the power cable
of this unit in order to share the power
with other devices. The current capacity of
the cable is limited.

Use a fuse of the rating prescribed.

Never wire the negative speaker cable di-
rectly to ground.

Never band together negative cables of
multiple speakers.

!

When this unit is on, control signals are sent
through the blue/white cable. Connect this
cable to the system remote control of an exter-
nal power amp or the vehicle

s auto-antenna

relay control terminal (max. 300 mA 12 V DC).
If the vehicle is equipped with a glass anten-
na, connect it to the antenna booster power
supply terminal.

!

Never connect the blue/white cable to the
power terminal of an external power amp.
Also, never connect it to the power terminal of
the auto antenna. Doing so may result in bat-
tery drain or a malfunction.

This unit

1

3

4

2

En

12

Section

02

Installation

1

Power cord input

2

Rear output or subwoofer output

3

Antenna input

4

Fuse (10 A)

Power cord

Perform these connections when not connect-
ing a rear speaker lead to a subwoofer.

1

8
9

c
d

6

3

2

4

5

7

a
b

e
f

h

g

L

R

F

R

Perform these connections when using a sub-
woofer without the optional amplifier.

1

8
9

c
d

6

3

2

4

7

a
b

a

b

e
f

h

g

L

R

F

SW

i

j

d

c

k

l

1

To power cord input

2

Left

3

Right

4

Front speaker

5

Rear speaker

6

White

7

White/black

8

Gray

9

Gray/black

a

Green

b

Green/black

c

Violet

d

Violet/black

e

Black (chassis ground)
Connect to a clean, paint-free metal location.

f

Yellow
Connect to the constant 12 V supply terminal.

g

Red
Connect to terminal controlled by ignition
switch (12 V DC).

h

Blue/white
Connect to system control terminal of the
power amp or auto-antenna relay control
terminal (max. 300 mA 12 V DC).

i

Subwoofer (4

Ω

)

j

When using a subwoofer of 70 W (2

Ω

), be

sure to connect the subwoofer to the violet
and violet/black leads of this unit. Do not con-
nect anything to the green and green/black
leads.

k

Not used.

l

Subwoofer (4

Ω

)× 2

Notes

!

With a 2 speaker system, do not connect any-
thing to the speaker leads that are not con-
nected to speakers.

!

Change the initial setting of this unit. Refer to

SW CONTROL

(rear output and subwoofer set-

ting)

on page 10.

The subwoofer output of this unit is monaural.

Power amp (sold separately)

Perform these connections when using the
optional amplifier.

1

3

2

4

5

5

1

System remote control
Connect to Blue/white cable.

En

13

English

Section

02

Installation

<CRD4529-A/S>

7

Summary of Contents for DEH-23UB

Page 1: ...Español Français English Owner s Manual Mode d emploi Manual de instrucciones DEH 23UB CD RDS RECEIVER AUTORADIO CD RDS REPRODUCTOR DE CD CON RECEPTOR RDS CRD4529 A S 1 ...

Page 2: ...XPOSURE CAUTION THE USE OF OPTICAL INSTRUMENTS WITH THIS PRODUCT WILL INCREASE EYE HAZARD En 2 Presection Before You Start CAUTION Do not allow this unit to come into contact with liquids Electrical shock could result Also damage to this unit smoke and over heating could result from contact with liquids Always keep the volume low enough to hear outside sounds Avoid exposure to moisture If the batt...

Page 3: ...g oper ated 5 artist The disc track artist name is dis played 6 disc The disc album name is dis played 7 song The track song name is dis played A playable audio file has been se lected during operation of the list 8 LOC Local seek tuning is on 9 repeat Track or folder repeat is on a ran dom Random play is on b sound re triever The sound retriever function is on Basic Operations Important Handle ge...

Page 4: ...ss Returning to the main menu Returning to the top tier of list 1 Press and hold En 6 Section 01 Operating this unit Returning to the ordinary display Canceling the initial setting menu 1 Press B BAND ESC Returning to the ordinary display from the list 1 Press B BAND ESC Tuner Basic Operations Selecting a band 1 Press B BAND ESC until the desired band F1 F2 F3 for FM or AM is displayed Manual tuni...

Page 5: ... repeat play range For details refer to Selecting a repeat play range on the previous page 3 Press M C to confirm the selection RANDOM random play 1 Press M C to turn random play on or off PAUSE pause 1 Press M C to pause or resume S RTRV sound retriever Automatically enhances compressed audio and re stores rich sound 1 Press M C to display the setting mode 2 Turn M C to select the desired setting...

Page 6: ...tically Please change the source to USB manually SW CONTROL rear output and subwoofer setting The rear speaker leads output and RCA output can be used for full range speaker or subwoofer connection If you switch to REAR SP SW you can connect a rear speaker lead directly to a subwoofer without using an auxiliary amp Initially REAR SP is set for rear full range speaker connection FUL 1 Press M C to ...

Page 7: ...ble di rectly to ground Never band together negative cables of multiple speakers When this unit is on control signals are sent through the blue white cable Connect this cable to the system remote control of an exter nal power amp or the vehicle s auto antenna relay control terminal max 300 mA 12 V DC If the vehicle is equipped with a glass anten na connect it to the antenna booster power supply te...

Page 8: ...o place 1 2 1 Dashboard 2 Mounting sleeve 3 Install the unit as illustrated 1 2 3 4 5 1 Nut 2 Firewall or metal support 3 Metal strap 4 Screw 5 Screw M4 8 Make sure that the unit is installed securely in place An unstable installation may cause skip ping or other malfunctions DIN Rear mount 1 Determine the appropriate position where the holes on the bracket and the side of the unit match En 14 Sec...

Page 9: ...e USB sto rage device FRMT READ Sometimes there is a delay be tween the start of playback and when you start to hear any sound Wait until the mes sage disappears and you hear sound En 16 Appendix Additional Information Message Cause Action NO AUDIO There are no songs Transfer the audio files to the USB storage device and connect The connected USB storage de vice has security enabled Follow the USB...

Page 10: ... MS ADPCM Sampling frequency 16 kHz to 48 kHz LPCM 22 05 kHz and 44 1 kHz MS ADPCM En 18 Appendix Additional Information Supplemental information Only the first 32 characters can be displayed as a file name including the file extension or a folder name This unit may not operate correctly depending on the application used to encode WMA files There may be a slight delay at the start of playback of a...

Page 11: ...4 W load both channels driven Load impedance 4 W 4 W to 8 W allowable Preout maximum output level 2 0 V Tone controls Bass Frequency 100 Hz Gain 12 dB Mid Frequency 1 kHz Gain 12 dB Treble Frequency 10 kHz Gain 12 dB Subwoofer mono Frequency 50 63 80 100 125 Hz Slope 18 dB oct Gain 6 dB to 24 dB Phase Normal Reverse CD player System Compact disc audio system Usable discs Compact disc Signal to noi...

Page 12: ...tendre les sons pro venant de l extérieur Évitez tout contact avec l humidité Si la batterie est débranchée ou déchargée le contenu de la mémoire sera effacé Remarque Les opérations de réglage des fonctions sont vali dées même si le menu est annulé avant la confir mation des opérations Fr 22 Présection Avant de commencer Mode de démonstration Important La non connexion du fil rouge ACC de cet appa...

Page 13: ...ier ou de menu existe 3 d Un niveau inférieur de dossier ou de menu existe 4 liste La fonction liste est utilisée 5 artiste Le nom de l artiste du disque de la plage s affiche 6 disque Le nom du disque de l album s affiche 7 plage musicale Le nom de la plage plage musi cale s affiche Un fichier audio pouvant être lu est sélectionné pendant l utilisa tion de la fonction liste 8 LOC L accord automat...

Page 14: ...irecte du soleil Ne laissez pas la télécommande tomber sur le plancher où elle pourrait gêner le bon fonc tionnement de la pédale de frein ou d accélérateur Fr 26 Section 01 Utilisation de l appareil Opérations communes des menus pour les réglages des fonctions réglages audio réglages initiaux listes Retour à l affichage précédent Retour à la liste précédente le dossier de niveau im médiatement su...

Page 15: ...vant être modi fiées dépendent du média Sélection et lecture des fichiers plages à partir de la liste des noms 1 Appuyez sur pour passer en mode liste des noms de fichiers plages Fr 28 Section 01 Utilisation de l appareil 2 Utilisez M C pour sélectionner le nom de fichier ou nom de dossier désiré Modification du nom de fichier ou de dossier 1 Tournez M C Lecture 1 Lorsqu un fichier ou une plage es...

Page 16: ...ection 01 Utilisation de l appareil SLA réglage du niveau de la source La fonction SLA réglage du niveau de la source per met d ajuster les niveaux sonores de chaque source afin d éviter que ne se produisent de fortes variations d amplitude sonore lorsque vous passez d une source à l autre Les réglages sont basés sur le niveau du volume FM qui lui demeure inchangé Le niveau du volume AM peut égale...

Page 17: ...re ou tombe il peut en résulter un in cendie de la fumée ou un dysfonctionne ment Important Lors de l installation de cet appareil dans un véhicule sans position ACC accessoire sur le contacteur d allumage ne pas connecter le câble rouge à la borne qui détecte l utilisation de la clé de contact peut entraîner le déchar gement de la batterie O N S T A R T O F F Avec position ACC Sans position ACC U...

Page 18: ...ys tème de l amplificateur de puissance ou à la broche de commande du relais de l antenne automatique max 300 mA 12 V CC i Haut parleur d extrêmes graves 4 Ω j Lors de l utilisation d un haut parleur d extrê mes graves de 70 W 2 Ω assurez vous de connecter le haut parleur d extrêmes graves aux fils violet et violet noir de cet appareil Ne connectez aucun périphérique aux fils vert et vert noir k N...

Page 19: ...ppropriée où les trous sur le support et sur le côté de l appareil se correspondent 2 Serrez deux vis de chaque côté 1 2 3 1 Vis 2 Support de montage 3 Tableau de bord ou console Utilisez des vis à tête bombée 5 mm 8 mm ou des vis en affleurement 5 mm 9 mm selon la forme des trous de vis dans le support Fr 36 Section 02 Installation Retrait de l appareil 1 Retirez l anneau de garniture 1 Anneau de...

Page 20: ... sur le disque in séré intègrent la protection par DRM Utilisez un autre disque Fr 38 Annexe Informations complémentaires Périphérique de stockage USB Message Causes possi bles Action corrective NO DEVICE Quand la fonc tion Plug and Play est hors ser vice aucun péri phérique de stockage USB n est connecté Mettez la fonc tion Plug and Play en service Connectez un pé riphérique de stoc kage USB comp...

Page 21: ...nir d utiliser des DualDiscs avec cet appareil Pour des informations plus détaillées sur les Dual Discs veuillez vous reporter aux informations four nies par le fabricant des disques Fr 40 Annexe Informations complémentaires Formats audio compressés compatibles disque USB WMA Extension de fichier wma Débit binaire 48 kbit s à 320 kbit s CBR 48 kbit s à 384 kbit s VBR Fréquence d échantillonnage 32...

Page 22: ...re une technologie détenue par Microsoft Corporation qui ne peut être uti lisée et distribuée que sous licence de Microsoft Licensing Inc Fr 42 Annexe Informations complémentaires Caractéristiques techniques Généralités Tension d alimentation 14 4 V CC 10 8 V à 15 1 V acceptable Mise à la masse Pôle négatif Consommation maximale 10 0 A Dimensions L H P DIN Châssis 178 mm 50 mm 165 mm Panneau avant...

Page 23: ...ague el modo de demostración seguirá activado Para cancelar el modo de demostración utilice la función del menú de ajuste inicial Si utiliza el modo de demostración cuando la llave de en cendido está en ACC se puede descargar la batería Servicio posventa para productos Pioneer Póngase en contacto con el concesionario o distribuidor al que compró esta unidad para obtener el servicio posventa inclui...

Page 24: ...r 3 d Existe un nivel carpeta o menú inferior 4 lista Se está utilizando la función de la lista 5 artista Se muestra el nombre del artista del disco pista 6 disco Se muestra el nombre del disco álbum 7 can ción Se muestra el nombre de la pista canción Se ha seleccionado un archivo de audio reproducible mientras se examinaba la lista 8 LOC La sintonización por búsqueda local está activada 9 repeti ...

Page 25: ...le que el mando a distancia no fun cione correctamente si lo expone a la luz solar directa No deje caer el mando a distancia al suelo ya que puede quedar atascado debajo del freno o del acelerador Es 48 Sección 01 Utilización de esta unidad Las operaciones del menú son idénticas para los ajustes de función ajustes de audio ajustes iniciales listas Para volver a la visualización anterior Para volve...

Page 26: ...os archivos o las carpe tas de la carpeta seleccionada 1 Tras seleccionar una carpeta pulse M C Reproducción de una canción de la carpeta seleccio nada 1 Tras seleccionar una carpeta mantenga pulsado M C Operaciones avanzadas mediante el uso de botones especiales Selección de una gama de repetición de reproduc ción 1 Pulse 6 para desplazarse entre las siguientes opciones CD CD R CD RW DISC Repite ...

Page 27: ...rar el modo de ajuste 2 Pulse M C para seleccionar el segmento de la pantalla del reloj que desea ajustar Hora Minuto 3 Haga girar M C para ajustar el reloj AUX entrada auxiliar Active este ajuste si utiliza un dispositivo auxiliar co nectado a esta unidad 1 Pulse M C para activar o desactivar la función AUX USB plug and play Es 52 Sección 01 Utilización de esta unidad Este ajuste permite cambiar ...

Page 28: ... aislamiento del cable de ali mentación de esta unidad para compartir la corriente con otros equipos La capaci dad de corriente del cable es limitada Utilice un fusible con la intensidad nomi nal indicada Nunca conecte el cable negativo de los al tavoces directamente a tierra Nunca empalme los cables negativos de varios altavoces Cuando se enciende esta unidad se emite una señal de control a travé...

Page 29: ...ángulo inferior a 60 60 Montaje delantero posterior DIN Esta unidad puede instalarse correctamente tanto si se realiza una instalación frontal o tra sera En la instalación emplee piezas disponibles en el mercado Montaje delantero DIN 1 Inserte el manguito de montaje en el salpicadero Si realiza la instalación en un espacio poco profundo utilice el manguito de montaje su ministrado Si hay suficient...

Page 30: ...ad está apagada Activado el modo de demostración Pulse para cancelar el modo de demostración Desactive el ajus te de la visualiza ción de la demostración La unidad no funciona co rrectamente Hay una inter ferencia Está usando un dispositivo como un teléfono móvil que trans mite ondas eléc tricas cerca de la unidad Aleje de la unidad los dispositivos eléctricos que pue dan estar causan do interfere...

Page 31: ...te discos que tengan uno de los si guientes dos logos Utilice discos de 12 cm No utilice discos de 8 cm o un adaptador de discos de 8 cm Utilice sólo discos convencionales y completamente circulares No use discos con formas irregulares No inserte ningún otro elemento que no sea un CD en la ranura de inserción de CD No use discos con roturas picaduras deformados o dañados de otro modo ya que pueden...

Page 32: ...PRECAUCIÓN Pioneer no asume ninguna responsabilidad por la pérdida de datos en el dispositivo de al macenamiento USB incluso si la pérdida ocurre durante el uso de esta unidad No deje discos ni dispositivos de almacena miento USB en lugares expuestos a altas temperaturas Es 62 Apéndice Información adicional Secuencia de archivos de audio El usuario no puede asignar números de car peta ni especific...

Page 33: ...2 estéreo Formato de decodificación WMA Ver 7 7 1 8 9 10 11 12 audio 2 canales Windows Media Player Formato de decodificación MP3 MPEG 1 2 Audio Layer 3 Formato de señal WAV PCM lineal MS ADPCM No comprimido USB Especificación de la norma USB USB 2 0 velocidad máxima Corriente máxima suministrada 500 mA Clase USB MCS Clase de almacena miento masivo Sistema de archivos FAT12 FAT16 FAT32 Formato de ...

Page 34: ...Es 66 67 CRD4529 A S 34 ...

Page 35: ... CRD4529 A S 35 ...

Page 36: ...5 Australia TEL 03 9586 6300 PIONEER ELECTRONICS OF CANADA INC 300 Allstate Parkway Markham Ontario L3R 0P2 Canada TEL 1 877 283 5901 TEL 905 479 4411 PIONEER ELECTRONICS DE MEXICO S A de C V Blvd Manuel Avila Camacho 138 10 piso Col Lomas de Chapultepec Mexico D F 11000 TEL 55 9178 4270 先鋒股份有限公司 台北市内湖區瑞光路 407 號 8 樓 電話 02 2657 3588 先鋒電子 香港 有限公司 香港九龍尖沙咀海港城世界商業中心 9 樓 901 6 室 電話 0852 2848 6488 Printe...

Reviews: