background image

+

+

+

+

+

+

V

23.

iolet

25.

26. With a 2 speaker system, do not

connect anything to the speaker leads
that are not connected to speakers.

r

25. Rea speaker

16.

Right

Rear speaker

24. Violet/black

20. Gray/black

14. Front speaker

19. Gray

17. White

18. White/black

21. Green

22. Green/black

15.

Left

14. Front speaker

13.

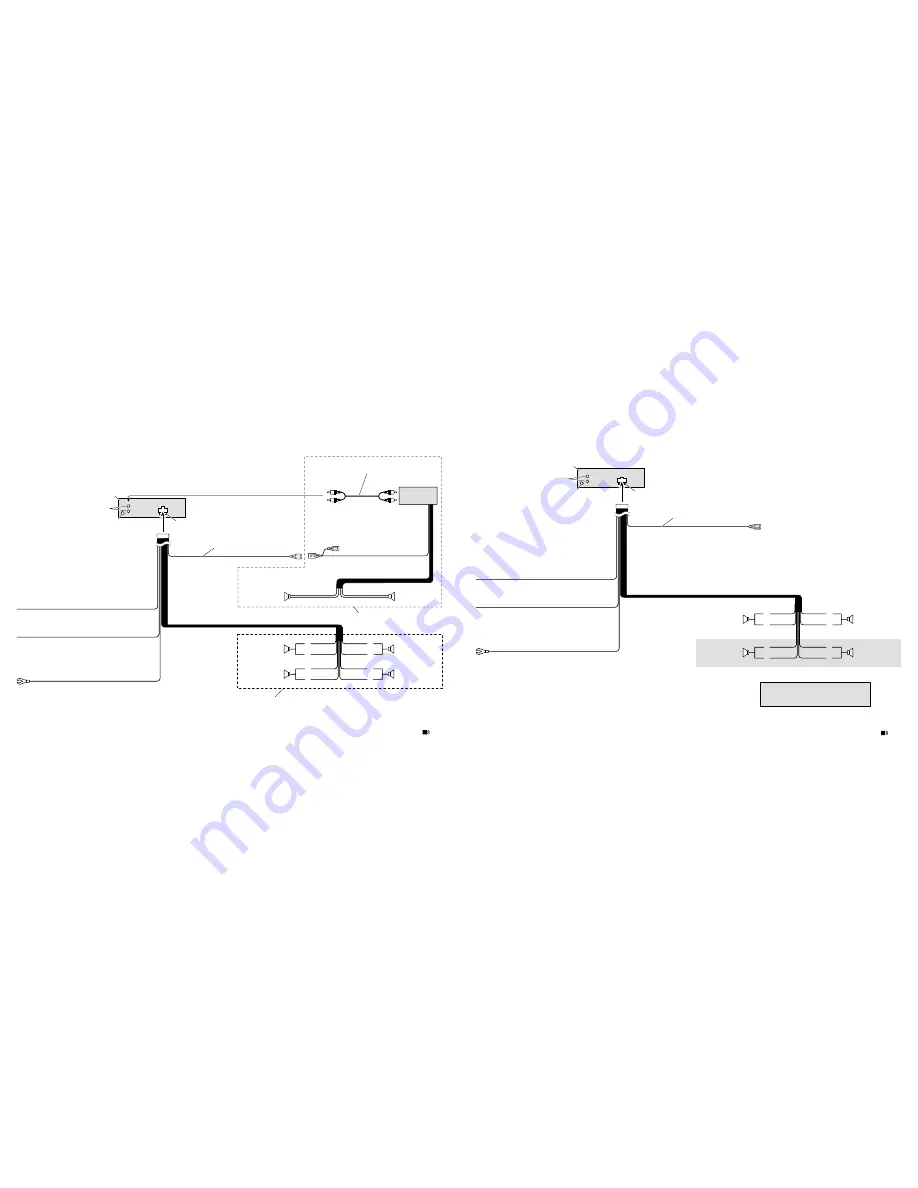
8. System remote control

5. Connecting cords with RCA

pin plugs (sold separately)

7. Power amp

(sold separately)

6. Blue/white

To system control terminal of the power amp or
Auto-antenna relay control terminal (max. 300 mA
12 V DC).

1. This Product

3. Antenna jack

9. Yellow

To terminal always supplied with
power regardless of ignition
switch position.

10. Red

To electric terminal controlled by
ignition switch (12 V DC)
ON/OFF.

11. Black (ground)

To vehicle (metal) body.

Perform these connections when using
the optional amplifier.

2. Rear output or

subwoofer output

4. Fuse (10 A)

12. Rear speaker or

subwoofer

12. Rear speaker or

subwoofer

Fig. 8

∏ qJA«

+

+

+

+

V

23.

iolet

16.

Right

24. Violet/black

20. Gray/black

14. Front speaker

19. Gray

17. White

18. White/black

21. Green

22. Green/black

15.

Left

14. Front speaker

6. Blue/white

To system control terminal of the power amp or
Auto-antenna relay control terminal (max. 300 mA
12 V DC).

1. This Product

3. Antenna jack

9. Yellow

To terminal always supplied with
power regardless of ignition
switch position.

10. Red

To electric terminal controlled by
ignition switch (12 V DC)
ON/OFF.

11. Black (ground)

To vehicle (metal) body.

4. Fuse (10 A)

27. Subwoofer output

28. Subwoofer

28. Subwoofer

29.

Note:

Change the initial setting of this unit (refer to the
Operation Manual). The subwoofer output of this unit is
monaural.

Fig. 9

π qJA«

Summary of Contents for DEH-3850MP

Page 1: ...nstallation methods DIN Front mount Installation with the rubber bush Fig 2 1 Dashboard 2 Holder After inserting the holder into the dashboard then select the appropriate tabs according to the thickness of the dashboard material and bend them Install as firmly as possible using the top and bottom tabs To secure bend the tabs 90 degrees 3 Rubber bush 4 Screw Removing the Unit Fig 3 Fig 4 5 Frame To...

Page 2: ...o priada do calor ao utilizar o aparelho certifique se de deixar um amplo espaço atrás do painel tra seiro e de enrolar quaisquer cabos soltos de modo que não bloqueiem as aberturas de venti lação Montagem dianteira traseira DIN Este aparelho pode ser instalado apropriadamente na Dianteira montagem convencional dianteira DIN ou na Traseira montagem traseira DIN utilizando os orifícios de parafusos...

Page 3: ... OFF 11 Black ground To vehicle metal body Perform these connections when using the optional amplifier 2 Rear output or subwoofer output 4 Fuse 10A 12 Rear speaker or subwoofer 12 Rear speaker or subwoofer Fig 8 qJA V 23 iolet 16 Right 24 Violet black 20 Gray black 14 Front speaker 19 Gray 17 White 18 White black 21 Green 22 Green black 15 Left 14 Front speaker 6 Blue white To system control termi...

Page 4: ...e graves secundario 13 Lleve a cabo estas conexiones cuando utilice el amplificador opcional 14 Altavoz delantero 15 Izquierda 16 Derecha 17 Blanco 18 Blanco negro 19 Gris 20 Gris negro 21 Verde 22 Verde negro 23 Violeta 24 Violeta negro 25 Altavoz trasero 26 Con un sistema de 2 altavoces no conecte nada a los hilos de altavoz que no se conectam a los altavoces 27 Salida de altavoz de graves secun...

Page 5: ...sistema certifique se de não conectar o fio azul branco do terminal de potência do ampli ficador Do mesmo modo não conecte o fio azul branco do terminal de potência da antena automática Tal conexão poderia causar uma drenagem de corrente excessiva e um conse qüente mau funcionamento Para evitar um curto circuito cubra o condutor desconectado com fita isolante Isole os condu tores de alto falante n...

Page 6: ... Î bI W cG Ð UNł v lD q dš Ëeð pKÝ UŽ bI b Ë UN K pKÝ qOLuð d bI ËU r OÝ ÆwŽ U2 pK K WO U ULŠ V bz Î Æ uOH b Ý bMŽ ULF Ý s b Pð d UF Ë uOH u u Ác vKŽ W Æ bŠ dz b  bT Ý t YOŠ BPTL dH ô b uð Ì L Ò ôUÐ UŽUL öÝ q dDÐ w WI dýU 5 ŽUL öÝ qLuð Ë UIKD d O Ë vMLO È ÆULNCFÐ l Ác v WKB UŽUL ÊuJð Ê wG M u bI w UF ŸuM s bŠ bŠ Ë bF0 Ë µ v œ Ë q ô vKŽ ËUF Ë v W Ê Æ ËUF Ë ØË Ãdš rOIÐ UŽULÝ qOLuð dOž W u c Ë tMŽ ...

Reviews: