background image

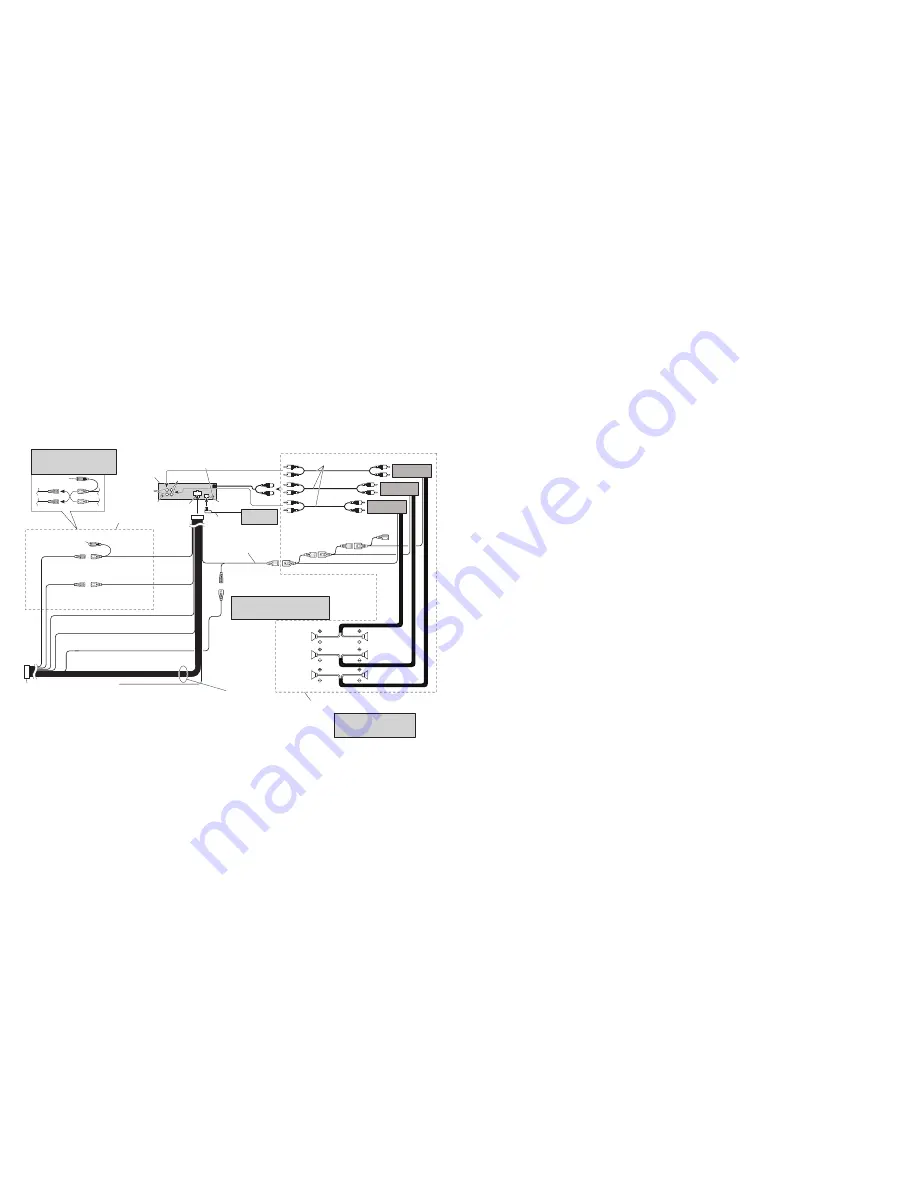
Fig. 12

Abb. 12

Afb. 12

1*

2*

4*

3*

5*

11.

3. Subwoofer output or

non fading output

36.

4. Antenna jack

1. This product

2. Front output

5. Fuse

8. IP-BUS input

(Blue)

9. IP-BUS cable

Note:

Depending on the kind of vehicle, the function
of 3* and 5* may be different. In this case, be
sure to connect 2* to 5* and 4* to 3*.

12. Connect leads of the same

color to each other.

13. Cap (1*)

When not using this terminal,
do not remove the cap.

14. Yellow (3*)

Back-up
(or accessory)

15. Yellow (2*)

To terminal always supplied
with power regardless of
ignition switch position.

16. Red (5*)

Accessory
(or back-up)

17. Red (4*)

To electric terminal controlled
by ignition switch (12 V DC)
ON/OFF.

18. Orange/white

To lighting switch terminal.

19. Black (ground)

To vehicle (metal) body.

20. ISO connector

Note:

In some vehicles, the ISO connector may be
divided into two. In this case, be sure to
connect to both connectors.

21. Yellow/black

If you use a cellular telephone, connect it via the
Audio Mute lead on the cellular telephone. If not,
keep the Audio Mute lead free of any connections.

22. Speaker leads

White

: Front left

+

White/black: Front left

Gray

: Front right

+

Gray/black : Front right

Green

: Rear left

+

or Subwoofer

+

Green/black: Rear left

or Subwoofer

Violet

: Rear right

+

or Subwoofer

+

Violet/black: Rear right

or Subwoofer

23. Connecting cords with RCA pin

plugs (sold separately)

10. Multi-CD player

(sold separately)

25. Blue/white

To system control terminal of
the power amp (max. 300 mA
12 V DC).

26. System remote control

27. Blue/white (7*)

To Auto-antenna relay control terminal
(max. 300 mA 12 V DC).

28. Blue/white (6*)

29. The pin position of the ISO connector will differ

depends on the type of vehicle. Connect 6* and 7*
when Pin 5 is an antenna control type. In another
type of vehicle, never connect 6* and 7*.

30. Front speaker

30. Front speaker

31.

Left

32.

Right

34. Subwoofer

34. Subwoofer

35. Perform these connections when using

the optional amplifier.

Note:

Change the initial setting of this unit (refer
to the Operation Manual). The subwoofer
output of this unit is monaural.

6. TEL terminal

Refer to a Handsfree Telephone
Unit’s manual (sold separately).

33. Rear speaker

33. Rear speaker

24. Power amp

(sold separately)

24. Power amp

(sold separately)

24. Power amp

(sold separately)

7. Rear output

(16 cm)

Summary of Contents for DEH-P7500MP

Page 1: ...Produkt entspricht den neuen kabelfarben Le code de couleur des câbles utilisé pour ce produit est nouveau Questo prodotto è conforme ai nuovi codici colori De kleuren van de snoeren van dit toestel zijn gewijzigd 60 7 Fig 1 Abb 1 Afb 1 Fig 3 Abb 3 Afb 3 Fig 2 Abb 2 Afb 2 53 182 1 2 3 4 5 6 Fig 4 Abb 4 Afb 4 8 9 Fig 5 Abb 5 Afb 5 Fig 7 Abb 7 Afb 7 Fig 6 Abb 6 Afb 6 Fig 8 Abb 8 Afb 8 10 14 11 13 12...

Page 2: ...ije el panel delantero a esta unidad 1 Coloque los sujetadores en ambos lados del panel delantero Fig 8 14 Sujetador 2 Reinstale el panel delantero en la unidad Fig 9 3 Mueva los sujetadores en las posi ciones verticales Fig 10 4 Fije el panel delantero a la unidad utilizando los tornillos de fijación Fig 11 15 Tornillos de fijación DIN Rear mount Installation using the screw holes on the side of ...

Page 3: ...ndiqué dans la figure jusqu à ce qu elles s enclenchent en position En maintenant ces clés pressées contre les côtés de l unité retirer l unité Installation FRANÇAIS DIN Rückmontage Installation unter Gebrauch der Gewindebohrungen an der Seite der Einheit Abb 5 Abb 6 Abb 7 1 Nehmen Sie den Rahmen ab 8 Rahmen 9 Setzen Sie den Ausziehschlüssel in die Öffnung unten am Rahmen ein und ziehen Sie den Ra...

Page 4: ... Installazione per mezzo dei fori per vite situati sui lati dell unità Fig 5 Fig 6 Fig 7 1 Rimuovere il telaio 8 Telaio 9 Inserire nel foro situato sul fondo del telaio l at trezzo di rilascio a filo quindi estraendolo in modo da rimuovere il telaio stesso Quando si rimonta il telaio dirigerne verso il basso il lato provvisto di scanalatura e quindi procedere con il montaggio 2 Assicurare l unità ...

Page 5: ...of any connections 22 Speaker leads White Front left White black Front left Gray Front right Gray black Front right Green Rear left or Subwoofer Green black Rear left or Subwoofer Violet Rear right or Subwoofer Violet black Rear right or Subwoofer 23 Connecting cords with RCA pin plugs sold separately 10 Multi CD player sold separately 25 Blue white To system control terminal of the power amp max ...

Page 6: ...a las conexiones correctamente Asegure el cableado con abrazaderas de cables o con cinta adhesiva Para proteger el cableado envuélvalo con cinta adhesiva donde éstos se apoyan sobre las piezas de metal Coloque y asegure todo el cableado de tal manera que no toque las piezas en movimiento tal como la palanca de cambio de velocidades el freno de mano y los pasamanos de los asientos No coloque el cab...

Page 7: ...rt bien ne pas être de la même couleur bien que remplissant la même fonction Pour relier ce produit à un autre produit utilisez le manuel d installation de chacun et effectuez les raccorde ments en ne tenant compte que de la fonction de chaque câble Remarque Cet appareil est destiné aux véhicules avec une bat terie de 12 V avec pôle négatif à la masse Avant de l installer dans un véhicule de loisi...

Page 8: ... caso in cui si faccia uso di un amplificatore opzionale 36 Nota Cambiare l impostazione iniziale di questa unità far riferimento al manuale d istruzioni per l uso L uscita subwoofer di questa unità è di tipo mono Snoeren voor dit product en overeenkomende snoeren voor andere producten hebbern mogelijk verschillende kleuren ookal is de functie van de snoeren hetzelfde Zie voor het verbinden van di...

Reviews: