background image

4

En

Contents

01  Before You Start

Features ..............................................................6
What’s in the box ............................................... 7
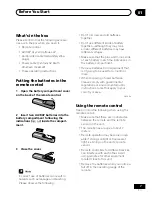
Putting the batteries in the remote control ..... 7
Using the remote control .................................. 7
Disc / Content Format Playback
Compatibility ......................................................8

General Disc Compatibility .......................... 8
CD-R/RW Compatibility ............................... 8
DVD-R/RW Compatibility ............................. 8
PC Created Disc Compatibility .................... 8
Compressed Audio Compatibility ............... 9
Titles, chapters and tracks ........................... 9
DVD-Video regions ........................................ 9

02  Connecting Up

Rear panel connections ................................. 10
Easy connections ............................................ 11
Using other types of video output .................. 12

Connecting using an S-Video output ........ 12
Connecting using the
component video output ............................ 12
Taiwanese model only: Connecting using
the D1 video output ....................................13

Connecting to an AV receiver ........................ 13

03  Controls and Displays

Front panel ........................................................15
Display ............................................................. 16
Remote control ................................................ 17

04  Getting Started

Switching on .................................................... 19

Let’s Get Started .........................................19

Using the on-screen displays ......................... 21
Setting up with the Setup Navigator .............. 21
Playing discs ................................................... 23

Basic playback controls ............................ 25
Front panel controls .................................. 25
DVD-Video disc menus ............................. 25
Video CD/Super VCD PBC menus ........... 26

05  Playing Discs

Introduction ..................................................... 27
Using the Disc Navigator to browse
the contents of a disc ..................................... 27
Scanning discs ................................................ 28
Playing in slow motion ....................................28
Frame advance/frame reverse ....................... 29
Looping a section of a disc ............................ 29
Using repeat play ............................................ 30
Using random play .......................................... 31
Creating a program list ....................................31

Editing a program list ................................. 33
Other functions available
from the program menu ............................ 33

Searching a disc ..............................................34
Switching subtitles ..........................................35
Switching DVD audio language ...................... 35
Switching audio channel when
playing a Video CD/Super VCD ....................... 35
Zooming the screen .........................................35

Thank you for buying this Pioneer product.

Please read through these operating instructions so you will know how to
operate your model properly. 

After you have finished reading the instructions, put

them away in a safe place for future reference.

Summary of Contents for DV-355

Page 1: ...DVD Player DV 355 Operating Instructions ...

Page 2: ...aution label appears on your unit Location rear of the unit CLASS 1 LASER PRODUCT WARNING Slot and openings in the cabinet are provided for ventilation and to ensure reliable opera tion of the product and to protect it from overheating to prevent fire hazard the openings should never be blocked and covered with items such as newspapers table cloths curtains etc Also do not put the appara tus on th...

Page 3: ...ION Use of controls or adjustments or performance of procedures other than those specified herein may result in hazardous radiation exposure The use of optical instruments with this product will increase eye hazard H013_En This product incorporates copyright protection technology that is protected by method claims of certain U S patents and other intellectual property rights owned by Macrovision C...

Page 4: ...t s Get Started 19 Using the on screen displays 21 Setting up with the Setup Navigator 21 Playing discs 23 Basic playback controls 25 Front panel controls 25 DVD Video disc menus 25 Video CD Super VCD PBC menus 26 05 Playing Discs Introduction 27 Using the Disc Navigator to browse the contents of a disc 27 Scanning discs 28 Playing in slow motion 28 Frame advance frame reverse 29 Looping a section...

Page 5: ...istering a new password 44 Changing your password 45 Setting changing the Parental Lock level 45 Setting changing the Country Code 46 08 Additional Information Taking care of your player and discs 47 Handling discs 47 Storing discs 47 Discs to avoid 47 Cleaning the pickup lens 48 Problems with condensation 48 Hints on installation 48 Moving the player 48 Power cord caution 48 Screen sizes and disc...

Page 6: ...zoom in on any part of the picture at up to 4x magnification for a closer look see page 35 MP3 compatibility This player is compatible with CD R CD RW and CD ROM discs that contain MP3 audio tracks see Compressed Audio Compatibility on page 9 Graphical on screen displays Setting up and using your DVD player is made very easy using the graphical on screen displays Energy saving design This player f...

Page 7: ... Remote operation may become unreli able if strong sunlight or fluorescent light is shining on the unit s remote sensor Remote controllers for different devices can interfere with each other Avoid using remotes for other equipment located close to this unit Replace the batteries when you notice a fall off in the operating range of the remote What s in the box Please confirm that the following acce...

Page 8: ... either the disc or the player s pick up lens Special note about particular formats or software follows below CD R RW Compatibility This unit will play CD R and CD RW discs recorded in CD Audio Video CD or MP3 audio formatting However any other content may cause the disc not to play or create noise distortion in the output This unit cannot record CD R or CD RW discs Un finalized CD R RW discs reco...

Page 9: ...t recording bit rates available to encode your MP3 files This unit was designed to be compatible with all of them Audio encoded at 128Kbps should sound close to regular CD Audio quality This player will play lower bit rate MP3 tracks but please note that the sound quality becomes noticeably worse at lower bit rates Titles chapters and tracks DVD discs are generally divided into one or more titles ...

Page 10: ...ents make sure that all components are switched off and unplugged 1 DIGITAL AUDIO OUT COAXIAL For connection to a PCM Dolby Digital DTS and or MPEG compatible AV receiver that has a coaxial digital input Connect using a commercially available coaxial digital audio cable 2 COMPONENT VIDEO OUT For connection to a TV monitor or AV receiver that has component video inputs Connect using a commercially ...

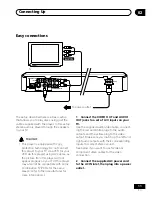
Page 11: ...s for the same reason refer to the manufacturer for more information 1 Connect the VIDEO OUT and AUDIO OUT jacks to a set of A V inputs on your TV Use the supplied audio video cable connect ing the red and white plugs to the audio outputs and the yellow plug to the video output Make sure you match up the left and right audio outputs with their corresponding inputs for correct stereo sound See belo...

Page 12: ...also gives you the flexibility of connecting your particular equipment using the best connection type available Connecting using an S Video output You can use the S Video output instead of the VIDEO OUT jack to connect this player to your TV or other equipment 1 Use an S Video cable not supplied to connect the S VIDEO OUT to an S Video input on your TV monitor or AV receiver Line up the small tria...

Page 13: ...ecommend also connecting using the stereo analog connection You ll probably also want to connect a video output to your AV receiver You can use any of the video outputs available on this player the illustration shows a standard compos ite connection 1 Connect one of DIGITAL OUT jacks on this player to a digital input on your AV receiver DIGITAL AUDIO OUT S L R PR PB Y COAXIAL OPTICAL COMPONENTVIDE...

Page 14: ...puts you can t use this player with it My VCR is already connected to my TV so there aren t any spare inputs What should I do If all your TV s inputs are already in use you can buy a video input selector from an electronics store which effectively gives you more inputs My TV only has one input for the sound What should I plug it into If you don t mind mono sound you can buy a stereo RCA to mono RC...

Page 15: ...verse scanning Press to jump back to the beginning of the current chapter or track then to previous chapters tracks 1 STANDBY ON Press to switch the player on or into standby 2 Disc tray 3 0 OPEN CLOSE Press to open or close the disc tray 4 Remote control sensor The remote control has a range of up to about 7m 5 Display See page 16 for a description of the display 6 3 Press to start or resume play...

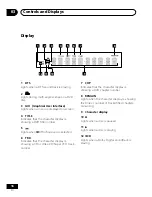
Page 16: ...n a disc is paused 11 3 Lights when a disc is playing 12 2D Lights when a Dolby Digital soundtrack is playing 1 DTS Lights when a DTS soundtrack is playing 2 Lights during multi angle scenes on a DVD disc 3 GUI Graphical User Interface Lights when a menu is displayed on screen 4 TITLE Indicates that the character display is showing a DVD title number 5 Lights when 2V TruSurround is selected 6 TRK ...

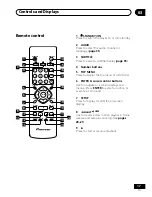
Page 17: ...o navigate on screen displays and menus Press ENTER to select an option or execute a command 7 SETUP Press to display or exit the on screen display 8 1 and e Use for reverse slow motion playback frame reverse and reverse scanning See pages 28 29 9 3 Press to start or resume playback Remote control 0 1 2 3 4 5 6 7 8 9 CLEAR ENTER ANGLE AUDIO TOP MENU SETUP SUBTITLE PLAYMODE SURROUND ZOOM DISPLAY ME...

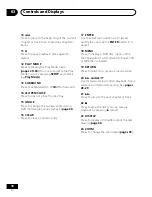
Page 18: ...e during DVD multi angle scene playback page 36 16 CLEAR Press to clear a numeric entry 17 ENTER Use to select menu options etc works exactly the same as the ENTER button in 6 above 18 MENU Press to display a DVD disc menu or the Disc Navigator if a CD Video CD Super VCD or MP3 disc is loaded 19 RETURN Press to return to a previous menu screen 20 and E Use for forward slow motion playback frame ad...

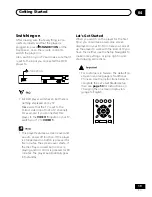
Page 19: ...creen saver and an auto power off function If the player is stopped and no button is pressed for five minutes the screen saver starts If the disc tray is closed but no disc is playing and no control is pressed for 30 minutes the player automatically goes into standby Let s Get Started When you switch on the player for the first time you should see a welcome screen displayed on your TV From here yo...

Page 20: ...r left right buttons to select either Wide screen 16 9 or Standard size screen 4 3 according to the kind of TV you have then press ENTER Let s Get Started Menu What kind of TV do you have Use the cursor buttons to choose then press ENTER Wide screen 16 9 Standard size screen 4 3 Taiwanese model only 3 Press ENTER again to finish setting up Let s Get Started Menu Setup complete If you re finished s...

Page 21: ...he highlighted menu item both ENTER buttons work in exactly the same way RETURN Returns to the main menu without saving changes The button guide at the bottom of every OSD screen shows you which buttons you ll need to use for that screen Setting up with the Setup Navigator Using the Setup Navigator you can make a number of other initial settings for this player We recommend using the Setup Navigat...

Page 22: ...cted Connected Not Connected AV Receiver Language Settings Audio Out Settings AV Receiver Func Setup Navigator If you selected Not Connected here that completes setup using the Setup Navigator Press ENTER to exit 6 Did you connect this player to an AV receiver using a digital output Select Connected or Not Connected Connected Not Connected AV Receiver Digital Audio Out Language Settings Audio Out ...

Page 23: ... SETUP to quit the Setup Navigator without making any changes Compatible Not Compatible Unknown Dolby Digital DTS MPEG 96kHz Linear PCM Language Settings Audio Out Settings AV Receiver Func Setup Navigator Settings complete Press ENTER to exit ENTER Congratulations setup is complete Playing discs The basic playback controls for playing DVD CD Video CD Super VCD and MP3 discs are covered here Furth...

Page 24: ... it s clean and not damaged See page 47 for information on cleaning discs If a disc loaded correctly won t play it s probably an incompatible format or disc type such as DVD Audio or DVD ROM See page 8 for more on disc compatibil ity I have a widescreen TV so why are there black bars at the top and bottom of the screen when I play some discs Some movie formats are such that even when played on a w...

Page 25: ...d title for DVD or track number for CD Video CD Super VCD MP3 If the disc is playing playback jumps to the start of the selected chapter or track Front panel controls The 3 play 7 stop and 8 pause buttons on the front panel work in exactly the same way as their remote control equivalents The combined scan skip buttons on the front panel 4 1 and work slightly differently from the remote buttons STA...

Page 26: ...u option some discs only Press ENTER to select Video CD Super VCD PBC menus Some Video CD Super VCDs have menus from which you can choose what you want to watch These are called PBC Playback control menus You can play a PBC Video CD Super VCD without having to navigate the PBC menu by starting playback using a number button to select a track rather than the 3 play button 0 1 2 3 4 5 6 7 8 9 RETURN...

Page 27: ...ispute 004 Delayed by rain 005 Accident incident 006 Pigeon post 007 Outernational 008 Vacuum tube Playback starts after you press ENTER Introduction Most of the features described in this chapter make use of on screen displays For an explanation of how to navigate these see Using the on screen displays on page 21 Many of the functions covered in this chapter apply to DVD discs Video CD Super VCDs...

Page 28: ...vailable unless there is a disc loaded It s not possible to use the Disc Naviga tor when playing a Video CD Super VCD in PBC mode or an unfinalized CD R RW disc Another way to find a particular place on a disc is to use one of the search modes See Searching a disc on page 34 Scanning discs You can fast scan discs forward or backward at various different speeds 1 During playback press 1 or to start...

Page 29: ...o points A and B within a track CD and Video CD or title DVD that form a loop which is played over and over A B Repeat is not available with MP3 discs Super VCDs Video CDs in PBC mode or unfinalized CD R RW discs 1 During playback press PLAY MODE and select A B Repeat from the list of functions on the left A Start Point B End Point Off A B Repeat Repeat Random Program Search Mode Play Mode 2 Press...

Page 30: ...t a repeat play option If program play is active select Program Repeat to repeat the program list or Repeat Off to cancel For DVD discs select Title Repeat or Chapter Repeat or Repeat Off Title Repeat Chapter Repeat Repeat Off A B Repeat Repeat Random Program Search Mode Play Mode For CDs and Video CD Super VCDs select Disc Repeat or Track Repeat or Repeat Off Disc Repeat Track Repeat Repeat Off A...

Page 31: ...ram Search Mode Play Mode To stop the disc and cancel random playback press 7 stop To cancel random playback without stopping playback press CLEAR The disc will play to the end then stop During random play the 4 and buttons function a little differently to normal 4 returns to the beginning of the current track chapter You can t go back further than this selects another track chapter at random from...

Page 32: ...05 Title 06 Title 07 Title 08 Chapter 1 4 Chapter 001 Chapter 002 Chapter 003 Chapter 004 Program To add a chapter first highlight the title then press cursor right and select a chapter from the list Program Step 01 01 003 02 03 04 05 06 07 08 Title 1 38 Title 01 Title 02 Title 03 Title 04 Title 05 Title 06 Title 07 Title 08 Chapter 1 4 Chapter 001 Chapter 002 Chapter 003 Chapter 004 Program For a...

Page 33: ...gram play press to skip to the next program step Press CLEAR during playback to switch off program play Press while stopped to erase the program list Editing a program list After creating a program list you can add delete and change steps 1 Press PLAY MODE and select Pro gram from the list of functions on the left 2 Select Create Edit from the list of program options 3 To clear a step highlight th...

Page 34: ...new one saved Searching a disc You can search DVD discs by title or chapter number or by time CD Super VCDs can be searched by track number and Video CDs by track number or time MP3 discs can be searched by folder or track number 1 Press PLAY MODE and select Search Mode from the list of functions on the left The search options that appear depend on the kind of disc loaded The screen below shows th...

Page 35: ... Audio French Dolby Digital 3 2 1CH 1 2 Current Total To set audio language preferences see Audio Language on page 42 Switching audio channel when playing a Video CD Super VCD When playing a Video CD you can switch between stereo just the left channel or just the right channel Super VCD supports four channels of audio You can switch the playback channel between Stereo 1 Left 1 Right 1 Stereo 2 Lef...

Page 36: ...r DVD discs can be displayed on screen while a disc is playing 1 To show switch the information displayed press DISPLAY When a disc is playing the information appears at the top of the screen Keep pressing DISPLAY to change the displayed information DVD displays Audio French Dolby Digital 3 2 1CH Angle Subtitle English 1 Title Play DVD 3 2 05 11 38 Current Total Elapsed 4 57 Remain 7 02 Total Tr R...

Page 37: ... speakers Audio DRC Default setting Off When watching Dolby Digital DVDs at low volume it s easy to lose the quieter sounds completely including some of the dialog Switching Audio DRC Dynamic Range Control to On can help by bringing up the quieter sounds while controlling loud peaks How much of a difference you hear depends on the material you re listening to If the material doesn t have wide vari...

Page 38: ...setting and exit the Audio Settings screen You can also use the SURROUND button on the remote control to switch Virtual Surround on 2V TruSurround Off Virtual Surround doesn t work with DTS or 96kHz linear PCM audio or during MP3 playback through either the analog or digital outputs If the player is outputting Dolby Digital or MPEG bitstream audio in other words no conversion to PCM Virtual Surrou...

Page 39: ...tal Out DTS Out 96 kHz PCM Out MPEG Out Dolby Digital Dolby Digital PCM Initial Settings If your AV receiver or other connected component is Dolby Digital compatible set to Dolby Digital otherwise set to Dolby Digital PCM Using the Initial Settings menu The Initial Settings menu gives you complete control in setting up your DVD player including audio and video output settings audience limitation s...

Page 40: ...anual that came with the other component if you re unsure whether it is MPEG audio compat ible DTS Out Default setting Off You only need to make this setting if you connected this system to an AV receiver or other component using one of the digital outputs Digital Audio Out Video Output Language Display Options Digital Out Dolby Digital Out DTS Out 96 kHz PCM Out MPEG Out DTS Off Initial Settings ...

Page 41: ...an Scan 16 9 Wide Initial Settings If you have a widescreen TV select the 16 9 Wide setting widescreen DVD software is then shown using the full screen area When playing software recorded in conventional 4 3 format the settings on your TV will determine how the material is presented see the manual that came with your TV for details on what options are available If you have a conventional TV select...

Page 42: ...title languages usually allow you to select the subtitle language from the disc menu Press MENU to access the disc menu Language settings Audio Language Default setting English Digital Audio Out Video Output Language Display Options Audio Language Subtitle Language DVD Menu Lang Subtitle Display English French Spanish Chinese Other Language Initial Settings Taiwanese model only Chinese Digital Aud...

Page 43: ...itle Display w Subtitle Lang English French Spanish Chinese Other Language Initial Settings Taiwanese model only Digital Audio Out Video Output Language Display Options Audio Language Subtitle Language DVD Menu Lang Subtitle Display w Subtitle Lang Chinese English Other Language Initial Settings Some multilingual discs have disc menus in several languages This setting specifies in which language t...

Page 44: ...w up as asterisks on screen Angle Indicator Default setting On Digital Audio Out Video Output Language Display Options OSD Language On Screen Display Angle Indicator On Off Initial Settings If you prefer not to see the camera icon on screen during multi angle scenes on DVD discs change this setting to Off Options Parental Lock Default level Off Default password none Default country code us 2119 So...

Page 45: ...The numbers appear as asterisks as you enter them Digital Audio Out Video Output Language Display Options Password Change Initial Settings Password New Password 3 Enter a new password Digital Audio Out Video Output Language Display Options Password Change Initial Settings Password New Password 4 Press ENTER to register the new password and return to the Options menu screen Setting changing the Par...

Page 46: ...ess ENTER Digital Audio Out Video Output Language Display Options Initial Settings Country Code List Code us 2 1 1 9 Parental Lock Country Code Password 3 Select a country code There are two ways you can do this Select by code letter Use cursor up down to change the country code Digital Audio Out Video Output Language Display Options Initial Settings Country Code List Code us 2 1 1 9 Parental Lock...

Page 47: ...iscs only Use of shaped discs is not recommended for this product Pioneer disclaims all liability arising in connection with the use of shaped discs Taking care of your player and discs Handling discs When holding discs of any type take care not to leave fingerprints dirt or scratches on the disc surface Hold the disc by its edge or by the center hole and edge Damaged or dirty discs can affect pla...

Page 48: ...epped on A damaged power cord can cause a fire or give you an electric shock Check the power cord once in a while If you find it damaged ask your nearest Pioneer authorized service center or your dealer for a replacement Cleaning the pickup lens The DVD player s lens should not become dirty in normal use but if for some reason it should malfunction due to dust or dirt consult your nearest Pioneer ...

Page 49: ...op and bottom of the screen Standard TV users If you have a standard TV the TV Screen setting page 41 of this player should be set to 4 3 Letter Box or 4 3 Pan Scan depending on which you prefer Set to 4 3 Letter Box widescreen discs are shown with black bars top and bottom Set to 4 3 Pan Scan widescreen discs are shown with the left and right sides cropped Although the picture looks larger you do...

Page 50: ...sh ku 1121 Kirghiz ky 1125 Latin la 1201 Lingala ln 1214 Laothian lo 1215 Lithuanian lt 1220 Latvian lv 1222 Malagasy mg 1307 Maori mi 1309 Macedonian mk 1311 Malayalam ml 1312 Mongolian mn 1314 Moldavian mo 1315 Marathi mr 1318 Malay ms 1319 Maltese mt 1320 Burmese my 1325 Nauru na 1401 Nepali ne 1405 Norwegian no 1415 Occitan oc 1503 Oromo om 1513 Oriya or 1518 Panjabi pa 1601 Polish pl 1612 Pas...

Page 51: ...d on these numbers See also Sampling frequency and Analog audio Dolby Digital 1 Using a maximum of 5 1 channels of audio this high quality surround system is used in many of the finer movie theaters around the world The on screen display shows which channels are active for example showing 3 2 1 The 3 being the two front channels and the center channel the 2 being the surround channels and the 1 be...

Page 52: ...data The higher the rate the better the sound quality but the more digital information is generated Standard CD audio has a sampling fre quency of 44 1kHz which means 44 100 samples measurements per second See also Digital audio DTS DTS stands for Digital Theater Systems DTS is a surround system different from Dolby Digital that has become a popular surround sound format for movies Dynamic range T...

Page 53: ...he player s display shows Welcome Pioneer then indicates the new setting You have to switch the player into standby press STANDBY ON before each change Watching NTSC on a PAL TV MOD PAL Most models of the newly developed countdown PAL TV system detect 50 Hz PAL 60 Hz NTSC and automatically switch vertical amplitude resulting in a display without vertical shrinkage If your PAL TV does not have a V ...

Page 54: ...elect from the on screen display then press ENTER 3 Use the cursor up down buttons to select from the list on the left then press ENTER 4 Press ENTER English 5 Use the cursor up down buttons to select English from the list on the right then press ENTER English 6 Press SETUP Digital Audio Out Video Output Language Display Options OSD Language On Screen Display Angle Indicator English Initial Settin...

Page 55: ... p 75 Ω C color Output level 286 mVp p 75 Ω Jack S Video jack Video output Output level 1 Vp p 75 Ω Jack RCA jack Audio output 1 stereo pair Output level During audio output 200 mVrms 1 kHz 20 dB Number of channels 2 Jacks RCA jack Digital audio characteristics Frequency response 4 Hz to 44 kHz DVD fs 96 kHz S N ratio 118 dB Dynamic range 101 dB Total harmonic distortion 0 0016 Wow and flutter Lim...

Page 56: ...Published by Pioneer Corporation Copyright 2002 Pioneer Corporation All rights reserved TPTZZ 02C00001 Printed in VRB1287 A ...

Reviews: