background image

28

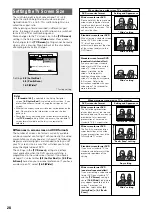
Setting the TV Screen Size

The width-to-height ratio of conventional TVs is 4:3,
while the width-to-height ratio of wide screen and
high-definition TVs is 16:9. This width-to-height ratio is
called the aspect ratio.
When viewing software recorded in different aspect
ratios, the image’s height to width ratio can be switched
to match the TV or monitor being used.
Make changes to the TV screen size in the 

[TV Screen]

setting in the Setup screen 

Video

 menu. Please note

that changes to the 

[TV Screen] 

setting cannot be made

when a disc is playing. Stop playback of the disc before
attempting to make any changes.

When viewing a wide screen TV or monitor

Standard screen format DVD

When viewing a standard screen
format DVD on a wide screen
TV,  black bars may be
automatically placed at the side
of the screen to adjust to the
DVD format.

“Wide” setting

Wide screen format DVD

Please note that there are some
wide screen letter box formats
that place black bars at the top
and bottom of the screen. This is
not a malfunction.

“Wide” setting

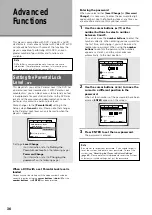
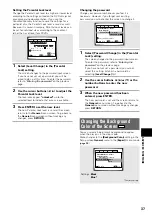
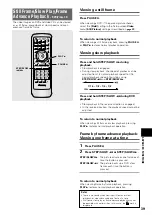
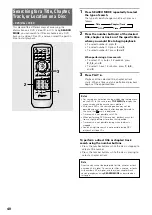
“Wide” setting

Standard screen format DVD
(unnatural stretched effect)

If you are viewing a standard
screen format DVD on a wide
screen TV, the picture may
appear ‘stretched’ on the
screen. To remedy this
condition, change your wide
screen TV to display a standard
(4:3) screen. Refer to the
instructions supplied with your
wide screen TV or monitor for
more information.

DVD screen size format

Setting and Appearance

Standard screen format DVD

If you have a standard TV, the
standard screen format will be
presented regardless of the
setting.

When viewing a standard size TV or monitor

Wide screen format DVD

The Pan & Scan presentation
crops both sides of the wide
screen presentation to use the
full standard TV screen.

“Letter Box” setting

Wide screen format DVD

The Letter box presentation
places black bars at the top and
bottom portions of the screen to
provide the full wide screen
presentation of a movie on a
standard TV (4:3 aspect ratio).

“Pan & Scan” setting

Any setting

Wide screen format DVD
(unnatural squeezed effect)

If you are viewing a wide screen
format DVD on a standard TV
and the 

[TV Screen]

 setting is

set to 

[16:9 (Wide)]

, the picture

may appear ‘squeezed’ on the
screen. To remedy this
condition, select either 

[4:3

(Letter Box)]

 or 

[4:3 (Pan &

Scan)]

.

DVD screen size format

Setting and Appearance

“Wide” setting

Settings:

4:3 (Letter Box)

4:3 (Pan & Scan)

16:9 (Wide)*

* Factory setting

Notes

• If 

[Standard (4:3)]

 is selected in the Setup Navigator

screen, 

[4:3 (Letter Box)]

 is selected on this screen. If you

prefer the pan&scan format, change the settings on this
screen.

• Whether the aspect can be switched or not depends on the

disc. Please refer to the information written on the disc
jacket, etc.

• Some discs may not include the screen format selected in

the 

[TV Screen]

 setting. When this occurs, the standard TV

screen format available on the disc is automatically
selected.

Differences in screen sizes and DVD formats

The number of screen size formats currently available
can be somewhat confusing. If set incorrectly, the video
presentation may not appear as it should. The following
diagrams and descriptions are intended to help you set
your TV screen size in a way that will allow you to fully
enjoy the digital video of DVD.
The settings in the 

[TV Screen]

 setting are perhaps

most applicable when the DVD you are watching  is
programmed in the wide screen format. If you have a
standard TV, select either 

[4:3 (Letter Box)]

 or 

[4:3 (Pan

& Scan)]

 based on your personal preference. If you have

a wide screen TV, select 

[16:9 (Wide)]

.

Audio1 Audio2

General

Language

Video

TV Screen 

Picture Quality -

Move

Exit

 16:9(Wide)

 4:3(Pan&Scan)

 4:3(Letter Box)

SETUP

Select your display preference

Summary of Contents for DV-535

Page 1: ...DV 535 DV 535K Operating Instructions DVD PLAYER ...

Page 2: ...e The use of optical instruments with this product will increase eye hazard Information to User Alteration or modifications carried out without appropriate authorization may invalidate the user s right to operate the equipment This product incorporates copyright protection technology that is protected by method claims of certain U S patents and other intellectual property rights owned by Macrovisi...

Page 3: ... 1 Max 74 minutes Digital audio Digital video MPEG 1 Max 20 minutes Digital audio Max 74 minutes 12 cm 5 in single sided 8 cm 3 in single sided 12 cm 5 in single sided 8 cm 3 in single sided Digital audio Max 20 minutes The disc format logos shown above are found on disc labels or on disc jackets To prevent malfunction do not use an 8 cm 3 in adaptor for CDs Discs other than the ones indicated abo...

Page 4: ...t converts Dolby Digital and MPEG audio formats into the linear PCM format This allows playback of DVDs recorded in Dolby Digital and MPEG without the need for a decoder Easy setup and adjustment using on screen menus Press SETUP on the remote control to open the Setup screen and you ll find setting up and adjusting the system easy to do with on screen menus conveniently organized and arranged Add...

Page 5: ... Screen Size 28 Selecting Picture Quality Appropriate for Program Content 29 Viewing from a Desired Camera Angle Multi Angle 30 Setting the Language Options 31 Setting the on screen display OSD language 31 Setting Language and Subtitle Preferences in the Setup Screen Menus 31 Changing the Audio Language Multi Language Function 32 Selecting a Subtitle Language Multi Language Subtitles 33 Advanced F...

Page 6: ...ction starting on page 24 are also used in a number of other functions Learning the procedure for operating these menus will make using this player much easier and more enjoyable Play a disc When all the connections and setups have been made you are ready to play a DVD Video CD or CD with the player The section Getting Started Using Your DVD Player starting on page 20 outlines the basic player ope...

Page 7: ...ol can be used up to 7 m 23 feet from the player and within a 30 angle on each side of the sensor Notes Exposing the remote sensor to direct sunlight or strong light may cause faulty operation If the CONTROL IN jack on the player s rear panel is connected to the CONTROL OUT jack of another component point the remote control at the other component to operate the player Operation will not be possibl...

Page 8: ...Press and hold to perform fast forward scanning page 22 8 4 1 reverse button Press to go back to previous chapters tracks Press and hold to perform reverse playback scanning pages 22 9 Remote sensor Point the remote control toward the remote sensor to operate the player page 7 0 Display window Displays system information page 9 ECHO control DV 535K only Turn to adjust the amount of digital echo ef...

Page 9: ...ndicator Indicates that Condition Memory settings are memorized for the currently loaded DVD page 47 0 TOTAL indicator Indicates that the disc in the player is stopped and DISPLAY has been pressed page 49 indicator Indicates that the Repeat function is on and that the current title chapter or track is being repeated page 41 DOLBY DIGITAL indicator Indicates Dolby Digital audio playback LAST MEMO i...

Page 10: ... input clear picture reproduction is possible by connecting the player to your TV or monitor via the S Video jack When using this output be sure to set VIDEO OUT SELECT to the left position page 15 8 VIDEO OUT jack Connect to the video input on a TV or monitor or AV amplifier or receiver with video input capability When using this output be sure to set VIDEO OUT SELECT to the left position pages 1...

Page 11: ... the Setup screen pages 17 24 6 MENU button Use to display or close the DVD menu screen page 21 7 DISPLAY button Press during playback to display statistical disc information Press repeatedly to display different information page 48 8 Cursor buttons 2 3 5 Use to move through the options on menu screens and to change settings 9 ENTER button Use to implement settings selected with the cursor buttons...

Page 12: ...ou can program titles chapters or tracks to play back in a desired order Programs can be a maximum of 24 steps Additionally DVD programs for up to 24 discs can be stored in the player s memory for future use pages 43 45 CONDITION MEMORY button You can store in memory the settings for up to 15 DVDs Press CONDITION MEMORY during DVD playback to memorize the settings page 47 OPEN CLOSE button Press t...

Page 13: ...ayback on DVDs from being copied If you connect the player to a TV via a VCR or record and play back the contents of a disc with a VCR the playback picture may not be normal Connecting Your DVD Player Unlike any other audiovisual media format DVD offers a wide array of audio and video output options which allows playback to be enjoyed in any number of system configurations from a standard TV with ...

Page 14: ...able Use to connect to an AV amplifier or receiver with built in Dolby Digital DTS or MPEG decoder Use a coaxial cable not supplied to connect the DIGITAL OUT coaxial digital output on the player to the coaxial digital input on an AV amplifier or receiver AV amplifier or receiver with built in Dolby Digital DTS or MPEG decoder COMPONENT VIDEO OUT DIGITAL OUT AUDIO OUT TV SYSTEM ATTENUATOR PAL NTSC...

Page 15: ... the player as though it were a component in a system system control If you connect for system control you cannot operate the player directly Point the remote control unit at the component AV amplifier etc connected to the CONTROL OUT jack to operate When controlling as a system be sure to make a connection to the amplifier using an audio or video cord even when using only digital components For d...

Page 16: ...em detect 50 Hz PAL 60 Hz NTSC and automatically switch vertical amplitude resulting in a display without vertical shrinkage If your PAL TV does not have a V Hold control you may not be able to view NTSC disc because the picture may roll If the TV has a V Hold control adjust it until the picture stops rolling On some TVs the picture may shrink vertically leaving black bands at the top and bottom o...

Page 17: ... Press RETURN The Setup Navigator is exited and the Setup screen General menu screen appears Please note that no settings are changed if RETURN is pressed before the Setup Navigator is finished D VDPLA YER 3 8 7 41 0 Î STANDBY ON RANDOM PROGRAM SEARCH MODE 0 9 8 7 10 6 5 4 CLEAR 3 2 1 1REV FWD PLAY 3 PAUSE 8 STOP 7 eSTEP SLOWE NEXT PREV 4 RETURN REPEAT CONDITION MEMORY LAST MEMORY ANGLE SUB TITLE ...

Page 18: ...e TV screen size The TV Type screen establishes the size or more appropriately the width to height ration of your television or monitor The width to height ratio of conventional TVs is 4 3 while the width to height ratio of wide screen and high definition TVs is 16 9 This width to height ratio is called the aspect ratio Settings Widescreen 16 9 Standard 4 3 Factory setting Note There are two scree...

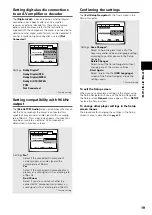
Page 19: ...e what digital audio formats can be decoded If you have made no digital connections select Not Connected Settings Dolby Digital Dolby Digital DTS Dolby Digital MPEG Dolby D DTS MPEG PCM Not Connected Factory setting Setting compatibility with 96 kHz output The 96 kHz PCM Audio screen establishes whether or not the AV component the player is connected to is capable of processing an audio signal wit...

Page 20: ... the cursor buttons 2 3 5 or the number buttons then press ENTER When a Video CD is loaded Use the number buttons to select the item Notes Noise is output if you make digital audio connections to a receiver or amplifier that does not have a built in decoder Check that the digital audio output format selected in the Audio 1 menu corresponds to the audio components you have made connections to pages...

Page 21: ... are used to make selections on Video CD menu screens When the Video CD has more than one menu pages can be advanced to or returned to with PREV 4 or NEXT To play Video CDs without displaying menu screens Video CDs with Playback Control PBC display a menu screen when play is started It is possible however to play back Video CDs without displaying menu screens When a Video CD with PBC is loaded pre...

Page 22: ... on the screen changes from flashing to lit fast forward scanning will continue even if the button is released When the desired location has been reached press PLAY 3 Fast reverse scanning Press and hold REV 1 4 1 on the front panel during playback Release REV 1 when you reach the desired location Normal playback resumes When the Scan indicator on the screen changes from flashing to lit fast rever...

Page 23: ...start position may be slightly before or after the resume position If you want to remove the disc but still want to resume playback from the last stopped position use the LAST MEMORY feature instead page 46 0 4 1 7 8 3 Stopping Playback and Switching Power Off DVD Video CD CD RANDOM PROGRAM SEARCH MODE 0 9 8 7 10 6 5 4 CLEAR 3 2 1 1REV FWD PLAY 3 PAUSE 8 STOP 7 eSTEP SLOWE NEXT PREV 4 RETURN REPEA...

Page 24: ...ear to the right when the setting is selected The current setting appears with the setting indicator lit 6 Use the cursor buttons 3 to enter the setting options Not all menu options can be changed while a disc is playing In these cases the options appear grayed out on the screen and cannot be adjusted To change these settings press STOP 7 first before pressing SETUP Operating the menu after pressi...

Page 25: ...setting indicator colors in the Setup screen menus When setting up the system or when making adjustments it is convenient to know what settings are applicable to the different disc formats When the settings appear for each menu option the currently selected setting appears with the setting indicator highlighted in one of three colors blue green or yellow These colors correspond to what formats the...

Page 26: ...nts if you are unsure about compatibility with DTS 96 kHz PCM Out This player is capable of outputting digital signals with a sampling frequency of 96 kHz If you have made connections to a component capable of processing this signal rate select 96 kHz for the signal to be output as is As some components are incapable of processing digital signal input with sampling rates of 96 kHz selecting 96 kHz...

Page 27: ...by Digital Out DTS Out Digital Out 96kHz PCM Out 96kHz 48kHz MPEG Out MPEG 3 PCM Move Exit Off Off On Dolby Digital SETUP MPEG Out This player is capable of outputting the MPEG digital bitstream When the player is connected to an AV component that has a built in MPEG decoder select the MPEG setting Otherwise select MPEG 3 PCM to convert the digital signal to the PCM signal the digital signal outpu...

Page 28: ...d TV screen Letter Box setting Wide screen format DVD The Letter box presentation places black bars at the top and bottom portions of the screen to provide the full wide screen presentation of a movie on a standard TV 4 3 aspect ratio Pan Scan setting Any setting Wide screen format DVD unnatural squeezed effect If you are viewing a wide screen format DVD on a standard TV and the TV Screen setting ...

Page 29: ...splay on or off Expert If you would rather not have the operation indicators Play Stop Resume etc and other messages displayed on the screen it is possible to turn them off in the On Screen Display setting in the Setup screen Video menu in the Expert menu mode page 25 Settings On Off Factory setting Setting the position of the on screen display Expert When watching conventional software on a wide ...

Page 30: ...scribed in the section below ANGLE 1 4 ANGLE 3 4 ANGLE 4 4 RETURN REPEAT CONDITION MEMORY LAST MEMORY ANGLE SUB TITLE AUDIO SETUP MENU TOP MENU DISPLAY 5 3 2 OPEN CLOSE REPEAT A B 5 5 5 ENTER ANGLE Turning the angle indicator on and off Expert When a picture recorded in different angles is played back is displayed on the screen This setting lets you see clearly whether the playback picture is reco...

Page 31: ...s English français Español Factory setting Selecting an audio language preference The audio language that you normally listen to can be selected from the various audio languages on a DVD Even when the audio language is changed during playback by pressing AUDIO the language selected at this setting will be selected as the default when the DVD is changed Make changes to the Audio Language setting in...

Page 32: ...n make your selection Audio 1 English Dolby Digital 5 1CH Audio 2 Spanish HELLO HOLA Dolby Digital 5 1CH Changing Audio Type Video CD CD For enjoyment of karaoke or similar format Video CDs and CDs it is possible to select stereo audio or either right or left channel mono depending on the requirements of the source Press AUDIO repeatedly during playback to switch the audio type Audio output change...

Page 33: ...ection HELLO HOLA Subtitle 1 English Subtitle 2 Spanish RANDOM PROGRAM SEARCH MODE 0 9 8 7 10 6 5 4 CLEAR 3 2 1 1REV FWD PLAY 3 PAUSE 8 STOP 7 eSTEP SLOWE NEXT PREV 4 RETURN REPEAT CONDITION MEMORY LAST MEMORY ANGLE SUB TITLE AUDIO SETUP MENU TOP MENU DISPLAY 5 3 2 Î OPEN CLOSE REPEAT A B 5 5 5 5 ENTER SUBTITLE Selecting a subtitle language preference The subtitle language that you will normally d...
Page 34: ...ppears A language code list can be found on page 52 1 Use the cursor buttons to select Other and press ENTER The language selection screen appears 2 Use the cursor buttons 2 3 to select either List of Languages or Code 3 If you select List of Languages use the cursor buttons 5 to select the language For languages which are only shown as a code please refer to Language Code List on page 52 Audio1 A...

Page 35: ...e language as the currently selected audio language Select Selected Subtitle to display the subtitles in the language set in the Subtitle Language setting Make changes to the Subtitle Off setting in the Setup screen Language menu in the Expert menu mode page 25 Selecting subtitles assist subtitles or no subtitles Expert Use this function to turn the subtitles on or off Additionally some DVDs provi...

Page 36: ...as been pressed Audio1 Audio2 General Language Video Parental Lock Setup Menu Mode Basic Setup Navigator Move Exit Level Change Password Change SETUP Setup viewing restrictions Audio1 Audio2 General Language Video Parental Lock Register Code Number Move Exit Return SETUP Enter 4 Digit Code RETURN Audio1 Audio2 General Language Video Parental Lock Register Code Number Move Exit 1 0 1 9 Return SETUP...

Page 37: ...urn Level SETUP ENTER Set Parental Lock RETURN Setting the Parental Lock level Change the Parental Lock level to a higher or lower level according to the settings printed on the DVD disc jacket or accompanying documentation If you use the Condition Memory function to save the settings for a particular disc the Parental Lock level is saved as well Because it is saved in memory Parental Lock levels ...

Page 38: ...arting on page 20 Adjust the volume on the TV or component that audio connections are made to VOLUME on the front panel controls only the level of the microphone 5 When the music starts turn VOLUME clockwise while speaking or singing into the microphone to adjust the vocal volume to an appropriate level 6 Turn ECHO clockwise to adjust the amount of echo effect that you want added to the vocals The...

Page 39: ... engaged In the reverse direction the playback speed cannot be adjusted To return to normal playback When viewing still frames or slow playback pressing PLAY 3 restores normal playback operation Frame by frame advance playback Viewing one frame at a time 1 Press PAUSE 8 2 Press STEP SLOW e or STEP SLOW E STEP SLOW E The picture advances one frame each time the button is pressed STEP SLOW e The pic...

Page 40: ...lay the menu screen and then make your selection With some DVDs the search operation may not be possible and may stop shortly after being performed In this case the mark is displayed Time search is not possible with CDs When performing DVD time search playback may start from a slightly different time than that specified Time search is not possible during when the disc is stopped Search using time ...

Page 41: ... can only perform A B repeat within the same title chapter or track To cancel A B repeat play Press CLEAR Playback continues but the repeat function is canceled Return to a specified location on a disc 1 Press REPEAT A B at the desired location 2 When you want to return to the specified location press PLAY 3 To clear the specified location Press CLEAR to cancel repeat play or to clear the specifie...

Page 42: ...ayback of chapters tracks in order from the chapter track currently playing Notes With Video CDs random play is not possible during playback when the menu is displayed PBC playback To perform random play start playback without displaying a menu by pressing a track number button while in the stop mode and then press RANDOM Random play of programmed chapters tracks is not possible In the case of DVD...

Page 43: ...number to be placed after the new number and then press the number button s of the number to be inserted The new number is inserted before the previously selected number To stop program play Press STOP 7 Notes When programming chapters chapters not programmed may appear on the screen This is not a malfunction Programming may not be possible with certain DVD discs On these types of discs the mark w...

Page 44: ...e deleted even if the disc tray is open Pressing CLEAR when the disc is stopped will clear all programs Programming Video CDs CDs A program with a maximum of 24 steps can be memorized 1 Press PROGRAM The program screen appears When a Video CD or CD is loaded the cursor appears in the program window 2 Use the number buttons to enter the numbers of the tracks in the order you want to program them in...

Page 45: ... the Program Memory to On the player will save your program and recall it the next time you use the same DVD When the program memory exceeds 24 programs will be erased in chronological order from the oldest program in memory 1 Use the cursor button to highlight Program Memory and use the cursor button 3 to select On 2 Press ENTER The program is saved in memory Note When a DVD with a program stored...

Page 46: ...ming playback from where LAST MEMORY was pressed 1 Load a disc that has a Last Memory point memorized Some DVDs will start playback automatically when loaded In this case press STOP 7 to stop playback 2 Press LAST MEMORY while in the stop mode The disc begins playback at the memorized point Last Memory mode may not function for some DVDs If you register more than five DVDs details of the latest di...

Page 47: ...ettings Switching of the multi language mode etc is automatic on some discs Memorizing Settings for Often Viewed DVDs Condition Memory DVD You can store in memory settings for DVDs you often watch Settings remain in memory even if you remove the disc from the player or switch power to the player to standby If you load a disc that has its settings memorized CONDITION appears in the display When you...

Page 48: ...apter 1 1 1 19 2 18 0 59 Viewing Disc Information DVD Video CD CD Use DISPLAY to get current information about the disc currently loaded You can get information about the titles and chapters on a DVD or tracks on a Video CD or CD When viewing DVDs you can also check the digital bitstream transmission rate Press DISPLAY during while a disc is playing Press DISPLAY repeatedly to change the informati...

Page 49: ... track Disc information Top Row current track number total number of tracks on CD total elapsed time of CD Bottom Row remaining time of CD total time of CD Play Track 1 0 03 3 32 3 29 Play All 1 2 0 15 6 32 6 15 Video CD with PBC disabled Play All 5 10 20 19 22 57 2 38 Play Track 5 20 19 4 40 2 38 Play Track 5 20 19 4 40 2 02 Display off Disc information Top Row current track number total number o...

Page 50: ...ause it to malfunction Never use discs with special shapes CD s with special shapes heart shaped CDs octagonal CDs etc cannot be played on this set Attempting to do so may damage the set Do not use such CDs After using discs store them upright After playing a disc always remove it from the player and return it to its jacket Then store it standing upright away from heat and humidity Store discs car...

Page 51: ... If moisture or dust has collected on the plug wipe it with a soft cloth before connecting For Proper and Long Use of This Unit Do not move the unit during playback During playback the disc rotates at high speed Do NOT lift or move the unit during playback Doing so may damage the disc When moving the unit When changing places of installation or packing the unit for moving be sure to remove the dis...

Page 52: ...c kl Cambodian km Kannada kn Kashmiri ks Kurdish ku Kirghiz ky Latin la Lingala ln Laothian lo Lithuanian lt Latvian lv Malagasy mg Maori mi Macedonian mk Malayalam ml Mongolian mn Moldavian mo Marathi mr Malay ms Maltese mt Burmese my Nauru na Nepali ne Norwegian no Occitan oc Oromo om Oriya or Panjabi pa Polish pl Pashto Pushto ps Quechua qu 0721 0801 0809 0818 0821 0825 0901 0905 0911 0914 0919...

Page 53: ...n the Setup screen menus is displayed There is a Video CD or CD loaded in the player and the setting that was changed only applies to DVD performance The setting will be effective the next time a DVD is loaded Settings are canceled When the power is turned off by power failure or by unplugging the power cord settings will be canceled Before unplugging the power cord press STANDBY ON and check that...

Page 54: ...on or wide TV is 16 9 The latter allows you to enjoy a picture with a wider perspective Chapter number Chapter numbers are the numbers assigned to sections of a title on the disc similar to chapters in a book If the disc includes chapter numbers you can locate the section you want very quickly using search and other functions Component color difference video output The color signal of the TV is di...

Page 55: ...at has become a popular surround sound format for movies as well as CDs In order to enjoy the benefits of DTS encoded discs the digital output jack either coaxial or optical of this player needs to be connected to an AV amplifier or receiver or to a DTS decoder to be able to enjoy the surround sound of DTS audio DTS audio is not output from the analog audio outputs Dynamic range Dynamic range refe...

Page 56: ...n standby mode less than 1 W Weight DV 535 2 7 kg DV 535K 2 8 kg Dimensions Not including protruding cables etc DV 535 420 W x 281 D x 104 H mm DV 535K 420 W x 284 D x 104 H mm Operating temperature 5 C to 35 C 36 F to 96 F Operating humidity 5 to 85 no condensation S Video output Y luminance Output level 1 Vp p 75 Ω C color Output level 286 mVp p 75 Ω Jacks S VIDEO jack Video output Output level ...

Reviews: