DVR-533H-S
108
1
2
3
4
1
2
3
4
C
D
F
A
B
E
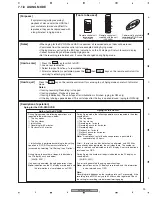
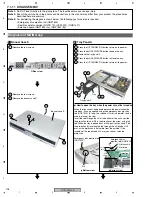
7.1.11 DISASSEMBLY
Projection
Cam R9
Slit of chassis
Slit of drive
(slide)
1
Remove the four screws.
2
Remove the four screws.
3
Remove the bonnet case S.
Bonnet Case S
1
1
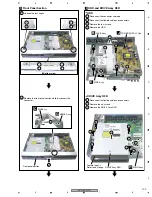
Press the
STANDBY/ON button to turn on the power.
2
Press the
OPEN/CLOSE button to open the tray.
3
Remove the tray panel A.
4
Press the
OPEN/CLOSE button to close the tray.
5
Press the
STANDBY/ON button to turn off the power.
Tray Panel A
2
Diagnosis of MAIN Assy
Bonnet case S
3
2
2
2
1
1
1
1
Rear view
×
2
3
1 5
2
2
4
4
Tray panel A
Tray
Emergency disc
ejection rod (GGF1529)
Emergency disc ejection rod
(GGF1529)
Bottom view
Bottom view
Slit
Note 1:
Do NOT look directly into the pickup lens. The laser beam may cause eye injury.
Note 2:
Even if the unit shown in the photos and illustrations in this manual may differ from your product, the procedures
described here are common.
Note 3:
For performing the diagnosis shown below, the following jigs for service is required:
• Emergency disc ejection rod (GGF1529)
• Flexible cable for service (GGD1170), (VKP2291), (GGD1437)
• Extension board (GGF1532 (A)), (GGF1532 (B))
about
15mm
about
5mm
How to open the tray when the power cannot be turned on
When the tray cannot be opened because the power cannot be
turned on, it can be opened using the emergency disc ejection
rod (GGF1529). (A long, thin rod about 1 mm in diameter can be
used in place of the rod.)
Insert the rod through the slit at the bottom of the unit and slide
the projection for cam R9 in the direction of the arrow, using the
rod. When the tray is popped out a little, pull it out by hand. Find
the projection by inserting the rod through the slit by about 20
mm, as the projection is not visible from the outside. If the
insertion of the rod exceeds 20 mm, you cannot catch the
projection.
Summary of Contents for DVR-531H-S
Page 17: ...DVR 533H S 17 5 6 7 8 5 6 7 8 C D F A B E ...
Page 41: ...DVR 533H S 41 5 6 7 8 5 6 7 8 C D F A B E I CN4501 To HDD CN9014 H 4 5 ...
Page 47: ...DVR 533H S 47 5 6 7 8 5 6 7 8 C D F A B E SIDE B SIDE B TUNB ASSY A A A CN101 VNP2004 A ...
Page 59: ...DVR 533H S 59 5 6 7 8 5 6 7 8 C D F A B E SIDE B SIDE B I I POWER SUPPLY UNIT I ...


