DVR-RT500-S
84
1
2
3
4
1
2
3
4
C
D
F
A
B
E
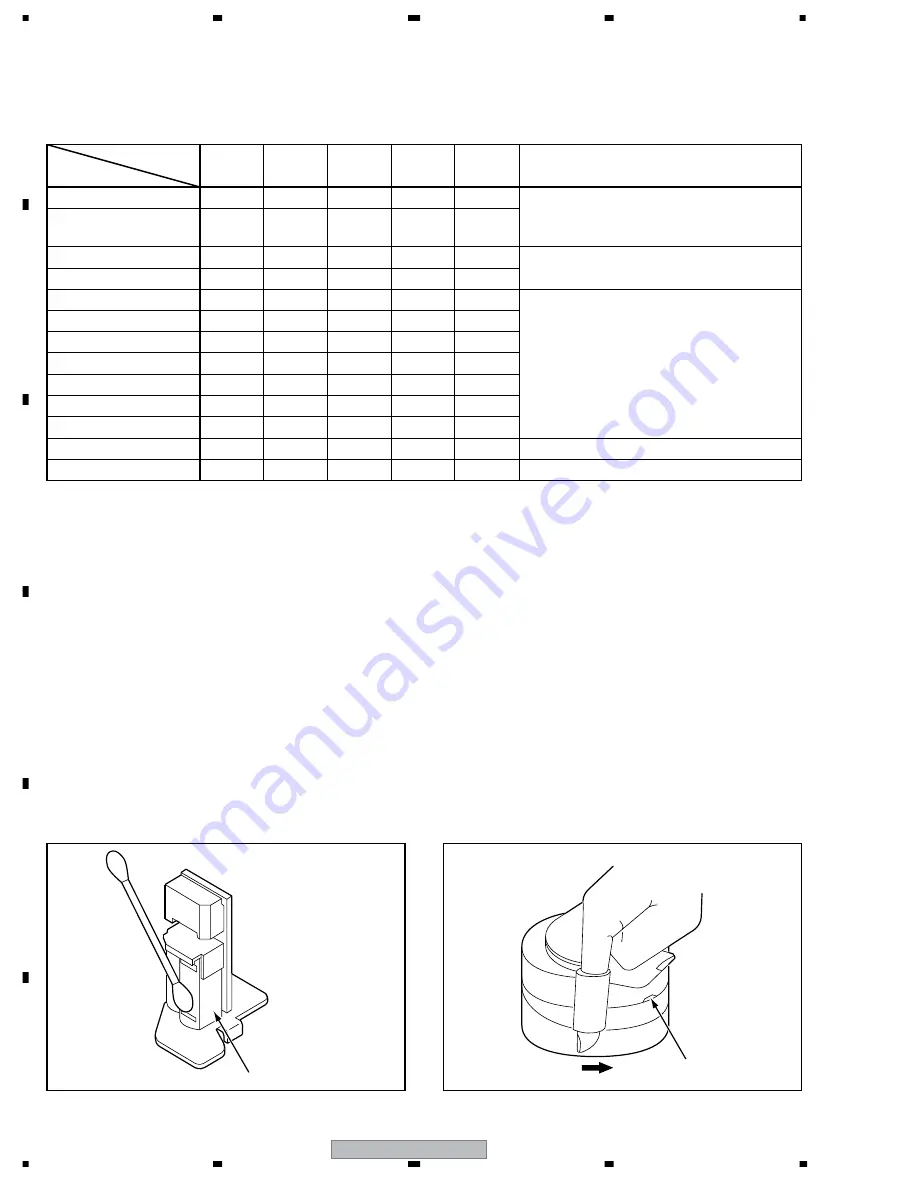
6.5 PREVENTIVE CHECKS AND SERVICE INTERVALS
The following standard table depends on environmental conditions and usage.
Parts replacing time does not mean the life span for individual parts.
Also, long term storage or misuse may cause transformation and aging of rubber parts.
The following list means standard hours, so the checking hours depends on the conditions.
Parts Name
Time
500
hours
1,000
hours
1,500
hours
2,000
hours
2,500
hours
Notes
Audio Control Head
7
7
7
Clean those parts in contact with the tape.
Full Erase Head
(Recorder only)
7
7
7
Capstan Belt
Clean the rubber, and parts which the rubber
touches
Pinch Roller
7
Capstan DD Unit
Loading Motor
Tension Band
T Brake Band
Clutch Assy
Idler Arm Assy
Capstan Shaft
7
7
7
7
7
Tape Running Guide Post
7
7
7
7
7
Replace when rolling becomes abnormal.
Cylinder Unit
7
Clean the Head
7
: Clean
: Check it and if necessary, replace it
NOTE
After cleaning the heads with isopropyl alcohol, do not run a
tape until the heads dry completely. If the heads are not
completely dry and alcohol gets on the tape, damage may
occur.
1. AUDIO CONTROL HEAD
Clean the Audio Control Head with the cotton stick soaked
by alcohol. Clean the full erase head in the same manner.
(Refer to the figure below.)
2. TAPE RUNNING SYSTEM
When cleaning the tape transport system, use the gauze
moistened with isopropyl alcohol.
3. CYLINDER
Wrap a piece of chamois around your finger. Dip it in
isopropyl alcohol. Hold it to the cylinder head softly.
Turn the cylinder head counterclockwise to clean it (in the
direction of the arrow).
(Refer to the figure below.)
NOTE
Do not exert force against the cylinder head. Do not move
the chamois upward or downward on the head.
Use the chamois one by one.
CLEANING
Audio Control Head
Cylinder Head


