background image

89

En

Appendix

 14

Appendix

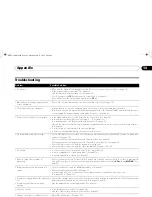
Troubleshooting

If the following error codes appear on the screen, check the corresponding items in the table.

Problem

Possible Solution

• No power.

• Make sure the Plasma Display and the Media Receiver are connected correctly. (See page 19.)

• Is the power cord disconnected? (See page 23.)

• Has the main power been turned on? (See page 25.)

• Check if you pressed 

TV


 on the remote control unit. (See page 25.)

If the indicator on the system lights up red, press 

TV


.

• Blue and red rectangles appear on the 

screen alternately.

• Check if the system cable has become disconnected or loose? (See page 19.)

• The system cannot be operated.

• External influences such as lightning, static electricity, etc., may cause improper operation. 

In this case, operate the system after first turning the power of the Plasma Display and the Media Receiver, 

or unplugging the power cord and re-plugging it in after 1 or 2 minutes.

• Remote control unit does not operate.

• Is the Mode switch set correctly? Slide it to the TV position. (See page 16.)

•  Are batteries inserted with connect polarity (+, –)? (See page 22.)

•  Are batteries worn out? (Replace with new batteries.) (See page 22.)

• Operate the remote control unit while pointing it toward the remote control sensor on the Plasma Display. 

(See page 22.)

•  Are you using it under strong or fluorescent lighting?

• Is a fluorescent light illuminating the remote control sensor? 

• No image and audio is presented.

• Check if the input source for video or PC has been unintentionally selected although you want to watch a TV 

channel. (See page 26.)

• Check if you have activated the Parental Control function. (See page 39.)

Enter a password to temporarily cancel the Parental Control function. (See page 43.)

• Check the cable connection with the antenna. (See page 20.)

• Check the cable connection with the other equipment. (See pages 68 to 78.)

• No picture.

• Is connection to other components correct? (See pages 68 to 76.)

• Is a non-compatible PC signal being input? (See page 76.)

• Is picture adjustment correct? (See page 59.)

• Audio is output but no image is 

presented. 

• Check if you have selected “Picture Off” for Energy Save. With this option selected, the screen is deactivated; 

only audio is output. To restore the screen display, press any button other than 

VOL +/–

 and 

MUTING

. (See 

page 63.)

• Images are presented but no audio is 

output.

• Check if you have selected the minimum volume. (See page 27.)

• Check if you have muted sound. (See page 27.)

• When using a video or PC input source, check that the audio terminals are also connected. 

(See pages 68 to 72 and 75.)

• Sound is reversed between the right and 

left.

• Sound is output from only a single 

speaker.

• Check if the speaker cable connections have been reversed between the right and left or if the speaker cable 

from either speaker has been disconnected. (See pages 13 and 19.)

• Has the balance been correctly adjusted? (See page 62.)

• Picture is cut off.

• Is the image position correct? (See page 64.)

• Has the correct screen size been selected? (See page 66.)

• Strange color, light color, dark or color 

misalignment.

• Adjust the picture tone. (See page 59.)

• Is the room too bright? The picture may look dark in a room that is too bright.

• Power is suddenly turned off.

• Is the sleep timer set? (See page 58.) 

• Check the power control setting. (See page 63.)

• The system’s internal temperature has increased. Clean the vents, or remove any blocking objects. 

(See page 17.)

• Panel sounds / noises

• Panel generated sounds, examples: Fan motor noise, Electrical Circuit Humming / Glass Panel buzzing are 

normal operation of a phosphor-based matrix display. 

Code

Message

Check

SD04

Powering off. Internal temperature too high.

Check temperature around PDP.

Check if the ambient temperature of the Plasma Display is high.

SD05

Powering off. Internal protection circuits activated, 

Is there a short in speaker cable?

Check the speaker cable connections between the Plasma Display and the 

speakers.

SD11

Powering off. Internal temperature too high.

Check temperature around media receiver.

Check if the ambient temperature of the Media Receiver is high.

PRO1130HD.book  Page 89  Monday, July 11, 2005  9:26 AM

Summary of Contents for Elite PRO-1130HD

Page 1: ...RegisterYour Product on www pioneerelectronics com US www pioneerelectronics ca Canada PLASMA DISPLAY SYSTEM PRO 1130HD PRO 930HD Operating Instructions ...

Page 2: ...us When a cart is used use caution when moving the cart apparatus combination to avoid injury from tip over Unplug this apparatus during lightning storms or when unused for long periods of time Refer all servicing to qualified service personnel Servicing is required when the apparatus has been damaged in any way such as power supply cord or plug is damaged liquid has been spilled or objects have f...

Page 3: ... Model Number PRO 1130HD PRO 930HD PRO 506PU PRO 436PU PRO R06U PRO R06U Product Category Class B Personal Computers Peripherals Responsible Party Name PIONEER ELECTRONICS SERVICE INC Address 1925 E DOMINGUEZ ST LONG BEACH CA 90801 1760 U S A Phone 310 952 2915 For Business Customer URL http www PioneerUSA com NOTE This equipment has been tested and found to comply with the limits for a Class B di...

Page 4: ...g the system cable 19 Cable connections for watching digital and or conventional TV channels 20 Connecting VHF UHF antennas and a Cable 20 Connecting a Cable box 20 Inserting the CableCARD 21 Switching between antenna A and B 21 Preparing the remote control unit 22 Inserting batteries 22 Cautions regarding batteries 22 Setting MTS SAP mode 28 Viewing a channel banner 29 Using the POD service 29 Us...

Page 5: ... Advanced picture adjustments 60 Using PureCinema 60 Power Management PC mode only 64 Image position adjustment AV mode only 64 Automatic image position and clock adjustments PC mode only 64 Manual image position and clock adjustments PC mode only 65 Selecting a screen size manually 65 Selecting a screen size automatically 66 Selecting a screen size for received 4 3 aspect ratio signals 66 Changin...

Page 6: ...nnecting control cords 78 About SR 78 Enjoying through memory cards Home Gallery function 79 Readable memory cards 79 Readable data files 79 Inserting a memory card 79 Removing a memory card 79 Starting the initial Home Gallery screen 80 Selecting a folder 80 Starting a thumbnail screen 80 Starting a standard single image screen 81 Starting the Slide Show Setup screen 81 Starting the Slide Show sc...

Page 7: ...ntinuously over a long period of time when using the still picture mode from a TV VCR DVD player or any other component Images which have both very bright areas and very dark areas side by side should not be displayed for a prolonged period of time Installation guidelines The Pioneer PureVision PRO 1130HD PRO 930HD Plasma Display System incorporates a very thin design To ensure safety please take ...

Page 8: ...se the remote controls of nearby equipment may be adversely affected or wireless headphones using infrared rays are interfered with by noise If this is the case place that Do not attach such items as labels and tape to the product This may result in the discoloration or scratch of the cabinet When not using the product for a long period of time If you do not use the product for a long period of ti...

Page 9: ...appear when moving images are displayed The time for the after images to disappear depends on the luminance of the still images and the time they had been displayed 2 After image lag image due to burning Avoid displaying the same image on the Plasma Display continuously over a long period of time If the same image is displayed continuously for several hours or for shorter periods of time over seve...

Page 10: ...fall from the cart 13 The plasma Display used in this product is made of glass Therefore it can break when the product is dropped or applied with impact Be careful not to be injured by broken glass pieces in case the plasma Display breaks 14 Overloading Do not overload AC outlets or extension cords Overloading can cause fire or electric shock 15 Entering of objects and liquids Never insert an obje...

Page 11: ...ines Use M8 screws which go 12 to 18 mm 0 5 to 0 7 inches in depth from the mounting surface of the Plasma Display See the side view above Be careful not to block the ventilation opening at the rear of the Plasma Display Be sure to install the Plasma Display on a flat surface because it contains glass The screw holes other than the above are to be used only for the specified products Never use the...

Page 12: ...Receiver models The speakers are available as options Plasma Display Media Receiver Model Name of the Entire Plasma Display System Model Name of the Main Unit Media Receiver Plasma Display PRO 1130HD PRO R06U PRO 506PU PRO 930HD PRO 436PU Power cord 2 m 6 6 feet Speed clamp 3 Warranty card Bead band 3 Cleaning cloth PRO1130HD book Page 12 Monday July 11 2005 9 26 AM ...

Page 13: ...BLACK Front view 1 a POWER button 2 STANDBY indicator Lights red when the unit is in standby mode page 25 3 POWER ON indicator Lights blue when the Plasma Display is operating page 25 4 Remote control sensor Rear view PRO1130HD book Page 13 Monday July 11 2005 9 26 AM ...

Page 14: ...IDEO 13 INPUT 4 terminal VIDEO 14 INPUT 4 PC terminals AUDIO PULL OPEN STANDBY ON ON STANDBY REC TIMER STANDBY ON ON STANDBY VOLUME CHANNEL TV GUIDE ENTER INPUT DOWN DOWN LEFT HOME GALLERY Y CB PB CR PR S VIDEO AUDIO PC PC ANALOG RGB INPUT 4 VIDEO L R EJECT COMPONENT VIDEO PC CARD SLOT DOWN RIGHT UP UP UP REC TIMER 1 2 3 4 5 6 7 8 9 10 11 12 13 14 15 Front view Pull this section to open the door P...

Page 15: ... INPUT 1 terminal S VIDEO 19 INPUT 3 terminals AUDIO 20 INPUT 3 terminals COMPONENT VIDEO Y CB PB CR PR 21 INPUT 1 terminals COMPONENT VIDEO Y CB PB CR PR 22 HDMI terminals INPUT1 INPUT3 23 SYSTEM CABLE terminal BLACK 24 SYSTEM CABLE terminal WHITE 25 AC IN terminal Y CB PB CR PR COMPONENT VIDEO SERVICE ONLY INPUT 3 INPUT 3 R AUDIO L R AUDIO L S VIDEO VIDEO INPUT 1 INPUT 1 Cable CARD BLACK WHITE A...

Page 16: ...eens when in the 2 screen or picture in picture mode 16 FAVORITE CH A B C D Selects any of the four preset channels See page 43 for details to set the FAVORITE CH While watching you can toggle the set channels by pressing A B C and D 17 D When pressed all buttons on the remote control unit will light The lighting will turn off if no operations are performed within about 5 seconds This button is us...

Page 17: ... of the rear of the unit Using the optional PIONEER stand For details on installation refer to the instruction manual Installing the Media Receiver CAUTION Do not place a VCR or any other device on the top of the Media Receiver When installing allow enough space on the sides and above the Media Receiver Do not block the side ventilation opening or the rear exhaust opening of the Media Receiver Ove...

Page 18: ...lease take the necessary safety measures to prevent it from falling or overturning in case of emergencies such as earthquakes or of accidents If you do not take these precautions the Plasma Display could fall down and cause injury The screws hooks chains and other fittings that you use to Using a wall for stabilization 1 Attach fall prevention bolts hooks to the Plasma Display 2 Use strong cords o...

Page 19: ... cable to the Media Receiver Media Receiver rear view BLACK WHITE For details on optional PIONEER speaker installation refer to the instruction manual that came with the speaker System cable Plasma Display rear view Connecting the system cable to the Plasma Display PRO1130HD book Page 19 Monday July 11 2005 9 26 AM ...

Page 20: ...l at the rear of the Media Receiver Connecting VHF UHF antennas and a Cable Connecting a Cable box Use the INPUT 1 terminals to connect a Cable box NOTE You can also connect to the INPUT 1 S VIDEO terminal instead of the INPUT 1 VIDEO terminal use a commercially available S Video cable If using a Cable box that supports digital TV channels and has an RF output terminal you can connect that termina...

Page 21: ...move the cover while releasing the tab s latch 3 Insert the specified CableCARD into the Cable CARD slot as far as it goes Switching between antenna A and B To watch broadcasts via the two antennas you can select it by pressing ANT on the remote control unit While watching a broadcast press ANT to view the image received from the other antenna Pressing ANT while watching in the 2 screen mode TV im...

Page 22: ...m right of the front panel of the Plasma Display The distance from the remote control sensor must be within 7 m 23 feet and the angle relative to the sensor must be within 30 degrees in the right or left direction Cautions regarding the remote control unit Do not expose the remote control unit to shock liquid or high humidity Do not place the remote control unit under direct sunlight the unit may ...

Page 23: ...LACK Power cord Noise filter Partially eliminates noise caused by the power source Y CB PB CR PR COMPONENT VIDEO SERVICE ONLY INPUT 3 INPUT 3 R AUDIO L R AUDIO L S VIDEO VIDEO INPUT 1 INPUT 1 Cable CARD BLACK WHITE AC IN SYSTEM CABLE HDMI DIGITAL OUT G LINK ANT CABLE A IN MONITOR OUT ANT B IN OUT CONTROL I N INPUT 2 SUB WOOFER OPTICAL S400 TS AC IN Power cord PRO1130HD book Page 23 Monday July 11 ...

Page 24: ...once in place Please attach them carefully Use pliers to twist the clamp 90 pulling outward The clamp may deteriorate over time and become damaged if removed NOTE Use the supplied bead bands as necessary Cable binder Using the cable binders supplied with the stand put the speaker and system cables together so that the cables are invisible from the front At that time be careful not to apply any for...

Page 25: ...nters the standby mode and the image on the screen disappears Both STANDBY indicators light up red This will allow the system to automatically receive digital TV program information while in the standby mode NOTE If you are not going to use this system for a long period of time press POWER on the Plasma Display and remove both power cord from the power outlet Plasma Display Media Receiver Plasma D...

Page 26: ... To decrease the channel number press CH CHANNEL UP DOWN on the Media Receiver operates the same as CH on the remote control unit Press CH RETURN to switch the currently tuned channel to the previously tuned channel Press CH RETURN again to restore the currently tuned channel Using 0 9 and dot on the remote control unit Select channels directly by pressing buttons 0 to 9 To select subchannels also...

Page 27: ...es by pressing MTS on the remote control unit Each time you press MTS the language switches NOTE Switchable languages differ depending on the current broadcast If the language selected through language setting is available when the channel or program is changed you will hear that language If you are watching a digital TV program without sound or language information N A appears on the screen With ...

Page 28: ...ch to the MONO mode to obtain clearer sound Once the MONO mode is selected the Plasma Display System sound remains mono even if the system receives a stereo broadcast You must reselect the STEREO mode if you want to hear stereo sound again Selecting MTS while the input source is INPUT 1 to 4 or PC does not change the type of sound In this case sound is determined by the video source Each time you ...

Page 29: ...ing icon 8 Channel logo NOTE The above information is not displayed if not included in broadcast signals If you do not setup the TV Guide On Screen system the channel banner may not display certain types of program Using the multiscreen functions Splitting the screen Use the following procedure to select the 2 screen or picture in picture mode DTV 2 1002 102 A 12 30pm 2 00pm XXXXXXXXXX 12 33pm XXX...

Page 30: ... input source button If watching TV programs press CH to change the channel NOTE Freezing images Use the following procedure to capture and freeze one frame from a moving image that you are watching 1 Press FREEZE A still image appears on the right screen while a moving image is shown on the left screen 2 Press FREEZE again to cancel the function NOTE With the screen split any image cannot be froz...

Page 31: ...ot provide listings for satellite services Depending on the current settings and selected items the order of the setup screens may differ from the one given in this manual Follow the instructions shown on the screens Setting up the TV Guide On Screen system When the Plasma Display System is powered on for the very first time you are automatically taken through the setup process Immediately thereaf...

Page 32: ...annot return to the previous screens If you realize you entered incorrect information continue with setup The last screen of the procedure gives you the opportunity to correct any mistakes before you exit setup Screen 1 Country This screen asks you the location of your TV Press to highlight a country Press ENTER to display Screen 2 Screen 2 Enter ZIP or Postal Code If you selected USA in Screen 1 ...

Page 33: ...6 If you make any other choice you see Screen 7 Screen 6 Cable Box Output Channel Select the channel used for the cable box Press ENTER to display Screen 7 Screen 7 Cable Box Configuration Diagram The diagram shows the correct way to install the G LINK cable from the back of the device to the cable box Make sure the G LINK cable is properly installed Press ENTER to display Screen 8 Screen 8 Cable ...

Page 34: ... Screen 10 Screen 12 Do you have an antenna connected If you select Yes you see Screen 13 NOTE If you selected No in Screen 3 then you must select Yes in this screen to receive a channel lineup and listings If you select No you see Screen 13 If you select Yes depending on your setup configuration you may see an additional screen After that screen you see Screen 13 Screen 13 Are the settings correc...

Page 35: ...e device to the recording device Make sure the G LINK cable is properly installed Press ENTER and you see Screen 17 Screen 17 VCR Brand Name Press to select the brand of the recording device Press ENTER and you see Screen 18 Screen 18 VCR Preparation Follow the on screen instructions and press ENTER to display Screen 19 Screen 19 VCR Code Testing When testing is done Screen 20 displays automatical...

Page 36: ...gain in Screen 19 Screen 21 Confirming Your Settings Verify the Setup information is correct If it is select Yes end setup and you see Screen 22 If it is not select No repeat setup process and you see Screen 1 Screen 22 Congratulations You have successfully completed Setup Press ENTER and you see Screen 23 Screen 23 Helpful Information This screen tells you valuable information on using your Guide...

Page 37: ... Reset 59 Sound Treble 62 Bass 62 Balance 62 Reset 62 FOCUS 63 Front Surround 63 Power Control Energy Save 63 No Signal off 63 No Operation off 64 Sleep Timer 58 Option Position 64 Auto Size 66 4 3 Mode 66 Side Mask 67 HDMI Input 69 70 Home Menu Item Page Picture AV Selection 58 Contrast 59 Brightness 59 Red 59 Green 59 Blue 59 Reset 59 Sound Treble 62 Bass 62 Balance 62 Reset 62 FOCUS 63 Front Su...

Page 38: ...n you have selected antenna A you can check the current channel s signal strength You may use this function when receiving a channel through a VHF UHF antenna 1 Press HOME MENU 2 Select Tuner Setup then ENTER 3 Select Channel Setup then ENTER 4 Select Ant A then ENTER 5 Select Signal Strength then ENTER Adjust the direction of the antenna so that the current signal strength reaches as close to the...

Page 39: ... on the left column on this page Changing the password Using a password prevents other persons from changing Parental Control settings A default password 1234 has been set before shipment Use the following procedure to change the password 1 Press HOME MENU 2 Select Tuner Setup then ENTER 3 Select Parental Control then ENTER 4 Select Password then ENTER 5 Select Change Password then ENTER 6 Enter t...

Page 40: ...ings have been unblocked before shipment 6 Press HOME MENU to exit the menu NOTE Blocking a rating causes more severe ratings to be automatically blocked as well Likewise unblocking a rating causes less severe ratings to be automatically unblocked Setting the TV ratings 1 Press HOME MENU 2 Select Tuner Setup then ENTER 3 Select Parental Control then ENTER 4 Select TV Ratings then ENTER 5 Select th...

Page 41: ...gs xxxxxxxxxxxxxxxxxxxxx xxxxxxxxxxxxxxxxxxxxx xxxxxxxxxxxxxxxxxxxxx Unavailable Ratings Block Don t Block Parental Control Exit Home Menu Rating Description Age Base E Exempt Includes news sports documentaries and other information programming talk shows music videos and variety programming C Children Intended for younger children under the age of 8 years Pays careful attention to themes that cou...

Page 42: ...ings to be automatically unblocked Rating Description Age Base E Exempt programming G General All ages and children contains minimal direct violence but may be integrated into the plot in a humorous or unrealistic manner 8ans General but inadvisable for young children May be viewed by a wide public audience but could contain scenes disturbing to children under eight who cannot distinguish between ...

Page 43: ... a color button A B C D then ENTER 5 Select a TV channel to be registered then ENTER A star appears beside the favorite channels currently selected To register another TV channel under the same color button repeat step 5 To register another TV channel under a different color button repeat steps 4 and 5 6 Press HOME MENU to exit the menu Setting up closed captions Your Plasma Display System is equi...

Page 44: ... Select Digital Service then ENTER 6 Select the desired closed caption then ENTER The factory default is Service 1 7 Press HOME MENU to exit the menu NOTE The Primary Caption Service is usually offered for Service 1 and the Secondary Language Service is usually offered for Service 2 if these services are available Selecting digital closed caption parameters Use the following procedure to change su...

Page 45: ...using and ENTER 11 Press HOME MENU to exit the menu NOTE If you setup the TV Guide On Screen system the Plasma Display System acquires clock information through the TV Guide On Screen system in this situation you cannot set up the clock using the menu If you select a parameter for the Clock menu and press ENTER the menu screen disappears and a dialog box appears instead press A to clear the dialog...

Page 46: ...n elements to make using the system easier 1 TV GUIDE logo TV Guide On Screen icons Various icons are used to convey information or show the status of an item You will locate these icons on the Info Bar inside the Info Box or beside program titles Info icon Additional information is available press the INFO button to display Progress Bar Shows the elapsed time of the current program HDTV Indicates...

Page 47: ...een press INFO to display and then close Help information Press TV GUIDE anytime to exit 2 Press to navigate the Listings screen With a currently showing program highlighted press ENTER to start watching Move right for later time slots Press PAGE to display listings for the previous next day Press INFO to display additional information if available about the currently selected show 3 To set the hi...

Page 48: ...ress REC as described above but if you want to set the recording options to anything other than the default the place to do it is the Recording Options panel menu Here you can adjust the start and end times the destination of the recording the recording quality and so on 1 From LISTINGS SCHEDULE or SEARCH highlight the program you want to record 3 Highlight set recording and press ENTER 4 Set the ...

Page 49: ...el recording Depending on the situation the following screens will appear While recording is in progress If you attempt to change the channel while recording is in progress the following screen appears Select either don t change keep recording or change stop recording Depending on the situation the following screens will appear In this case the reminder will remain on screen for 15 seconds before ...

Page 50: ...nder and press ENTER 4 Set the reminder options 5 Once all the settings have been made press ENTER to highlight schedule reminder then press ENTER again The reminder is now set and will appear in SCHEDULE and the appropriate icon appears on the show tile If there is a time conflict with previously scheduled auto tune reminder or recording when you preset a reminder you will be alerted to this too ...

Page 51: ...lets you search for programs alphabetically by category or by keyword You can also search for HDTV programs Searching by category Here you can search for programs by category and then by a further sub category if you want 1 Select SEARCH from the Service bar at the top of the screen 2 Press to move to the search category bar then press to select a search category Available categories may include M...

Page 52: ...ou Searching by keyword Here you search for shows based on keywords you enter The keywords you create are stored so you can use them again in the future 1 Select SEARCH from the Service bar at the top of the screen 2 Press to move to the search category bar then press to select KEYWORD If you already entered any keywords they are displayed Just select one if you want to search for it again To edit...

Page 53: ...d you input is stored so that you can use it again whenever you need it 8 Select DONE to start the search 9 Highlight a program listing then press MENU to display the Episode Options panel menu Alphabetical search This search is designed to display all programs that start with a particular letter 1 Select SEARCH from the Service bar at the top of the screen 2 Press to move to the search category b...

Page 54: ...ious screen or press MENU to cancel any changes and close the menu Scheduling recordings and reminders From the Schedule area you can review edit or delete recordings and reminders 1 Select SCHEDULE from the Service bar at the top of the screen A list of programs that have record or remind events scheduled appears The icons on the right side indicate the status of the events Once only recording Da...

Page 55: ...t cancel to exit without saving done closes the panel menu and returns to the Service bar at the top of the screen cancel closes the panel menu without saving any changes and returns to the Service bar at the top of the screen When a program is highlighted go to Service Bar closes the panel menu and returns to the Service bar at the top of the screen watch now start watching the selected program t...

Page 56: ...y On never display Off or display only when channel information is available Auto Hide the tuned channel number the channel position in the channel listing 1 Highlight the Change Channel Display item 3 Press to highlight a channel then press ENTER to go to the Grid Options menu From the Grid Options menu you can set channel On display in channel list Off don t display or Auto Hide hide when no pro...

Page 57: ...large small large all auto guide Display TV Guide On Screen guide automatically when you switch on the TV On Off Record defaults start when to start a recording up to 120 minutes earlier or later than the program start time or On time end when to end a recording up to 120 minutes earlier or later than the program end time or On time recorder selects a recorder to be used for recording quality reco...

Page 58: ... is switched in this order STANDARD DYNAMIC MOVIE GAME USER then PURE For PC source the mode is switched between You can also use the menu to change the options 1 Press HOME MENU 2 Select Picture then ENTER 3 Select AV Selection then ENTER 4 Select the desired option then ENTER For AV source For PC source 30 60 90 120 Off cancel minutes Item Description STANDARD For a highly defined image in a nor...

Page 59: ...he subsequent procedures see Advanced picture adjustments on page 60 To restore the factory defaults for all items press to select Reset in step 3 and then press ENTER A confirmation screen appears Press to select Yes and then press ENTER Item button button Contrast For less contrast For more contrast Brightness For less brightness For more brightness Color For less color intensity For more color ...

Page 60: ...PureCinema Automatically detects a film based source originally encoded at 24 frames second analyzes it then recreates each still film frame for high definition picture quality Selections Off Deactivates the PureCinema Standard Produces smooth and vivid moving images film specific by automatically detecting recorded image information when displaying DVD or high definition images e g movies having ...

Page 61: ...ENTER 4 Select DRE then ENTER 5 Select an item to be adjusted then ENTER You can select Dynamic Contrast Black Level ACL or Gamma CTI Provides images with clearer color contours The CTI stands for Color Transient Improvement Selections Off Deactivates the CTI On Activates the CTI Item button button R Closer to magenta Closer to yellow Y Closer to red Closer to green G Closer to yellow Closer to cy...

Page 62: ... optimum contrast characteristics for images Selections Off Deactivates the ACL On Activates the ACL Gamma Adjusts the gamma characteristics image gradation characteristics Selections 1 Selects gamma characteristics 1 2 Selects gamma characteristics 2 3 Selects gamma characteristics 3 3DYC Optimizes characteristics for separating brightness signals and color signals This works for both video and s...

Page 63: ... menu NOTE You can also select this function using the Home menu when the input source is a PC No Signal off AV mode only The system will be automatically placed into the standby mode if no signal is received for 15 minutes 1 Press HOME MENU 2 Select Power Control then ENTER 3 Select No Signal off then ENTER 4 Select Enable then ENTER Item Description Off factory default Deactivates the FOCUS On A...

Page 64: ...position 6 Press HOME MENU to exit the menu NOTE To restore the factory defaults for all the items press to select Reset in step 4 and then press ENTER A confirmation screen appears Press to select Yes and then press ENTER Adjustments are stored separately for each input source Automatic image position and clock adjustments PC mode only Use Auto Setup to automatically adjust positions and clock of...

Page 65: ...e screen sizes differ depending on the types of input signals AV mode PC mode except for XGA signals PC mode for XGA signals Ex 1024 768 input with PRO 1130HD Manual Setup H V Position Adjust Clock Phase Reset 0 0 Item Description 4 3 For 4 3 standard pictures A side bar appears on each side FULL For 16 9 squeezed pictures ZOOM For 16 9 letterbox pictures Bars may appear on the top and bottom on s...

Page 66: ...t automatically switch to a correct screen format When the video signal contains no aspect ratio information the function will not work even with On selected Selecting a screen size for received 4 3 aspect ratio signals Specify whether the Plasma Display should choose the 4 3 mode or WIDE mode when 4 3 aspect ratio signals are received with the Auto Size function activated 1 Press HOME MENU 2 Sele...

Page 67: ...s HOME MENU to exit the menu Language setting You can select a language to be used for on screen display such as menus from among three languages English French and Spanish 1 Press HOME MENU 2 Select Option then ENTER 3 Select Language then ENTER 4 Select a language 5 Press HOME MENU to exit the menu Item Description Fixed factory default Always sets the same brightness for the gray side masks Aut...

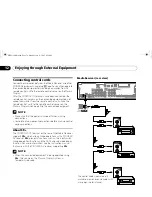
Page 68: ... 1 on the remote control unit or press INPUT on the Media Receiver to select INPUT1 NOTE Refer to your DVD player instruction manual for the signal type The INPUT 1 terminals are checked whether they are connected in the following order 1 Component Video 2 S Video 3 Video Use the desired connection for viewing Connect external equipment to only terminals that are to be actually used Watching a VCR...

Page 69: ...E MENU 2 Select Option then ENTER 3 Select HDMI Input then ENTER 4 Select Video then ENTER 5 Select the type of digital video signals then ENTER If you select Auto an attempt will be made to identify the type of digital video signals when digital video signals are received 6 Press HOME MENU to exit the menu NOTE If you select a parameter other than Auto make such a setting that results in natural ...

Page 70: ...MONITOR OUT terminals on the rear of the Media Receiver you can record for example digital TV programs using the recording equipment You can also record digital TV programs more easily by using the TV Guide On Screen system Connect the supplied G LINK cable to the G LINK terminal on the rear of the Media Receiver and then position the G LINK cable s wand so that its light emitting section faces th...

Page 71: ...l connect the MONITOR OUT terminals AUDIO on the rear of the Media Receiver to the audio input terminals on the AV receiver NOTE When using the digital audio output terminal optical you need to make settings depending on your AV receiver For more information see the instruction manual that came with the AV receiver Connecting an AV receiver Y CB PB CR PR COMPONENT VIDEO SERVICE ONLY INPUT 3 INPUT ...

Page 72: ... of differences in the specifications What can be recorded through i LINK With D VHS recorders connected to this system through i LINK you can record only digital TV programs You cannot record conventional TV channels nor contents coming from When connecting a single D VHS recorder When connecting two D VHS recorders You can connect two D VHS recorders directly to the i LINK terminals on the rear ...

Page 73: ...put sound To record digital TV programs using connected D VHS recorders use D VHS tape You cannot use VHS tape nor S VHS tape Some D VHS recorders connected though i LINK may not allow this system to play back images and sound recorded on VHS tape S VHS tape or if with analog signals D VHS tape If this is the case connect the analog output terminals on the D VHS recorder to INPUT 1 2 3 or 4 termin...

Page 74: ...NK Setup The i LINK list shows all devices connected through i LINK interfaces In this list you can change the name or order of devices or delete device information 1 Press HOME MENU 2 Select Tuner Setup then ENTER 3 Select i LINK Setup then ENTER 4 Select the desired device The following procedure differs depending on what you want to perform To change the name of a device 5 Press B to select Ren...

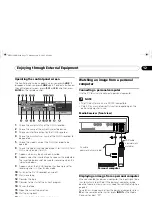
Page 75: ...Rewinds the tape 13 Rewinds to the start of the current program 14 Pauses the tape 15 Stops the current tape motion 16 Starts playing back Watching an image from a personal computer Connecting a personal computer Use the PC terminals to connect a personal computer NOTE The PC input terminals are DDC2B compatible Plug Play may not correctly function depending on the personal computer in use Display...

Page 76: ...Pin No Signal name 1 R 2 G 3 B 4 Not connected 5 Not connected 6 GND ground 7 GND ground 8 GND ground 9 5V 10 GND ground 11 Not connected 12 SDA 13 HD 14 VD 15 SCL 15 14 13 12 9 11 10 8 7 6 5 4 3 2 1 Resolution Frequency Remarks 720 400 70 Hz 640 480 60 Hz 72 Hz 75 Hz 800 600 56 Hz 60 Hz 72 Hz 75 Hz 1024 768 60 Hz 70 Hz 75 Hz 1280 768 56 Hz 60 Hz 70 Hz PRO1130HD book Page 76 Monday July 11 2005 9 ...

Page 77: ...ting TV programs for recording with the TV Guide On Screen system Be careful not to leave the cable looped when making the connection If degraded picture quality is observed while viewing copy protected VOD movies connect the Media Receiver directly to other TV sets Do not connect through a VCR Use only one wand on the G LINK cable to control one device When connecting both the cable box and VCR Y...

Page 78: ... terminal on the rear of the Media Receiver supports SR which allows linked operations with a PIONEER AV receiver SR presents functions such as the input switch linkage operation function and the DSP surround mode display function For more information see the instruction manual that came with the PIONEER AV receiver supporting SR NOTE When the connected equipment is being operated using SR the vol...

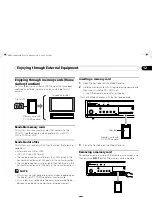
Page 79: ... memory card This system may not be able to display images modified or edited using a personal computer or other equipment Inserting a memory card 1 Open the front door on the Media Receiver 2 Hold the memory card with its top side facing upward and then insert it into the PC CARD slot Insert the memory card as far as it goes 3 Close the front door on the Media Receiver Removing a memory card To r...

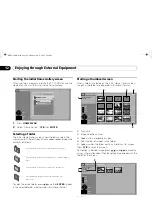
Page 80: ...croll the screen To highlight a desired image press and to move the cursor Information about the highlighted image appears at the top left of the screen Designates a folder that contains another folder Designates a folder that contains one or more image files Designates a folder that contains no image file Designates an image file saved under the root directory Home Gallery Folder selection MEMORY...

Page 81: ...een 3 Select Playback Order 4 Select Name Order or Random 5 Select Number Of Times Of Playback 6 Select Single Time or Loop With Loop selected Slide Show is repeated until RETURN is pressed 7 Select Playback Mode 8 Select Auto or Manual With Auto selected images are automatically changed at the specified intervals With Manual selected images are changed each time you press CH CH 9 If you have sele...

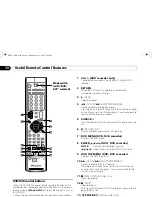
Page 82: ...hanged when in the Learn mode the Learn mode is canceled If no operation is performed for more than one minute the Presetting manufacturer codes 1 Slide the Mode switch to match the device to which you want to preset the remote control signal 2 Press EDIT LEARN and 1 at the same time The LED flashes 3 Press 0 9 to enter the manufacturer code See page 83 Preset mode is finished once the LED no long...

Page 83: ... DVD 006 JERROLD5 CABLE HITACHI2 PIONEER DVD RECORDER 007 JERROLD6 CABLE HITACHI3 PIONEER2 DVD RECORDER 008 JERROLD7 CABLE MAGNAVOX2 PIONEER3 DVD RECORDER 009 JERROLD8 CABLE MITSUBISHI PANASONIC DVD RECORDER 010 JERROLD9 CABLE MITSUBISHI2 PANASONIC2 DVD RECORDER 011 JERROLD10 CABLE MITSUBISHI3 PANASONIC3 DVD RECORDER 012 S A 1 CABLE MITSUBISHI4 PHILIPS DVD RECORDER 013 S A 2 CABLE MITSUBISHI5 SHAR...

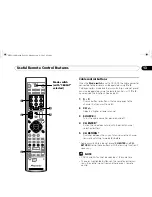
Page 84: ... 3 must first be learned before operating See page 82 1 RECEIVER STANDBY ON Turns the receiver power on and off 2 RECEIVER INPUT Selects the input source connected to the receiver 3 RECEIVER VOL Adjusts the receiver volume level Press VOL to increase the volume and VOL to decrease it NOTE The color highlighted buttons on the remote control can learn the control signal from another device s remote ...

Page 85: ...r or lower channel 3 SOURCE Turns the cable converter power on and off 4 CH ENTER Enters the selected channel with the direct channel selection buttons 5 CH RETURN Switches between the current channel and the channel you were watching immediately before Some manufacturers do not preset CH ENTER and CH RETURN Set up these buttons with the learning function if necessary NOTE CABLE and SAT cannot be ...

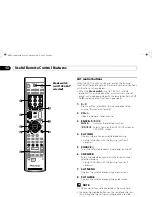
Page 86: ... function Selects items on the SAT GUIDE screen or SAT MENU screen 4 SAT INFO Displays information on satellite broadcasting Set up this button with the learning function if necessary 5 SOURCE Turns the Satellite broadcast tuner power on and off 6 CH ENTER Enters the selected channel with the direct channel selection buttons Set up this button with the learning function if necessary 7 SAT MENU Dis...

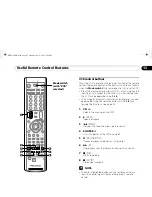
Page 87: ...t can also be operated using the remote control unit if 1 to 8 have learned the functions See page 82 1 CH Selects the channel on the VCR 2 PLAY Selects playback 3 REW Rewinds the tape and allows picture search 4 SOURCE Turns the power of the VCR on and off 5 PAUSE STILL Pauses playback and displays still pictures 6 FF Rapidly advances the tape and allows picture search 7 REC Starts recording 8 ST...

Page 88: ...u move back to the start of the previous chapter 5 SOURCE Turns the power of the DVD player or DVD recorder on and off 6 PAUSE STILL Pauses playback and displays still pictures 7 DVD MENU DVD DVD recorder Displays the DVD menu 8 ENTER DVD DVD recorder ENTER Activates the selected function Selects items on the DVD MENU screen 9 DVD TOP MENU DVD DVD recorder Displays the DVD top menu 10 SCAN CHAPTER...

Page 89: ... although you want to watch a TV channel See page 26 Check if you have activated the Parental Control function See page 39 Enter a password to temporarily cancel the Parental Control function See page 43 Check the cable connection with the antenna See page 20 Check the cable connection with the other equipment See pages 68 to 78 No picture Is connection to other components correct See pages 68 to ...

Page 90: ... A PARTICULAR PURPOSE ARE DISCLAIMED IN NO EVENT SHALL THE OpenSSL PROJECT OR ITS CONTRIBUTORS BE LIABLE FOR ANY DIRECT INDIRECT INCIDENTAL SPECIAL EXEMPLARY OR CONSEQUENTIAL DAMAGES INCLUDING BUT NOT LIMITED TO PROCUREMENT OF SUBSTITUTE GOODS OR SERVICES LOSS OF USE DATA OR PROFITS OR BUSINESS INTERRUPTION HOWEVER CAUSED AND ON ANY THEORY OF LIABILITY WHETHER IN CONTRACT STRICT LIABILITY OR TORT ...

Page 91: ... copies of such a program whether gratis or for a fee you must give the recipients all the rights that you have You must make sure that they too receive or can get the source code And you must show them these terms so they know their rights We protect your rights with two steps 1 copyright the software and 2 offer you this license which gives you legal permission to copy distribute and or modify t...

Page 92: ...means the preferred form of the work for making modifications to it For an executable work complete source code means all the source code for all modules it contains plus any associated interface definition files plus the scripts used to control compilation and installation of the executable However as a special exception the source code distributed need not include anything that is normally distr...

Page 93: ...ER PARTY WHO MAY MODIFY AND OR REDISTRIBUTE THE PROGRAM AS PERMITTED ABOVE BE LIABLE TO YOU FOR DAMAGES INCLUDING ANY GENERAL SPECIAL INCIDENTAL OR CONSEQUENTIAL DAMAGES ARISING OUT OF THE USE OR INABILITY TO USE THE PROGRAM INCLUDING BUT NOT LIMITED TO LOSS OF DATA OR DATA BEING RENDERED INACCURATE OR LOSSES SUSTAINED BY YOU OR THIRD PARTIES OR A FAILURE OF THE PROGRAM TO OPERATE WITH ANY OTHER P...

Page 94: ...s to the recipients so that they can relink them with the library after making changes to the library and recompiling it And you must show them these terms so they know their rights We protect your rights with a two step method 1 we copyright the library and 2 we offer you this license which gives you legal permission to copy distribute and or modify the library To protect each distributor we want...

Page 95: ...offer warranty protection in exchange for a fee 2 You may modify your copy or copies of the Library or any portion of it thus forming a work based on the Library and copy and distribute such modifications or work under the terms of Section 1 above provided that you also meet all of these conditions a The modified work must itself be a software library b You must cause the files modified to carry p...

Page 96: ... not necessarily be able to recompile the application to use the modified definitions b Use a suitable shared library mechanism for linking with the Library A suitable mechanism is one that 1 uses at run time a copy of the library already present on the user s computer system rather than copying library functions into the executable and 2 will operate properly with a modified version of the librar...

Page 97: ...e Library into other free programs whose distribution conditions are incompatible with these write to the author to ask for permission For software which is copyrighted by the Free Software Foundation write to the Free Software Foundation we sometimes make exceptions for this Our decision will be guided by the two goals of preserving the free status of all derivatives of our free software and of p...

Page 98: ...4QAM 256QAM QPSK demodulation Tuner VHF UHF VHF Ch 2 13 UHF Ch 14 69 CATV Ch 2 135 Audio format Dolby Digital Reception System Analog American TV standard NTSC system Circuit type Video signal detection PLL full synchronous detection PLL digital synthesizer system Tuner VHF UHF VHF Ch 2 13 UHF Ch 14 69 CATV ANT CABLE A IN Ch 1 135 ANT B IN Ch 1 125 Audio multiplex BTSC system Terminals Rear ANT CA...

Page 99: ... a registered trademark of Video Electronics Standards Association CableCARD is a trademark of Cable Television Laboratories Inc The names of the companies or institutions are trademarks or registered trademarks of the respective companies or institutions License The TV Guide On Screen system is manufactured under license from Gemstar TV Guide International Inc and or one of its affiliates Patent ...

Page 100: ...PRO1130HD book Page 100 Monday July 11 2005 9 26 AM ...

Reviews: