background image

42

En

Tuner Setup

09

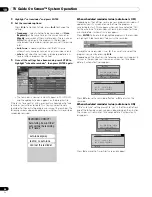
Setting your favorite channels 

Set up to 10 TV channels to each of the four color buttons on the 
remote control unit (40 channels in total). You can then quickly 
select from only your favorite channels.

1

Press HOME MENU.

2

Select “Tuner Setup” ( /  then ENTER).

3

Select “Favorites” ( /  then ENTER).

4

Select a color button (A, B, C, D) ( /  then ENTER).

5

Select a TV channel to be registered ( /  then ENTER).

• A star appears beside the favorite channels currently 

selected.

• To register another TV channel under the same color 

button, repeat step 5. To register another TV channel under 
a different color button, repeat steps 4 and 5.

6

Press HOME MENU to exit the menu.

Setting up closed captions

Your plasma display is equipped with an internal closed caption 
decoder. Closed caption allows you to view conversations, 
narration, and sound effects in TV programs and home videos as 
subtitles on your plasma display screen.

You may enjoy digital closed captions when watching digital TV 
programs. Digital closed captions allow you to change 
parameters such as fonts and colors.

• Not all programs and videos offer closed caption. Please look 

for the “

” symbol to ensure that captions will be shown.

• No Closed Caption setting is available for any content played or 

displayed in the Home Media Gallery.

Activating the closed caption

1

Press HOME MENU.

2

Select “Tuner Setup” ( /  then ENTER).

3

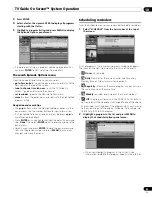
Select “Closed Captions” ( /  then ENTER).

4

Select “Status” ( /  then ENTER).

5

Select “On” or “On If Mute” ( /  then ENTER).

6

Press HOME MENU to exit the menu.

Selecting the type of conventional closed 
captions

Select the type of conventional closed captions that you will 
watch after tuning to a conventional TV channel. This selection 
also becomes effective when a selected digital TV program 
provides only conventional closed captions.

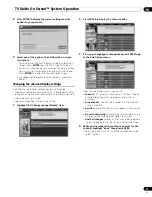
• “CC 1”, “CC 2”, “CC 3”, or “CC 4” displays subtitles of TV 

dramas and news programs while allowing a full view of the 
picture.

• “Text 1”, “Text 2”, “Text 3”, or “Text 4” superimposes on the 

picture other information (e.g. TV guide, weather) that is 
independent of the TV program in progress.

1

Press HOME MENU.

2

Select “Tuner Setup” ( /  then ENTER).

3

Select “Closed Captions” ( /  then ENTER).

4

Select “Analog Settings” ( /  then ENTER).

5

Select the desired closed caption ( /  then ENTER).

• The factory default is “CC 1”.

6

Press HOME MENU to exit the menu.

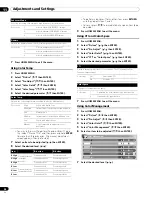
Selecting digital closed captions

Use the following procedure to select digital closed captions: 
Service 1 to 6. 

1

Press HOME MENU.

2

Select “Tuner Setup” ( /  then ENTER).

3

Select “Closed Captions” ( /  then ENTER).

4

Select “Digital Settings” ( /  then ENTER).

5

Select “Digital Service” ( /  then ENTER).

6

Select the desired closed caption ( /  then ENTER).

• The factory default is “Service 1”.

Favorites

Favorites

Current Favorites A Line Up
B0008.000          A0009.000

Favorites

B        9.0

xxxxxxxxxxxxxxxxxxxxx

A      11.0
B      11.0

A

Exit

Home Menu

A

A0011.000

B        8.0
A        9.0

Closed Captions

Status

Status

xxxxxxxxxxxxxxxxxxxxx

On

On If Mute

Off

Exit

Home Menu

Item

Description

Off
(default)

Does not show closed captions

On

Always shows closed captions

On If Mute

Shows closed captions only while sound is being 
muted

Analog Settings

xxxxxxxxxxxxxxxxxxxxx

Closed Captions

Analog Settings

CC3

CC2

CC1

Text 1

CC4

Exit

Home Menu

Digital Settings

Digital Settings

Digital Service

xxxxxxxxxxxxxxxxxxxxx

Closed Captions

Digital Service

Service 3

Service 4
Service 5

Service 2

Service 1

Exit

Home Menu

PRO1150HD.book  Page 42  Tuesday, April 17, 2007  9:34 AM

Summary of Contents for Elite PRO-1150HD

Page 1: ...Operating Instructions PLASMA DISPLAY SYSTEM PRO 1150HD PRO 950HD ...

Page 2: ...ower supply cord or plug is damaged liquid has been spilled or objects have fallen into the apparatus the apparatus has been exposed to rain or moisture does not operate normally or has been dropped 11 12 13 14 WARNING This equipment is not waterproof To prevent a fire or shock hazard do not place any container filed with liquid near this equipment such as a vase or flower pot or expose it to drip...

Page 3: ...ate radio frequency energy and if not installed and used in accordance with the instructions may cause harmful interference to radio communications However there is no guarantee that interference will not occur in a particular installation If this equipment does cause harmful interference to radio or television reception which can be determined by turning the equipment off and on the user is encou...

Page 4: ...emote control unit 25 Allowed operation range of the remote control unit 25 06 Basic Operations 26 Turning on the power 26 Turning off the power 26 Watching TV channels 27 Selecting the antenna 27 Changing channels 27 Changing the volume and sound 28 Changing the language 28 Setting MTS SAP mode 29 Viewing a channel banner 30 Using the POD service 30 Using the multiscreen functions 30 Splitting th...

Page 5: ...5 Using the Picture Detail 55 Using Color Temp 56 Using CTI and Color Space 56 Using Color Management 56 Eliminating noise from images 57 Using the 3DYC and I P Mode 57 Comparing picture adjustments on the screen 58 Sound adjustments 58 Power Control 59 Energy Save 59 No Signal off AV source only 59 No Operation off AV source only 60 Power Management PC source only 60 Sleep Timer 60 Image position...

Page 6: ...lossary 87 13 Using the HDMI Control 88 Using the HDMI Control functions 88 Making the HDMI Control connections 89 Setting the HDMI Control 90 Using the HDMI Control menus 91 14 Useful Remote Control Features 92 Learning function of the remote control unit 92 Using the learning function 92 Presetting manufacturer codes to control other devices 92 Presetting manufacturer codes 92 Library Search 92 ...

Page 7: ...e WIDE or FULL screen setting for over three times longer than the previous still moving image After using the plasma display always switch the display to STANDBY mode Extensive viewing of content with top bottom or side masks may cause uneven wear After viewing masked content it is recommended to view full screen motion video for an equal or greater amount of time Installation guidelines The Pion...

Page 8: ...osed of extremely fine pixels and these pixels emit light according to received video signals This principle may cause you to hear a buzz or electrical hum coming from the plasma display Do not attach such items as labels and tape to the product This may result in the discoloration or scratch of the cabinet When not using the product for a long period of time If you do not use the product for a lo...

Page 9: ...ages after displaying still images for a period of time may cause image retention In most cases the image retention can be corrected by displaying bright images for a similar period of time If you display still images on your plasma display for long periods of time image retention may be irreparable Caution Panel sticking and after image lag Displaying the same images such as still images for a lo...

Page 10: ...me consult your dealer or local power company 12 Power cord protection The power cords must be routed properly to prevent people from stepping on them or objects from resting on them Check the cords at the plugs and product 13 The plasma display used in this product is made of glass Therefore it can break when the product is dropped or applied with impact Be careful not to be injured by broken gla...

Page 11: ...ounting surface of the plasma display See the side view above Be careful not to block the ventilation opening at the rear of the plasma display Be sure to install the plasma display on a flat surface because it contains glass The screw holes other than the above are to be used only for the specified products Never use them for mounting non specified products Note It is strongly recommended to use ...

Page 12: ...eries for remote control unit Remote control unit Operating instructions Speaker accessories for PRO 1150HD only Speaker mounting screws M5 10 mm Black 16 Plastic bands x 2 Screws M4 x 10 mm x 2 for plastic bands Speed clamps 3 Bracket for TOP RIGHT Speaker Mounting Fittings Bracket for TOP LEFT Bracket for BOTTOM LEFT Bracket for BOTTOM RIGHT Speaker cables 2 ...

Page 13: ...HANNEL UP DOWN buttons LEFT RIGHT buttons 11 TV GUIDE button 12 USB port 13 PHONES output terminal 14 INPUT 3 terminals COMPONENT VIDEO Y PB PR 15 INPUT 3 terminal VIDEO 16 INPUT 3 terminals AUDIO The buttons with asterisks can operate the TV Guide On Screen system 5 3 Viewed from below of the display Viewed from the front side of the display Side PRO 1150HD PRO 950HD Side 1 4 3 2 5 6 6 4 2 1 13 1...

Page 14: ... 18 INPUT 2 terminals AUDIO 19 INPUT 4 terminals AUDIO 20 INPUT 5 terminals AUDIO 21 INPUT 2 terminal VIDEO 22 IR REPEATER OUT terminal 23 DIGITAL OUT terminal OPTICAL 24 PC INPUT terminal AUDIO 25 INPUT 2 terminals COMPONENT VIDEO Y PB PR 26 SPEAKERS R L terminals 27 SPEAKERS R terminal Speaker side 28 SPEAKERS L terminal Speaker side 4 5 4 5 4 5 4 5 4 5 4 5 PRO 1150HD PRO 950HD 24 23 18 15 16 17...

Page 15: ...ing A B C and D 12 0 to 9 Selects the channel 13 dot Enters a dot 14 CH Selects the channel 15 SPLIT Switches the screen mode among 2 screen picture in picture and single screen 16 FREEZE Freezes a frame from a moving image Press again to cancel the function 17 MTS Selects MTS SAP or language depending on the program being watched 18 D Lights up all buttons Lights turn off if no operations are per...

Page 16: ... not use the speaker with anything other than the plasma display Doing so may result in damage or fire Be sure to turn the connected devices off and remove the power cord from the power outlet beforehand when changing the connection or installation method When using a tone control function to greatly emphasize treble sounds do not use excessive amplifier volume Please handle the speaker with suffi...

Page 17: ...e by the same procedure PRO 1150HD with the speaker installed with the Pioneer table top stand Speaker mounting fitting for TOP RIGHT Speaker mounting screw M5 x 10 mm Speaker cable Speaker mounting fitting for BOTTOM RIGHT Speaker mounting screw M5 x 10 mm Speaker mounting screw M5 x 10 mm Speaker mounting screw M5 x 10 mm Speaker mounting screw M5 x 10 mm Bead band Accessories of the plasma disp...

Page 18: ...ws firmly 5 Tighten the two screws at the top and bottom for each speaker total of four screws thus fixing the speakers to the display 6 Pass the supplied speaker cable between the speaker and the plasma display below the speaker mounting fitting from below 7 Connect the speaker cables to the speaker see next page 8 Insert the cable in the groove on the speaker 9 Connect the other end of the speak...

Page 19: ...ve load may be applied to the plasma display resulting in interrupted operation or malfunction Incorrect connections of the speaker cable to the right or left of the plasma display terminals with respect to the polarity may result in insufficient stereo sound effects delivering poor bass sounds or unstable sound image Bundle the cable without pulling Connecting the speaker cables to the rear of pl...

Page 20: ...ok Nominal diameter 8 mm length 12 mm to 18 mm 0 5 inches to 0 7 inches Caution A table or rack with adequate strength should always be used to support the plasma display Failure to do so could result in personal injury and physical damage When installing the plasma display please take the necessary safety measures to prevent it from falling or overturning in case of emergencies such as earthquake...

Page 21: ...e display from scratches or damage Work only with the plasma display lying flat on a table or similar surface When lying the plasma display down be careful not to scratch or damage it If the speaker has been installed it is recommended to detach the speaker before removing the stand for PRO 1150HD only Attaching the stand again 1 With the plasma display lying flat fit the stand s support columns t...

Page 22: ...ioneer speaker on pages 16 PRO 1150HD only Note Be sure to install the plasma display in a flat stable location Insert the screws into the holes vertically and tighten them Place a sheet or protective cover to protect the display from scratches or damage Work only with the plasma display lying flat on a table or similar surface When lying the plasma display down be careful not to scratch or damage...

Page 23: ...and ANT B IN terminals Similarly do not connect a cable from an antenna to both the ANT CABLE A IN and ANT B IN terminals TV Guide may not be available in all areas and is not available with satellite systems In addition as content providers move to digital programming and broadcasting TV Guide Data may be unavailable or become unavailable Inserting the CableCARD The plasma display is equipped wit...

Page 24: ...ct the power cord after all component connections have been completed Plasma display rear view Note Always turn off the power of the plasma display when connecting or disconnecting power cords Disconnect the power cord from the power outlet when the plasma display is not going to be used for a long period of time Rear view When the speaker is installed under the plasma display panel for PRO 1150HD...

Page 25: ... remote control sensor located on the PRO 950HD see Part Names on page 13 Cautions regarding the remote control unit Do not expose the remote control unit to shock liquid or high humidity Do not place the remote control unit under direct sunlight the unit may deform The remote control unit may not work properly if the remote sensor window of the plasma display is under direct sunlight or strong li...

Page 26: ...current status of the system with the indicators on the plasma display For other than the above see Troubleshooting on page 103 Note You can select Auto High Mid or Low for the brightness of the POWER ON indicator When Auto is selected the brightness of the indicator changes to High Mid or Low to match the brightness level of the viewing area For details see Blue LED Dimmer on page 64 Caution Whil...

Page 27: ...To increase the channel number press CH on the remote control unit To decrease the channel number press CH CHANNEL on the plasma display operates the same as CH on the remote control unit Press CH RETURN to switch the currently tuned channel to the previously tuned channel Press CH RETURN again to restore the currently tuned channel Using 0 to 9 and dot on the remote control unit Select channels d...

Page 28: ...ected a digital TV program that provides multi language services you can switch among the languages by pressing MTS on the remote control unit Each time you press MTS the language switches Note Switchable languages differ depending on the current broadcast If the language selected through language setting is available when the channel or program is changed you will hear that language If you are wa...

Page 29: ...even if the system receives a stereo broadcast You must reselect the STEREO mode if you want to hear stereo sound again Selecting MTS while the input source is INPUT 1 to INPUT 7 or PC does not change the type of sound In this case sound is determined by the video source The MTS button is disabled while the TV Guide On Screen system is displayed In each of the MTS SAP modes selected the display ch...

Page 30: ...y certain types of program information Using the POD service If you have watched digital and or High Definition TV channels over cable you can use the POD service provided by the cable TV company This service presents various types of useful information using HTML text Press HOME MENU 9 9 then 9 to view the POD display Using the multiscreen functions Splitting the screen Use the following procedur...

Page 31: ...ou press HOME MENU the single screen mode is restored and the corresponding menu is displayed When the two screens show the same analog broadcasting coming through antenna A and B the picture quality may differ between the two screens Displaying pictures in multi screen mode for an extended period may cause an after image Freezing images Use the following procedure to capture and freeze one frame ...

Page 32: ...able in all areas As content providers move to digital programming and broadcasting TV Guide data may be unavailable or become unavailable Setting up the TV Guide On Screen system When the plasma display is powered on for the very first time you are automatically taken through the setup process Immediately thereafter the TV Guide On Screen setup process begins starting with the Welcome Screen Setu...

Page 33: ...ew the information you entered Press ENTER to display Screen 3 If you selected Canada in Screen 1 you see the Postal Code screen Input Postal Code by pressing to scroll through letters or numbers and then to move to the next character field Press to highlight Next Press ENTER to display Screen 3 Screen 3 Select service s Press to highlight the connected video source s for which you would like to r...

Page 34: ...34 En TV Guide On Screen System Setup 07 Screen 5 Are the settings correct If you select Yes you see Screen 6 If you select No you see Screen 1 Screen 6 Congratulations ...

Page 35: ...vels by pressing RETURN HOME MENU Item Page Picture AV Selection 53 Contrast 54 Brightness 54 Color 54 Tint 54 Sharpness 54 Pro Adjust 54 Reset 54 Sound Treble 58 Bass 58 Balance 58 Reset 58 Sound Effect 59 Power Control Energy Save 59 No Signal off 59 No Operation off 60 Sleep Timer 60 Option Position 60 Auto Size 63 Side Mask 63 HDMI Input 66 HDMI Control Setting 90 Blue LED Dimmer 64 Orbiter 64...

Page 36: ...tep 6 When using the Cable Converter you may need to manually add Cable Converter output channels Setting up TV channels manually This section describes how to manually set up TV channels that have not been set up by Auto Channel Preset 1 Press HOME MENU 2 Select Tuner Setup then ENTER 3 Select Channel Setup then ENTER 4 Select Ant A or Ant B then ENTER 5 Select Add Channel then ENTER 6 Select a c...

Page 37: ...th a None rating include Emergency Bulletins such as EAS messages weather warning and others Locally originated programming News Political Public Service Announcements Religious Sports Weather No Parental Control setting is available for any content played or displayed in the Home Media Gallery Voluntary movie rating system MPAA Note The voluntary movie rating system only uses an age based rating ...

Page 38: ... time you press ENTER the setting is switched A lock icon appears beside the blocked rating All the ratings have been unblocked before shipment 6 Press HOME MENU to exit the menu Note Blocking a rating causes more severe ratings to be automatically blocked as well Likewise unblocking a rating causes less severe ratings to be automatically unblocked Setting the TV ratings 1 Press HOME MENU 2 Select...

Page 39: ...al Control TV Parental Guidelines Fantasy Violence TV Parental Guidelines Blocked TV Parental Guidelines xxxxxxxxxxxxxxxxxxxxx xxxxxxxxxxxxxxxxxxxxx xxxxxxxxxxxxxxxxxxxxx Violence Sexual Situations Exit Home Menu Unavailable Ratings xxxxxxxxxxxxxxxxxxxxx xxxxxxxxxxxxxxxxxxxxx xxxxxxxxxxxxxxxxxxxxx Unavailable Ratings Block Don t Block Parental Control Exit Home Menu Rating Description Age Base E E...

Page 40: ...broadcasts a New Parental Control menu appears on the screen This tells you that you must now change your Parental Control settings to handle these new ratings Otherwise ratings you had previously blocked may become unblocked 1 Press HOME MENU 2 Select Tuner Setup then ENTER 3 Select Parental Control then ENTER The new menu is displayed when Status is selected and the message Regional ratings have...

Page 41: ...ing but a message The method for temporarily deactivating the Parental Control differs depending on the currently selected input source Antenna A or antenna B The following screen appears Press ENTER Enter your four digit password The password entry screen stays only for one minute After the screen disappears pressing ENTER causes it to appear again INPUT 1 to INPUT 3 Enter your four digit passwor...

Page 42: ...l TV channel This selection also becomes effective when a selected digital TV program provides only conventional closed captions CC 1 CC 2 CC 3 or CC 4 displays subtitles of TV dramas and news programs while allowing a full view of the picture Text 1 Text 2 Text 3 or Text 4 superimposes on the picture other information e g TV guide weather that is independent of the TV program in progress 1 Press ...

Page 43: ...not be displayed regardless of the Auto Manual Set setting 8 Select Auto Manual Set then ENTER 9 Select Auto Set or Manual Set then ENTER 10 If you select Auto Set select an antenna A or B and a channel number using and ENTER The date and time will be automatically corrected using data from the selected channel If you select Manual Set manually set the date and time using and ENTER 11 Press HOME M...

Page 44: ...ected service 6 Service bar Gives access to the various services of the Guide 7 Info Bar Shows various icons to convey information or show the status of an item 8 Title tile Shows the title of the TV program 9 Video window Allows you to continue watching the current program while using the Guide or to view the program selected in the listings 10 Panel ads and panel menu entry Space for show or pro...

Page 45: ...y showing program highlighted press ENTER to start watching Move right for later time slots Press PAGE to scroll one vertical screen at a time Press INFO to display additional information if available about the currently selected program Press DAY to jump to the next previous day in the listings grid Setting program reminders By setting a program reminder you can have the TV alert you when a progr...

Page 46: ...appear on your TV screen around the time the program is scheduled to start This happens when you have selected NO for the auto tune The reminder will remain on screen for three minutes before it automatically disappears Press ENTER to tune to the highlighted program in the reminder or highlight hide reminders to dismiss the reminder If more than one reminder is set for the same time select the pro...

Page 47: ...rch category bar then press to select a search category Available categories may include Movies Sports Children Educational News Variety Series HDTV 3 Press to move to the search sub categories and select the sub category you want The sub categories available depend on the category you chose in the last step 4 Press ENTER to display a listing of upcoming programs that match the categories you chos...

Page 48: ...ct the category you want To search using only the keyword leave the category set to All If you select a category HDTV for example then you ll only see programs in that category that also match the keyword 6 Highlight enter keyword and press ENTER 7 Input the keyword for the search Highlight characters by pressing then pressing ENTER to input them The keyword you input is stored so that you can use...

Page 49: ...one then press ENTER again to execute and close the panel menu Select Cancel and press ENTER to close the panel menu and return to the previous screen or press MENU to cancel any changes and close the menu Scheduling reminders From the Schedule area you can review edit or delete reminders 1 Select SCHEDULE from the Service bar at the top of the screen A list of programs that have remind events sch...

Page 50: ...returns to the Service bar at the top of the screen When a program is highlighted go to Service Bar closes the panel menu and returns to the Service bar at the top of the screen watch now start watching the selected program this option is tune to channel for a program that isn t showing now cancel closes the panel menu and returns to the highlighted program listing For reminder delete reminder rem...

Page 51: ...available Auto Hide the tuned channel number the channel position in the channel listing 1 Highlight the Change channel display item 2 Press ENTER to display the channel editor 3 Press to highlight a channel then press ENTER to go to the Grid Options menu From the Grid Options menu you can set channel On display in channel list Off don t display or Auto Hide hide when no program information is ava...

Page 52: ...Channel ID in Listings Logo Number Both default Auto guide whether Guide appears automatically when the unit is powered On On Off default Remind defaults auto tune automatically tunes to the correct channel when a reminder becomes due Yes or No when when to display the reminder 15 minutes early to 15 minutes late or On time 3 When you ve made all the settings you want highlight done then press ENT...

Page 53: ...ge the AV selection mode but you cannot select USER As the OPTIMUM function automatically optimizes image quality the process in which image settings such as brightness and tint gradually change may be seen on the screen This is not a malfunction When OPTIMUM is selected images are reproduced based on the information collected at the Room Light Sensor as well regardless of its setting On or Off fo...

Page 54: ...ctions such as OPTIMUM Room Light Sensor and Intelligent Mode are temporarily turned off when the Picture menu is displayed This may cause the screen brightness to suddenly change as you open the menu You may experience a sudden change in the image position and screen brightness when you open the Picture menu Picture AV Selection Contrast Brightness Color Tint Sharpness Pro Adjust Reset OPTIMUM 40...

Page 55: ...then ENTER You can select DRE Picture Black Level ACL Enhancer Mode or Gamma 6 Select the desired parameter then ENTER PureCinema Automatically detects a film based source originally encoded at 24 frames second analyzes it then recreates each still film frame for high definition picture quality Film Mode Off Deactivates the PureCinema Standard Produces smooth and vivid moving images film specific ...

Page 56: ...en ENTER 7 Select the desired level Enhancer Mode Selects processing of the image s high frequency detailed areas Selections 1 Selects Hard SHARPNESS image 2 Selects Natural SHARPNESS image 3 Selects Soft SHARPNESS image Gamma Adjusts the gamma characteristics image gradation characteristics Selections 1 Selects gamma characteristics 1 2 Selects gamma characteristics 2 3 Selects gamma characterist...

Page 57: ...Item button button R Closer to magenta Closer to yellow Y Closer to red Closer to green G Closer to yellow Closer to cyan C Closer to green Closer to blue B Closer to cyan Closer to magenta M Closer to blue Closer to red 3DNR Eliminates video noise for clean crisp images 3DNR stands for 3 dimensional Noise Reduction Selections Off Deactivates 3DNR High Enhanced 3DNR Mid Standard 3DNR Low Moderate ...

Page 58: ...y and the button no longer works If you move and change the AV Selection parameter the new entry in the current parameter is stored in the memory and the button continues to work You cannot compare images between different parameters on the AV Selection menu STANDARD and MOVIE for example When you select this function OPTIMUM on the AV Selection menu Intelligent Mode for Pro Adjust on the Picture ...

Page 59: ...o Signal off AV source only The system will be automatically placed into the standby mode if no signal is received for 15 minutes 1 Press HOME MENU 2 Select Power Control then ENTER 3 Select No Signal off then ENTER 4 Select Enable then ENTER 5 Press HOME MENU to exit the menu Note Five minutes before the system is placed into the standby mode a message appears every minute The system may not be p...

Page 60: ...After checking the time press HOME MENU to restore the previous display The SLEEP indicator on the front of the plasma display lights orange when the sleep timer is set About Option menus The Option menu consists of two screens To select the desired menu press repeatedly to switch between Screen 1 and Screen 2 The current screen number appears at the top right corner on the screen Item Description...

Page 61: ...uto Setup Depending on the displayed video the image position may not change even after adjustment This function is not selectable when the PC is connected to the HDMI terminal Manual image position and clock adjustments PC source only Usually you can easily adjust the positions and clock of images using Auto Setup Use Manual Setup to optimize the positions and clock of images when necessary 1 Pre...

Page 62: ...IDE selected part of the screen e g images graphic interface may not appear on the display If this is the case select FULL Some HD broadcasts may display 4 3 content with side masks which may cause uneven wear After viewing it is recommended to view full screen motion video see Detecting side masks on page 63 The selectable screen sizes may differ depending on the conditions You can freely change ...

Page 63: ... aspect ratio images containing side masks will be detected automatically and side masks will be added or the image displayed in full screen This Side Mask detection does not operate on 4 3 content displayed in SD standard definition broadcasts AUTO will appear on the channel display when this function is on Detection errors may occur depending on the HD content In case a detection error occurs ma...

Page 64: ...ption then ENTER 3 Select Orbiter then ENTER 4 Select On then ENTER 5 Press HOME MENU to exit the menu To cancel this function select Off in step 4 Note When the Orbiter function is set to On the image may appear to drop slightly on the screen This function does not operate when PC signals are received Video Pattern You can display the Video Pattern screen that also helps eliminate after image whe...

Page 65: ...age To watch a DVD image press INPUT 2 on the remote control unit or press INPUT on the plasma display to select INPUT 2 Note Refer to your DVD player instruction manual for the signal type The INPUT 2 terminals are checked whether they are connected in the following order 1 Component Video 2 S Video 3 Video Use the desired connection for viewing Connect external equipment to only terminals that a...

Page 66: ...lasma display also supports RGB YCbCr30 bit 36 bit signals This enables finer minute color reproduction when a device that supports Deep Color signals HDMI1 3 is connected to the plasma display When Deep Color signals are received the color depth appears on the channel display Note It may take a short while until the image is displayed depending on the equipment connected When connecting a PC to t...

Page 67: ... of audio signals When you use the INPUT 4 or INPUT 5 HDMI terminal select the terminal for the desired input source then perform the following procedure to specify the type of audio signals 1 Press HOME MENU 2 Select Option then ENTER 3 Select HDMI Input then ENTER 4 Select Audio then ENTER 5 Select the type of audio signals then ENTER If you select Auto an attempt will be made to identify the ty...

Page 68: ...he AV receiver However this method may result in audio delay between the speakers and AUDIO which may be reduced by muting the speakers on the plasma display Nonetheless you may experience delay between audio and video Connecting an AV receiver Note When using the digital audio output terminal optical you need to make settings depending on your AV receiver For more information see the instruction ...

Page 69: ... from the personal computer press PC on the remote control unit or press INPUT on the plasma display to select PC Note The PC terminals cannot be used for audio visual equipment Signal names for 15 pin mini D sub connector Computer compatibility chart Item Description Dolby Digital default For Dolby Digital encoded signals outputs in the Dolby Digital format For PCM encoded signals outputs in the ...

Page 70: ...eration function and the DSP surround mode display function For more information see the instruction manual that came with the Pioneer AV receiver supporting SR Note When making control cord connections use the SR cable When making control cord connections with one or more pieces of Pioneer equipment directly connect the plasma display and the Pioneer amplifier that supports SR Do not connect othe...

Page 71: ...ome Networked Device Interoperability Guidelines v1 0 When a PC running DLNA server software or other DLNA compatible device is connected to this player some setting changes of software or other devices may be required Please refer to the operating instructions for the software or device for more information DLNA and DLNA CERTIFIED are trademarks and or service marks of Digital Living Network Alli...

Page 72: ...and Subnet mask Use the 0 to 9 and buttons to enter an address then press ENTER You do not need to enter Default Gateway and DNS Server 6 Select OK then ENTER The Reset dialog appears on screen 7 Select OK and press ENTER The home network module restarts A message Setting up Home Media Gallery Please wait until initialized appears on screen When the initialization is finished setting values become...

Page 73: ... displayed data inside the memory may be damaged Do not insert or remove the USB device immediately after the system is switched On or Off This action may cause data inside the memory to be damaged Pioneer is not liable for any loss or damage to the data inside the USB flash drive Starting the Home Media Gallery function 1 Press HOME MEDIA GALLERY The Home Media Gallery screen is displayed 2 Selec...

Page 74: ...gs Detailed Display Select Searver Stop Music 1 27 1 Tool D XXXX XXXX XXXX XXXX XXXX XXXX XXXX XXXX All Photos 1 27 1 Tool D Title XXXX Album XXXX Date 2006 11 19 Server XXXXXX Title XXXX Album XXXX Date 2006 11 19 Server XXXXXX All Photos 1 27 1 Tool D XXXX XXXX XXXX XXXX All Photos 1 27 1 Tool D Title XXXX Album XXXX Date 2006 11 19 Server XXXXXX List screen Thumbnail screen Thumbnail List scree...

Page 75: ... Media Navigator To edit a Playlist use the Tool Menu page 74 1 Press HOME MEDIA GALLERY The Home Media Gallery screen is displayed 2 Select My Playlist then ENTER 3 Select a Playlist list from Movie Playlist Music Playlist or Photo Playlist then ENTER 4 Select the desired content or then ENTER The menu can be displayed as a List Thumbnail or Thumbnail List screen Press D then select Change view f...

Page 76: ...while in the slow mode A BLUE Sets A B repeat mode Sets the desired point A to start and B to end during playback To cancel the mode press A BLUE on the remote control B RED Every press toggles the repeat mode between No Repeat and Repeat Once or between No Repeat Repeat Once and Repeat All while in Playlist C GREEN Available only in Playlist or Consecutive Playback mode Every press toggles the ra...

Page 77: ...d hold for Fast Forward Forward Reverse 15 sec 1 While playing content press and hold or to jump backward or forward in 15 second increments A B Repeat Mode 1 While playing content press A where you want repeat to start 2 Press A again where you want repeat to end The Player status appears on the screen and the A B mode icon changes The selected movie scenes are repeatedly played back To return to...

Page 78: ...the Playlist screen or plays the selected music content if different content is highlighted by pressing Fast reverse during playback or when in PAUSE Each press toggles the reverse speed between x 2 x 4 x 8 x 20 x 50 and x 100 When the beginning of the content is reached it pauses Fast forward during playback or when in PAUSE Each press toggles the forward speed between x 2 x 4 x 8 x 20 x 50 and x...

Page 79: ...Thumbnail List screen Press D then select an option under Change view on the Tool Menu You can also navigate through the subsequent or preceding menu levels in the server or USB device by pressing ENTER When you select photo content from the server menu on the Media Navigator screen the Photo Player automatically launches The selected content is displayed in full screen by pressing ENTER Select a ...

Page 80: ...ile in PAUSE RETURN Stops the Player and returns to the previous screen List Thumbnail Thumbnail List Displays the previous image content Display the next image content PLAY Plays a slideshow PAUSE Pauses the slideshow STOP Stops the Player and returns to the previous screen List Thumbnail Thumbnail List FF Rotates the image 90º clockwise Each press toggles the rotation angle by 90º between 90º 18...

Page 81: ...ETURN or Stop during the playback The previous screen returns Note When you press while photo content is displayed the Photo Player goes into PAUSE Rotating the image 1 Press HOME MEDIA GALLERY The Home Media Gallery screen is displayed 2 Select photo content in the Media Navigator USB device or My Playlist then ENTER The photo content is displayed in full screen To stop the slideshow press ENTER ...

Page 82: ...t in the Media Navigator then ENTER 3 Press D then select Sort from the Tool Menu then ENTER A Sort dialog screen appears 4 Select Bottom Up or Top Down in the Sort Order box then ENTER 5 Select OK on the Sort dialog screen then ENTER The sorting starts based on your selection and sort results are displayed Even while sorting you can select content to play To return to the sort screen press RETURN...

Page 83: ...PC etc you use For enter 3 digit figures 0 254 that have not been used for network connections yet 5 Press ENTER on the setup item s box after the entry is complete The screen turns to setup selection mode Repeat steps 2 to 4 to complete the necessary setup 6 Select OK then ENTER A restart dialog screen appears 7 Press ENTER again on the dialog screen The setup finishes The system restarts then th...

Page 84: ...ed in a yellow box Source Selection mode 2 Select the desired content then ENTER The selected content is highlighted in the yellow box A specific icon appears on the left Destination Selection mode 3 Press to move the content up or down then ENTER The highlight in the yellow box disappears and the specific icon returns to the original one Repeat steps 2 and 3 to move another content 4 Press RETURN...

Page 85: ... of the names of the files or folders updating may not work properly A ZIP compressed file cannot be used to update your software Make sure to decompress the file before copying it to the USB flash drive Software to decompress ZIP files is not supplied with the plasma display The software is available on the Internet Confirming the existing Home Media Gallery version Be sure to check the version o...

Page 86: ...as you have checked in the Single Server USB box If not the list may be displayed at any time Media Navigator Server When a single server is connected the Server List is skipped as long as you have checked in the Single Server USB box If not the list may be displayed at any time When the Last Connected Server box is checked the other server setup option Single Server USB becomes invalid Setup 1 So...

Page 87: ...four pins A straight cable is used when connecting the plasma display to a home network via a hub A cross over cable is used when connecting directly to a PC Use category 5 CAT 5 LAN cables MAC Media Access Control Address An address attached to the port of any network device with an IP address The MAC address is expressed as 00 e0 36 01 23 xx and cannot be changed Mass Storage Class devices The s...

Page 88: ...layback of content The proper input source is automatically selected and the content is played back on the plasma display as you press PLAY on the connected device Recorder player On screen control Recorder player operation can be controlled on screen or with the remote control unit of the plasma display play stop fast forward reverse etc Recorder player Display Language Setup Information on the d...

Page 89: ...asma display and all the connected devices 2 Confirm that the setting in Input Setting for HDMI Control Setting is properly entered according to the connected devices Also confirm the HDMI Control related settings in the connected devices 3 Switch to the HDMI input terminals to which the devices are connected to check if audio and video images are properly output and displayed 4 Try turning off th...

Page 90: ...nput Setting for HDMI Control Setting Be sure that the setting is entered in each HDMI input terminal to which the device is connected Settings in the connected device s are also required to use the HDMI Control functions For details see the operation manual that came with the connected device s For more information on the devices that support the HDMI Control functions check the Pioneer Web site ...

Page 91: ...er On Off control function is effective between the plasma display and the connected device 1 Repeat steps 1 to 3 in Selecting the Power Off Control 2 Select Power On Test or Power Off Test then ENTER A list containing devices appears when multiple HDMI devices are connected to the HDMI terminals 3 Select the desired device then ENTER 4 Press HOME MENU to exit the menu Note Devices that can be che...

Page 92: ...witch position or even if the switch is shifted to a different position Presetting manufacturer codes to control other devices Presetting manufacturer codes 1 Slide the Mode switch to match the type of device to be preset 2 Press EDIT LEARN and 1 at the same time The LED flashes 3 Press 0 to 9 to enter the manufacturer code See page 94 Preset mode is finished when the LED blinks Off Library Search...

Page 93: ...o exit the Edit mode before it is complete press EDIT LEARN again If the Mode switch selection is changed when in the Edit mode the Edit session is canceled If no operation is performed within one minute the Edit session is canceled When you enter an unlisted code the LED flashes repeatedly If the tables on pages 94 to 98 do not include your device s manufacturer or the remote control does not wor...

Page 94: ...017 0021 Zenith 0000 0525 0899 0017 Digi 0637 Multitech 0883 Director 0476 Myrio 1602 1822 Dumont 0637 Nova Vision 0008 Sejin 1602 Emerson 0014 Novaplex 0008 0017 Signal 0011 Brand Codes Brand Codes Brand Codes Brand Codes A Mark 0210 GE 0392 0566 MegaSat 1551 Realistic 0052 AlphaStar 0772 General Instrument 0869 Memorex 0724 0269 Samsung 1377 1142 1276 1108 1109 1442 1609 Amino 1615 GOI 0775 1775...

Page 95: ...erFocus 1346 Kodak 0035 0037 NAD 0240 0104 0058 Beaumark 0240 Fisher 0039 0047 0000 0104 0046 0054 KTV 0000 NEC 0104 0067 0041 0038 0040 0050 0082 0457 Bell Howell 0035 0048 0039 0000 0104 0046 0479 LG 0037 0240 0038 1037 1137 Fuji 0035 0033 Broksonic 0184 0121 0209 0002 0208 0479 1815 Fujitsu 0000 Linksys 1972 New Tech 0072 Funai 0037 0000 0072 0278 0593 1593 Lloyd s 0240 0000 0072 0038 0040 0208...

Page 96: ...0081 0042 0067 0058 0168 1337 Tandy 0000 0104 Sanyo 0047 0240 0000 0104 0046 0159 0372 0479 Tatung 0048 0081 0000 0067 0041 0008 Polk Audio 0081 Portland 0278 0020 Teac 0000 0067 0041 Presidian 1593 Scientific Atlanta 0008 Technics 0035 0162 0037 0000 0246 Wharfedale 0593 Profitronic 0240 Scott 0184 0045 0121 0043 0208 0210 0212 White Westinghouse 0000 0209 0072 0278 0479 Proscan 0060 0202 0760 07...

Page 97: ...627 0798 1173 1747 AMW 0872 1245 Creative 0503 0539 Lecson 1533 Apex Digital 0533 0672 0717 0755 0794 0796 0797 1004 1020 1056 1061 1100 Curtis Mathes 1087 Lenoxx 1127 CyberHome 0816 0874 1017 1019 1023 1024 1117 1129 1502 1537 LG 0591 0741 0801 0869 Go Vision 1071 1072 LiteOn 1058 1158 1416 1440 1656 GoldStar 0741 0801 0869 Arcam 0732 Cytron 0705 Goodmans 0790 Loewe 0511 0741 Arrgo 1023 Daewoo 07...

Page 98: ... Xbox 0522 1708 PianoDisc 1024 Saba 0651 Tatung 0770 Xwave 1001 Pioneer 0525 0571 0142 0631 0632 1475 1476 1571 Sampo 0698 0752 1501 Teac 0571 0717 0692 0790 0809 Yamaha 0490 0539 0545 0497 0817 Samsung 0490 0573 0744 0199 0820 1044 1075 Technics 0490 0703 Yamakawa 0872 Polaroid 1020 1061 1086 1245 1316 1478 Sansui 0695 Technika 0770 Zenith 0503 0591 0741 0869 Sanyo 0670 0675 0695 0873 1334 Techno...

Page 99: ...asma display the receiver can be operated using buttons 1 to 3 1 RECEIVER STANDBY ON Turns the Pioneer receiver power on and off 2 RECEIVER INPUT Selects the input source connected to the Pioneer receiver 3 RECEIVER VOL Adjusts the Pioneer receiver volume level Press VOL to increase the volume and VOL to decrease it 3 1 2 Mode switch buttons operate at any position ...

Page 100: ...ress a button or buttons that corresponds to the channel that you want to watch 4 CH Selects a higher or lower channel 5 SOURCE Turns the equipment power on and off 6 SAT GUIDE Displays the satellite broadcasting guide screen 7 RETURN When the CBL SAT menu is displayed restores the immediately previous screen 8 CH ENTER Enters the selected channel with the direct channel selection buttons 9 CH RET...

Page 101: ... 1 to 8 VCRs made by other manufacturers can also be operated using the remote control unit if the remote control signals of the devices have been preset See page 92 1 CH Selects the channel on the VCR 2 PLAY Selects playback 3 REW Rewinds the tape and allows picture search 4 SOURCE Turns the power of the VCR on and off 5 PAUSE STILL Pauses playback and displays still pictures 6 FF Rapidly advance...

Page 102: ...quipment power on and off 5 PAUSE STILL Pauses playback and displays still pictures 6 DVD MENU Displays the DVD menu 7 DVD TOP MENU Displays the DVD top menu 8 ENTER ENTER Activates the selected function Selects items on the DVD MENU screen 9 RETURN When the DVD menu is displayed restores the immediately previous screen 10 A BLUE B RED C GREEN D YELLOW BD only Controls the BD J Application 11 SCAN...

Page 103: ... or more If the problem is not solved with this contact the nearest Pioneer Authorized Independent Service Company or the Customer Support Division see back cover PICTURE SOUND No image and audio is presented Check if the input source for video or PC has been unintentionally selected although you want to watch a TV channel See page 27 Check if you have activated the Parental Control function See p...

Page 104: ...ge 90 Home Media Gallery NETWORK No servers are found Confirm that the PC is On and not in Standby or Sleep nothing is chosen in Select Servers When the PC has started with the Wake On LAN WOL check if the PC complies with WOL or if the WOL setup has been properly done on the device manager for BIOS or Windows Check the physical connections hub 100BASE TX 10BASE T or crossed cable and other cable ...

Page 105: ...card into the multi card reader Confirm that the device is correctly inserted or removed Check that the firmware file has been correctly downloaded Also check the file size See the Pioneer website www pioneerelectronics com for details Home Media Gallery USB USB devices are not properly recognized Check if the device is Mass Storage Class compliant if it is connected properly nothing is damaged po...

Page 106: ...efer to the instruction manual for the digital still camera Photo data stored in a digital still camera cannot be read through USB interface Check if the device is connectable to the display See page 73 Check if the digital still camera is turned on Panel sounds noises Panel generated sounds examples Fan motor noise Electrical Circuit Humming Glass Panel buzzing are normal operation of a phosphor ...

Page 107: ...libpng 1 2 5 with the following individual added to the list of Contributing Authors Cosmin Truta libpng versions 1 0 7 July 1 2000 through 1 2 5 October 3 2002 are Copyright c 2000 2002 Glenn Randers Pehrson and are distributed according to the same disclaimer and license as libpng 1 0 6 with the following individuals added to the list of Contributing Authors Simon Pierre Cadieux Eric S Raymond G...

Page 108: ...he Open Source Initiative Glenn Randers Pehrson glennrp users sourceforge net September 12 2004 Copyright c 2002 Xiph org Foundation Redistribution and use in source and binary forms with or without modification are permitted provided that the following conditions are met Redistributions of source code must retain the above copyright notice this list of conditions and the following disclaimer Redi...

Page 109: ...hings To protect your rights we need to make restrictions that forbid anyone to deny you these rights or to ask you to surrender the rights These restrictions translate to certain responsibilities for you if you distribute copies of the software or if you modify it For example if you distribute copies of such a program whether gratis or for a fee you must give the recipients all the rights that yo...

Page 110: ...the terms of Sections 1 and 2 above provided that you also do one of the following a Accompany it with the complete corresponding machine readable source code which must be distributed under the terms of Sections 1 and 2 above on a medium customarily used for software interchange or b Accompany it with a written offer valid for at least three years to give any third party for a charge no more than...

Page 111: ...her free programs whose distribution conditions are different write to the author to ask for permission For software which is copyrighted by the Free Software Foundation write to the Free Software Foundation we sometimes make exceptions for this Our decision will be guided by the two goals of preserving the free status of all derivatives of our free software and of promoting the sharing and reuse ...

Page 112: ...hese rights or to ask you to surrender these rights These restrictions translate to certain responsibilities for you if you distribute copies of the library or if you modify it For example if you distribute copies of the library whether gratis or for a fee you must give the recipients all the rights that we gave you You must make sure that they too receive or can get the source code If you link ot...

Page 113: ...ense and to the absence of any warranty and distribute a copy of this License along with the Library You may charge a fee for the physical act of transferring a copy and you may at your option offer warranty protection in exchange for a fee 2 You may modify your copy or copies of the Library or any portion of it thus forming a work based on the Library and copy and distribute such modifications or...

Page 114: ... so that the user can modify the Library and then relink to produce a modified executable containing the modified Library It is understood that the user who changes the contents of definitions files in the Library will not necessarily be able to recompile the application to use the modified definitions b Use a suitable shared library mechanism for linking with the Library A suitable mechanism is o...

Page 115: ...ion limitation excluding those countries so that distribution is permitted only in or among countries not thus excluded In such case this License incorporates the limitation as if written in the body of this License 13 The Free Software Foundation may publish revised and or new versions of the Lesser General Public License from time to time Such new versions will be similar in spirit to the presen...

Page 116: ...U Lesser General Public License as published by the Free Software Foundation either version 2 1 of the License or at your option any later version This library is distributed in the hope that it will be useful but WITHOUT ANY WARRANTY without even the implied warranty of MERCHANTABILITY or FITNESS FOR A PARTICULAR PURPOSE See the GNU Lesser General Public License for more details You should have r...

Page 117: ... mounting fittings and screws Total 40 8 kg 89 9 lbs Main unit 29 9 kg 65 9 lbs Stand 1 9 kg 4 2 lbs including bolts Total 31 8 kg 70 1 lbs Reception System Digital ATSC Digital TV system Circuit type 8VSB 64QAM 256QAM QPSK demodulation Tuner VHF UHF VHF Ch 2 to 13 UHF Ch 14 to 69 CATV Ch 2 to 135 Audio format Dolby Digital Reception System Analog American TV standard NTSC system Circuit type Vide...

Page 118: ...I Licensing LLC This product includes FontAvenue fonts licensed by NEC Corporation FontAvenue is a registered trademark of NEC Corporation DDC is a registered trademark of Video Electronics Standards Association CableCARD is a trademark of Cable Television Laboratories Inc This software is based in part on the work of the independent JPEG Group The names of the companies or institutions are tradem...

Page 119: ...accuracy or availability of the program schedule information or other data in the TV Guide On Screen system Pioneer provides information to help in setting up a network and connecting the plasma display to the network but you are solely responsible for proper network setup and the connection Pioneer bears no responsibility whatsoever for any damage arising from the network setup and the connection...

Page 120: ...all the number shown below 8 0 0 4 2 1 1 6 2 5 Please do not ship your product to Pioneer without first calling the Customer Support Division at the above listed number for assistance Pioneer Electronics USA Inc Customer Support Division P O BOX 1760 Long Beach CA 90801 1760 U S A For warranty information please see the Limited Warranty sheet included with your product Should this product require ...

Reviews: