background image

40

Follow steps 1-3 on page 34, if necessary, to get to
the starting point mentioned here.

1

Use the 

5∞

 buttons to select

NORMAL. Press the ENTER
button.

LOUDNESS

MIDNIGHT

TONE DNR

ATT

STEREO

TUNED

RDS
Hi-BIT/

MULTI-ROOM

SAMPLING

EON

RF ATT

MONO

Neo :6

DIGITAL

DTS ES EX
MPEG AAC
STEREO

PRO LOGIC

DSP

L

C

R

LFE

AUTO

SB CH

ON

MOVIE
MUSIC

OFF

L

S

S

R

S

AUTO

RF

DIGITAL

dB

SIGNAL

SP

A

 B

ANALOG

2

The CHANNEL DELAY should be
selected. If it isn’t use the 

5∞

buttons to select it. Press the
ENTER button.

LOUDNESS

MIDNIGHT

TONE DNR

ATT

STEREO

TUNED

RDS
Hi-BIT/

MULTI-ROOM

SAMPLING

EON

RF ATT

MONO

Neo :6

DIGITAL

DTS ES EX
MPEG AAC
STEREO

PRO LOGIC

DSP

L

C

R

LFE

AUTO

SB CH

ON

MOVIE
MUSIC

OFF

L

S

S

R

S

AUTO

RF

DIGITAL

dB

SIGNAL

SP

A

 B

ANALOG

3

Select each speaker channel with
the 

5∞

  buttons and press

ENTER.

LOUDNESS

MIDNIGHT

TONE DNR

ATT

STEREO

TUNED

RDS
Hi-BIT/

MULTI-ROOM

SAMPLING

EON

RF ATT

MONO

Neo :6

DIGITAL

DTS ES EX
MPEG AAC
STEREO

PRO LOGIC

DSP

L

C

R

LFE

AUTO

SB CH

ON

MOVIE
MUSIC

OFF

L

S

S

R

S

AUTO

RF

DIGITAL

dB

SIGNAL

SP

B

ANALOG

You can select from L, C, R, RS, SBR, SBL, LS and
SW. The selected setting blinks.

 CHANNEL DELAY

Adding a slight delay to some speakers is necessary to achieve proper sound depth, separation as well as an
effective surround sound effect. You need to figure out the distance from your listening position to your
speakers to add the proper delay. The following steps show you how to set the delay time for each channel by
specifying the distances from your listening position to each speaker. If continuing from CHANNEL LEVEL go to
step 2.

Setting Up for Surround Sound

CHANNEL

CHANNEL

+

DTV  ON/OFF  BAND

MENU

TOP MENU

TUNER EDIT

GUIDE

SYSTEM

SETUP

AUDIO

RETURN

ST

TUNE

MASTER

 VOLUME

ST

TUNE

ENTER

1-6

7

4

Use the 

5∞

 buttons to add or

subtract the distance in feet that
the speaker is from your normal
listening position. Press the
ENTER button.

LOUDNESS

MIDNIGHT

TONE DNR

ATT

STEREO

TUNED

RDS
Hi-BIT/

MULTI-ROOM

SAMPLING

EON

RF ATT

MONO

Neo :6

DIGITAL

DTS ES EX
MPEG AAC
STEREO

PRO LOGIC

DSP

L

C

R

LFE

AUTO

SB CH

ON

MOVIE
MUSIC

OFF

L

S

S

R

S

AUTO

RF

DIGITAL

dB

SIGNAL

SP

B

ANALOG

Adjust the speaker distance in half foot
increments from 0.5 to 45 feet.
The default setting is 10 feet.

5

Repeat steps 3 & 4 for all
speaker channels.

6

Use the 

5∞

 buttons to select

EXIT and press ENTER.

LOUDNESS

MIDNIGHT

TONE DNR

ATT

STEREO

TUNED

RDS
Hi-BIT/

MULTI-ROOM

SAMPLING

EON

RF ATT

MONO

Neo :6

DIGITAL

DTS ES EX
MPEG AAC
STEREO

PRO LOGIC

DSP

L

C

R

LFE

AUTO

SB CH

ON

MOVIE
MUSIC

OFF

L

S

S

R

S

AUTO

RF

DIGITAL

dB

SIGNAL

SP

B

ANALOG

If you want to change a setting before
proceeding

start over from step 2.

7

Press the SYSTEM SETUP
button to leave the SYSTEM
SETUP mode.

1-6

STANDBY/ON

MOVIE

MUSIC

MULTI   JOG

ENTER

STANDBY

PHONES

SPEAKERS

SIGNAL
SELECT

HI-BIT

HI-SAMPLING

SB CH
MODE

SET UP

RETURN

TONE

TONE CONTROL

BASS/TREBLE

MIDNIGHT

LO

MULTI  JOG   CONTROL

7

Summary of Contents for Elite VSX-43TX

Page 1: ...AUDIO VIDEO MULTI CHANNEL RECEIVER VSX 43TX Operating Instructions ...

Page 2: ...n your enclosed warranty card and keep it in a secure area This is for your security Thank you for buying this Pioneer product Please read through these operating instructions so you will know how to operate your model properly After you have finished reading the instructions put them away in a safe place for future reference ...

Page 3: ...3 ...

Page 4: ...cing Noise During Playback DIGITAL NR Function 47 Listening in MIDNIGHT Mode 48 Listening in LOUDNESS Mode 48 Adjusting Bass and Treble TONE CONTROL 49 Listening in HI BIT SAMPLING Mode 50 DVD Audio MULTI CHANNEL IN Playback 50 SB CH MODE button 51 SB CH MODE 51 VIRTUAL SURROUND BACK Mode 51 DUAL MONO setting and Playback 52 Using Headphones 52 Video Select 53 Adjusting the Brightness of the Displ...

Page 5: ...cing Noise During Playback DIGITAL NR Function 47 Listening in MIDNIGHT Mode 48 Listening in LOUDNESS Mode 48 Adjusting Bass and Treble TONE CONTROL 49 Listening in HI BIT SAMPLING Mode 50 DVD Audio MULTI CHANNEL IN Playback 50 SB CH MODE button 51 SB CH MODE 51 VIRTUAL SURROUND BACK Mode 51 DUAL MONO setting and Playback 52 Using Headphones 52 Video Select 53 Adjusting the Brightness of the Displ...

Page 6: ...onent video output is fully compatible with high definition progressive scan digital video 720p Universal Player Compatibility DVD Audio Super Audio CD SACD This receiver incorporates the latest technology and is able to handle cutting edge audio formats like DVD Audio and Super Audio CD SACD which are just hitting the market Its high compatibility offers a variety of inputs to decode all types of...

Page 7: ...a Remote Control Unit Operating Instructions 1 2 3 AA IEC LR6 batteries x 2 Preparing the Remote Control Loading the batteries Load the batteries into the remote control as shown below Please use alkaline batteries When you notice a decrease in the operating range replace all batteries with new ones S O U R C E M U LT I C O N T R O L R E C E IV E R M O V IE M U S IC E N T E R MU LT I OP ER AT IO N...

Page 8: ...here are obstacles between the remote control and the remote sensor Direct sunlight or fluorescent light is shining onto the remote sensor The receiver located near a device emitting infrared rays Operated simultaneously with another remote control which uses infrared rays CAUTION Do not cover this unit in any way for exam ple with a sheet or piece of cloth This would prevent proper heat dispersal...

Page 9: ...ese sources 2 The Source Material DVDs have become the basic source material for home theater because they are convenient to use and offer excellent sound and picture quality as well as allow users to enjoy home theater soundtracks with more than two channels of audio For example Dolby Pro Logic plays back four channels front left front right center and a single channel for both surround speakers ...

Page 10: ...ls but there is no need to connect both If your DVD player has a coaxial terminal not a PCM only output for the audio out hook it up using this terminal Follow the diagram below This is the best scenario as you will be able to follow the default settings of this receiver and won t need to assign the digital inputs you should use DIGITAL IN 3 If your DVD player only has an optical terminal for the ...

Page 11: ...e and negative terminals on the receiver match those on the speakers 7 Speaker terminals 1 Twist exposed wire strands together tightly 2 Loosen speaker terminal and insert exposed wire The speaker terminals also accept single banana plugs Refer to speaker manual for details 3 8 in 10mm We recommend speakers with a nominal impedance rated 8 Ω Ω Ω Ω Ω 16 Ω Ω Ω Ω Ω but you can change the speaker impe...

Page 12: ... a wall outlet 2 Press the STANDBY ON button to switch the receiver ON Easy Setup Guide Part1 2 7 SOURCE MULTI CONTROL RECEIVER MOVIE MUSIC ENTER MULTI OPERATION SURROUND MODE STEREO DIRECT SYSTEM OFF ACOUSTIC EQ SB CH MODE INPUT MIDNIGHT CHANNEL CHANNEL DTV ON OFF BAND MUTE MENU TOP MENU TUNER EDIT GUIDE SYSTEM SETUP AUDIO RETURN MULTI CH INPUT ST TUNE MASTER VOLUME ST TUNE DVD LD ENTER VCR 2 TV ...

Page 13: ... to adjust press ENTER LOUDNESS MIDNIGHT TONE DNR ATT STEREO TUNED RDS Hi BIT MULTI ROOM SAMPLING EON RF ATT MONO Neo 6 DIGITAL DTS ES EX MPEG AAC STEREO PRO LOGIC DSP L C R LFE AUTO SB CH ON MOVIE MUSIC OFF LS S RS AUTO RF DIGITAL dB SIGNAL SP A B ANALOG When ENTER is pressed the setting for each selected menu blinks In each mode the current settings are dis played automatically We suggest you ad...

Page 14: ...5 1 channel playback A1 Either the DVD is not set for digital output or the Dolby Digital DTS output settings are not correct Set the DVD player to output a digital signal and set the Dolby Digital and DTS output properly If you are unsure how to do this check the DVD initial setup in the manual that came with your DVD player Q2 There is no sound from the subwoofer or it is very low A2 There is a ...

Page 15: ...on t follow the default settings below you must assign the inputs you used with the Assigning the Component Video Inputs procedure See page 77 to do this The default settings are COMPONENT VIDEO IN 1 DVD LD COMPONENT VIDEO IN 2 TV SAT S VIDEO S video cables produce clearer picture reproduction by sending separate signals for the luminance and the color Composite Video Composite video cords are the...

Page 16: ...t as well See your DVD manual for details If you have a DVD Audio or Super Audio CD SACD compatible player see Connecting to the Multi Channel Analog Inputs on page 20 You need to hook up your audio with analog connections as well memo Be sure to make either a digital coaxial or digital optical connection pictured as DIGITAL jack 3 or DIGITAL jack 2 in this diagram but you DON T need to make both ...

Page 17: ...r changing the connections switch off the power and disconnect the power cord from the AC outlet Connect the video out of your VCR DVR using either S video or composite video cords depending on how you connected the receiver to your TV see page 15 Use analog audio cords for the audio signal To record you also need to connect a set of audio video outputs from the receiver to the audio video inputs ...

Page 18: ...ning the Component Video Inputs See page 77 to do this If your digital connections are different than the default settings you will need to assign the digital jacks to the proper component s with the Assigning the Digital Inputs procedure See page 76 to do this PCM 2DIGITAL DTS OUT1 OUT2 IN R L TV SAT 1 IN 1 IN 2 IN CD R TAPE1 2 IN 3 DVD LD IN 4 CD PLAY PLAY CD R TAPE1 IN OUT IN OUT VCR1 DVR TV SA...

Page 19: ...o equalizer 7 Audio cords Use RCA audio cords not supplied to con nect the audio components Connect red plugs to R right and white plugs to L left Be sure to insert completely L R PCM 2DIGITAL DTS OUT1 OUT2 IN R L TV SAT 1 IN CD R TAPE1 2 IN 3 DVD LD IN 4 CD PLAY PLAY CD R TAPE1 IN OUT IN OUT VCR1 DVR TV SAT IN DVD LD IN SUR ROUND BACK FRONT CENTER SUR ROUND SUB WOOFER PRE OUT VCR2 CD LINE DIGITAL...

Page 20: ...TAL DTS OUT1 OUT2 IN R L TV SAT 1 IN 1 IN 2 IN CD R TAPE1 2 IN 3 DVD LD IN 4 CD PLAY PLAY CD R TAPE1 IN OUT IN OUT VCR1 DVR TV SAT IN DVD LD IN SUR ROUND BACK DVD LD TV SAT FRONT CENTER SUR ROUND SUB WOOFER PRE OUT MONITOR OUT PB PR PB PR Y Y Y PB PR VCR2 CD LINE DIGITAL AUDIO AUDIO VIDEO IN IN IN OUT IN OUT VIDEO S VIDEO MD TAPE2 REC REC MULTI CH IN COMPONENT VIDEO OUT IN MONITOR OUT CONTROL 75Ω ...

Page 21: ...ith this unit We also recommend hooking up your digital components to analog audio jacks see page 19 in order to make recordings because some digital sources may be protected against making digital copies The arrows indicate the direction of the audio signal not a PCM only output PCM 2DIGITAL DTS OUT1 OUT2 IN R L TV SAT 1 IN CD R TAPE1 2 IN 3 DVD LD IN 4 CD PLAY PLAY CD R TAPE1 IN OUT IN OUT VCR1 ...

Page 22: ...mponents will be in sync with the names on the remote control buttons and the like To avoid having to assign the digital inputs you can hook up your equipment in accordance with the receiver s default settings The default settings are DIGITAL IN 1 optical TV SAT DIGITAL IN 2 optical CD R TAPE1 DIGITAL IN 3 coaxial DVD LD DIGITAL IN 4 coaxial CD See Assigning the Digital Inputs on page 76 if the wa...

Page 23: ... to the supplied AM loop antenna For best possible reception suspend horizontally outdoors 7 To improve FM reception Connect an external FM antenna 7 AM loop antenna 1 Assemble the antenna 2 Twist exposed wire strands together and insert 3 Attach to a wall etc if desired and face toward the direction providing the best reception 3 8 in 10 mm Outdoor antenna 15 18 ft 5 6 m Indoor antenna vinyl coat...

Page 24: ...k terminal If you use a THX certified subwoofer use the THX INPUT jack on the subwoofer if your subwoofer has one or switch the filter position to THX on your subwoofer memo 7 Speaker terminals 1 Twist exposed wire strands tightly together 2 Loosen speaker terminal and insert exposed wire 3 Tighten terminal The speaker terminals also accept single banana plugs Refer to speaker manual for details 3...

Page 25: ...AUTO SB CH ON MOVIE MUSIC OFF LS S RS AUTO RF DIGITAL dB SIGNAL SP A B ANALOG LOUDNESS MIDNIGHT TONE DNR ATT STEREO TUNED RDS Hi BIT MULTI ROOM SAMPLING EON RF ATT MONO Neo 6 DIGITAL DTS ES EX MPEG AAC STEREO PRO LOGIC DSP L C R LFE AUTO SB CH ON MOVIE MUSIC OFF LS S RS AUTO RF DIGITAL dB SIGNAL SP A B ANALOG Bi wiring your speakers This high quality but difficult method of wiring speakers will be...

Page 26: ... screen place the speakers farther away from the TV Install the center speaker above or below the TV so that the sound of the center channel is localized at the TV screen THX recommends that if you have two surround back speakers place them close together Front Speaker L Surround Speaker L Surround Back Speaker L Surround Back Speaker R Surround Speaker R Front Speaker R Subwoofer Center Speaker C...

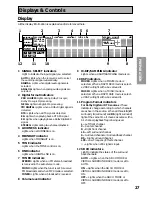
Page 27: ... input 12 SB CH indicators Light to indicate the status of the surround back channels AUTO Lights when the SB CH MODE or VIRTUAL SURROUND BACK mode is set to AUTO ON Lights when the SB CH MODE or VIRTUAL SURROUND BACK mode is set to ON OFF Lights when the SB CH MODE or VIRTUAL SURROUND BACK mode is set to OFF 1 SIGNAL SELECT indicators Light to indicate the input signal you selected AUTO Lights wh...

Page 28: ...he most accurate reproduction of a program source 4 ENTER button Use this button to enter information concerning the SYSTEM SETUP listening mode or the tuner 5 STANDBY indicator Lights when the receiver is in STANDBY mode Please note that this receiver consumes a small amount of power 0 6 W in the standby mode 6 Remote sensor Receives the signals from the remote control 7 Display See page 27 8 MCA...

Page 29: ...HX CINEMA mode 17 LOUDNESS button see page 48 Switches the LOUDNESS mode on or off for all modes except THX CINEMA and MULTI CH IN 18 TUNER CONTROL buttons See page 54 58 BAND Press to select the AM or FM band CLASS Press repeatedly to switch the preset station classes SELECT Switches the buttons between station memory and frequency select modes Selects station memories or frequencies when using t...

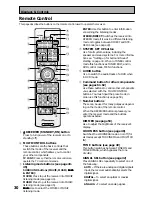
Page 30: ...61 62 Use these buttons to control other components you selected with the MULTI CONTROL buttons You must input the preset code in order use this function see page 59 7 Number buttons These can be used for many purposes depend ing on the mode of the remote control When the RECEIVER button is pressed you enter the receiver mode and the buttons operate as below DIMMER see page 53 Use to adjust the br...

Page 31: ...RECEIVER button Use this button to switch the remote control into receiver mode in order to get certain receiver functions or do receiver setups RECEIVER control buttons ACOUSTIC EQ button see page 47 Use to switch on and off the Acoustic Calibra tion EQ SB CH MODE button see pages 51 Use this button to turn the surround back channels ON OFF AUTO or switch the VIRTU AL SURROUND BACK mode between O...

Page 32: ...ee page 23 Hook up antennas for the radio tuner built into the receiver here 5 MONITOR OUT terminals connect a TV or monitor here see page 15 Use these terminals to output a video signal to a TV or monitor 6 PRE OUT analog terminals connect an amplifier here see page 67 Use these terminals to output the audio signal from this amplifier to a different amplifier if that s how you choose to set up yo...

Page 33: ...gnal from analog components like a cassette deck or turntable These are analog jacks 11 Video components input output terminals Input output signals from your video compo nents DVD VCR TV tuners SAT tuners etc here see page 16 18 12 MULTI CH IN terminals see page 20 Use these terminals to input a multichannel surround signal for example a DVD Audio signal in an analog fashion These are analog jack...

Page 34: ...current settings are displayed We suggest you do a basic system setup for surround sound when you first hook up the receiver That gets it out of the way and you won t need to do it again unless you change your home set up by adding new speakers etc To do a basic setup use SURRBACK and NORMAL setups below To do a more advanced setup for surround sound see EXPERT setup starting on page 79 SURRBACK S...

Page 35: ...ON RF ATT MONO Neo 6 DIGITAL DTS ES EX MPEG AAC STEREO PRO LOGIC DSP L C R LFE AUTO SB CH ON MOVIE MUSIC OFF LS S RS AUTO RF DIGITAL dB SIGNAL SP A B ANALOG SECOND ZONE Choose to use your surround back speakers for a B speaker system That is if you want to use your surround back speakers for a different room You will hear the same source as is playing in the main room and multichannel soundtracks ...

Page 36: ...ONT TUNER RECEIVER 1 2 SPEAKER SET See pages 37 38 Use to specify the type and number of speakers you connected LOUDNESS MIDNIGHT TONE DNR ATT STEREO TUNED RDS Hi BIT MULTI ROOM SAMPLING EON RF ATT MONO Neo 6 DIGITAL DTS ES EX MPEG AAC STEREO PRO LOGIC DSP L C R LFE AUTO SB CH ON MOVIE MUSIC OFF LS S RS AUTO RF DIGITAL dB SIGNAL SP A B ANALOG CHANNEL LEVEL See page 39 Use to balance the volumes of...

Page 37: ...tively Select SMALL to send bass frequencies to the other speakers or subwoofer If you did not connect surround speakers choose NO In this case the sound of the surround channels is output from the front and center speakers If the front speakers are set to SMALL the surround speakers will automatically be set to SMALL SURROUND BACK default setting is SMALL X2 If you chose FRONT BI AMP or SECOND ZO...

Page 38: ...unt of bass due to what is called low frequency cancellations If you have a subwoofer listen to the bass response with the front speakers set to LARGE and SMALL alternately and let your ears judge which sounds best If you have a subwoofer the safest option is to route all the bass sounds to it by selecting SMALL for the front speakers memo Setting Up for Surround Sound CHANNEL CHANNEL DTV ON OFF B...

Page 39: ...2 Setting Up for Surround Sound MENU TOP MENU TUNER EDIT GUIDE SYSTEM SETUP AUDIO RETURN ST TUNE ST TUNE ENTER 1 6 If your subwoofer has a volume control set it to the middle position before doing these operations If you are using a Sound Pressure Level SPL meter take the readings from your main listening position and adjust the level of each speaker to 75dB SPL C weight ing slow reading The volum...

Page 40: ...your speakers to add the proper delay The following steps show you how to set the delay time for each channel by specifying the distances from your listening position to each speaker If continuing from CHANNEL LEVEL go to step 2 Setting Up for Surround Sound CHANNEL CHANNEL DTV ON OFF BAND MENU TOP MENU TUNER EDIT GUIDE SYSTEM SETUP AUDIO RETURN ST TUNE MASTER VOLUME ST TUNE ENTER 1 6 7 4 Use the ...

Page 41: ...or MUSIC buttons and the MULTI JOG dial Press the button of the mode type you want and then use the dial to cycle through the possibilities Press ENTER See SURROUND Modes on pages 44 45 for details on which modes are available and in which situations they are designed to be used 5 Start playback of the component you selected in step 3 6 Adjust the volume by using the MASTER VOLUME buttons on the r...

Page 42: ...GNAL SELECT to ANALOG to listen to these formats When an LD with DTS is played back with the SIGNAL SELECT set in ANALOG digital noise caused by playing back the DTS signal directly with no decoding is output To prevent noise you need to make digital connections See pages 21 22 and set SIGNAL SELECT to AUTO or DIGITAL Some DVD players don t output DTS signals For more details refer to the instruct...

Page 43: ...he signal You may need to experiment with these modes to see which suit your home system and personal tastes The MUSIC and STEREO modes are designed to be used with music sources but some MUSIC modes are also suitable for film soundtracks Again try different modes with various soundtracks to see which you like but you must choose one of the MOVIE and MUSIC listening modes in order to get surround ...

Page 44: ... 6 CINEMA This mode gives 6 1 channel surround sound and is suitable for movies The NEO 6 Cinema mode delivers good channel separation for movie soundtracks With sources other than stereo 5 1 etc the display will automatically show the type of decoding being employed Dolby Digital DTS ES etc ACTION This mode is designed for action movies which generally use lots of sound effects The mode enriches ...

Page 45: ... center sound With sources other than stereo 5 1 etc the display will automatically show the type of decoding being employed Dolby Digital DTS ES etc CLASSICAL Simulates the acoustic effects of a large concert hall Suitable for classical music A long delay time of reflected sounds coupled with reverb effects let the listener experience the dynamic and rich sounds characteristic of concert halls an...

Page 46: ...ly and select the setting you want They appear in the receiver s display CENTER WIDTH With Pro Logic decoding center channel signals can come only from the center speaker If no center speaker is present this channel is split between the two front speakers creating a phantom channel The CENTER WIDTH feature lets you adjust the center channel so it can heard only from the center speaker only as a ph...

Page 47: ...TIC EQ is being applied the MCACC indicator lights You can t turn on ACOUSTIC CALIBRATION EQ mode on in MULTI CH IN mode If you turn ACOUSTIC CALIBRATION EQ mode on in DIRECT mode the receiver automatically switches to STEREO mode Listening with ACOUSTIC CALIBRATION EQ You can listen to the soundtrack with the ACOUSTIC CALIBRATION EQ if you have adjusted ACOUSTIC CAL EQ in the EXPERT Setup menu se...

Page 48: ... LOUDNESS lights in the display You can t use the LOUDNESS mode with the THX CINEMA MULTI CH IN MIDNIGHT modes If you set LOUDNESS on in DIRECT mode the receiver will switch to STEREO mode memo SOURCE MULTI CONTROL RECEIVER MOVIE MUSIC ENTER MULTI OPERATION SURROUND MODE STEREO DIRECT SYSTEM OFF ACOUSTIC EQ SB CH MODE INPUT MIDNIGHT MUTE MENU TOP MENU TUNER EDIT GUIDE SYSTEM SETUP MULTI CH INPUT S...

Page 49: ...ASS appears press the TONE button to get TONE ON 4 Use the buttons to adjust the low or high frequency levels A few seconds after you finish adjusting the tone the receiver will revert to the sound mode it was in at the beginning of the process 4 2 3 SOURCE MULTI CONTROL RECEIVER MOVIE MUSIC ENTER MULTI OPERATION SURROUND MODE STEREO DIRECT SYSTEM OFF ACOUSTIC EQ SB CH MODE INPUT MIDNIGHT CHANNEL ...

Page 50: ...OFF ACOUSTIC EQ SB CH MODE INPUT MIDNIGHT MUTE MULTI CH INPUT MASTER VOLUME DVD LD VCR 2 TV SAT CD VCR DVR TV CONT TUNER RECEIVER 1 STEREO DIRECT MULTI CH IN MASTER VOLUME ACOUSTIC EQ VSX 43TX AUDIO VIDEO MULTI CHANNEL RECEIVER Listening in HI BIT SAMPLING Mode Use to hear CD and DVD as well as other digital soundtracks at a wider dynamic range allowing for finer audio reproduction 1 Press RECEIVE...

Page 51: ...e SURROUND speakers set to something other than NO and have chosen NO for the SURROUND BACK speakers in SPEAKER SETTING see page 37 38 to use this mode 1 Press the SB CH MODE button on the remote control Each press switches between VIRTL SB ON VIRTL SB OFF and VIRTL SB AUTO For each choice you can create VIRTUAL SURROUND BACK channels under the conditions listed below VIRTL SB ON virtual surround ...

Page 52: ...only hear channel 2 and DUAL ch1 ch2 where you hear both channels but independently from different speakers The default setting is DUAL ch1 You can only use this function with Dolby Digital sources that have this function memo 1 Using Headphones 1 Plug headphones into the PHONES jack on the front of the receiver No sound will be audible from the speakers when headphones are plugged in All SURROUND...

Page 53: ...play DIMMER button on the remote control to alternate between the different levels of brightness for the display Four levels of brightness ranging from very dim to very bright can be selected Each press changes the brightness of the display When cycling through the options the default brightness can also be selected Please note It is a feature of this unit that the fluorescent display will be brig...

Page 54: ...other stations For Manual Tuning To change frequencies one step at a time press TUNE repeatedly To change frequencies quickly hold down TUNE and release when you reach the frequency you desire MPX Mode If the TUNED or STEREO indicators do not light when tuning an FM station because the station is too far away or the broadcast signal is weak press MPX on the remote control to switch to MONO recepti...

Page 55: ...ter the frequency of the station you want Example To tune station 106 00 FM press 1 6 To cancel before inputting the frequency Press D ACCESS and enter the frequency again Direct Access Tuning The following steps show you how to tune directly to a specific frequency using the remote control SOURCE MULTI CONTROL RECEIVER MOVIE MUSIC ENTER MULTI OPERATION SURROUND MODE STEREO DIRECT SYSTEM OFF ACOUS...

Page 56: ...LFE AUTO SB CH ON MOVIE MUSIC OFF LS S RS AUTO RF DIGITAL dB SIGNAL SP A B ANALOG STEREO 5 Press the ENTER button to input your choice SOURCE MULTI CONTROL RECEIVER MOVIE MUSIC ENTER MULTI OPERATION SURROUND MODE STEREO DIRECT SYSTEM OFF ACOUSTIC EQ SB CH MODE INPUT MIDNIGHT CHANNEL CHANNEL DTV ON OFF BAND DIMMER TONE LOUDNESS EFFECT CH SEL SIGNAL SEL BASS TREBLE DISC DNR VIDEO SEL SUBTITLE REMOTE...

Page 57: ... erase a station name simply repeat steps 1 4 and input four spaces instead of a name 6 Press ENTER when you have got the characters you want to enter Repeat steps 2 to 5 to memorize up to 30 preset broadcast station names To change a station name enter a new name over the top of the existing one memo SOURCE MULTI CONTROL RECEIVER MOVIE MUSIC ENTER MULTI OPERATION SURROUND MODE STEREO DIRECT SYSTE...

Page 58: ... DSP L C R LFE AUTO SB CH ON MOVIE MUSIC OFF LS S RS AUTO RF DIGITAL dB SIGNAL SP A B ANALOG STEREO To step through each channel in order Press the ST buttons repeatedly CLASS A CLASS B CLASS C 3 2 SOURCE MULTI CONTROL RECEIVER MOVIE MUSIC ENTER MULTI OPERATION SURROUND MODE STEREO DIRECT SYSTEM OFF ACOUSTIC EQ SB CH MODE INPUT MIDNIGHT CHANNEL CHANNEL DTV ON OFF BAND DIMMER TONE LOUDNESS EFFECT C...

Page 59: ... your other components VCR TV DVD CD etc after you program it to do so In this way instead of fumbling with many different controls and buttons you only need to use one remote control If your component s are listed in the remote control s memory simply follow the steps below If your component s are not listed or if you want the remote to learn additional operations you can use the learning mode to...

Page 60: ...ations for another component repeat steps 2 through 4 5 Press the REMOTE SETUP button to exit the learning setup mode The remote control and receiver return to their previous operation modes memo To exit from the remote control setup mode at any time press REMOTE SETUP You can also program the 5 2 3 and ENTER buttons with the LEARNING mode The TUNER button cannot be assigned Some commands cannot b...

Page 61: ...i d e h t e s u a c l l i w d e p p o t s D L D V D R C V R D C D M D C k c e d e t t e s s a C r e d r o c e r D V D E L T I T B U S n o t t u B s D V D l a u g n i l i t l u m n o s e l t i t b u s e h t s e g n a h c s y a l p s i D r e d r o c e r D V D D V D r e b m u N e c r u o s m a r g o r p a n o s k c a r t s s e c c a y l t c e r i D D L R D C D M D C s n o t t u B e c r u o s m a r g ...

Page 62: ... m u l o v V T e h t t s u j d A V T U N E M m e t s y s t a h t f o u n e m V T e h t o t u o y s e k a T V T V T e t i l l e t a S V T e l b a C V T l a t i g i D E D I U G m e t s y s t a h t f o u n e m e d i u g e h t o t u o y s e k a T V T V T e t i l l e t a S V T e l b a C V T l a t i g i D N R U T E R g n i w e i v e r a u o y u n e m e h t s t i x E l a t i g i D V T e t i l l e t a S V...

Page 63: ...function setup mode The LED begins to blink To cancel the direct function setup mode press REMOTE SET UP 2 Press the MULTI CONTROL button of the component whose direct function you want to turn on or off The LED lights and remains lit For example if you want to turn off direct function for VCR 2 you would press VCR 2 3 Set the DIRECT FUNCTION of each external source to OFF by pressing ON by pressi...

Page 64: ...MIDNIGHT LOUDNESS ACOUSTIC CAL EQ and surround effects have no effect on the recorded signal In some cases digital recordings have copy guard protections and making a digital copy is not pos sible In this case you can only copy them in an analog manner Some video recordings are copy protected these sources cannot be recorded When recording video the source must be connected to the receiver using t...

Page 65: ... and low frequencies Bi amping delivers more power to the front speakers but disables the surround back speakers so you will be limited to 5 1 channel playback 1 Connect your speakers as shown Since both Front A and B speaker terminals output the same audio it doesn t matter which set A or B is powering which part HI or LOW of the speaker 2 Select FRONT BI AMP in the SURRBACK SYSTEMS setup see pag...

Page 66: ...he SPEAKERS button on the front panel to switch speakers on off or cycle through the different speaker systems if SECOND ZONE or FRONT BI AMP has been selected in the SURRBACK SYSTEM setup PHONES SPEAKERS SIGNAL SELECT HI BIT HI SAMPLING SB CH MODE S VIDEO VIDEO VIDEO INPUT AUDIO L R SET UP RETURN TONE TONE CONTROL BASS TREBLE CLASS BAND MIDNIGHT LOUDNESS STATION TUNING MULTI JOG ENTER MULTI JOG C...

Page 67: ...mono Surround back channel amplifier Powered subwoofer INPUT L R ANALOG INPUT L R ANALOG INPUT L R ANALOG INPUT ANALOG INPUT ANALOG You can use the additional amplifier on the surround back channels for a single speaker as well In this case plug the amplifier into the L SINGLE terminal only The sound from the surround back terminals will depend on how you have set up the SURRBACK SYSTEM see pages ...

Page 68: ...TE SET UP 2 Select a MULTI CONTROL button for this multi operation The LED lights and remains lit Each MULTI CONTROL button can be used for one multi operation If a multi operation relates to using a DVD player for example it makes sense to select the DVD LD button 3 Press the operation button for example 3 play you want to input Be sure to set up each component before programming multi operations...

Page 69: ... your TV as explained above 2 Press the DVD LD button then POWER to turn on your DVD player if it is not a PIONEER product 3 Press the DVD LD button then 3 play to start playing the DVD player When you employ multi operations see below these three tasks will be performed in the same order 5 Press the REMOTE SETUP button to exit the multi operation setup mode The remote control return to their prev...

Page 70: ...blink To cancel the SYSTEM OFF setup mode press RE MOTE SET UP 2 Press the RECEIVER button The LED lights and remains lit 3 Select a MULTI CONTROL button for SYSTEM OFF Each MULTI CONTROL button can be used for SYSTEM OFF If a SYSTEM OFF command relates to using a DVD player for example it makes sense to select the DVD LD button 4 Press the SOURCE button of the component to be set with SYSTEM OFF ...

Page 71: ... OFF Do the following to use the SYSTEM OFF function The SYSTEM OFF feature allows you to tell the receiver and your other components to stop and or turn off with the remote control Most Pioneer components will automatically turn off The receiver itself will go off automatically as well The following Pioneer components can be turned off using the SYSTEM OFF function DVD DVD Recorder LD CATV CD CD ...

Page 72: ...will be erased DIMMER TONE LOUDNESS EFFECT CH SEL SIGNAL SEL BASS TREBLE DISC DNR VIDEO SEL SUBTITLE REMOTE SETUP HI BIT TV CONTROL CHANNEL VOLUME INPUT SELECT 10 RECEIVER ENTER 1 1 DIMMER TONE LOUDNESS EFFECT CH SEL SIGNAL SEL BASS TREBLE DISC DNR VIDEO SEL SUBTITLE REMOTE SETUP HI BIT TV CONTROL CHANNEL VOLUME INPUT SELECT 10 RECEIVER ENTER 1 1 Erasing All Remote Control settings 1 Press and hol...

Page 73: ...unit to the factory default settings STANDBY ON MOVIE MUSIC MULTI JOG ENTER STEREO DIRECT MULTI CH IN MASTER VOLUME ACOUSTIC EQ STANDBY VSX 43TX AUDIO VIDEO MULTI CHANNEL RECEIVER PHONES SPEAKERS SIGNAL SELECT HI BIT HI SAMPLING SB CH MODE S VIDEO VIDEO VIDEO INPUT AUDIO L R SET UP RETURN TONE TONE CONTROL BASS TREBLE CLASS BAND MIDNIGHT LOUDNESS STATION TUNING MULTI JOG ENTER MULTI JOG CONTROL SE...

Page 74: ...UNED RDS Hi BIT MULTI ROOM SAMPLING EON RF ATT MONO Neo 6 DIGITAL DTS ES EX MPEG AAC STEREO PRO LOGIC DSP L C R LFE AUTO SB CH ON MOVIE MUSIC OFF LS S RS AUTO RF DIGITAL dB SIGNAL SP A B ANALOG If you hook up your digital components in a different way than the default settings you need to tell the receiver how you hooked them up so the names on the remote control and front panel match your home se...

Page 75: ...STEREO TUNED RDS Hi BIT MULTI ROOM SAMPLING EON RF ATT MONO Neo 6 DIGITAL DTS ES EX MPEG AAC STEREO PRO LOGIC DSP L C R LFE AUTO SB CH ON MOVIE MUSIC OFF LS S RS AUTO RF DIGITAL dB SIGNAL SP A B ANALOG NEO 6 CINEMA is selected LOUDNESS MIDNIGHT TONE DNR ATT STEREO TUNED RDS Hi BIT MULTI ROOM SAMPLING EON RF ATT MONO Neo 6 DIGITAL DTS ES EX MPEG AAC STEREO PRO LOGIC DSP L C R LFE AUTO SB CH ON MOVI...

Page 76: ...o OFF This is because one function cannot be assigned to two different places If you are continuing from page 74 you can skip the first two steps 1 Turn on the receiver press the RECEIVER button on the remote control 2 Press the SYSTEM SETUP button 3 Looking at the display on your receiver use the 5 buttons to select INPUT ASSIGN Press the ENTER button LOUDNESS MIDNIGHT TONE DNR ATT STEREO TUNED R...

Page 77: ...e 5 buttons to select EXIT and press ENTER again Then use the 5 buttons to select EXIT and press ENTER This exits the SYSTEM SETUP mode and returns to normal operation memo If you connect any source component to the receiver using a component video input you should also have your TV connected to this receiver s component video output MOVIE MUSIC ENTER SURROUND MODE STEREO DIRECT ACOUSTIC EQ SB CH ...

Page 78: ...t EXIT and press ENTER 9 Use the MULTI JOG to select EXIT and press ENTER This exits the SYSTEM SETUP mode and returns to normal operation If you are continuing from page 74 you can skip the first two steps 1 Turn on the receiver If you want to use the remote control for this setup press the RECEIVER button 2 Press the SET UP button LOUDNESS MIDNIGHT TONE DNR ATT STEREO TUNED RDS Hi BIT MULTI ROOM...

Page 79: ... ES EX MPEG AAC STEREO PRO LOGIC DSP L C R LFE AUTO SB CH ON MOVIE MUSIC OFF LS S RS AUTO RF DIGITAL dB SIGNAL SP A B ANALOG This feature determines which frequencies will be sent to the subwoofer or large speakers FINE CHANNEL LEVEL page 81 LOUDNESS MIDNIGHT TONE DNR ATT STEREO TUNED RDS Hi BIT MULTI ROOM SAMPLING EON RF ATT MONO Neo 6 DIGITAL DTS ES EX MPEG AAC STEREO PRO LOGIC DSP L C R LFE AUT...

Page 80: ...eo 6 DIGITAL DTS ES EX MPEG AAC STEREO PRO LOGIC DSP L C R LFE AUTO SB CH ON MOVIE MUSIC OFF LS S RS AUTO RF DIGITAL dB SIGNAL SP A B ANALOG 80 Hz Sends bass frequencies below 80 Hz to the subwoofer or large speakers LOUDNESS MIDNIGHT TONE DNR ATT STEREO TUNED RDS Hi BIT MULTI ROOM SAMPLING EON RF ATT MONO Neo 6 DIGITAL DTS ES EX MPEG AAC STEREO PRO LOGIC DSP L C R LFE AUTO SB CH ON MOVIE MUSIC OF...

Page 81: ...STER VOLUME rotates to the reference position 0 dB and the display on the receiver flashes TEST TONE After a few seconds the test tone is output CHANNEL CHANNEL DTV ON OFF BAND D ACCESS MPX CLASS MENU TOP MENU TUNER EDIT GUIDE SYSTEM SETUP AUDIO RETURN ST TUNE MASTER VOLUME ST TUNE ENTER 1 5 The adjustable channels are R Front right C Center LS Surround left RS Surround right SBL Surround back lef...

Page 82: ...t RS Surround right SBL Surround back left SBR Surround back right and SW Subwoofer 4 Adjust the level of each channel using the 5 buttons LOUDNESS MIDNIGHT TONE DNR ATT STEREO TUNED RDS Hi BIT MULTI ROOM SAMPLING EON RF ATT MONO Neo 6 DIGITAL DTS ES EX MPEG AAC STEREO PRO LOGIC DSP L C R LFE AUTO SB CH ON MOVIE MUSIC OFF LS S RS AUTO RF DIGITAL dB SIGNAL SP A B ANALOG Listen to the reference chan...

Page 83: ... you want to adjust and press ENTER Then follow step 3 6 When done select EXIT if it s not already selected and press ENTER LOUDNESS MIDNIGHT TONE DNR ATT STEREO TUNED RDS Hi BIT MULTI ROOM SAMPLING EON RF ATT MONO Neo 6 DIGITAL DTS ES EX MPEG AAC STEREO PRO LOGIC DSP L C R LFE AUTO SB CH ON MOVIE MUSIC OFF LS S RS AUTO RF DIGITAL dB SIGNAL SP A B ANALOG Next if you want proceed to ACOUSTIC CAL EQ...

Page 84: ...ct the channel that you want to adjust Press ENTER LOUDNESS MIDNIGHT TONE DNR ATT STEREO TUNED RDS Hi BIT MULTI ROOM SAMPLING EON RF ATT MONO Neo 6 DIGITAL DTS ES EX MPEG AAC STEREO PRO LOGIC DSP L C R LFE AUTO SB CH ON MOVIE MUSIC OFF LS S RS AUTO RF DIGITAL dB SIGNAL SP A B ANALOG The adjustable channels are Center Surround L Surround R Surr Back surround back L Surr Back surround back R 3 Use t...

Page 85: ...5 buttons to select it and press ENTER LOUDNESS MIDNIGHT TONE DNR ATT STEREO TUNED RDS Hi BIT MULTI ROOM SAMPLING EON RF ATT MONO Neo 6 DIGITAL DTS ES EX MPEG AAC STEREO PRO LOGIC DSP L C R LFE AUTO SB CH ON MOVIE MUSIC OFF LS S RS AUTO RF DIGITAL dB SIGNAL SP A B ANALOG 9 The cursor automatically goes to the next channel Press ENTER and repeat steps 3 8 to adjust all the channels LOUDNESS MIDNIGH...

Page 86: ...evel for the LFE channel If continuing from the preceding page the BASS PEAK LEVEL should be selected CHANNEL CHANNEL DTV ON OFF BAND D ACCESS MPX CLASS MENU TOP MENU TUNER EDIT GUIDE SYSTEM SETUP AUDIO RETURN ST TUNE MASTER VOLUME ST TUNE ENTER 1 5 3 Use the 5 buttons to adjust the test tones and specify the bass peak level LOUDNESS MIDNIGHT TONE DNR ATT STEREO TUNED RDS Hi BIT MULTI ROOM SAMPLIN...

Page 87: ... A B ANALOG OFF No Dynamic Range Control MID A moderate amount of Dynamic Range Control MAX The most Dynamic Range Control available is applied CHANNEL CHANNEL DTV ON OFF BAND D ACCESS MPX CLASS MENU TOP MENU TUNER EDIT GUIDE SYSTEM SETUP AUDIO RETURN ST TUNE MASTER VOLUME ST TUNE ENTER 1 6 3 EXIT should be selected if it isn t use the 5 buttons to select it and press ENTER LOUDNESS MIDNIGHT TONE ...

Page 88: ...f digital sound Dolby Digital is a standard audio format for DVD and has been adopted by HDTV broadcasts throughout the USA Dolby Dolby Digital Dolby Digital is a discrete digital surround format used for multichannel surround sound It was developed after the Dolby Surround System and Dolby Pro Logic Surround System Dolby Digital is a high quality digital sound format that is used by many theatric...

Page 89: ...D ROM DTS adopts a simultaneous playback format With a low rate of compression of sound signals and a high rate of transmittance a higher sound quality format is produced For this reason the format is being introduced in more and more movie theaters and is being adopted for home use as DTS Digital Surround When used with movies it s called DTS LD DVD and for music software 5 1 channel CD as DTS CD...

Page 90: ...levels appropriate to your system Set this function according to the Bass Peak Level instructions on page 86 Loudspeaker Position Time Synchronization This feature allows you to adjust for the difference in the distance from each individual loudspeaker to the listening position Doing this ensures that all the speakers operate in precise synchronization improving the seamless nature of the soundfie...

Page 91: ...on Follow the diagrams and instructions below for optimum placement of each set of speakers If you re using a CENTER speaker set the FRONT speakers to a wider angle If not set them to a narrower angle Surround speakers should be positioned a foot and a half to three feet higher than your ears and titled slight downward Make sure the speakers don t face each other For DVD Audio the speakers should ...

Page 92: ...t at an angle parallel to the listener Also notice the angle of the front speakers Speaker Placement for DVD Audio etc Sources The best speaker placement for DVD Audio and other multichannel music sources may be different than for regular DVD discs For these formats follow the diagram at right as opposed to the home theater setups of the preceding pages 60 120 FL SL Surround Surround Back Surround...

Page 93: ...RADIOLA 5126 RCA PROSCAN 5127 5128 5129 SABA 5130 SAMSUNG 5131 5132 SANYO 5133 5134 5135 SCHNE I DER 5136 SCOTT 5137 5138 SHARP 5139 5140 SIEMENS 5141 SIGNATURE 5142 5143 SONY 5144 5145 SYLVANIA 5146 5147 SYMPHONIC 5148 TATUNG 5149 TELEFUNKEN 5150 5151 THORN 5152 TOSHIBA 5153 5154 UNIVERSUM 5155 VIDECH 5156 5157 W WHOUSE 5158 WARDS 5159 5160 5161 WATSON 5162 ZENITH 5163 5164 VCR PIONEER 3001 3002 ...

Page 94: ...05 FISHER 7006 7007 JVC 7008 7009 7010 7011 KENWOOD 7012 7013 7014 7015 7016 MAGNAVOX 7017 7018 MARANTZ 7019 ONKYO 7020 7021 PANASONIC 7022 7023 PHILIPS 7024 7025 RCA 7026 7027 SANYO 7028 SHARP 7029 SONY 7030 TEAC 7031 7032 7033 TECHNICS 7034 7035 YAMAHA 7036 7037 7038 7039 DENON 7040 7041 JVC 7042 KENWOOD 7043 PHILIPS 7044 SONY 7045 LOEWE 3077 3078 LUXOR 3079 LXI 3080 3081 3082 3083 3084 3085 308...

Page 95: ...has a serious problem Something is stuck in the fan and or the fan is broken The receiver has gotten too hot The thermistor temperature sensor is broken The speakers have been incorrectly connected connections are reversed Improper connections Sound is muted The volume is turned down Speakers are turned off DIGITAL ANALOG setting is incorrect MULTI CH IN mode is on Connect the power plug to the wa...

Page 96: ...quipped with digital output level adjustment capability Connect the front speakers to the A speaker system jacks see page 24 See SPEAKER SETTING on pages 37 38 to check the speaker settings Connect the speakers see page 24 Choose a surround listening mode see pages 43 45 Change the setting to YES or PLUS see page 37 38 Adjust the output setting to the level you want see pages 39 81 Adjust the peak...

Page 97: ...ECT is on ANALOG You are trying to make an analog recording from a digital signal or a digital recording of an analog source The digital source is copy protected The jacks for recording have not been connected properly To get more signal to the subwoofer set it to PLUS or choose SMALL for the front speakers see pages 37 38 Set the speaker to YES Check the MULTI CH IN connection see page 20 and sel...

Page 98: ...ings for audio output Although it s a non PCM digital source there is a possibility the present track is not the proper format 5 1 6 1 or 7 1 channel The digital signal is not being sent with the source The audio is in two channel format It has already been Dolby surround encoded The source may be 6 1 playback compatible but there is no signal from the source to indicate this Make sure the compone...

Page 99: ...settings are wrong The batteries wore out and the system settings were cleared The SR cable hasn t been connected properly The rest of the component connection have not been made The component you have hooked up is not SR compatible This is not a malfunction See the player s manual for more details Switch to STEREO mode see page 43 Turn it them off see page 47 49 Replace the batteries see page 7 O...

Page 100: ... Normal Expert Crossover Network Fine Channel Level Fine Channel Delay Acoustic Cal EQ Bass Peak Level D Range Control Exit Speaker Setting Front SMALL Center SMALL Surround SMALL SurrBack SMALLX2 Subwoofer YES Exit Free THX Channel Level Test Tone Manual Auto Exit Channel Delay Front Center Front Surround SurrBack SurrBack Surround Subwoofer Exit L R R R L L 1 0 5 f t 9 0 f t 1 0 0 f t 8 5 f t 7 ...

Page 101: ...e Used wisely your new sound equipment will provide a lifetime of fun and enjoyment Since hearing damage from loud noise is often undetectable until it is too late this manufacturer and the Electronic Industries Association s Consumer Electronics Group recommend you avoid prolonged exposure to excessive noise This list of sound levels is included for your protection Decibel Level Example 30 Quiet ...

Page 102: ...R 1 DVR VCR 2 VIDEO DVD LD TV SAT Luminance signal Y 5 Hz to 10 MHz dB Signal to Noise Ratio Luminance signal Y 65 dB 0 3 0 3 Component Video Section Input Sensitivity Y 1 Vp p 75 Ω PB PR 0 7 V 75 Ω Output Level Impedance Y 1 Vp p 75 Ω PB PR 0 7 V 75 Ω Frequency Response Y 5 Hz to 40 MHz dB PB PR 5 Hz to 40 MHz dB VIDEO Section Composite Input Sensitivity Impedance VCR 1 DVR VCR 2 VIDEO DVD LD TV ...

Page 103: ...103 Techno Tidbits Problem solving EXPERT ...

Page 104: ...0 U S A PIONEER ELECTRONICS OF CANADA INC 300 Allstate Parkway Markham Ontario L3R OP2 Canada PIONEER EUROPE NV Haven 1087 Keetberglaan 1 B 9120 Melsele Belgium TEL 03 570 05 11 PIONEER ELECTRONICS AUSTRALIA PTY LTD 178 184 Boundary Road Braeside Victoria 3195 Australia TEL 03 9586 6300 PIONEER ELECTRONICS DE MEXICO S A DE C V San Lorenzo 1009 3er Piso Desp 302 Col Del Valle Mexico D F C P 03100 T...

Reviews: