background image

75

Using Other Functions

EXPER

T

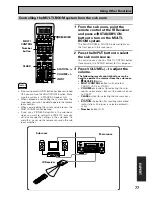
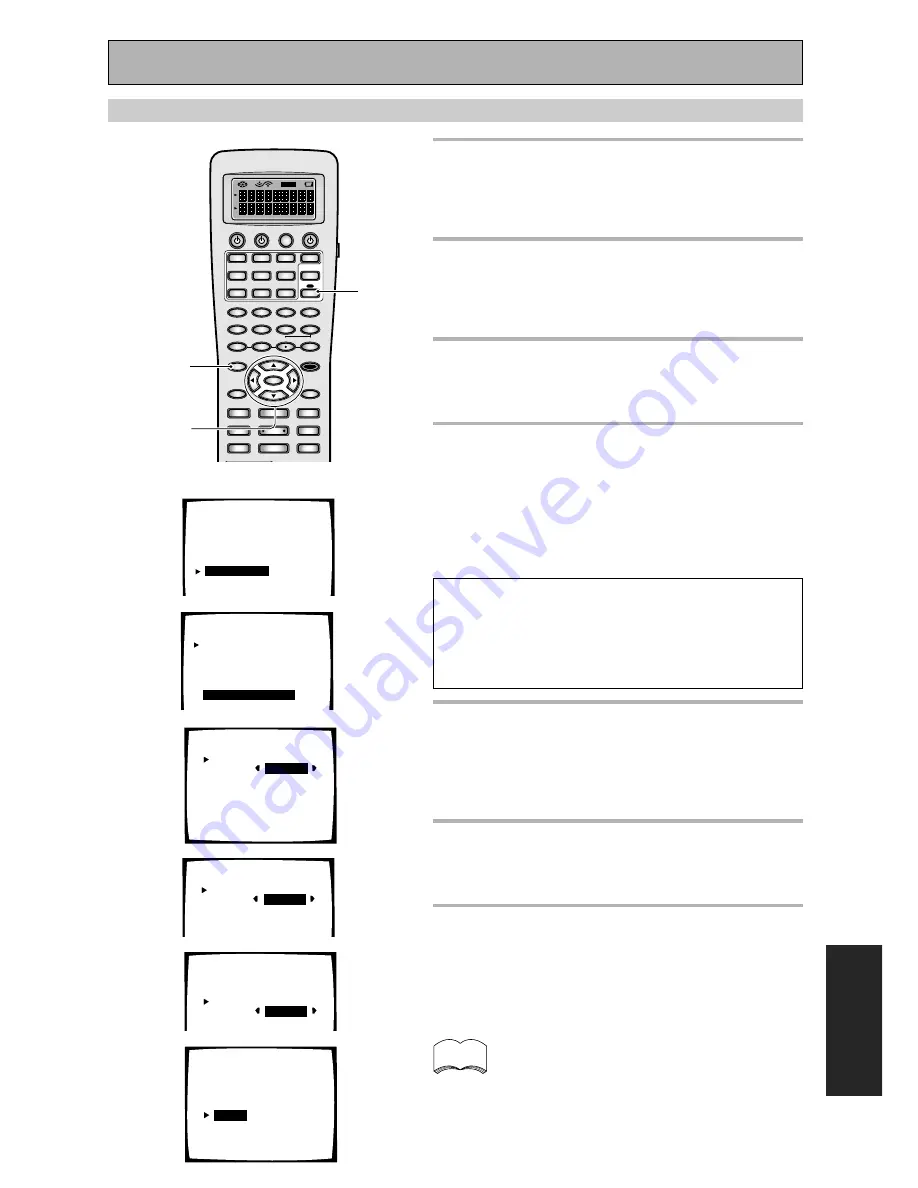
1

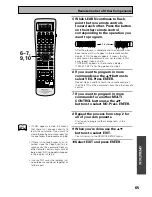
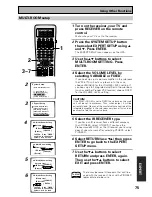
Turn on the receiver, your TV and
press RECEIVER on the remote
control.

Make sure your TV is set to the receiver.

2

Press the SYSTEM SETUP button
then select EXPERT SETUP using 

5

and 

. Press ENTER.

The EXPERT SETUP menu appears on the OSD.

3

Use the 

5∞

 buttons to select

MULTI-ROOM SETTING . Press
ENTER.

4

Select the VOLUME LEVEL by
selecting VARIABLE or FIXED.

If you hook up a just a power amplifier in the sub room
the VSX-47TX will act as a pre-amp. In this case
choose VARIABLE for the VOLUME LEVEL setting. If
you hook up a full integrated amplifier in the sub room
(such as another Pioneer VSX receiver) choose FIXED
for the VOLUME LEVEL setting.

CAUTION!

If the MULTI ROOM is set to FIXED the volume on the main
unit will be set to maximum. Thus, when output, it will be
extremely loud. Please set the master volume controls of the
integrated amplifier in the sub room very low at first and ex-
periment to find the correct volume.

5

Select the IR RECEIVER type.

If you have an IR receiver from a different company
than PIONEER, select OTHERS. If you have the
Pioneer-made MR-100, or the IR receiver you're using
doesn't seem to work after selecting OTHERS, select
PIONEER.

6

Select RETURN (use 

∞5

) then press

ENTER to go back to the EXPERT
SETUP menu.

7

Use the 

∞5

 buttons to select

RETURN and press ENTER, again.
Then use the 

∞5

 buttons to select

EXIT and press ENTER.

MULTI-ROOM setup

There may be some IR receivers that can't be
used with this receiver. Check with a PIONEER
representative to be sure.

memo

4

3

4.6. Multi-Room Setting

     Volume Level

[  

FIXED     

]

IR Receiver

[PIONEER  ]

[Return]

4.6. Multi-Room Setting

     Volume Level

[

VARIABLE

]

IR Receiver

[PIONEER  ]

[Return]

  CAUTION:    If  the "FIXED"

  position  is  chosen,the

  volume  will  be  loud.

4.6. Multi-Room Setting

     Volume Level

[VARIABLE]

IR Receiver

OTHERS

  ]

[Return]

3.Expert Setup

[1. OSD Adjustment


]

[2. Bass Peak Level]
[3. D-Range Control]
[4. Multi-Ch In Select]
[5. Function Renane]
[

6. Multi-Room Setting 

]

g]

5

System Setup

[Auto Surround Setup]

[1. Input Assign


]

[2. Surround Setup ]
[

3. Expert Setup

 ]

[4. THX Audio Setup ]

2

3.6. Multi-Room Setting

     Volume Level

[VARIABLE]

IR Receiver

[ OTHERS  ]

[

Return

]

  CAUTION:    If  the "FIXED"

  position  is  chosen,the

  volume  will  be  loud.

6

OFF

S0URCE

TV

MULTI CONTROL

SYSTEM RECEIVER

DVD/LD

TV

SAT

TV CONT

VCR1/

DVR

VCR2

VIDEO

MULTI

OPERATION

CD

DIMMER

CD-R/

TAPE1

TUNER

RECEIVER

1

INPUT ATT

2

LOUDNESS

3

SPEAKER A/B

4

VIDEO SEL

5

SIGNAL SEL

6

TAPE 2

DIRECT ACCESS DISP MODE

+

+

10

DISC

ENTER

7

EFFECT/CH SELL

8

TONE

9

BASS/TREBLE

0

SYSTEM SETUP

TUNER EDIT

MENU

REMOTE SETUP

STATUS

MPX

GUIDE

EXIT

RETURN

ENTER

TUNING

STATION

CHANNEL

1

4

DTV ON/OFF

TUNING

+

+

CHANNEL

+

¡

STATION

¢

8

3

7

EXTRA MENU

BAND

DTV MENU CLASS

SETUP

2

3~7

1

Summary of Contents for Elite VSX-47TX

Page 1: ...AUDIO VIDEO MULTI CHANNEL RECEIVER VSX 47TX Operating Instructions ...

Page 2: ...n your enclosed warranty card and keep it in a secure area This is for your security Thank you for buying this Pioneer product Please read through these operating instructions so you will know how to operate your model properly After you have finished reading the instructions put them away in a safe place for future reference ...

Page 3: ...3 ...

Page 4: ...stening in LOUDNESS Mode 51 Adjusting Bass and Treble Tone Control 52 DVD Audio MULTI CHANNEL IN Playback 53 DUAL MONO setting and Playback 54 Input Attenuator 54 Tape 2 Monitor 54 Using the Headphones 55 Video Select 55 Adjusting the Brightness of the Display 56 Status Display 56 Using the Tuner 57 Automatic and Manual Tuning 57 MPX Mode 57 Direct Access Tuning 58 Memorizing Frequently Used Stati...

Page 5: ...stening in LOUDNESS Mode 51 Adjusting Bass and Treble Tone Control 52 DVD Audio MULTI CHANNEL IN Playback 53 DUAL MONO setting and Playback 54 Input Attenuator 54 Tape 2 Monitor 54 Using the Headphones 55 Video Select 55 Adjusting the Brightness of the Display 56 Status Display 56 Using the Tuner 57 Automatic and Manual Tuning 57 MPX Mode 57 Direct Access Tuning 58 Memorizing Frequently Used Stati...

Page 6: ...ndards and New Digital Formats The VSX 47TX is the first receiver in the world to be THX Ultra2 certified Among the new THX technologies is ASA Advanced Speaker Array which can process any 5 1 channel source for 7 1 channel playback THX Ultra2 Cinema and THX MusicMode or 6 1 channel playback THX Surround EX THX Surround EX technology makes possible true playback of Dolby Digital Surround EX soundt...

Page 7: ... U LT I C O N TR O L S Y S TE M R E C E IV E R DV D LD TV S A T TV CO N T VC R1 DV R V C R 2 V ID E O MU LTI OP ER AT ION C D DI M M ER CD R TA PE 1 TU N ER RE CE IVE R 1 IN PU T AT T 2 LO UD NE SS 3 SP EA KE R A B 4 VI DE O SE L 5 SI GN AL SE L 6 TA PE 2 DI RE CT AC CE SS DI SP M OD E 1 0 D IS C EN TE R 7 EF FE CT C H SE LL 8 TO NE 9 BA SS T RE BL E 0 SY ST EM SE TU P TU NE R ED IT M EN U RE M OT...

Page 8: ...NT VCR 1 DVR VC R2 VID EO MUL TI OPER ATIO N CD DIM ME R CD R TAP E1 TU NE R AM P 1 INP UT ATT 2 LOU DN ESS 3 SPE AKE R A B 4 VID EO SEL 5 SIG NAL SEL 6 TAP E 2 DIR ECT ACC ESS DIS P MO DE 10 DIS C 7 EFF ECT CH SEL L 8 TON E 9 BAS S T REB LE 10 11 12 0 SYS TEM SET UP ME NU REM OTE SET UP STA TUS MP X GU IDE EXI T RET URN EN TER TUN ING STA TIO N SU RR OU ND LIS TEN ING MO DE CHA NN EL 1 4 RF ATT T...

Page 9: ...ce Material DVDshavebecomethebasicsourcematerialforhometheaterbecausetheyofferexcellentsoundandpicturequality andallowuserstoenjoyhometheatersoundtrackswithmorethantwochannelsofaudio Forexample DolbyPro Logicplaysbackfourchannels frontleft frontright centerandasinglechannelforbothsurroundspeakers Dolby DigitalandDTSsourcesusuallyhavesixdiscretechannels frontleft frontright center surroundleftandri...

Page 10: ... the audio out hook it up using this terminal Follow the diagram below This is the best scenario as you will be able to follow the default settings of this receiver and won t need to assign the digital inputs you should use DIGITAL IN 1 If your DVD player only has an optical terminal for the audio output you can hook it up using one of the DIGITAL IN terminals between 3 5 for example DIGITAL IN 3 ...

Page 11: ...HONO CD OUT IN IN IN R R L R L 1 2 R L R L R L R L R L R L L R L AUDIO AUDIO FRONT CENTER SUR ROUND SUR ROUND BACK AUDIO VIDEO S VIDEO FRONT FRONT CENTER CENTER SUB W SUB W SUR ROUND SUR ROUND SUR ROUND BACK SUR ROUND BACK Single Single Single Single PCM 2DIGITAL DTS PCM 2DIGITAL DTS 1 OUT 2 2 1 3 OUT CD R TAPE1 MD CD R TAPE1 MD TAPE2 MONITOR SAT VCR1 DVR VCR1 DVR OUT MULTI ROOM SOURCE MULTI ROOM ...

Page 12: ...ith the 5 buttons and press ENTER You will return to the SYSTEM SETUP menu 8 Use the 5 buttons to select RETURN and press ENTER The receiver exits the setup process 4 4 4 4 4 Assigning the Digital Inputs This is only necessary if you did not hook up your DVD player to DIGITAL IN 1 using a coaxial cable but rather connected it to one of the optical digital inputs The following example shows how to ...

Page 13: ...rround sound setups by making the settings manually go to Setting up for Surround Sound starting on page 35 Make sure all the components you need especially speakers have been properly connected before you do the steps described here Use the arrow buttons 5 and the ENTER button on the remote control to navigate the on screen display OSD on your TV A B MIC MASTER VOLUM TOR PHONES SP SYSTEM A B SIGN...

Page 14: ...EMS CHECK screen If you want to view the settings select NEXT and press ENTER repeatedly If not simply go to step 13 If they do not match the speaker configuration you hooked up and you wan to try again select RETRY with 5 buttons and press ENTER Put the remote control into the its stand again Follow the instructions above from step 10 If the speaker settings do not match the speaker configuration...

Page 15: ...fter it has finished you see the SPEAKER SYSTEMS CHECK screen If you want to view the settings select NEXT and press ENTER repeatedly If not simply go to the next step 13 Select RETURN to go back to the SYSTEM SETUP menu then choose EXIT to complete the auto surround sound setup and return to normal use You should now have settings that will give you good surround sound The MCACC indicator will li...

Page 16: ... and from the receiver to your TV or monitor If you don t follow the default settings below you must assign the inputs you used with the Assigning the Component Video Inputs procedure See page 89 to do this The default settings are COMPONENT VIDEO IN 1 DVD LD COMPONENT VIDEO IN 2 TV COMPONENT VIDEO IN 3 SAT Composite Video Composite video cords are the most common or standard video cord but also t...

Page 17: ...deo cable connections you might need to setup your DVD player for component video output as well See your DVD manual for details If you have a DVD A or Super Audio CD compatible player see Connecting to the Multi Channel Analog Inputs on page 21 You need to hook up your audio with analog connections as well Before making or changing the connections switch off the power and disconnect the power cor...

Page 18: ...n the front panel It will always appear as VIDEO in the receiver s display See page 88 for more information on Assigning the Digital Inputs PHONO CD OUT IN IN IN R R L R L 1 2 R L R L R L R L R L R L L R L AUDIO AUDIO AUDIO VIDEO S VIDEO FRONT FRONT CENTER CENTER SUB W SUB W SUR ROUND SUR ROUND SUR ROUND BACK SUR ROUND BACK Single Single Single PCM 2DIGITAL DTS PCM 2DIGITAL DTS 1 OUT 2 2 1 3 OUT C...

Page 19: ...nnections are different than the default settings you will need to assign the digital jacks to the proper component s with the Assigning the Digital Inputs procedure See page 88 to do this PHONO CD OUT IN IN IN R R L R L 1 2 R L R L R L R L R L R L L R L AUDIO AUDIO AUDIO VIDEO S VIDEO FRONT FRONT CENTER CENTER SUB W SUB W SUR ROUND SUR ROUND SUR ROUND BACK SUR ROUND BACK Single Single Single PCM ...

Page 20: ...omponent to the PHONO jacks other than a turntable It could damage the equipment If your turntable has a phono pre amplifier most do not please hook it up to an input other than PHONO 7 Audio cords Use RCA audio cords not supplied to con nect the audio components Connect red plugs to R right and white plugs to L left Be sure to insert completely L R memo PHONO CD OUT IN IN IN R R L R L 1 2 R L R L...

Page 21: ...our cassette deck which is caused by leakage flux from the transformer in the receiver If you experience noise move the cassette deck farther away from the receiver If you use only one surround back input hook up the left one memo PHONO CD OUT IN IN IN R R L R L 1 2 R L R L R L R L R L R L L R L AUDIO AUDIO AUDIO VIDEO S VIDEO FRONT FRONT CENTER CENTER SUB W SUB W SUR ROUND SUR ROUND SUR ROUND BAC...

Page 22: ...ct this to the optical input on a digital recorder currently these include MD DAT and CD R you can make direct digital recordings with this unit We also recommend hooking up your digital components to analog audio jacks see p 20 in order to make recordings some digital sources may be protected against making digital copies Before making or changing the connections switch off the power and disconne...

Page 23: ...nalog connections the jacks for digital connections are not dedicated to one type of component they can be used freely Thus you must tell the receiver what digital component is connected to which jack so your components will be in sync with the names on the remote control buttons and the like To avoid having to assign the digital inputs you can hook up your equipment in accordance with the receive...

Page 24: ...tdoor antenna Ground 15 18 ft 5 6 m Indoor antanna vinyl coated wire AM loop antenna ANTENNA AM LOOP ANTENNA FM 75Ω UNBAL Connecting Your Equipment PHONO CD OUT IN IN R R L R L L R L AUDIO AUDIO FRONT CENTER SUR FRONT CENTER CD R TAPE1 VCR1 OUT DVD LD IN DVD LD IN Y Y L ª R L PB PR PB PR 1 2 IN 3 IN Y Y TV IN SAT IN IN MULTI ROOM SOURCE MULTI ROOM SOURCE OUT IN IN OUT REC OUT IN Å AC IN AC OUTLET ...

Page 25: ...on page 70 If you use a THX certified subwoofer use the THX INPUT jack on the subwoofer if your subwoofer has one or switch the filter position to THX on your subwoofer memo Use Speakers with a nominal impedance rated 6Ω to 16Ω PHONO CD OUT IN IN IN R R L R L 1 2 R L R L R L R L R L R L L R L AUDIO AUDIO FRONT CENTER SUR ROUND SUR ROUND BACK AUDIO VIDEO S VIDEO FRONT FRONT CENTER CENTER SUB W SUB ...

Page 26: ...or below the TV so that the sound of the center channel is localized at the TV screen THX recommends that if you have two surround back speakers place them close together Then you can take advantage of the ASA feature see p 97 101 See page 102 103 for more detailed advice on speaker placement Front Speaker L Surround Speaker L Surround Back Speaker L Surround Back Speaker R Surround Speaker R Fron...

Page 27: ...is the primary setting The button cycles through the speaker systems as follows A B A B off Different conditions apply when bi amping the speakers For this case refer to page 71 VIDEO SELECT button see p 55 Use to toggle between the different video input possibilities SIGNAL SELECT button see p 45 Press SIGNAL SELECT repeatedly to select one of the following ANALOG To select an analog signal DIGIT...

Page 28: ...OL buttons You must input the preset code in order use this function see page 62 63 9 TV CONTROL buttons The following buttons are used to control the TV only and can be used once they are preset to control your TV TV INPUT Press to select the input source for the TV TV CH Use these buttons to change the channel of the TV TV VOL Press to control the volume of the TV 0 LISTENING MODE buttons see p ...

Page 29: ...dures When you are using your DVD menu screen this button acts the same as the DVD player s Return button When you are using cable tuners satellite tuners or digital TV tuners this button will either exit you from the menu screen or act like a Return button above depending on the maker of the unit INPUT button Press to select an input source The button will cycle through all the possible sources V...

Page 30: ...UT analog terminals connect an amplifier here see p 72 73 Use these terminals to output the audio signal from this amplifier to a different amplifier if that s how you choose to set up your system Remove the U shaped connectors only if you plan to do so 8 Video components in out terminals Input output signals from you video compo nents DVD VCR TV tuners SAT tuners etc here see number 2 here and p ...

Page 31: ...s the possibil ity on inputting and or outputting information to from the receiver in the future 15 Radio antenna terminals Hook up antennas for the radio tuner built into the receiver here 16 SPEAKERS terminals see p 25 Use these terminals to connect speakers to the receiver There are two speaker systems on this receiver A B The A system is the one that handles surround sound and is fed by the su...

Page 32: ...3 13 17 15 6 8 9 10 1 INPUT SELECTOR dial Turn to select a source component You can also use to select a source in the MULTI ROOM SOURCE mode The input indicators show the current component 2 STANDBY ON button power ON OFF button Press to switch the receiver ON or into STANDBY mode or switch OFF 3 STANDBY indicator Lights when the receiver is in STANDBY mode Please note that this receiver consumes...

Page 33: ...A is the primary setting The button cycles through the speaker systems as follows A B A B off Different conditions apply when bi amping the speakers For this case refer to page 70 20 SIGNAL SELECT button see p 45 Use to select the type of signal being input into the receiver Press SIGNAL SELECT repeatedly to select one of the following ANALOG To select an analog signal DIGITAL To select an optical...

Page 34: ...l you selected ANALOG Lights when analog signals are assigned DIGITAL Lights when digital audio signals are selected 2 RF Lights when 2 RF signals are assigned AUTO Lights when the receiver is set to select the input signal automatically 2 Program Format indicators For Dolby Digital or DTS sources These indicators change according to which channels are active in the source When all three LS left s...

Page 35: ... menu press ENTER In each mode the current settings are displayed We suggest you adjust all these settings when you first hook up the receiver That gets them out of the way and you won t need to return to this setting mode unless you change your home set up by adding new speakers etc SPEAKER SYSTEMS See p 36 37 Use to specify the type and number of speakers you connected CHANNEL DELAY See p 38 You...

Page 36: ...he subwoofer will automatically be switched YES Also the center and surround speakers cannot be set to LARGE if the front speakers are set to SMALL In this case all bass frequencies are sent to the subwoofer CENTER default setting is SMALL Select LARGE if your speaker will reproduce bass frequencies effectively Select SMALL to send bass frequencies to the other speakers or subwoofer If you did not...

Page 37: ... 2 set all speakers except for surround back to SMALL 6 Use the 2 3 buttons to choose the size and number for each set of speakers as well as LARGE SMALL YES NO or PLUS 7 Repeat steps 5 6 for all speakers channels 8 Use the button to go to the next screen 9 Use the 2 3 buttons to choose a Crossover Frequency of 50 Hz 80 Hz 100 Hz 150 Hz or 200 Hz Certain bass sounds will play back from the subwoof...

Page 38: ...your listening position to your speakers to add the proper delay The following steps show you how to set the delay time for each channel by specifying the distances from your listening position to each speaker Once you specify the speaker distances or it is done automatically through the AUTO selection or in the Quick Start Guide the receiver calculates the correct delay times automatically If con...

Page 39: ...few seconds the test tone is output If your subwoofer has a volume control set it to the middle position before doing these operations CHANNEL LEVEL channel balance The following steps show you how to balance the sound output level of your speakers Proper speaker balance is essential for obtaining high quality surround sound If continuing from CHANNEL DELAY go to step 1 If starting fresh complete ...

Page 40: ...TO mode Press ENTER to exit the process The display on the receiver will say RESUME and the MASTER VOLUME will return to its original position Next proceed to Acoustic Calibration Setting Up for Surround Sound memo You can change the channel level of each speaker at any time by using the EFFECT CH SEL and buttons on the remote control You can set the levels for each three groups of the listening m...

Page 41: ... EQ Return 1 ACOUSTIC CAL EQ should be selected If it isn t use the 5 buttons to select and press ENTER 2 AUTO will appear on the OSD Press ENTER There are two types of curve modes that will be set These are ALL CH ADJ mode and FRONT ALIGN mode ALL CH ADJ mode flat curve All the speakers are set individually except for the subwoofer No special weighting is given to any channel over any other chann...

Page 42: ...tons to select NEXT and pressing ENTER until you are done checking the settings 5 To exit the check select RETURN with the 5 buttons and press ENTER You will return to the SURROUND SETUP menu 6 To exit the SURROUND SETUP menu select RETURN with the 5 buttons and press ENTER Then select EXIT with the 5 buttons and press ENTER 3 Surround Setup Check 1 Speaker Systems 2 Channel Delay 3 Channel Level ...

Page 43: ...PUT SELECTOR dial to select the source The default setting for the input signal is AUTO if you need to select ANALOG DIGITAL or 2 RF see p 45 4 Press the LISTENING CH SEL button on the remote control Each press switches LISTENING CH SELECT between 5 1 7 1 and AUTO see page 44 for more on this On the front panel use the LISTENING CH SELECT button to select the channel 5 Choose a listening mode by p...

Page 44: ...1 channel or AUTO with this button LISTENING CH SELECT options may change if the SPEAKER SYSTEM settings are changed p 36 37 LISTENING CH SELECT affects which listening modes will be available You can t select LISTENING CH SELECT in STEREO mode 1 memo AV PRE PROGRAMMED AND LEARNING REMOTE CONTROL UNIT AXD7290 Î STATION SURROUND LISTENING MODE CHANNEL 1 4 CHANNEL STATION 3 7 DTV MENU CLASS TV INPUT...

Page 45: ... to the instruction manual supplied with your DVD player This receiver can only play back Dolby Digital PCM 32kHz 44kHz 48kHz 88kHz and 96kHz sampling frequency and DTS digital signal formats If your source is not one of these select ANALOG for playback Make sure you connect your DVD LD or LD players using the 2 RF jack If your player has a 2 RF output this will ensure you can use all LDs Refer to...

Page 46: ...can still use Acoustic Calibration EQ Digital NR Midnight mode Loudness mode and Tone Control functions DIRECT In DIRECT mode the audio bypasses all types of signal processing to remain as close to the source audio quality as possible Note If you switch on Acoustic Calibration EQ Digital NR Midnight mode Loudness mode or Tone Control when DIRECT is selected the receiver automatically switches to S...

Page 47: ...ces the THX SURROUND EX mode is automatically selected when the LISTENING CH SELECT is set to AUTO default Basic Operation This mode gives 6 1 channel surround sound and is suitable for music The NEO 6 Music mode plays the stereo source as is through the front left right speakers and generates a natural ambient surround and center sound For 6 1 or 7 1 channel playback of 5 1 Channel Sources SX Stu...

Page 48: ...e will allow you to experience these movies in surround sound even though they were not recorded that way originally X D THEATER This mode is especially designed to give sound depth to stereo sources The overall effect builds a dynamic and broad sound space allowing two channel stereo signals to faithfully imitate a five speaker sound The mode should be used in conjunction with Dolby Pro Logic for...

Page 49: ...oustic environment of a regular stereo while using all the speakers in the system to induce a rich all around sound The display will change to 5CH STEREO or 7CH STEREO according to the sources LISTENING CH SELECT and speaker configuration memo 1 Press RECEIVER 2 Press the EFFECT CH SEL button repeatedly until you see EFFECT in the receiver s display 3 Use the buttons to add or subtract the amount ...

Page 50: ...N and OFF After completing the AUTO SURROUND SETUP p 13 or setup using AUTO p 41 ACOUSTIC CAL ON ALL CH ADJ is set automatically You can t turn on ACOUSTIC CAL on in MULTI CH IN mode If you turn ACOUSTIC CAL on in DIRECT mode the receiver automatically switches to STEREO mode Listening with Acoustic Calibration EQ You can listen to the soundtrack with the Acoustic Calibration EQ you set on page 41...

Page 51: ...for listening to music at low volumes 1 Press RECEIVER 2 Press the LOUDNESS button on the remote control Each press switches LOUDNESS mode on or off You can t use the LOUDNESS mode with the HOME THX MULTI CH IN MIDNIGHT or TONE CONTROL modes If you set LOUDNESS on in DIRECT mode the receiver will switch to STEREO mode memo 1 AV PRE PROGRAMMED AND LEARNING REMOTE CONTROL UNIT AXD7290 Î TUNING STATI...

Page 52: ...ou adjust these functions The second means the tone controls are being bypassed and thus have no effect on the sound If TONE BYPASS appears press the button again to get TONE ON which is the tone adjust mode 3 Press the BASS TREBLE button repeatedly to select BASS or TREBLE 4 Use the buttons to adjust the low or high frequency levels A few seconds after you finish adjusting the tone the receiver w...

Page 53: ...on on the remote control s Receiver MAIN screen or the MULTI CH INPUT button on the front panel Each press switches the input between the previous mode and MULTI CH IN ON This is a true playback of the signal from the MULTI CH INPUT terminals output without digital processing You can only control each channel level OFF Cancels the MULTI CH IN modes 2 Use the LISTENING CH SEL button to select the n...

Page 54: ...e you want release the button The L ch1 and R ch2 indicators in the display light to indicate the playback channel DUAL ch2 DUAL ch1 DUAL ch1 ch2 The different settings are DUAL ch1 where you only hear channel 1 DUAL ch2 where you only hear channel 2 and DUAL ch1 ch2 where you hear both channels but independently from different speakers memo 1 Tape 2 Monitor If you connect a cassette deck with a r...

Page 55: ...t to the input you chose until you change the audio input If you change audio functions the receiver will reset itself to make the video and audio inputs correspond Also if you switch the power of the receiver off when you turn it back on the video and audio in puts will reset so that they correspond memo Using Headphones 1 Plug headphones into the headphone jack on the front of the receiver No so...

Page 56: ...ery dim to very bright can be selected Each press changes the brightness of the display When cycling through the options the default brightness can also be selected Please note It is a feature of this unit that the fluorescent display will be brighter for a few sec onds after you choose a function like DVD LD CD etc and then get softer This will still hap pen when you adjust the brightness but the...

Page 57: ... and release when you reach the frequency you desire MPX Mode If the TUNED or STEREO indicators do not light when tuning an FM station because the station is too far away or the broadcast signal is weak press MPX on the remote control to switch to MONO reception This should improve reception enough for you to enjoy the broadcast OFF AV PRE PROGRAMMED AND LEARNING REMOTE CONTROL UNIT AXD7290 S0URCE...

Page 58: ... tune directly to a specific frequency using the remote control OFF AV PRE PROGRAMMED AND LEARNING REMOTE CONTROL UNIT AXD7290 S0URCE Î TV MULTI CONTROL SYSTEM RECEIVER DVD LD TV SAT TV CONT VCR1 DVR VCR2 VIDEO MULTI OPERATION CD DIMMER CD R TAPE1 TUNER RECEIVER 1 INPUT ATT 2 LOUDNESS 3 SPEAKER A B 4 VIDEO SEL 5 SIGNAL SEL 6 TAPE 2 DIRECT ACCESS DISP MODE 10 DISC ENTER 7 EFFECT CH SELL 8 TONE 9 BA...

Page 59: ...ass The station is memorized automatically after 5 sec onds 5 Press the ENTER button to input your choice OFF AV PRE PROGRAMMED AND LEARNING REMOTE CONTROL UNIT AXD7290 S0URCE Î TV MULTI CONTROL SYSTEM RECEIVER DVD LD TV SAT TV CONT VCR1 DVR VCR2 VIDEO MULTI OPERATION CD DIMMER CD R TAPE1 TUNER RECEIVER 1 INPUT ATT 2 LOUDNESS 3 SPEAKER A B 4 VIDEO SEL 5 SIGNAL SEL 6 TAPE 2 DIRECT ACCESS DISP MODE ...

Page 60: ...it the process you can press the TUNER EDIT button 6 Press ENTER when you have got the characters you want to enter Repeat steps 2 to 6 to memorize up to 30 preset broadcast station names To erase a station name enter eight spaces for the station name To change a station name enter a new name over the top of the existing one memo OFF AV PRE PROGRAMMED AND LEARNING REMOTE CONTROL UNIT AXD7290 S0URC...

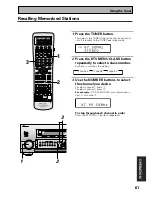
Page 61: ...2 MONITOR SETUP MIC DIGITAL IN S VIDEO VIDEO VIDEO INPUT MIDNIGHT TONE TONE BASS TEREBLE DIGITAL NR CLASS STATION TUNER MU C ACOUSTIC CAL LISTENING CH SELECT MULTI CH INPUT DVD A SACD OFF AV PRE PROGRAMMED AND LEARNING REMOTE CONTROL UNIT AXD7290 S0URCE Î TV MULTI CONTROL SYSTEM RECEIVER DVD LD TV SAT TV CONT VCR1 DVR VCR2 VIDEO MULTI OPERATION CD DIMMER CD R TAPE1 TUNER RECEIVER 1 INPUT ATT 2 LOU...

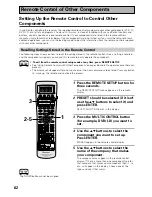
Page 62: ...mode to input the information from the remote controls supplied with your other components Recalling Settings Stored in the Remote Control The following steps show you how to recall the setting stored in the remote control Once a setting is recalled and the component assigned you can use this remote to easily operate the component To exit from the remote control setup mode at any time press REMOTE...

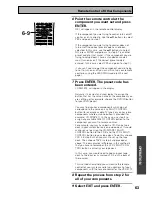
Page 63: ...he name on any MULTI CONTROL button for example a cable TV tuner or you have two components where only one button is provided for example CD R TAPE 1 In this case use step 3 to assign any available MULTI CONTROL button to the component you want to remote control For example you may have both a CD R and a tape deck in your system but only one video deck It would make sense to assign the CD R TAPE 1...

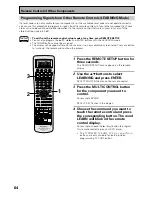
Page 64: ...r DVD player The TV POWER TV FUNC TV CH and VOL buttons are only available for learning when programming TV CONT button memo OFF AV PRE PROGRAMMED AND LEARNING REMOTE CONTROL UNIT AXD7290 S0URCE Î TV MULTI CONTROL SYSTEM RECEIVER DVD LD TV SAT TV CONT VCR1 DVR VCR2 VIDEO MULTI OPERATION CD DIMMER CD R TAPE1 TUNER RECEIVER 1 INPUT ATT 2 LOUDNESS 3 SPEAKER A B 4 VIDEO SEL 5 SIGNAL SEL 6 TAPE 2 DIREC...

Page 65: ...ll appear in the display in step 5 In some NG cases the remotes just need to be moved closer together or farther apart 2 8 inches OFF AV PRE PROGRAMMED AND LEARNING REMOTE CONTROL UNIT AXD7290 S0URCE Î TV MULTI CONTROL SYSTEM RECEIVER DVD LD TV SAT TV CONT VCR1 DVR VCR2 VIDEO MULTI OPERATION CD DIMMER CD R TAPE1 TUNER RECEIVER 1 INPUT ATT 2 LOUDNESS 3 SPEAKER A B 4 VIDEO SEL 5 SIGNAL SEL 6 TAPE 2 ...

Page 66: ...c e r D V D 1 k c a b y a l p e s r e v e r t s a f r o f n w o d d l o H D L D V D R C V R D C D M D C k c e d e t t e s s a C r e d r o c e r D V D 3 k c a b y a l p t r a t S D L D V D R C V R D C D M D C k c e d e t t e s s a C r e d r o c e r D V D 7 y d a e r l a s i c s i d e h t n e h w s i h t g n i s s e r p s l e d o m e m o s n o k c a b y a l p p o t S n e p o o t y a r t c s i d e h ...

Page 67: ... S Y B D N A T S Y B D N A T S Y B D N A T S Y B D N A T S d n a N ON ON ON ON O V T V T e t i l l e t a S V T e l b a C T U P N I V T t u p n i V T e h t h c t i w s o t s s e r P V T H C V T s l e n n a h c t c e l e S V T V T e t i l l e t a S V T e l b a C E M U L O V e m u l o v V T e h t t s u j d A V T U N E M m e t s y s t a h t f o u n e m V T e h t o t u o y s e k a T V T V T e t i l l e...

Page 68: ...on the remote control display 4 Use the 5 buttons to select ON OFF or EXIT and press ENTER ON The direct function is on OFF The direct function is off EXIT Leaves the DIRECT FUNCTION settings and returns you to the REMOTE SETUP menu After you press ENTER if you chose one of the first two settings COMPLETE will appear in the display 5 Repeat steps 2 4 to set the direct function for as many componen...

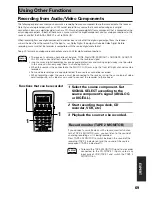
Page 69: ... them in an analog manner When the source is the connected to the MULTI CH IN jacks only the front left right channels can be recorded Some video recordings are copy protected these sources cannot be recorded When recording video the source must be connected to the receiver using the same type of video cord composite or S video as you used to connect the recorder to the receiver 1 Select the sourc...

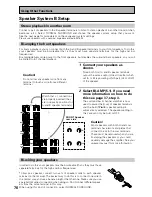
Page 70: ...wo metal plates that connect the Hi to the Low terminals These must be removed when you are bi amping the speakers or you could severely damage the amplifier See your speaker manual for more information In order to do this your speakers must be bi wireable that is they must have separate terminals for the high and low frequencies To bi wire a speaker connect two sets of speaker cords to each speak...

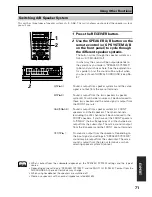
Page 71: ... speaker system A and the same signal is output from the pre out terminals B SP3B Sound is output from the two speakers in speaker system B Multichannel sources will be downmixed to these two speakers and the same signal is output from the FRONT pre outs A B SP3AB Sound is output from speaker system A s FRONT speakers and the B speakers The other channels excluding the LFE channel will be downmixe...

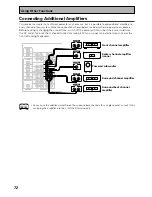
Page 72: ...annel amplifier Powered subwoofer INPUT L R ANALOG INPUT L R ANALOG INPUT L R ANALOG INPUT ANALOG INPUT ANALOG You can use the additional amplifier on the surround back channels for a single speaker as well In this case plug the amplifier into the L SINGLE terminal only Connecting Additional Amplifiers This receiver has more than sufficient power for any home use but it is possible to add addition...

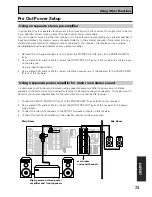
Page 73: ...eiver to power the sub room speakers You might want to do this if your power requirements for the main room are not met by this receiver 1 Connect the MULTI ROOM OUT jacks to the POWER AMP IN jacks both on this receiver 2 Use a stereo RCA audio cable to connect the FRONT PRE OUT jacks of this receiver to the power amp s inputs 3 Connect the sub room speakers to the FRONT A speaker outputs on this ...

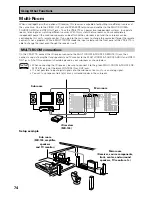
Page 74: ...X 47TX can power two independent systems in separate rooms listening to or watching different sources With this system the two rooms can have completely independent power the main room power can be off while the sub room is on and the sub room can be controlled by this unit s remote control If you go into the main room to change the source but forget the remote control it s not a problem While in ...

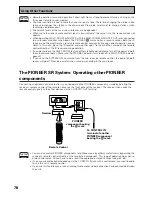
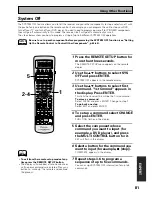
Page 75: ...s ENTER to go back to the EXPERT SETUP menu 7 Use the 5 buttons to select RETURN and press ENTER again Then use the 5 buttons to select EXIT and press ENTER MULTI ROOM setup There may be some IR receivers that can t be used with this receiver Check with a PIONEER representative to be sure memo 4 3 4 6 Multi Room Setting Volume Level FIXED IR Receiver PIONEER Return 4 6 Multi Room Setting Volume Le...

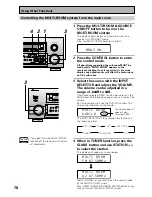
Page 76: ... MULTI ROOM The INPUT SELECTOR steps through the functions in the following order DVD LD TV SAT VCR1 DVR CD R TAPE1 CD TUNER 3 3 3 3 3 3 3 4 When in TUNER function press the CLASS button and use STATION to select the station The display will appear as shown below FM 87 5OMHz MULTI ROOM A2 87 5OMHz MULTI ROOM Press CONTROL at any time to exit the control mode of the MULTI ROOM system Press MULTI RO...

Page 77: ...4 VIDEO SEL 5 SIGNAL SEL 6 TAPE 2 DIRECT ACCESS DISP MODE 10 DISC ENTER 7 EFFECT CH SELL 8 TONE 9 BASS TREBLE 0 SYSTEM SETUP TUNER EDIT MENU REMOTE SETUP STATUS MPX GUIDE EXIT RETURN ENTER TUNING STATION SURROUND LISTENING MODE CHANNEL 1 4 DTV ON OFF TUNING CHANNEL STATION 8 3 7 EXTRA MENU BAND DTV MENU CLASS TV INPUT TV CONTROL TV CH TV VOL VOLUME INPUT MIDNIGHT DIGITAL NR STEREO DIRECT THX MUTE ...

Page 78: ...ow The tuner cannot be tuned to more than one station at a time Therefore changing the station in one room also changes the station in the other room Please be careful not to change stations when recording a radio broadcast The volume levels of the main and sub rooms are independent When more than one remote control signal is transmitted at the same time the receiver does not operate When operatin...

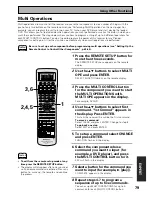
Page 79: ...ING CHANNEL STATION 8 3 7 EXTRA MENU BAND DTV MENU CLASS TV INPUT TV CONTROL TV CH TV VOL VOLUME INPUT MIDNIGHT DIGITAL NR STEREO DIRECT THX MUTE STANDARD LISTENING CH SELECT MULTI CH INPUT ACOUSTIC CAL ADVANCED CONCERT ADVANCED CINEMA DVD A SACD LIGHT SETUP 2 4 5 3 6 1 1 Press the REMOTE SETUP button for more than three seconds The REMOTE SETUP menu appears on the remote display 2 Use the 5 butto...

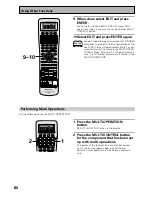
Page 80: ...CR1 DVR VCR2 VIDEO MULTI OPERATION CD DIMMER CD R TAPE1 TUNER RECEIVER 1 INPUT ATT 2 LOUDNESS 3 SPEAKER A B 4 VIDEO SEL 5 SIGNAL SEL 6 TAPE 2 DIRECT ACCESS DISP MODE 10 DISC ENTER 7 EFFECT CH SELL 8 TONE 9 BASS TREBLE 0 SYSTEM SETUP TUNER EDIT MENU REMOTE SETUP STATUS MPX GUIDE EXIT RETURN ENTER TUNING STATION SURROUND LISTENING MODE CHANNEL 1 4 DTV ON OFF TUNING CHANNEL STATION 8 3 7 EXTRA MENU B...

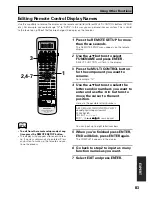
Page 81: ...STATION 8 3 7 EXTRA MENU BAND DTV MENU CLASS TV INPUT TV CONTROL TV CH TV VOL VOLUME INPUT MIDNIGHT DIGITAL NR STEREO DIRECT THX MUTE STANDARD LISTENING CH SELECT MULTI CH INPUT ACOUSTIC CAL ADVANCED CONCERT ADVANCED CINEMA DVD A SACD LIGHT SETUP 2 4 1 5 To exit from the remote setup mode at any time press the REMOTE SETUP button The display will disappear after one minute or so if no new commands...

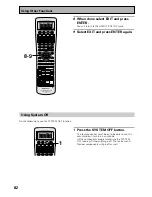
Page 82: ...L SEL 6 TAPE 2 DIRECT ACCESS DISP MODE 10 DISC ENTER 7 EFFECT CH SELL 8 TONE 9 BASS TREBLE 0 SYSTEM SETUP TUNER EDIT MENU REMOTE SETUP STATUS MPX GUIDE EXIT RETURN ENTER TUNING STATION SURROUND LISTENING MODE CHANNEL 1 4 DTV ON OFF TUNING CHANNEL STATION 8 3 7 EXTRA MENU BAND DTV MENU CLASS TV INPUT TV CONTROL TV CH TV VOL VOLUME INPUT MIDNIGHT DIGITAL NR STEREO DIRECT THX MUTE STANDARD LISTENING ...

Page 83: ...d press ENTER END will blink press ENTER again The COMPLETE appears in the display 6 Go back to step 2 to input as many function names as you want 7 Select EXIT and press ENTER To exit from the remote setup mode at any time press the REMOTE SETUP button The display will disappear after one minute or so if no new commands are entered Press any button to wake up the remote and con tinue the process ...

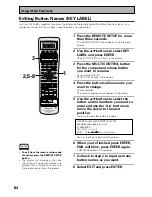
Page 84: ...s 6 When you re finished press ENTER END will blink press ENTER again COMPLETE appears in the display 7 Go back to step 2 to input as many button names as you want 8 Select EXIT and press ENTER OFF AV PRE PROGRAMMED AND LEARNING REMOTE CONTROL UNIT AXD7290 S0URCE Î TV MULTI CONTROL SYSTEM RECEIVER DVD LD TV SAT TV CONT VCR1 DVR VCR2 VIDEO MULTI OPERATION CD DIMMER CD R TAPE1 TUNER RECEIVER 1 INPUT...

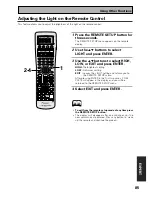
Page 85: ... S0URCE Î TV MULTI CONTROL SYSTEM RECEIVER DVD LD TV SAT TV CONT VCR1 DVR VCR2 VIDEO MULTI OPERATION CD DIMMER CD R TAPE1 TUNER RECEIVER 1 INPUT ATT 2 LOUDNESS 3 SPEAKER A B 4 VIDEO SEL 5 SIGNAL SEL 6 TAPE 2 DIRECT ACCESS DISP MODE 10 DISC ENTER 7 EFFECT CH SELL 8 TONE 9 BASS TREBLE 0 SYSTEM SETUP TUNER EDIT MENU REMOTE SETUP STATUS MPX GUIDE EXIT RETURN ENTER TUNING STATION SURROUND LISTENING MOD...

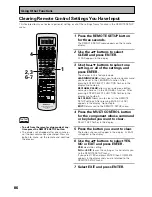
Page 86: ...en will appear in the display CLEAR will appear in the display 6 Use the 5 buttons to select YES NO or EXIT and press ENTER YES clears the setting NO and EXIT leaves the setting as is and returns you to the REMOTE SETUP menu If you select YES and press ENTER then COMPLETE appears in the display and you are returned to the REMOTE SETUP menu 7 Select EXIT and press ENTER OFF AV PRE PROGRAMMED AND LE...

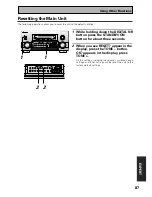
Page 87: ...d settings and tuner settings will be reset the unit to the factory default settings STANDBY ON OFF ON STANDBY DVD LD TV DVD SAT VIDEO VIDEO AUDIO VCR VCR2 CD TUNER PHONO MAC3 CD R TAPE1 MD MULTI CH INPUT LISTENING MODE SELECTOR MASTER VOLUME INPUT SELECTOR VSX 47TX AUDIO VIDEO MULTI CHANNEL AMPLIFIER PHONES SP SYSTEM A B SIGNAL SELECT VIDEO SELECT TAPE2 MONITOR SETUP MIC DIGITAL IN S VIDEO VIDEO ...

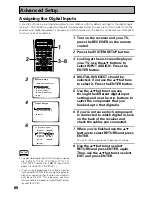
Page 88: ...exits the Assigning the Digital Inputs mode 8 Use the 5 buttons to select RETURN and press ENTER again Then use the 5 buttons to select EXIT and press ENTER 3 4 6 System Setup Auto Surround Setup 1 Input Assign 2 Surround Setup 3 Expert Setup 4 THX Audio Setup Exit 1 Input Assign 1 Digital In Select 2 C nent Vudeo In Return memo The possible digital inputs that can be assigned are DVD LD TV SAT VC...

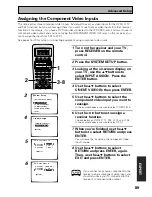
Page 89: ...oose between DVD LD TV SAT VCR1 and VCR2 In the example above we would select VCR1 7 When you re finished use the 5 buttons to select RETURN and press ENTER You will leave the Assigning the Component Video Inputs mode 8 Use the 5 buttons to select RETURN and press ENTER again Then use the 5 buttons to select EXIT and press ENTER 3 4 1 Input Assign 1 Digital In Select 2 C nent Video In Return 1 2 C...

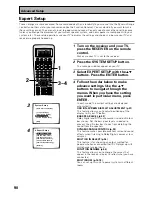
Page 90: ...92 Dolby Digital and DTS audio sources include ultra low bass tones Set the bass peak level as needed to prevent the ultra low bass tones from distorting the sound from the speakers DYNAMIC RANGE CONTROL p 93 This feature makes possible excellent surround sound effects when listening to Dolby Digital sources at low volumes MULTI CH IN SELECT p 94 This feature is for choosing an output method for p...

Page 91: ...ant to change a setting before proceeding Start over from step one 4 If you want to continue EXPERT SETUP use the 5 buttons to select the next setup and press ENTER Go on to the next page 5 If you want to finish EXPERT SETUP use the 5 buttons to select RETURN and press ENTER Then use the 5 buttons to select EXIT and press ENTER 1 3 1 OSD Adjustment Return 2 4 Expert Setup 1 OSD Adjustment 2 Bass P...

Page 92: ...ntinue EXPERT SETUP use the 5 buttons to select the next setup and press ENTER Go on to the next page 6 If you want to finish EXPERT SETUP use the 5 buttons to select RETURN and press ENTER Then use the 5 buttons to select EXIT and press ENTER 1 If you set the THX Ultra2 feature to YES on p 96 the BASS PEAK LEVEL feature will be cancelled memo 4 2 Bass Peak Level Manager Setting Start Setting Canc...

Page 93: ...Range Control is set Go on to the next setting If you want to change a setting before proceeding Start over from step one You may need to experiment with different Dolby Digital sources before you can use the DYNAMIC RANGE CONTROL setting to suit your low volume listening needs 4 If you want to continue EXPERT SETUP use the 5 buttons to select the next setup and press ENTER 5 If you want to finish...

Page 94: ... SB 3 Use the 5 buttons to select RETURN Press ENTER button Your MULTI CH IN SELECT output set Next move on to FUNCTION RENAME if necessary If you want to change a setting before proceeding Start over from step one 4 If you want to continue EXPERT SETUP use the 5 buttons to select the next setup and press ENTER 5 If you want to finish EXPERT SETUP use the 5 buttons to select RETURN and press ENTER...

Page 95: ...123456789 ˆ_ space 4 Repeat step 3 until you get the name as you want it You can input up to ten characters 5 Press ENTER The new function name is set 6 Repeat steps 2 5 to change other function names Use the 5 buttons to select RETURN and press ENTER 7 To finish EXPERT SETUP use the 5 buttons to select RETURN and press ENTER Then use the 5 buttons to select EXIT and press ENTER 4 Expert Setup 1 O...

Page 96: ...ue THX AUDIO SETUP use the 5 buttons to select the next setup and press ENTER Go on to the next page 9 If you want to finish THX AUDIO SETUP use the 5 buttons to select RETURN and press ENTER Then use the 5 buttons to select EXIT and press ENTER 4 THX Audio Setup 1 Ultra2 SW Setup 2 SurBack SP Position 3 Re Equalization Return 3 4 System Setup 1 Auto Surround Setup 2 Input Assign 3 Surround Setup ...

Page 97: ...d with the principles of THX Ultra2 technology in order to get optimum sound from your surround back speakers Choose whether your speakers are closer or further apart than 4 feet To optimize the ASA technology closer together is better than farther apart For more information about ASA see page 101 and for THX speaker placement information see p 103 4 THX Audio Setup 1 Ultra2 SW Setup 2 SurBack SP ...

Page 98: ...eater 3 Use the 2 3 buttons to select ON for the mode s you specified above Selecting STANDARD ON will also apply Re Equalization to the ADVANCED CINEMA listening modes 4 Select RETURN use 5 to go back to the THX AUDIO SETUP menu and press ENTER 5 To finish THX AUDIO SETUP use the 5 buttons to select RETURN and press ENTER Then use the 5 buttons to select EXIT and press ENTER OFF S0URCE TV MULTI C...

Page 99: ...es masking technology and Adaptive Transform Coding resulting in no audible loss of sound quality In the present age of digital sound Dolby Digital is a standard audio format for DVD and has been adopted by HDTV broadcasts throughout the USA Dolby Dolby Digital Dolby Digital is a discrete digital surround format used for multichannel surround sound It was developed after the Dolby Surround System ...

Page 100: ...t has been extended for home theater use and consumers can no benefit from this excellent realistic sound format For more details see THX Surround EX on the next page This unit is equipped with a THX Surround EX decoder DTS DTS DTS has been adopted as a sound recording format in the movie theaters since the release of JURASSIC PARK in 1993 and has a good reputation for high quality sound and dynam...

Page 101: ...echnology can be found at www thx com Only receiver and controller products bearing the THX Surround EX logo when in the THX Surround EX mode faithfully reproduce this new technology in the home This product may also engage the THX Surround EX mode during the playback of 5 1 channel material that is not Dolby Digital Surround EX encoded In such case the information delivered to the Surround Back c...

Page 102: ...grams and instructions below for optimum placement of each set of speakers If you re using a CENTER speaker set the FRONT speakers to a wider angle If not set them to a narrower angle Surround speakers should be positioned a foot and a half to three feet 60 cm 1 meter higher than your ears and titled slight downward Make sure the speakers don t face each other For DVD Audio the speakers should be ...

Page 103: ...or regular DVD discs For these formats follow the diagram at right as opposed to the home theater setups of the pre ceding pages If you want to use both home theater and DVD Audio discs follow the diagrams below and set up your MULTI CH IN SELECT output mode accordingly 50 100 FL SL Surround Surround Back Surround SBL SBR SR C FR Di polar Radiating Speaker In order to choose the best MULTI CH IN S...

Page 104: ...104 Techno Tidbits Problem solving Audio Block Diagram MR OUT ...

Page 105: ...e speakers have been incorrectly connected connections are reversed Improper connections Sound is muted The volume is turned down The TAPE 2 MONITOR is on Speakers are turned off DIGITAL ANALOG setting is incorrect MULTI CH IN mode is on The U shaped connectors that connect the POWER AMP IN terminals to the front channel pre outs are not connected The front speakers are connected to the B speaker ...

Page 106: ...adjustment capability Select the A speaker system see p 71 See SPEAKER SYSTEMS on p 36 37 to check the speaker settings Connect the speakers see p 25 Choose a surround listening mode see p 43 Change the setting to YES or PLUS see p 35 37 Adjust the output setting to the level you want see p 92 Adjust the peak level setting to the level you want Change your subwoofer setting to one of the following...

Page 107: ...e from another component or appliance The search function performed by the player interferes with the reading of digital information The SIGNAL SELECT is on ANALOG You are trying to make an analog recording from a digital signal or a digital recording of an analog source The digital source is copy protected The jacks for recording have not been connected properly Set the SIGNAL SELECT to AUTO see ...

Page 108: ...ck is not the proper format 5 1 6 1 or 7 1 channel The digital signal is not being sent with the source The audio is in two channel format It has already been Dolby surround encoded The source may be 6 1 playback compatible but there is no signal from the source to indicate this The listening mode is set incorrectly for the source Make sure the component is connected correctly see p 16 17 19 Press...

Page 109: ...to the CONTROL IN terminal on this unit The IR Receiver type is mismatched with the setting The preset code settings are wrong The battery wore out and the system settings were cleared The SR cable hasn t been connected properly The rest of the component connection have not been made The component you have hooked up is not SR compatible The current setting is for only one surround back speaker The...

Page 110: ...loud noise is often undetectable until it is too late this manufacturer and the Electronic Industries Association s Consumer Electronics Group recommend you avoid prolonged exposure to excessive noise This list of sound levels is included for your protection Decibel Level Example 30 Quiet library soft whispers 40 Living room refrigerator bedroom away from traffic 50 Light traffic normal conversati...

Page 111: ... 86 dB LINE 105 dB Signal to Noise Ratio EIA at 1 W 1 kHz PHONO MM 83 dB LINE 93 dB Measured pursuant to the Federal Trade Commission s Trade Regulation rule on Power Output Claims for Amplifiers Measured by Audio Spectrum Analyzer Video Section Input Sensitivity 1 Vp p 75 Ω Output Level Impedance 1 Vp p 75 Ω Signal to Noise Ratio 70 dB Frequency Response 5 Hz to 10 MHz dB Component Video Section ...

Page 112: ... at the above listed number for assistance PIONEER ELECTRONICS SERVICE INC CUSTOMER SERVICE DEPARTMENT P O BOX 1760 LONG BEACH CA 90801 1760 U S A For warranty information please see the Limited Warranty sheet included with your product Si ce produit doit être réparé au Canada veuillez vous adresser à un distributeur autorisée Pioneer au Canada pour obtenir le nom de la Société de Service Autorisé...

Reviews: