background image

Basic Operation

To Listen to Music

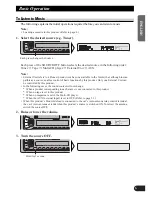
The following explains the initial operations required before you can listen to music. 

Note:

• Loading a cassette in this product. (Refer to page 8.)

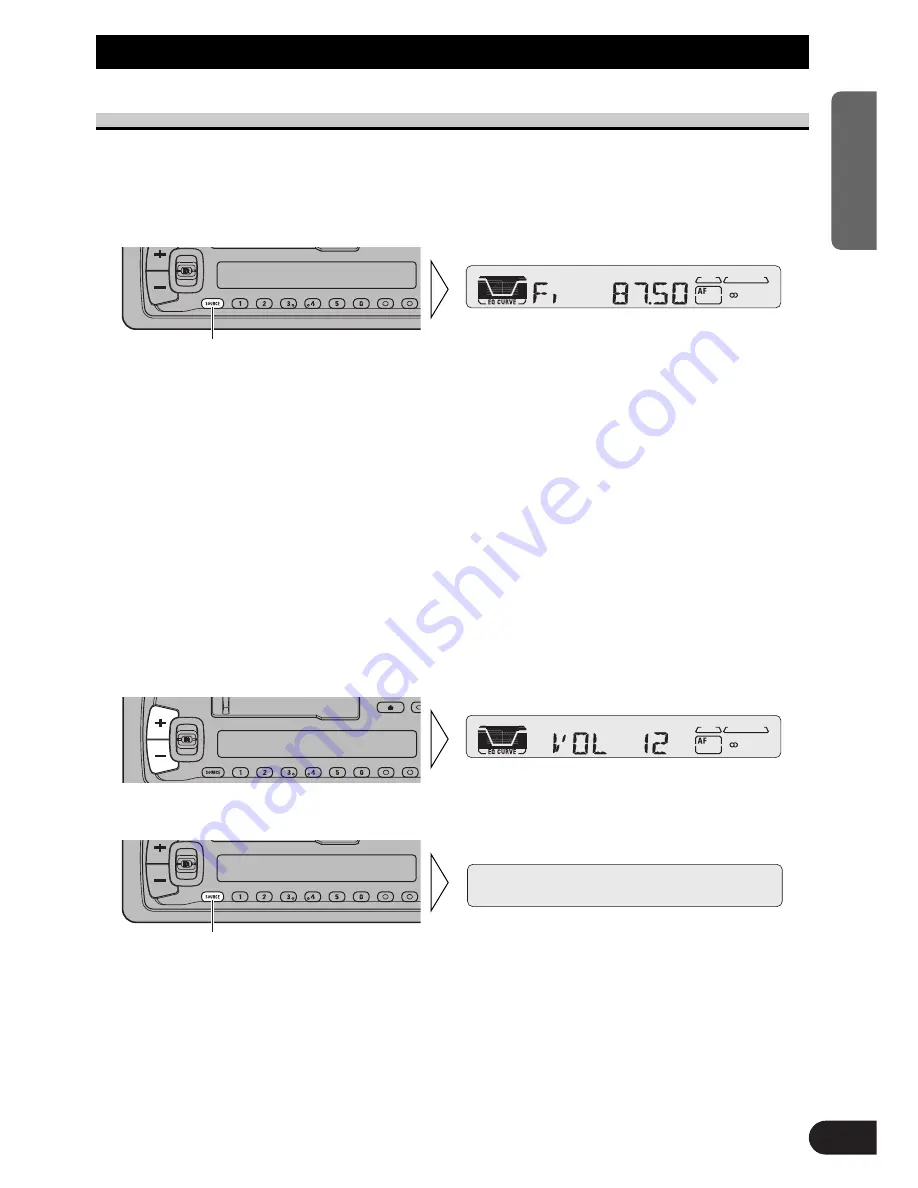
1. Select the desired source (e.g. Tuner).

Each press of the SOURCE/OFF button selects the desired source in the following order:
Tuner 

=

Tape 

=

Multi-CD player 

=

External Unit 

=

AUX

Note:

• External Unit refers to a Pioneer product (such as one available in the future) that, although incom-

patible as a source, enables control of basic functions by this product. Only one External Unit can
be controlled by this product.

• In the following cases, the sound source will not change:

* When a product corresponding to each source is not connected to this product.
* When no tape is set in this product.
* When no magazine is set in the Multi-CD player.
* When the AUX (external input) is set to OFF. (Refer to page 31.)

• When this product’s blue/white lead is connected to the car’s Auto-antenna relay control terminal,

the car’s Auto-antenna extends when this product ’s source is switched ON. To retract the antenna,
switch the source OFF.

2. Raise or lower the volume.

3. Turn the source OFF.

Hold for 1 second

Each press changes the Source ...

6

ENGLISH

ESPAÑOL

DEUTSCH

FRANÇAIS

ITALIANO

NEDERLANDS

Summary of Contents for KEH-P4900R

Page 1: ...ENGLISH ESPAÑOL DEUTSCH FRANÇAIS ITALIANO NEDERLANDS Multi CD control High power cassette player with RDS tuner Operation Manual KEH P4900R ...
Page 2: ...tations Memory BSM Using RDS Functions 11 What is RDS 11 Program Service Name Display 11 AF Function 12 Activating Deactivating the AF Function PI Seek Function 13 PI Seek Auto PI Seek for preset station Regional Function 13 Activating Deactivating the REG Function TA Function 14 Activating Deactivating the TA Function Canceling Traffic Announcements Adjusting the TA Volume TP Alarm Function PTY F...

Page 3: ... the Front Panel Replacing the Front Panel Initial Setting Menu 30 Entering the Initial Setting Menu 30 Initial Setting Menu Functions 30 Changing the FM Tuning Step FM Switching the Auto PI Seek A PI Switching the AUX Mode AUX Other Functions 32 Using the AUX Source 32 Selecting the AUX Source AUX Title Input Cellular Telephone Muting 32 Cassette Player and Care 33 Precaution 33 About the Cassett...

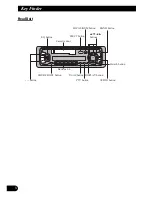
Page 4: ...Key Finder Head Unit 5 2 3 buttons SOURCE OFF button button AUDIO button Detach button Buttons 1 6 Cassette door EJECT button LOCAL BSM button PTY button TA AF button BAND button DISPLAY button EQ button ...

Page 5: ...ated functions ensuring superior reception and operation All are designed for the easiest possible use but many are not self explanatory This operation manual is intended to help you benefit fully from their potential and to maximize your listening enjoyment We recommend that you familiarize yourself with the functions and their operation by reading through the manual before you begin using this p...

Page 6: ...rocedures and precautions Always keep the volume low enough for outside sounds to be audible Protect this product from moisture If the battery is disconnected the preset memory will be erased and must be repro grammed In Case of Trouble Should this product fail to operate properly contact your dealer or nearest authorized Pioneer Service Station ...

Page 7: ...is product Only one External Unit can be controlled by this product In the following cases the sound source will not change When a product corresponding to each source is not connected to this product When no tape is set in this product When no magazine is set in the Multi CD player When the AUX external input is set to OFF Refer to page 31 When this product s blue white lead is connected to the c...

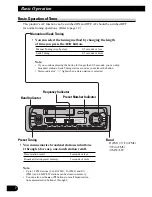
Page 8: ...on is selected Preset Tuning You can memorize broadcast stations in buttons 1 through 6 for easy one touch station recall Preset station recall 2 seconds or less Broadcast station preset memory 2 seconds or more Note Up to 18 FM stations 6 in FI FM1 FII FM2 and FIII FM3 and 6 MW LW stations can be stored in memory You can also use the 5 or buttons to recall broadcast sta tions memorized in buttons...

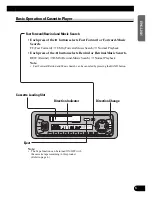
Page 9: ...s product Refer to page 6 Fast Forward Rewind and Music Search Each press of the 3 button selects Fast Forward or Forward Music Search FF Fast Forward F MS Forward Music Search Normal Playback Each press of the 2 button selects Rewind or Rewind Music Search REW Rewind R MS Rewind Music Search Normal Playback Note Fast Forward Rewind and Music Search can be canceled by pressing the BAND button Cass...

Page 10: ...directly with the 1 to 6 buttons Just press the number corresponding to the disc you want to listen to Note When a 12 Disc Multi CD Player is connected and you want to select disc 7 to 12 press the 1 to 6 buttons for 2 seconds or longer Note The Multi CD player may perform a preparatory operation such as verifying the presence of a disc or reading disc information when the power is turned ON or a ...

Page 11: ...s Memory BSM The BSM function stores stations in memory automatically To cancel the process press the LOCAL BSM button before memorization is complete Press the LOCAL BSM but ton for 2 seconds to switch BSM ON The stations with the strongest sig nals will be stored under buttons 1 6 and in order of their signal strength Switch the Local ON OFF with the LOCAL BSM button ...

Page 12: ...they are tuned in When you want to know PTY Information or the frequency of the current station change the display Each press of the DISPLAY button selects the display in the following order Program Service Name PTY Information Frequency Note After switching displays if you do not perform an operation within 8 seconds the Program Service Name is automatically displayed 7 PTY Information PTY Progra...

Page 13: ...Memory with the AF indicator ON When you recall a preset station the tuner may update the preset station with a new frequency from the station s AF list This is only available when using presets on the FM1 and FM2 bands No preset number appears on the display if the RDS data for the station received differs from that for the originally stored station Sound may be temporarily interrupted by another...

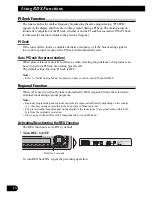
Page 14: ... can be set to perform PI Seek also during preset recall The default setting for Auto PI Seek is OFF Note Refer to Initial Setting Menu for details on how to switch Auto PI Seek ON OFF Regional Function When AF is used to retune the tuner automatically REG regional limits the selection to stations broadcasting regional programs Note Regional programming and regional networks are organized differen...

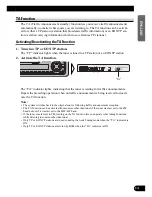
Page 15: ... the TA function The TA indicator lights indicating that the tuner is waiting for traffic announcements Repeat the preceding operation when no traffic announcement is being received to deacti vate the TA function Note The system switches back to the original source following traffic announcement reception The TA function can be activated from sources other than tuner if the tuner was last set to t...

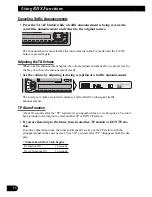
Page 16: ... adjusting it during reception of a traffic announcement The newly set volume is stored in memory and recalled for subsequent traffic announcements TP Alarm Function About 30 seconds after the TP indicator is extinguished due to a weak signal a 5 second beep sounds to remind you to select another TP or EON TP station If you are listening to the tuner tune in another TP station or EON TP sta tion I...

Page 17: ...lar music 11 ROCK MUS Contemporary modern music 12 EASY MUS Easy listening music 13 L CLASS Light classical music 14 CLASSIC Serious classical music 15 OTH MUS Other types of music which can t be categorized 16 WEATHER Weather reports Meteorological information 17 FINANCE Stock market reports commerce trading etc 18 CHILDREN Children s programs 19 SOCIAL Social affairs programs 20 RELIGION Religio...

Page 18: ...rogram type appears on the display for 5 seconds Note CURRENT sets desired PTY to the program type of the current station only for RDS stations broadcasting PTY information 2 Select one of the PTYs 3 When the desired programming type appears on the display return to the normal display Hold for 2 seconds ...

Page 19: ...al station PTY Alarm PTY Alarm is a special PTY code for announcements regarding emergencies such as nat ural disasters When the tuner receives the radio alarm code ALARM appears on the display and the volume adjusts to the TA volume When the station stops broadcasting the emergency announcement the system returns to the previous source Note The system switches back to the original source followin...

Page 20: ...period of silence 12 seconds or longer between songs Radio Intercept This function allows you to listen to the radio during tape fast forwarding rewinding Note The radio intercept function does not work during a Music Search operation Switch the Radio Intercept ON OFF with the button 6 Switch the Blank Skip ON OFF with the button 5 RPT Switch the Repeat Play ON OFF with the PTY button ...

Page 21: ...to Disc Repeat Random Play Tracks are played at random within the selected repeat play range as explained in Repeat Play above Indicator Play range RPT DISC Disc Repeat Nothing Multi CD player Repeat Note One track Repeat changes to the Disc Repeat when you switch the Random Play ON Press the PTY button for 2 seconds to switch the Random Play ON OFF After selecting the desired repeat play range fr...

Page 22: ...tically after all the tracks or discs have been scanned One track Repeat changes to the Disc Repeat when you switch the Scan Play ON Pause Pause pauses the currently playing track Switch the Pause play ON OFF with the LOCAL BSM button 2 When you find the desired track or disc cancel the Scan Play by pressing the LOCAL BSM button for 2 sec onds 1 Press the LOCAL BSM button for 2 seconds to switch t...

Page 23: ...rded text information such as Disc Title Note Titles remain in memory even after the disc has been removed from the magazine and are recalled when the disc is reinserted After the titles for 100 discs have been entered data for a new disc will overwrite the data for the disc that has not been played back for the longest time You can display the disc title of the disc currently playing For details ...

Page 24: ...ti CD Player before reading of informa tion on all discs has been completed reading of information stops part way through Note LOAD will be displayed in the following cases If the disc in the extra tray is selected If the disc is moved from the extra tray to the magazine Refer to the 50 Disc type Multi CD player owner s manual You cannot use the Ejecting a Single Disc Frequency Play Music Group Pl...

Page 25: ...ASS Note CUSTOM stores an equalizer curve you have made adjustments to Refer to Equalizer Curve Adjustment on page 26 Entering the Audio Menu With this Menu you can adjust the sound quality Note After entering the Audio Menu if you do not perform an operation within about 30 seconds the Audio Menu is automatically canceled 1 Select the desired mode in the Audio Menu 2 Operate a mode 3 Cancel the A...

Page 26: ...nditions in all occupied seats 1 Press the AUDIO button and select the Fader Balance mode FAD in the Audio Menu Note FAD 0 is the proper setting when 2 speakers are in use 3 Adjust left right speaker bal ance with the 2 3 buttons BAL L9 BAL R9 is displayed as it moves from left to right 2 Adjust front rear speaker bal ance with the 5 buttons FAD F15 FAD R15 is dis played as it moves from front to ...

Page 27: ...splay while selecting the equalizer curve Refer to page 24 Loudness Adjustment LOUD The Loudness function compensates for deficiencies in the low and high sound ranges at low volume You can select a desired Loudness level 1 Press the AUDIO button and select the Loudness mode LOUD in the Audio Menu 3 Select the desired level with the 2 3 buttons LOW MID HI LOUD 2 Switch the Loudness function ON OFF...

Page 28: ...e Audio Menu Note After switching the F I E function ON select the Fader Balance mode in the Audio Menu and adjust front and rear speaker volume levels until they are balanced Switch the F I E function OFF when using a 2 speaker system 3 Select the desired frequency with the 2 3 buttons 100 160 250 Hz FIE 2 Switch the F I E function ON OFF with the 5 but tons Precaution When the F I E function is ...

Page 29: ...e FM volume is the control SLA is not possible in the FM modes The MW LW cassette CD External Unit and AUX levels can all be adjusted 1 Compare the FM volume with the volume of the other source e g Cassette player 2 Press the AUDIO button and select the SLA mode SLA in the Audio Menu 3 Increase or decrease the level with the 5 buttons The display shows 4 4 28 ENGLISH ESPAÑOL DEUTSCH FRANÇAIS ITALI...

Page 30: ...tightly when removing or replacing the front panel Avoid subjecting the front panel to excessive shocks Keep the front panel out of direct sunlight and high temperatures Replace the front panel by clipping it into place 3 Use the protective case pro vided to store carry the detached front panel 2 To remove the front panel pull its right hand side toward you Take care not to grip it tightly or drop...

Page 31: ... Menu Note Holding down the AUDIO button for 2 seconds also cancels the Initial Setting Menu Initial Setting Menu Functions Changing the FM Tuning Step FM Normally set at 50 kHz during Seek tuning in the FM mode the tuning step changes to 100 kHz when the AF or TA mode is activated It may be preferable to set tuning step to 50 kHz in the AF mode 1 Press the AUDIO button and select the FM Tuning St...

Page 32: ...ction on page 13 1 Press the AUDIO button and select the Auto PI Seek mode A PI in the Initial Setting Menu Switching the AUX Mode AUX It is possible to use auxiliary AUX equipment with this product Activate the AUX mode when using external equipment with this product 1 Press the AUDIO button and select the AUX Setting mode AUX in the Initial Setting Menu 2 Switch the AUX ON OFF with the 5 buttons...

Page 33: ...e for AUX source can be changed 1 Select the Aux Title Input mode by pressing the DISPLAY button for 2 seconds 2 Input the Aux Title Refer to Disc Title Input on page 22 and perform procedures 3 to 5 in the same way Cellular Telephone Muting Sound from this system is muted automatically when a call is made or received using a cellular telephone connected to this product The sound is turned off MUT...

Page 34: ...ining dialog etc with pauses lasting for 4 seconds or longer A tape with an extremely quiet passage in the music lasting for 4 seconds or longer About Cassette Tapes Do not use tapes longer than C 90 type 90 min cassettes Longer tapes can interfere with tape transport Storing cassettes in areas directly exposed to sunlight or high temperatures can distort them and subsequently interfere with tape ...

Page 35: ...layer Tape Compact cassette tape C 30 C 90 Tape speed 4 8 cm sec Fast forward rewinding time Approx 100 sec for C 60 Wow flutter 0 09 WRMS Frequency response 30 16 000 Hz 3 dB Stereo separation 45 dB Signal to noise ratio 61 dB IEC A network FM tuner Frequency range 87 5 108 MHz Usable sensitivity 11 dBf 1 0 µV 75 Ω mono S N 30 dB 50 dB quieting sensitivity 16 dBf 1 7 µV 75 Ω mono Signal to noise ...

Page 36: ... Qué es RDS 11 Visualización del nombre de servicio de programa 11 Función AF 12 Activación desactivación de la función AF Función de búsqueda PI 13 Búsqueda PI Búsqueda PI automática para la emisora preajustada Función regional 13 Activación desactivación de la función REG Función TA 14 Activación desactivación de la función TA Cancelación de anuncios de tráfico Ajuste del volumen de la función T...

Page 37: ...olocación del panel delantero Menú de ajustes iniciales 30 Selección del menú de ajustes iniciales 30 Funciones del menú de ajustes iniciales 30 Cambio del paso de sintonía de FM FM Cambio de la búsqueda PI automática A PI Conmutación del modo AUX AUX Otras funciones 32 Uso de la fuente AUX 32 Selección de la fuente AUX Ingreso de título para la fuente AUX Enmudecimiento de teléfono celular 32 Pla...

Page 38: ...e botones Unidad principal Botón Botones 5 2 3 Botón SOURCE OFF Botón AUDIO Botón de desmontaje Botones 1 6 Botón EJECT Botón LOCAL BSM Botón PTY Botón TA AF Botón BAND Botón DISPLAY Botón EQ Puerta de cassette ...

Page 39: ... sofisticadas que aseguran una recepción y operación superior El producto ha sido proyectado para uso lo más fácil posible pero muchas funciones requieren explicación El propósito de este manual de operación es ayudarle a beneficiarse completamente del potencial del producto y maximizar su dis frute de audición Se recomienda familiarizarse con las funciones y operaciones leyendo completamente el m...

Page 40: ...iones Mantenga siempre el volumen bajo lo suficiente para oír los sonidos de tráfico Proteja el producto contra la humedad Si la batería del automóvil se desconecta por alguna razón la memoria programada será apagada y deberá ser programada nuevamente En caso de problema Cuando este producto no funciona correctamente comuníquese con su concesionario o centro de servicio Pioneer autorizado ...

Page 41: ...producto Solamente una unidad externa se puede controlar por este producto En los siguientes casos la fuente no cambiará Cuando un producto correspondiente a cada fuente no se conecta a este producto Cuando no hay un cassette colocado en este producto Cuando no hay ningún magazine colocado en el reproductor de Multi CD Cuando la toma AUX entrada externa está ajustada a OFF Vea la página 31 Cuando ...

Page 42: ...ización de emisoras preajustadas Se puede memorizar emisoras en los botones 1 a 6 para una llamada fácil de las emisoras a simple tacto Llamada de emisora preajustada 2 segundos o menos Memoria de preajuste de una emisora 2 segundos o más Nota Se puede almacenar en la memoria hasta un máximo de 18 emisoras FM 6 en FI FM1 FII FM2 y FIII FM3 y 6 emisoras MW LW También se pueden utilizar los botones ...

Page 43: ... Cada vez que se presiona el botón 3 el modo de avance rápido o de búsqueda de canciones hacia adelante cambia en el siguiente orden FF Avance rápido F MS Búsqueda de canciones hacia adelante Reproducción normal Cada vez que se presiona el botón 2 el modo de rebobinado y búsqueda de canciones hacia tras cambia en el siguiente orden REW Rebobinado R MS Búsqueda de canciones hacia tras Reproducción ...

Page 44: ...las informaciones de un disco cuando se enciende el reproductor o cuando se selecciona un nuevo disco para reproducción Se visualiza READY Si un reproductor de Multi CD no funciona adecuadamente se visualiza un mensaje de error tal como ERROR 14 Consulte el manual del propietario del reproductor de Multi CD Si no hay discos en el cargador de CD del reproductor de Multi CD se visualiza NO DISC 9 Op...

Page 45: ...n la memoria automáticamente Para cancelar el proceso presione el botón LOCAL BSM antes del término de la memorización Presione el botón LOCAL BSM durante 2 segundos para activar la fun ción BSM Las emisoras con las señales más fuertes serán almacenadas bajo los botones 1 6 por orden de fuerza de sus señales Active o desactive el local con el botón LOCAL BSM 10 ENGLISH ESPAÑOL DEUTSCH FRANÇAIS ITA...

Page 46: ...ués de sintonizada la emisora Cuando desee saber la información PTY o la frecuencia de la emisora actual cambie la visualización Cada vez que se presiona el botón DISPLAY la visualización cambia en el siguiente orden Nombre de servicio de programa Información PTY Frecuencia Nota Después de cambiar las visualizaciones si no se realiza una operación dentro de 8 segundos el nombre de servicio de prog...

Page 47: ... preajustada el sintonizador puede actualizar la emisora preajustada con una nueva frecuencia desde la lista AF de la emisora Esto solamente se dispone cuando se usan los preajustes en las bandas FM1 y FM2 Ningún número preajustado aparece en el visual izador si los datos RDS para la emisora recibida son diferentes de los datos para la emisora almace nada originalmente El sonido puede interrumpirs...

Page 48: ...mada de emisoras preajustadas La búsqueda PI automática está desactivada por omisión Nota Para más detalles sobre cómo activar y desactivar la búsqueda PI automática consulte a la sección Menú de ajustes iniciales Función regional Cuando se usa la función AF para sintonizar de nuevo el receptor automáticamente la fun ción REG regional limita la selección a emisoras que transmiten programas regiona...

Page 49: ...ndicando que el sintonizador está esperando por anuncios de tráfico Repita la operación precedente cuando ningún anuncio de tráfico está siendo recibido para desactivar la función TA Nota El sistema regresa a la fuente original al final de la recepción de anuncio de tráfico La función TA se podrá activar desde fuentes diferentes del sintonizador si el sintonizador estaba ajustado a la banda FM per...

Page 50: ...ráfico El nuevo volumen ajustado se almacena en la memoria siendo llamado para los anuncios de tráfico subsecuentes Función de alarma TP Aproximadamente 30 segundos después que se extingue el indicador TP debido a una señal débil suena un timbre de 5 segundos para que se seleccione una otra emisora TP o EON TP Si usted está escuchando al sintonizador sintonice una otra emisora TP o emisora EON TP ...

Page 51: ...CK MUS Música moderna contemporánea 12 EASY MUS Música fácil de escuchar 13 L CLASS Música clásica ligera 14 CLASSIC Música clásica seria 15 OTH MUS Otros tipos de música que no se clasifican por categorías 16 WEATHER Informes del tiempo Información meteorológica 17 FINANCE Informes del mercado de valores comercio operaciones de compraventa etc 18 CHILDREN Programas para niños 19 SOCIAL Programas ...

Page 52: ...ama aparece en el visualizador por 5 segundos Nota El modo CURRENT ajusta el PTY deseado al tipo de programa de la emisora actual solamente para emisoras RDS que transmiten información PTY 2 Seleccione uno de los PTYs 3 Cuando el tipo de programa deseado aparece en el visualizador vuelva a la visualización normal Sostenga durante 2 segundos ...

Page 53: ...riginal Alarma PTY La alarma PTY es un código PTY especial para anuncios relativos a emergencias tales como desastres naturales Cuando el sintonizador recibe el código de alarma de radio ALARM alarma aparece en el visualizador y el volumen se ajusta al volumen TA Cuando la emisora deja de transmitir el anuncio de emergencia la unidad vuelve a la fuente anterior Nota El sistema cambia nuevamente a ...

Page 54: ...cio largo 12 segundos o más entre las canciones Intercepción de radio Esta función le permite escuchar a la radio durante el avance rápido rebobinada de una cinta Nota La función de intercepción de radio no funciona durante la operación de búsqueda de canciones Active o desactive la intercep ción de radio con el botón 6 Active o desactive la salto de espacio con en blanco con el botón 5 RPT Active...

Page 55: ...ón aleatoria Las pistas se reproducen aleatoriamente dentro de la gama de reproducción de repetición seleccionado como se describe en Reproducción de repetición precedente Indicador Gama de reproducción RPT DISC Repetición de disco Nada Repetición de reproductor de Multi CD Nota La repetición de una pista cambia a la repetición de disco cuando activa la reproducción aleatoria Presione el botón PTY...

Page 56: ...spués que todas las pistas o discos han sido explorados La repetición de una pista cambia a la repetición de disco cuando activa la reproducción de exploración Pausa Pausa permite detener temporalmente la reproducción de la pista actual Active o desactive la pausa con el bóton LOCAL BSM 2 Al encontrar la pista deseada o disco cancele la reproduc ción con exploración presion ando el botón LOCAL BSM...

Page 57: ... presenta información de texto tal como un título de disco Nota Los títulos permanecen en la memoria aún después que se saque el disco del cargador de CD y se llaman cuando se inserta el disco nuevamente Después de haber ingresado títulos para 100 discos los datos para un nuevo disco sobreponen los datos del disco que no haya sido reproducido por el período de tiempo más largo Se puede visualizar ...

Page 58: ... antes del término de la lectura de las informaciones en todos los discos la lectura se detiene en el medio Nota Se visualiza LOAD en los siguientes casos Si el disco está en la bandeja extra Si se mueve el disco de la bandeja extra para el cargador Consulte el manual del propietario del reproductor de Multi CD de 50 discos Con esta unidad no se pueden usar las funciones Ejecting a Single Disc exp...

Page 59: ...hos ajustes Vea a Ajuste de la curva del ecualizador en la página 26 Selección del menú de audio Con este menú se puede ajustar la calidad sonora Nota Después de seleccionar el menú de audio si no se realiza ninguna operación dentro de aproximada mente 30 segundos el menú de audio se cancela automáticamente 1 Seleccione el modo deseado en el menú de audio 2 Opere un modo 3 Cancele el menú de audio...

Page 60: ...resione el botón AUDIO y seleccione el modo de potenciómetro equilibrio FAD en el menú de audio Nota FAD 0 es el ajuste apropiado cuando se usan 2 altavoces 3 Ajuste el equilibrio de los altavo ces izquierdos y derechos con los botones 2 3 Se visualiza BAL L 9 BAL R 9 a medida que se mueve de la izquierda a la derecha 2 Ajuste el equilibrio de los altavo ces delanteros o traseros con los botones 5...

Page 61: ... una nueva curva con CUSTOM EQ aparece en la presentación visual mientras selecciona la curva del ecualizador Vea la página 24 Ajuste de sonoridad LOUD La función de sonoridad compensa las deficiencias en las gamas de sonido altas y bajas en volúmenes bajos Se puede seleccionar un nivel de sonoridad deseado 1 Presione el botón AUDIO y seleccione el modo de sonoridad LOUD en el menú de audio 3 Sele...

Page 62: ...espués de activar la función F I E seleccione el modo de potenciómetro equilibrio en el menú de audio y ajuste los niveles de volumen de los altavoces delanteros y traseros hasta que se equilibren Desactive la función F I E cuando utilice un sistema de 2 altavoces 3 Seleccione la frecuencia desea da con los botones 2 3 100 160 250 Hz FIE 2 Active o desactive la función F I E con los botones 5 Prec...

Page 63: ...el del volumen de FM que permanece inalterado Como el volumen de FM es el control la función SLA no es posi ble en los modos FM Los nivels de MW LW cassette CD Unidad externa y AUX se pueden ajustar 1 Compare el volumen de FM con el volumen de la otra fuente tal como del reproductor de cassette 2 Presione el botón AUDIO y seleccione el modo SLA SLA en el menú de audio 3 Aumente o disminuya el nive...

Page 64: ...car el panel delantero No exponga el panel delantero a fuertes impactos No deje el panel delantero en áreas expuestas a los rayos directos del sol o a altas temperaturas Vuelva a colocar el panel delantero encajándolo en su lugar 3 Utilice la caja protectora sum inistrada para guardar trans portar el panel delantero extraído 2 Para extraer el panel delantero tómelo del lado derecho y tire de él ha...

Page 65: ...O durante 2 segundos también cancela el menú de ajustes iniciales Funciones del menú de ajustes iniciales Cambio del paso de sintonía de FM FM Normalmente ajustado en 50 kHz durante la sintonización por búsqueda en el modo FM el intervalo de afinación cambia a 100 kHz cuando se activa el modo AF o TA Puede ser preferible ajustar el intervalo de afinación a 50 kHz en el modo AF 1 Presione el botón ...

Page 66: ...ca Vea a Función de búsqueda PI en la página 13 1 Presione el botón AUDIO y seleccione el modo de búsqueda PI automática A PI en el menú de ajustes iniciales Conmutación del modo AUX AUX Es posible usar un equipo auxiliar AUX con este producto Active el modo AUX cuando utilice un equipo externo con este producto 1 Presione el botón AUDIO y seleccione el modo AUX AUX en el menú de ajustes iniciales...

Page 67: ...fuente AUX 1 Seleccione el modo de ingreso de título para la fuente AUX presionando el botón DISPLAY durante 2 segundos 2 Ingrese el título Vea Ingreso de título de disco en la página 22 y realice los pasos de 3 a 5 de la misma manera Enmudecimiento de teléfono celular El sonido de este sistema se enmudece automáticamente cuando se hace o se recibe una llamada usando un teléfono celular conectado ...

Page 68: ...tas que contienen diálogos etc con pausas que duran por 4 segundos o más Cintas con pasajes extremamente tranquilos en la música que duren por 4 segundos o más Acerca de los cassettes No utilice cintas de cassette con duración superior a C 90 90 minutos Cintas más largas pueden interferir con el transporte de la cinta Almacenar cassettes en áreas expuestas directamente a los rayos del sol o a alta...

Page 69: ...ta Cinta de cassette compacto C 30 C 90 Velocidad de la cinta 4 8 cm seg Tiempo de avance rápido rebobinado Aprox 100 seg para C 60 Lloro y trémolo 0 09 WRMS Respuesta de frecuencia 30 16 000 Hz 3 dB Separación estéreo 45 dB Relación de señal a ruido 61 dB Red IEC A Sintonizador FM Gama de frecuencias 87 5 108 MHz Sensibilidad utilizable 11 dBf 1 0 µV 75 Ω mono S N 30 dB Umbral de silenciamiento a...

Page 70: ...cher BSM Gebrauch der RDS Funktionen 11 Was bedeutet RDS 11 Programmservice Namensanzeige 11 AF Funktion 12 Aktivieren Deaktivieren der AF Funktion PI Suchlauffunktionen 13 PI Suchlauf Auto PI Suchlauf für Vorwahlsender Regional Funktion 13 Aktivieren Deaktivieren der REG Funktion TA Funktion 14 Aktivieren Deaktivieren der TA Funktion Aufheben von Verkehrsdurchsagen Einstellen der TA Lautstärke TP...

Page 71: ...anbringen der Frontplatte Ausgangeinstellmenü 30 Aufrufen des Ausgangseinstellmenüs 30 Funktionen des Ausgangseinstellmenüs 30 Ändern des UKW Abstimmrasters FM Umschalten des Auto PI Suchlaufs A PI AUX Umschaltung AUX Andere Funktionen 32 Gebrauch einer AUX Programmquelle 32 Wahl einer AUX Programmquelle AUX Titel Eingabe Zellular Telefon Stummschaltung 32 Cassettenspieler und Gehäuse 33 Zur beson...

Page 72: ...3 Tastenübersicht Hauptgerät Tasten 5 2 3 Taste SOURCE OFF Taste Taste AUDIO Tasten 1 6 Taste EJECT Taste LOCAL BSM Taste PTY Taste TA AF Taste BAND Taste DISPLAY Taste EQ Abnehmtaste Cassettenklappe ...

Page 73: ... Bei der Entwicklung wurde größter Wert auf Bedienungsfreundlichkeit gelegt jedoch nicht alle Funktionen können ohne weiteres sofort genutzt werden Diese Bedienungsanleitung möchte dazu beitragen daß Sie alle Möglichkeiten des Geräts voll nutzen können um Ihr Hörvergnügen zu maximieren Wir empfehlen daß Sie sich mit den Funktionen des Geräts und deren Bedienungsverfahren vertraut machen indem Sie ...

Page 74: ...der Polizei die eingetragene eingravierte Serien Nummer und das Kaufdatum durch Vorlage des Passes bekannt Auf die Unterseite des Geräts wurde eine 14 stellige Serien Nummer eingraviert Bewahren Sie dieses Handbuch zum Nachschlagen stets griffbereit auf Halten Sie die Lautstärke stets auf einem Pegel bei dem Sie Außengeräusche noch gut wahrnehmen können Setzen Sie das Gerät keiner Feuchtigkeit aus...

Page 75: ...r Hauptfunktionen durch dieses Produkt ermöglicht Nur ein externes Gerät kann von diesem Produkt gesteuert werden In den folgenden Fällen ändert sich die Programmquelle nicht Wenn ein Produkt entsprechend jeder Programmquelle nicht an diesem Gerät angeschlossen ist Wenn keine Cassette eingelegt ist Wenn kein Magazin im Multi CD Player geladen ist Wenn AUX externer Eingang auf OFF gestellt ist Sieh...

Page 76: ...drückt gehalten wird werden Sender übersprungen Die Suchlaufabstimmung beginnt sobald die Taste losgelassen wird Bei Empfang eines Stereo Senders leuchtet die Stereo Anzeige Vorwahlnummer Anzeige Wellenbereichsanzeige Frequenzanzeige Wellenbereich FI UKW1 FII UKW2 FIII UKW3 MW LW Vorwahl Abstimmung Sender können den Tasten 1 bis 6 zugeordnet und danach mühelos per Tastendruck abgerufen werden Abru...

Page 77: ...nellvorlauf Rücklauf und Musiksuche Mit jedem Druck auf die Taste 3 wird Schnellvorlauf oder Schnellvorlauf Musiksuche gewählt FF Schnellvorlauf F MS Schnellvorlauf Musiksuche Normale Wiedergabe Mit jedem Druck auf die Taste 2 wird Rücklauf oder Rücklauf Musiksuche gewählt REW Rücklauf R MS Rücklauf Musiksuche Normale Wiedergabe Hinweis Schnellvorlauf Rücklauf und Musiksuche können durch Drücken d...

Page 78: ...ritt durch wie z B Kontrollieren des Vorhandenseins einer Disc oder Lesen von Disc Informationen wenn der Strom eingeschaltet ON oder eine neue Disc für Wiedergabe gewählt wird READY wird angezeigt Wenn der Multi CD Player nicht richtig funktioniert erscheint eine Fehlermeldung wie z B ERROR 14 Siehe Multi CD Player Bedienungsanleitung Wenn sich keine Discs im Multi CD Player Magazin befinden wird...

Page 79: ...rozesses bevor die Speicherung abgeschlossen ist drücken Sie die Taste LOCAL BSM Die Taste LOCAL BSM 2 Sekunden lang drücken um BSM einzuschalten ON Die Stationen mit den stärksten Signalen werden unter den Tasten 1 6 in der Reihenfolge ihrer Signalstärke gespeichert Die Lokalbetriebsart kann mit der Taste LOCAL BSM ein und ausgeschaltet ON OFF werden 10 DEUTSCH ESPAÑOL DEUTSCH FRANÇAIS ITALIANO N...

Page 80: ...n Sie PTY Informationen erhalten oder die Frequenz des momentan abgestimmten Senders erfahren wollen schalten Sie das Display um Mit jedem Druck auf die Taste für DISPLAY wird das Display in der nachstehenden Reihenfolge gewählt Programm Service Name PTY Informationen Frequenz Hinweis Wenn nach dem Umschalten der Anzeigen nicht innerhalb von 8 Sekunden ein Bedienungsschritt durchgeführt wird wird ...

Page 81: ...tation abrufen kann der Tuner diese mit einer neuen Frequenz aus der Stations AF Liste aktualisieren Dies ist nur bei Gebrauch von Vorprogrammierungen auf den Wellenbereichen UKW1 und UKW2 möglich Es erscheint keine Stationsnummer im Display wenn die RDS Daten für die empfangene Station von denen für die ursprünglich gespeicherte Station abweichen Während eines AF Frequenzsuchlaufs kann der Ton vo...

Page 82: ...tationsabrufs auf PI Suchlauf eingestellt werden Standardmäßig ist der Auto PI Suchlauf ausgeschaltet OFF Hinweis Einzelheiten zum Ein und Ausschalten des Auto PI Suchlaufs finden Sie unter Ausgangseinstellmenü Regional Funktion Wenn AF zur automatischen Neuabstimmung des Tuners verwendet wird beschränkt REG Regional die Auswahl auf Sender die regionale Programme ausstrahlen Hinweis Regionale Prog...

Page 83: ...ieren daß der Tuner Verkehrsdurchsagen empfangen kann Zum Deaktivieren der TA Funktion wiederholen Sie das obige Bedienungsverfahren wenn gerade keine Verkehrsdurchsagen empfangen werden Hinweis Nach einer Verkehrsdurchsage schaltet das System auf die ursprüngliche Programmquelle zurück Die TA Funktion kann von anderen Programmquellen als Tuner aus aktiviert werden wenn der Tuner zuletzt auf UKW e...

Page 84: ...ke während Empfangs einer Verkehrsdurchsage ein Die neu eingestellte Lautstärke wird gespeichert und bei nachfolgenden Verkehrsdurchsagen wirksam TP Alarm Funktion Etwa 30 Sekunden nach Ausgehen der TP Anzeige wegen eines schwachen Signals werden Sie durch einen 5 Sekunden andauernden Piepton daran erinnert eine andere TP oder EON TP Station zu wählen Bei Tuner Betrieb stimmen Sie eine andere TP S...

Page 85: ...rhaltungsprogramme 10 POP MUS Populäre Musik 11 ROCK MUS Kontemporäre moderne Musik 12 EASY MUS Leichte Hörmusik 13 L CLASS Leichte klassische Musik 14 CLASSIC Ernste klassische Musik 15 OTH MUS Andere Musik Kategorien 16 WEATHER Wetterberichte meteorologische Informationen 17 FINANCE Aktien Wirtschaft Handel usw 18 CHILDREN Programme für Kinder 19 SOCIAL Programme für soziale Angelegenheiten 20 R...

Page 86: ...es Programmtyps erscheint 5 Sekunden lang im Display Hinweis CURRENT stellt den Programmtyp der momentanen Station ein nur für RDS Stationen die PTY Informationen ausstrahlen 2 Wählen Sie einen PTY 3 Wenn der gewünschte Programmtyp angezeigt wird schalten Sie auf die normale Anzeige zurück 2 Sekunden lang gedrückt halten ...

Page 87: ...igt wonach der Tuner auf den zuvor eingestellten Sender zurückschaltet PTY Alarm PTY Alarm ist ein spezieller PTY Code für Notdurchsagen wie z B Naturkatastrophen Sobald der Tuner den Radioalarmcode empfängt erscheint ALARM im Display und die Lautstärke wird auf den TA Lautstärkepegel eingestellt Nach der Notdurchsage schaltet das System auf die vorige Programmquelle zurück Hinweis Sobald die Notd...

Page 88: ...länger zwischen Titeln besteht Radio Zwischenempfang Diese Funktion ermöglicht Rundfunkempfang während Umspulbetriebs Hinweis Die Radio Zwischenempfang Funktion funktioniert nicht während eines Musik Suchlaufbetriebs Die Radio Zwischenempfangs Betriebsart kann mit der Taste 6 ein und ausgeschaltet ON OFF werden Zum Ein Ausschalten ON OFF des Leerstellen Sprungbetriebs betätigen Sie der Taste 5 RPT...

Page 89: ...l werden innerhalb des gewählten Wiederholbereichs wie oben unter Wiederhol Wiedergabe beschrieben nach dem Zufallsprinzip abgespielt Anzeige Wiedergabe Bereich RPT DISC Disc Wiederholung Keine Anzeige Multi CD Player Wiederholung Hinweis Einzeltitel Wiederholung wird auf Disc Wiederholung umgeschaltet wenn zufallsgesteuerte Wiedergabe aktiviert wird Die Taste PTY 2 Sekunden lang drücken um die zu...

Page 90: ...oben Einzeltitel Wiederholung wird auf Disc Wiederholung umgeschaltet wenn Scan Wiedergabe aktiviert wird Pause Pause unterbricht die Wiedergabe des laufenden Titels Die Pause Wiedergabe kann mit der Taste LOCAL BSM ein und ausgeschaltet ON OFF werden 2 Wenn der gewünschte Titel oder die gewünschte Disc aufgefunden worden ist Scan Play aufheben indem die Taste LOCAL BSM 2 Sekunden lang gedrückt wi...

Page 91: ... z B Disc Titel Hinweis Titel bleiben gespeichert auch wenn Discs vom Magazin entnommen werden und können nach erneutem Einsetzen der entsprechenden Discs wieder abgerufen werden Nachdem Titel für 100 Discs eingegeben worden sind überschreiben Daten für eine neue Disc die Daten der Disc die am längsten nicht mehr gespielt worden ist Der Disc Titel der momentan spielenden Disc kann angezeigt werden...

Page 92: ...sc Multi CD Player starten bevor die Informationssammlung für alle Discs abgeschlossen ist wird der Lesevorgang abgebrochen Hinweis LOAD wird in den folgenden Fällen angezeigt Wenn die Disc im Zusatzfach angewählt wird Wenn die Disc vom Zusatzfach zum Magazin befördert wird Siehe Bedienungsanleitung für 50 Disc Multi CD Player Dieses Gerät verfügt nicht über die Funktionen Auswerfen einer einzelne...

Page 93: ...peichert eine Equalizer Kurve an der Einstellungen vorgenommen worden sind Siehe Equalizer Kurveneinstellung auf Seite 26 Aufrufen des Audio Menüs Über dieses Menü können Sie die Klangqualität einstellen Hinweis Das Audio Menü erlischt automatisch wenn innerhalb von etwa 30 Sekunden kein Bedienungsschritt vorgenommen wird 1 Wählen Sie die gewünschte Betriebsart im Audio Menü 2 Aktivieren Sie eine ...

Page 94: ...berblendung Balance Betriebsart FAD im Audio Menü Hinweis FAD 0 ist die richtige Einstellung wenn 2 Lautsprecher in Gebrauch sind 3 Stellen Sie die Balance zwischen den linken rechten Lautsprechern mit den Tasten 2 3 ein Bei Verschiebung des Lautstärkeschwerpunkts von links nach rechts wird BAL L 9 BAL R 9 angezeigt 2 Stellen Sie die Balance zwischen den vorderen hinteren Lautsprechern mit den Tas...

Page 95: ...Q wird im Display angezeigt während die Equalizer Kurve gewählt wird Siehe Seite 24 Loudness Einstellung LOUD Die Loudness Funktion schafft einen Ausgleich für die Schwäche des menschlichen Gehörs im Tief und Hochtonbereich bei niedriger Lautstärke Der Loudness Pegel kann wunschgemäß eingestellt werden 1 Drücken Sie die Taste AUDIO und wählen Sie die Loudness Betriebsart LOUD im Audio Menü 3 Den g...

Page 96: ... F I E Funktion eingeschaltet haben wählen Sie die Überblendung Balance Betriebsart im Audio Menü und stellen Sie die Balance zwischen den vorderen und hinteren Lautsprechern optimal ein Bei Gebrauch eines Systems mit 2 Lautsprechern schalten Sie die F I E Funktion aus 3 Die gewünschte Frequenz mit den Tasten 2 3 wählen 100 160 250 Hz FIE 2 Die F I E Funktion kann mit den Tasten 5 ein und aus gesc...

Page 97: ... unverändert bleibt Da die UKW Lautstärke maßgebend ist kann SLA in den UKW Betriebsarten nicht durchgeführt werden MW LW Cassetten CD Externes Gerät und AUX Pegel können individuell eingestellt werden 1 Vergleichen Sie die UKW Lautstärke mit der der anderen Programmquelle wie z B eingebauter Cassettenspieler 2 Drücken Sie die Taste AUDIO und wählen Sie die SLA Betriebsart SLA im Audio Menü 3 Zum ...

Page 98: ...tark anfassen Achten Sie darauf die Frontplatte keinen übermäßigen Erschütterungen auszusetzen Auch direkte Sonnenbestrahlung und hohe Temperaturen sind zu vermeiden Bringen Sie die Frontplatte wieder an indem Sie sie an ursprünglicher Position einrasten 3 Verwenden Sie das mit gelieferte Schutzgehäuse um die abgenommene Frontplatte aufzubewahren oder zu befördern 2 Zum Abnehmen der Frontplatte zi...

Page 99: ...ngseinstellmenü kann auch dadurch verlassen werden daß die Taste AUDIO 2 Sekunden lang gedrückt gehalten wird Funktionen des Ausgangseinstellmenüs Ändern des UKW Abstimmrasters FM Bei Normaleinstellung von 50 kHz für Suchlaufabstimmung auf UKW ändert sich das Abstimmraster auf 100 kHz wenn die Betriebsart AF oder TA aktiviert wird Es könnte vorteilhaft sein das Abstimmraster für AF Betrieb auf 50 ...

Page 100: ...die Taste AUDIO und wählen Sie die Auto PI Suchlaufbetriebsart A PI im Ausgangseinstellmenü AUX Umschaltung AUX Mit diesem Produkt können auch externe Geräte AUX verwendet werden Aktivieren Sie die Betriebsart AUX wenn Sie externe Geräte mit diesem Produkt verwenden wollen 1 Drücken Sie die Taste AUDIO und wählen Sie die gewünschte AUX Einstellbetriebsart AUX im Ausgangseinstellmenü 2 Die AUX kann...

Page 101: ...ert werden 1 Die Aux Titel Eingabebetriebsart wählen indem die Taste DISPLAY 2 Sekunden lang gedrückt wird 2 Geben Sie den AUX Titel ein Nehmen Sie Bezug auf Seite 22 Disc Titel Eingabe und führen Sie Schritte 3 bis 5 auf gleiche Weise durch Zellular Telefon Stummschaltung Dieses System wird automatisch stummgeschaltet wenn eine Verbindung über ein an dieses Gerät angeschlossenes Zellular Telefon ...

Page 102: ...nem Dialog o ä mit einer Dauer von 4 Sekunden oder länger Ein Band mit einer besonders leisen Stelle in der Musik die 4 Sekunden oder länger andauert Hinweis zu Cassettenbändern Verwenden Sie keine Bänder die länger als die von C 90 Cassetten 90 Minuten sind da sich derartige Bänder im Laufwerk verwickeln können Legen Sie Cassetten nicht an Stellen ab wo sie direkter Sonnenbestrahlung oder hohen T...

Page 103: ...11 dB 10 kHz Lautstärke 30 dB Cassettenspieler Band Kompakt Cassettenband C 30 C 90 Bandlaufgeschwindigkeit 4 8 cm s Umspulzeit ca 100 s für C 60 Gleichlaufschwankungen 0 09 Effektiv Frequenzgang 30 16 000 Hz 3 dB Stereotrennung 45 dB Rauschabstand 61 dB IEC A Netz UKW Tuner Frequenzbereich 87 5 108 MHz Nutzempfindlichkeit 11 dBf 1 0 µV 75 Ω Mono S N 30 dB 50 dB Geräuschberuhigung 16 dBf 1 7 µV 75...

Page 104: ...oria 3195 Australia TEL 03 9586 6300 PIONEER ELECTRONICS OF CANADA INC 300 Allstate Parkway Markham Ontario L3R 0P2 Canada TEL 905 479 4411 PIONEER ELECTRONICS DE MEXICO S A de C V San Lorenzo Num 1009 3er piso Desp 302 Col Del Valle Mexico D F C P 03100 TEL 5 688 52 90 Printed in Imprimé CRD3080 A JS EW 99H00F0P01 Published by Pioneer Corporation Copyright 1999 by Pioneer Corporation All rights r...

Reviews: