background image

35

It

Italiano

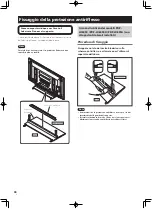
Procedura di montaggio 

1

  Girate il coperchio della base con la parte 

inferiore rivolta verso l’alto.

2

  Inserite le gambe del supporto nel 

coperchio della base.

3

  Stringete le viti 

 (4 mm x 10 mm: argento) 

per fissare le aste del supporto.

��������
��������

��������
��������

��������

�����

�����������������������

���������������������

������������������
��������

�����

�����������������������

�����

���������������

����

Quando montate il supporto appoggiate un lenzuolo sotto il 
coperchio della base. Se non si appoggia il lenzuolo prima del 
montaggio, la superficie anteriore del coperchio della base 
potrebbe graffiarsi.

Montaggio del supporto

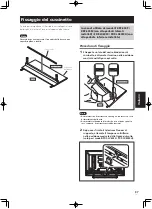
4

  Dopo aver montato il supporto, fissate gli 

accessori metallici anticaduta con le viti di 
installazione 

 (M4 × 35 mm: nero).

����������
����������

�����

���������������

������������������

������������������

���������������������
����������

����

Assicuratevi di non montare gli accessori metallici anticaduta al 
contrario.

���������������������

��������������������

Summary of Contents for KRP-TS01

Page 1: ......

Page 2: ...ドです その他の機器への取り付けには対応しておりません 詳し くは お買い求めの販売店にご相談ください 注意 指定外のプラズマテレビへの取り付け 改造およ び他の用途での使用はしないでください 設置場所について 設置場所にはスタンドとプラズマテレビの質量に十 分耐えられる強度をもつ場所を選定してください 必ず平坦で安定した場所に設置してください 屋外や温泉 海辺などの水場には設置しないでく ださい 振動や衝撃の加わるような場所には設置しないで ください 組み立て 設置について 組み立ての手順を守り 指定の箇所はすべて確実 にネジ留めしてください 指定を守らないとプラズマテレビ取り付け後に 破損や転倒など思わぬ事故の原因となることがあ ります プラズマテレビの取り付け作業は安全のため 必 ず 2 人以上で行ってください 作業の際には プラズマテレビと周辺機器の電源 を切り 電源プラグをコンセ...

Page 3: ...3 Ja 日本語 日本語 同梱された部品の確認 組み立て 設置の前に同梱された部品を確認してください ベースカバー 1 ネジ 4 10 mm シルバー 4 取付ネジ 転倒防止金具用 M4 35 mm 黒 4 取扱説明書 本書 1 取付ネジ M6 20 mm 黒 4 スタンドパイプ 2 クッション 1 遮光板 1 転倒防止金具 2 KRP 600A KRP 600M では使用しません ...

Page 4: ... シート ベースカバー テーブルトップ スタンド完成図 ネジ 4 10 mm シルバー ネジ 4 10 mm シルバー スタンドパイプ スタンド パイプ 前 後 ご注意 スタンドを組み立てる際は ベースカバーの下に柔らかいシート などを敷いて組み立ててください シートを敷いて組み立てを行わないと ベースカバーの表面をキ ズつける恐れがあります 4 スタンドの組み立て後 転倒防止金具を取付 ネジ M4 35 mm 黒 で取り付ける 前 後 ベースカバー 取付ネジ M4 35 mm 黒 転倒防止金具 ご注意 転倒防止金具は逆向きに取り付けないようにご注意ください 正しい取り付け方 誤った取り付け方 ...

Page 5: ...け 製品背面に接続したケーブル類のベースカバーへの映り込 みを防止する部品です ご注意 平坦で安定した場所にベースカバーを固定してから 取り付けを 行ってください 前 後 クッション ベースカバー 取り付け手順 クッションの両面テープのはくり紙をはがし ベースカバーの下図の位置に貼る 前 後 ご注意 パイプ差込口にクッションがかからないようにしてください すき間がないように固定してください すき間があると クッションがはがれる可能性があります ...

Page 6: ...きがなく 不安定なため 取り付けおよび設置は必ず 2 人以上で 行ってください ご注意 必ず平坦で安定した場所で取り付けをしてください ネジは穴に対して垂直に挿入し 確実に締めてください ディスプレイにキズおよび破損が生じないように シートなど を敷いてください ネジを手で 2 3 回軽く締めてからドライバーで締めつけてく ださい 取り付け手順 1 プラズマテレビにスタンドを取り付ける プラズマテレビを寝かせた状態にして プラズマテレ ビのスタンド挿入部にスタンドの支柱を合わせ 水平 にゆっくり挿入してください スタンドの支柱をプラ ズマテレビのスタンド挿入口以外の部分に当てないよ うに注意してください 本体裏面や端子にキズをつけ たり 変形させる恐れがあります 前 後 ご注意 プラズマテレビを寝かせるときは ディスプレイにキズおよび破 損が生じないようにご注意ください プラズマテレビの上...

Page 7: ... プラズマテレビ付属品 ひも 取付具 設置後の転倒 落下防止のお願い 地震などでの製品の転倒 落下によるけがなどの危害を軽減す るために 必ず転倒 落下防止対策を行ってください ご注意 転倒 落下防止器具を取り付ける壁や台の強度によっては 転 倒 落下防止効果が大幅に減少します その場合は適当な補強 を施してください また転倒 落下防止対策は けがなどの危害の軽減を意図した ものですが すべての地震に対してその効果を保障するもので はありません ラックなどに固定する方法 ネジ 市販品 を使って 図のように固定してください ご注意 ラックなどに固定する際のネジは 呼び径 4 mm 長さ 20 mm 以上 のものを使用してください ネジ 市販品 転倒防止金具 ラック天板に下穴をあけてから 市販のネジで ネジ留めしてください 20 mm以上 4 mm 8 mm 15 mm プラズマテレビはラック...

Page 8: ...幅 222 4 mm 高さ 430 mm 奥行 質量 KRP TS01 5 8 kg 上記の仕様および外観は 改良のため予告なく変更することがあります 寸法図 サイドスピーカー取り付け時 KRP TS01 単位 mm 124 5 60 1677 1465 922 430 876 76 152 64 スピーカーなしの時 KRP TS01 単位 mm 124 5 60 1465 876 76 922 430 152 64 2008 パイオニア株式会社 禁無断転載 ...

Page 9: ...cified Do not use this stand for a Pioneer display and television other than those designated and do not modify it or use it for other purposes Installation Location Select a location that is strong enough to support the weight of the stand and the displays Make sure to place it in a level and stable location Do not install it outdoors or in a wet place such as at a hot spring or near a beach Do no...

Page 10: ...10 En Checking the Standard Accessories Check to make sure that you have all the standard accessories before assembly and installation ...

Page 11: ... stand pipes Assemble the stand with a soft sheet placed under the base cover If a sheet is not laid before assembly the front surface of the base cover may be scratched Assembling the Stand 4 After assembling the stand attach the falling prevention metal fittings with the installation screws M4 35 mm black Be sure not to attach the falling prevention metal fittings in the reverse position ...

Page 12: ...ttaching the Light blocking Shield In case of PDP LX6090 PDP LX6090H PDP LX609A with side speakers installed Attachment Procedure Peel off one side of the double stick tape on the light blocking shield and attach the light blocking shield onto the base cover Be careful that the light blocking shield does not catch on the pipe insertion holes Anchor it in place so that there are no gaps If there is...

Page 13: ...P LX6090H with under speaker installed Attachment Procedure 1 Peel off one side of the double stick tape on the cushion and attach the cushion onto the position in the bottom diagram Be careful that the cushion does not catch on the pipe insertion holes Anchor it in place so that there are no gaps If there is a gap the cushion may peel off 2 After attaching the Pioneer television onto the stand at...

Page 14: ...iver 1 Attaching the Pioneer display and television to the stand Lay the Pioneer display and television down flat Align the stand supports with the Pioneer display and television stand slots and slowly insert the supports horizontally Please ensure that the stand supports do not come into contact with anything other than the Pioneer display and television stand slots Contact with any other area ma...

Page 15: ... sturdy element Perform this work in the same way on the left and right sides Use hooks cords and fittings that are available on the market Recommended hook Nominal diameter M8 Length 12 mm to 15 mm 1 2 inch to 5 8 inch Specifications External dimensions KRP TS01 922 mm W 222 4 mm H 430 mm D 36 5 16 in W 8 3 4 in H 16 15 16 in D PDK TS35A 922 mm W 298 9 mm H 430 mm D 36 5 16 in W 11 25 32 in H 16 1...

Page 16: ... 8 1677 66 1 32 1465 57 11 16 922 36 5 16 430 16 15 16 876 34 1 2 76 3 64 2 17 32 1 93 3 21 32 2 147 5 25 32 1465 57 11 16 922 36 5 16 430 16 15 16 956 37 5 8 1030 40 9 16 201 7 29 32 60 2 3 8 93 3 21 32 When the side speakers are installed KRP TS01 Unit mm inch When the under speaker is installed PDK TS35A Unit mm inch Without speakers KRP TS01 Unit mm inch 1 KRP 600P KRP 600M 2 PDP LX6090 PDP LX...

Page 17: ...n du produit qu en respectant les indications fournies N utilisez pas ce pied de table pour un moniteur et téléviseur Pioneer autre que ceux spécifiés et ne le modifiez pas ou ne l utilisez pas à des fins autres que celles pour lesquelles il a été conçu Lieu d installation Sélectionnez un emplacement assez solide pour supporter le poids du pied de table et de l écran Assurez vous de placer le produit...

Page 18: ...18 Fr Vérification des pièces fournies Veuillez vous assurer que vous possédez bien toutes les pièces nécessaires avant de procéder au montage et à l installation du pied de table ...

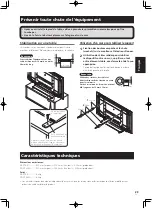
Page 19: ...fin de stabiliser les colonnes de support Avant de monter le pied de table glissez un drap doux sous la couverture de table Sans ce drap vous risqueriez d érafler la surface de la couverture de table Montage du pied de table 4 Après avoir monté le pied de table fixez les pièces métalliques anti chute à l aide des vis d installation M4 35 mm noires Veillez à fixer les pièces métalliques anti chute ...

Page 20: ...surface plane et stable Mise en place de l écran occultant Pour les modèles PDP LX6090 PDP LX6090H PDP LX609A avec enceintes latérales Procédure d installation Décollez un côté du ruban adhésif double face placé sur l écran occultant et posez celui ci sur la couverture de table Veillez à ce que l écran occultant ne déborde pas sur les trous d insertion Mettez l écran occultant en place de façon à ...

Page 21: ...dessous de la dalle Procédure d installation 1 Décollez un côté du ruban adhésif double face placé sur la bande anti reflet et fixez celle ci sur l emplacement indiqué sur le schéma ci dessous Veillez à ce que la bande anti reflet ne déborde pas sur les trous d insertion Mettez la bande anti reflet en place de façon à ce qu il n y ait pas d espace libre Dans le cas contraire elle pourrait se décol...

Page 22: ... Installation du moniteur et téléviseur Pioneer sur le pied de table Couchez le moniteur et téléviseur Pioneer Alignez les supports du pied sur les encoches du moniteur et téléviseur Pioneer prévues pour recevoir le pied puis insérez lentement les supports à l horizontale dans les encoches Veillez à ce que les supports du pied soient en contact uniquement avec les encoches du moniteur et téléviseu...

Page 23: ...Ces opérations doivent être effectuées de la même manière à gauche et à droite Utilisez des crochets des câbles et d autres dispositifs de fixation en vente dans le commerce Crochet recommandé Diamètre nominal M8 longueur de 12 mm à 15 mm Caractéristiques techniques Dimensions extérieures KRP TS01 922 mm largeur 222 4 mm hauteur 430 mm profondeur PDK TS35A 922 mm largeur 298 9 mm hauteur 430 mm pr...

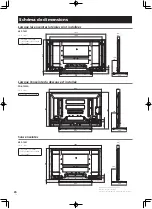
Page 24: ...es latérales sont installées KRP TS01 Unité mm Lorsque l enceinte du dessous est installée PDK TS35A Unité mm Sans enceintes KRP TS01 Unité mm 1 KRP 600P KRP 600M 2 PDP LX6090 PDP LX6090H PDP LX609A PDP LX6090 PDP LX6090H 1 KRP 600P KRP 600M 2 PDP LX6090 PDP LX6090H PDP LX609A Publication de Pioneer Corporation 2008 Pioneer Corporation Tous droits de reproduction et de traduction réservés ...

Page 25: ...rändern Sie es nicht Verwenden sie diesen Ständer auf keinen Fall für einen anderen Pioner Bildschirm oder Fernseher als vorgesehen verändern Sie ihn nicht und verwenden Sie ihn nicht für andere Zwecke Installationsort Wählen Sie für die Installation einen Platz der stabil genug ist das Gewicht des Tischständers und des Bildschirms zu tragen Sorgen Sie dafür dass der Ständer und der betreffende Bi...

Page 26: ...26 Ge Überprüfung des Standardzubehörs auf Vollständigkeit Überprüfen Sie vor Beginn der Montage und Installation ob alle Teile des Standardzubehörs vorhanden sind ...

Page 27: ...ie den Ständer indem Sie ein weiches Tuch unter die Basisabdeckung legen Wenn Sie das nicht tun ist es möglich dass die vordere Oberfläche zerkratzt wird Montage des Tischständers 4 Befestigen Sie nach der Montage des Ständers unter Verwendung der Installationsschrauben M4 x 35 mm schwarz die Metallhalterungen zur Verhinderung des Umfallens Achten Sie darauf die Metallhalterungen zur Verhinderung ...

Page 28: ...Bei den Modellen PDP LX6090 PDP LX6090H PDP LX609A mit seitlich installierten Lautsprechern Verfahrensweise der Befestigung Entfernen Sie eine Seite des doppelseitig klebenden Bandes am Reflexionsschutz Pad und kleben Sie das Reflexionsschutz Pad auf die Basisabdeckung Achten Sie bitte darauf dass die Reflexionsschutz Leiste nicht auf die Einführungs Öffnungen für die Ständerelemente gelangt Nehme...

Page 29: ...r Verfahrensweise der Befestigung 1 Entfernen Sie eine Seite des doppelseitig klebenden Bandes am Reflexionsschutz und kleben Sie den Reflexionsschutz auf die in dem Diagramm unten angegebenen Position Achten Sie darauf dass der Reflexionsschutz nicht auf die Einführungs Öffnungen für die Ständerelemente gelangt Nehmen Sie die Befestigung so vor dass es keine Lücken gibt Wenn eine Lücke bleibt kan...

Page 30: ...ie Schrauben nachdem Sie sie zwei bis dreimal leicht mit der Hand gedreht haben mit einem Schraubenzieher fest 1 Montage des Montage des Pioneer Bildschirms und Fernsehers am Ständer Legen sie den Pioneer Bildschirm oder Fernseher mit der Vorderseite nach unten nieder Richten Sie die Ständerelemente auf die Einführöffnungen des Pioneer Bildschirms oder Fernsehers aus und führen Sie die Ständerelem...

Page 31: ...erung an einer Wand einem Pfeiler oder einem anderen stabilen Bauelement Führen Sie diese Arbeiten in der gleichen Weise auf der linken und der rechten Seite aus Verwenden Sie handelsübliche Ösenschrauben Schnuren und Halteschrauben Empfohlene Halteschrauben Nenndurchmesser M8 Länge 12 mm bis 15 mm Technische Daten Außenabmessungen KRP TS01 922 mm Breite 222 4 mm Höhe 430 mm Tiefe PDK TS35A 922 mm...

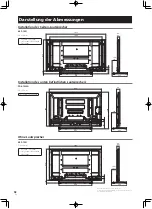
Page 32: ...eiten Lautsprecher KRP TS01 Einheit mm Installation des unten befindlichen Lautsprechers PDK TS35A Einheit mm Ohne Lautsprecher KRP TS01 Einheit mm 1 KRP 600P KRP 600M 2 PDP LX6090 PDP LX6090H PDP LX609A PDP LX6090 PDP LX6090H 1 KRP 600P KRP 600M 2 PDP LX6090 PDP LX6090H PDP LX609A Veröffentlicht von Pioneer Corporation Urheberrechtlich geschützt 2008 Pioneer Corporation Alle Rechte vorbehalten ...

Page 33: ...ate o modificate il prodotto diversamente da come specificato Non usate questo supporto con display o televisori Pioneer diversi da quelli indicati e non modificatelo o usatelo per altri scopi Posizione dell installazione Scegliete una posizione abbastanza resistente da sostenere i pesi del supporto e del display Assicuratevi di posizionarlo in piano e in modo stabile Non installatelo all aperto vici...

Page 34: ...34 It Controllo degli accessori standard Prima del montaggio e dell installazione controllate che tutti gli accessori standard siano stati forniti ...

Page 35: ...te del supporto Quando montate il supporto appoggiate un lenzuolo sotto il coperchio della base Se non si appoggia il lenzuolo prima del montaggio la superficie anteriore del coperchio della base potrebbe graffiarsi Montaggio del supporto 4 Dopo aver montato il supporto fissate gli accessori metallici anticaduta con le viti di installazione M4 35 mm nero Assicuratevi di non montare gli accessori m...

Page 36: ...ella protezione antiriflesso In caso di utilizzo dei modelli PDP LX6090 PDP LX6090H PDP LX609A con altoparlanti laterali installati Procedura di fissaggio Strappate un lato del nastro biadesivo sullo schermo antiriflesso e attaccate quest ultimo sul coperchio della base Assicuratevi che la protezione antiriflesso non copra i fori di inserimento delle gambe del supporto Fissatelo saldamente di modo ...

Page 37: ...con altoparlante inferiore installato Procedura di fissaggio 1 Strappate un lato del nastro biadesivo sul cuscinetto e attaccate il cuscino nella posizione mostrata nella figura qui sotto Assicuratevi che il cuscinetto non venga a contatto con i fori di inserimento delle aste Assicuratelo saldamente di modo che non vi siano spazi In caso contrario il cuscinetto potrebbe staccarsi 2 Dopo aver fissa...

Page 38: ...sore Pioneer al supporto Appoggiate il display e il televisore Pioneer Allineate le linguette del supporto con le scanalature del display e del televisore Pioneer e inserite lentamente le linguette in direzione orizzontale Assicuratevi che le linguette del supporto entrino in contatto esclusivamente con le scanalature del display e del televisore Pioneer Il contatto con qualsiasi altra area potreb...

Page 39: ...o pilastro o altro elemento resistente Svolgete questo lavoro nello stesso modo sul lato sinistro e su quello destro Usate ganci corde e accessori disponibili in commercio Gancio consigliato Diametro nominale M8 Lunghezza da 12 mm a 15 mm Dati tecnici Misure esterne KRP TS01 922 mm L 222 4 mm A 430 mm P PDK TS35A 922 mm L 298 9 mm A 430 mm P Peso KRP TS01 5 8 kg PDK TS35A 6 0 kg Le suddette specif...

Page 40: ...gli altoparlanti laterali montati KRP TS01 Unità mm Con l altoparlante inferiore montato PDK TS35A Unità mm Senza altoparlanti KRP TS01 Unità mm 1 KRP 600P KRP 600M 2 PDP LX6090 PDP LX6090H PDP LX609A PDP LX6090 PDP LX6090H 1 KRP 600P KRP 600M 2 PDP LX6090 PDP LX6090H PDP LX609A Pubblicato da Pioneer Corporation Copyright 2008 Pioneer Corporation Tutti i diritti riservati ...

Page 41: ...taander mag niet voor een andere dan de daarvoor bestemde Pioneer Display en Televisie worden gebruikt ook mogen er geen wijzigingen op worden aangebracht noch mag het voor andere doeleinden worden gebruikt Plaats van installatie Kies een plaats die sterk genoeg is om het gewicht van de staander en de displays te kunnen dragen Zorg ervoor dat de plaats van installatie vlak en stabiel is Plaats het...

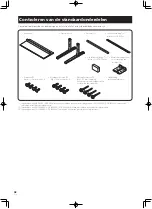
Page 42: ...42 Du Controleren van de standaardonderdelen Controleer voorafgaande aan de montage en installatie of alle standaardonderdelen aanwezig zijn ...

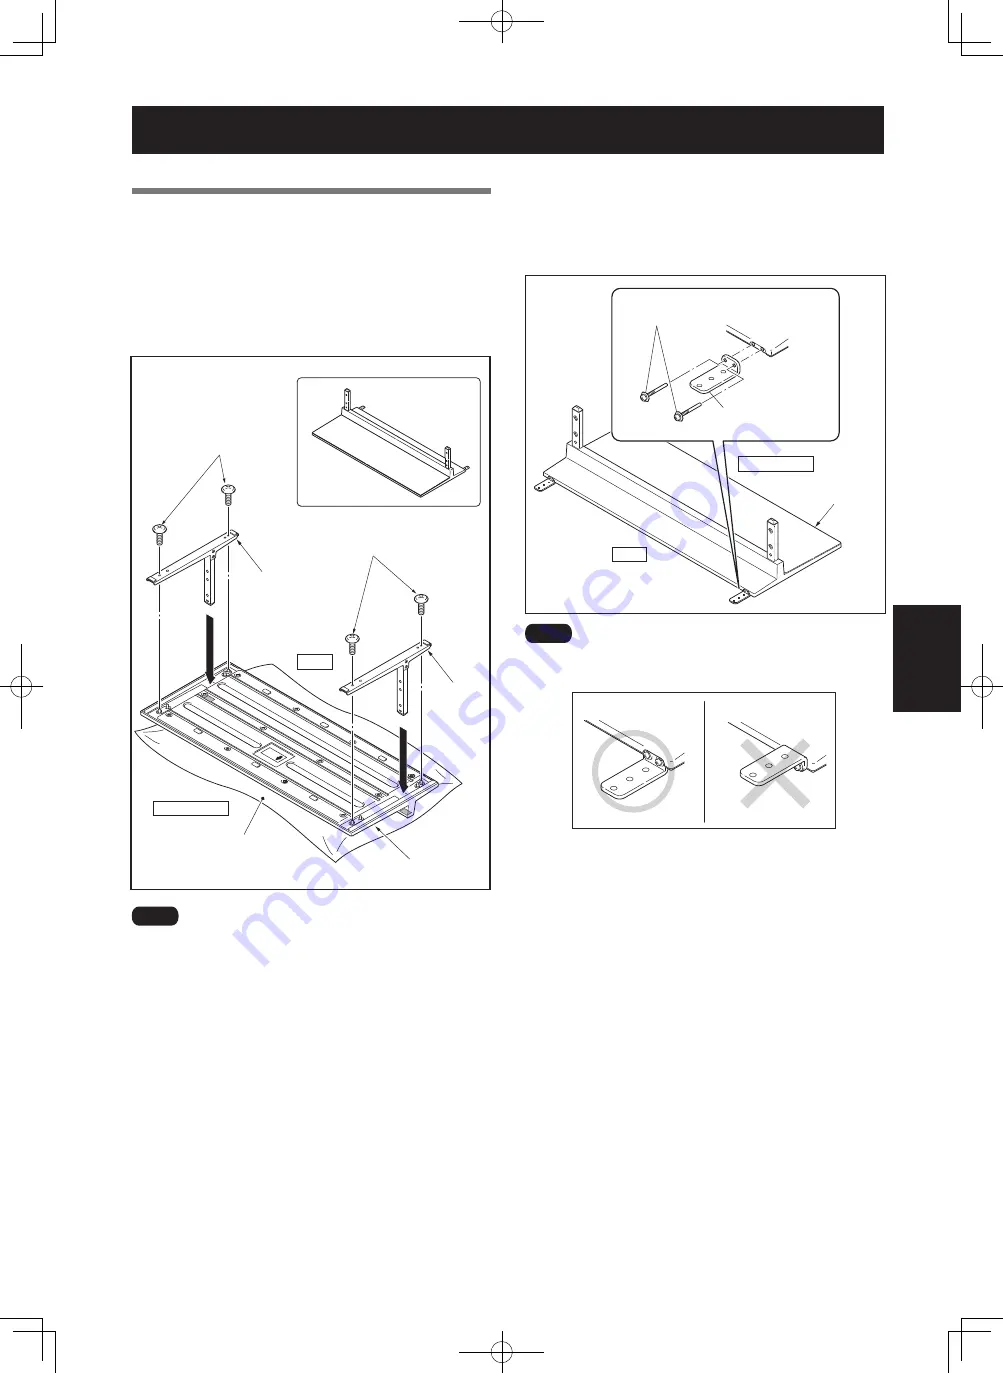
Page 43: ...eer de staander wordt gemonteerd Indien er voorafgaande aan de montage geen doek onder wordt neergelegd kunnen er aan de bovenzijde van het voetstuk krassen ontstaan Montage van de tafelbladstaander 4 Nadat de staander is geïnstalleerd dienen de metalen montagestukken ter voorkoming van omvallen met de montageschroeven M4 35 mm zwart te worden bevestigd Zorg ervoor dat de metalen montagestukken te...

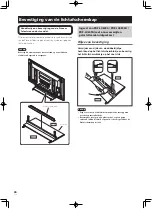
Page 44: ...t Bevestiging van de lichtafschermkap Ingeval van PDP LX6090 PDP LX6090H PDP LX609A met aan weerszijden geïnstalleerde luidsprekers Wijze van bevestiging Verwijder een zijde van de dubbelzijdige hechtband op het lichtafschermblokje en bevestig het lichtafschermblokje op het voetstuk Zorg ervoor dat de lichtafschermkap niet de invoeggaten voor het opzetstuk afdekt Bevestig het stevig op zijn plaats...

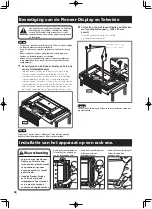
Page 45: ...e geïnstalleerde luidsprekers Wijze van bevestiging 1 Verwijder een zijde van de dubbelzijdige hechtband op de vulling en bevestig de vulling op de juiste plaats zoals in de onderste figuur is aangegeven Zorg ervoor dat de vulling niet de invoeggaten van de buizen afdekt Bevestig de vulling stevig op zijn plaats zodat er geen gaten ontstaan Indien dit wel het geval is is het mogelijk dat de vullin...

Page 46: ...orden vastgedraaid 1 Bevestiging van de Pioneer Display en Televisie aan de tafelbladstaander Leg de Pioneer Display en Televisie vlak neer Lijn de steunen van de staander op met de gleuven van de staander in de Pioneer Display en Televisie en voeg de steunen geleidelijk horizontaal in Zorg ervoor dat de steunen van de staander uitsluitend in aanraking komen met de gleuven van de staander in de Pi...

Page 47: ...t te geven en deze stevig aan een muur zuil of ander stevig element te bevestigen Dit dient op dezelfde wijze aan de linker en rechterzijde van de display te worden gedaan Gebruik haken snoeren en appendages die in de winkel verkrijgbaar zijn Aanbevolen schroefhaak Nominale diameter M8 Lengte 12 mm tot 15 mm Technische gegevens Afmetingen buitenzijde KRP TS01 922 mm B 222 4 mm H 430 mm D PDK TS35A...

Page 48: ... luidsprekers aan weerszijden KRP TS01 Eenheid mm Bij installatie van de luidspreker onder PDK TS35A Eenheid mm Zonder luidsprekers KRP TS01 Eenheid mm 1 KRP 600P KRP 600M 2 PDP LX6090 PDP LX6090H PDP LX609A PDP LX6090 PDP LX6090H 1 KRP 600P KRP 600M 2 PDP LX6090 PDP LX6090H PDP LX609A Uitgegeven door Pioneer Corporation Copyright 2008 Pioneer Corporation Alle rechten voorbehouden ...

Page 49: ...o salvo según lo especificado No utilice este soporte para un monitor y televisor Pioneer distinto de los especificados y no lo modifique ni lo utilice para otros fines Dónde instalar el soporte Elija un lugar cuya resistencia permita aguantar el peso del soporte y de la pantalla Asegúrese de que el lugar de instalación sea una superficie llana y estable No instale el soporte en el exterior junto a un...

Page 50: ...50 Sp Verificación de las piezas suministradas Antes de proceder al montaje e instalación asegúrese de que dispone de todas las piezas suministradas ...

Page 51: ...ilizar las columnas de soporte Para montar el soporte coloque una sábana suave debajo de la base de apoyo Si no coloca ninguna sábana antes de proceder al montaje la superficie frontal de la base de apoyo se podría rayar Cómo montar el soporte 4 Después de montar el soporte asegure los accesorios metálicos anticaída mediante los tornillos de fijación M4 35 mm negros Asegúrese de que no coloca al r...

Page 52: ...y estable Cómo instalar el dispositivo antirreflejos En el caso de los modelos PDP LX6090 PDP LX6090H PDP LX609A equipados con altavoces laterales Procedimiento de colocación Despegue un lado de la cinta adhesiva de doble cara del dispositivo antirreflejos y fije éste en la base de apoyo Tenga cuidado de que el dispositivo antirreflejos no interfiera con los agujeros para introducir las columnas de...

Page 53: ...uipados con un altavoz en la parte inferior Procedimiento de colocación 1 Despegue un lado de la cinta adhesiva de doble cara de la almohadilla y adhiera ésta en la posición que se indica en la figura inferior Tenga cuidado de que la almohadilla no interfiera con los agujeros para introducir las columnas de soporte Colóquela de manera que no quede ningún hueco ya que en tal caso la almohadilla pod...

Page 54: ... destornillador 1 Cómo acoplar el monitor y televisor Pioneer al soporte Coloque el monitor y televisor Pioneer en posición horizontal Alinee las columnas de soporte con las ranuras del soporte del monitor y televisor Pioneer e introdúzcalas lentamente y de forma horizontal Asegúrese de que las columnas de soporte únicamente entran en contacto con las ranuras practicadas en el monitor y televisor ...

Page 55: ... una pared columna u otro elemento resistente Practique esta operación en el lado izquierdo y derecho del monitor y televisor Pioneer Utilice ganchos cuerdas y fijaciones disponibles en el mercado Gancho recomendado Diámetro nominal M8 Longitud entre 12 mm y 15 mm Especificaciones Dimensiones externas KRP TS01 922 mm ancho 222 4 mm alto 430 mm fondo PDK TS35A 922 mm ancho 298 9 mm alto 430 mm fondo...

Page 56: ... se han instalado en los laterales KRP TS01 Unidad mm Cuando el altavoz se ha instalado en la parte inferior PDK TS35A Unidad mm Sin altavoces KRP TS01 Unidad mm 1 KRP 600P KRP 600M 2 PDP LX6090 PDP LX6090H PDP LX609A PDP LX6090 PDP LX6090H 1 KRP 600P KRP 600M 2 PDP LX6090 PDP LX6090H PDP LX609A Publicado por Pioneer Corporation Copyright 2008 Pioneer Corporation Todos los derechos reservados ...

Page 57: ...是專為先鋒顯示器及電視 PDP LX6090 PDP LX6090H PDP LX609A KRP 600P KRP 600M 所設計的 如果使用其他機種 可能會因為不穩定而造成傷害 想要獲得 更進一步的資訊 請跟你購買顯示器的店家聯絡 除了詳細的指示 請不要安裝或修改產品 除了那些指示說明 請不要將此支架安裝先鋒顯示器及電視 也不要修改或是另有 用途 安裝位置 選擇一個夠堅固 足以支撐桌上支架和顯示器的地方 確認是安裝於平坦和堅固的地方 切勿將本產品安裝於室外 溫泉處或沙灘附近 不要將支架安裝於會震動或衝撞的地方 組合和安裝 請按照裝配指示組合桌上支架 將所有螺絲穩固的栓在指定 的地方 安裝顯示器以後 因為桌上支架沒有按照指示安裝 可能會 發生幾種狀況 如設備碎裂或是翻覆的意外發生 安裝顯示器時一定要有兩人或兩人以上去確認是否安裝妥 當 安裝以前 將顯示器和周邊設備的電源關閉 然後再將電...

Page 58: ...58 ChH 清點標準配件 請清點確定收到所有標準配件 再行組裝及安裝 座板 螺絲 銀色 安裝螺絲 黑色 供防摔落金屬配件使用 操作手冊 本份文件 安裝螺絲 黑色 支架 襯墊 遮光罩 限 防摔落金屬配件 阻光墊 限 1 與 已安裝側揚聲器 已安裝底部揚聲器 一起使用 2 與 已安裝側揚聲器 一起使用 3 與 已安裝底部揚聲器 一起使用 ...

Page 59: ...使底面朝上 2 將支架管插入座板內 3 鎖緊螺絲 4 mm 10 mm 銀色 以固定 支架 支架 支架 軟墊 螺絲 銀色 螺絲 銀色 桌上支架安裝完成 正面 背面 座板 附注 組裝支架管時 請於座板放置一軟墊 組裝前若未放置軟墊 則座板正面可能會刮傷 組裝支架 4 裝上支架後 再使用安裝螺絲 M4 35 mm 黑色 裝上防摔落金屬配件 正面 背面 座板 安裝螺絲 黑色 防摔落金屬配件 附注 請確定未將防摔落金屬配件的方向裝反 錯誤安裝 正確安裝 ...

Page 60: ...上先鋒電視的支架後再執行 此部份可防止連接至先鋒電視背面的連接線反光到底蓋上 附注 將座板固定到一平坦 穩定之處後 再將其接上 遮光罩 正面 背面 座板 接合遮光罩 PDP LX6090 PDP LX6090H PDP LX609A 已安裝側揚聲器 的情況 接合程序 撕下遮光罩上雙面膠的一面後 將其貼在底蓋上 正面 背面 附注 小心遮光罩不要扣到支架管安插孔上 固定於定位時不要有任何空隙 如有空隙 遮光罩可能會剝落 ...

Page 61: ...上 附注 將座板固定到一平坦 穩定之處後 再將其接上 襯墊 正面 背面 座板 貼上襯墊 KRP 600P KRP 600M 已安裝側揚聲器 PDP LX6090 PDP LX6090H 已安裝底部揚聲 器 的情況 接合程序 1 撕下襯墊上雙面膠的一面後 將其貼在下圖所 示的位置上 正面 背面 附注 請小心勿將襯墊貼上插管孔上 將襯墊定位後將無間隙存在 否則襯墊可能會剝落 2 裝好先鋒電視的支架後 再將阻光墊貼在 下圖所示的位置上 限 PDP LX6090 PDP LX6090H ...

Page 62: ...在電視底部放置床單或其他布料 以免刮傷或損壞電視 用手稍微轉動螺絲二到三次 然後用螺絲起子鎖緊 1 將先鋒顯示器及電視安裝到機架上 將先鋒顯示器及電視平放 將機架上的支架對準先鋒顯示器及電視的機架槽 然後將 支架緩慢地水平插入機架槽 請確定支架的支撐點除接觸先鋒顯示器及電視支架的插 槽外 未與其他地方接觸 否則 可能會造成刮痕 或使 顯示器的後側或端子變形 正面 背面 附注 將先鋒顯示器及電視平放時 請謹慎小心 以免造成刮痕或損壞 安裝先鋒顯示器及電視 注 意 將本產品安裝到機架等裝置上 安裝至機櫃時 請務必由 兩位以上人員抓穩先鋒顯 示器及電視 請勿利用揚聲器或機架為 施力點搬動先鋒顯示器及 電視 以免造成損壞 注 意 請由頂部並利用把手搬動先鋒 顯示器及電視 請勿利用揚聲器為施力點搬動 先鋒顯示器及電視 請勿利用機架為施力點搬動先 鋒顯示器及電視 ...

Page 63: ...金屬配件 利用牆壁固定 1 將防摔落螺絲 掛鉤 安裝到先鋒顯示器及電 視上 2 利用強力鋼索適當地穩固並牢牢固定到牆上 柱上或其他堅固的元件上 請使用相同方式固定好左右兩側 附注 請使用一般市面上的掛鉤 鋼索及固定配件 建議掛鉤 額定直徑 M8 長度 12 mm 至 15 mm 鋼索 掛鉤 固定配件 規格 外部尺寸 KRP TS01 922 mm 寬 222 4 mm 高 430 mm 深 PDK TS35A 922 mm 寬 298 9 mm 高 430 mm 深 重量 KRP TS01 5 8 kg PDK TS35A 6 0 kg 以上的外部規格如有修改 以改善產品品質 恕不另行通知 至 最少 至 在安裝支架後 請特別小心確定設備不會摔落 將電漿電視安裝至機櫃和牆面上 ...

Page 64: ...76 152 1 147 2 64 1 93 2 147 1465 922 430 956 1030 201 60 93 安裝側揚聲器時 KRP TS01 單位 mm 安裝底部揚聲器時 PDK TS35A 單位 mm 未配備揚聲器 KRP TS01 單位 mm 1 KRP 600P KRP 600M 2 PDP LX6090 PDP LX6090H PDP LX609A PDP LX6090 PDP LX6090H 1 KRP 600P KRP 600M 2 PDP LX6090 PDP LX6090H PDP LX609A 日本先鋒公司出版 版權 2008 日本先鋒公司 版權所有 ...

Page 65: ...ривести к возможным физическим повреждениям Для получения дополнительной информации обратитесь в магазин где Вы купили телевизор Не устанавливайте и не модифицируйте данный продукт если это не указано Не используйте этот столик подставку для дисплея и телевизора Pioneer не по назначению не модифицируйте и не используйте его для других целей Место установки Выберите место достаточно прочное чтобы в...

Page 66: ...инт M6 x 20 мм черный 4 Опорная стойка 2 Подкладка 1 1 Светозащитный экран 2 1 только KRP TS01 Металлический фитинг для предотвращения падения 2 Светозащитная накладка 3 1 только PDK TS35A 1 Используйте с KRP 600P KRP 600M с установленными боковыми громкоговорителями PDP LX6090 PDP LX6090H с установленными нижними громкоговорителями 2 Используйте с PDP LX6090 PDP LX6090H PDP LX609A с установленным...

Page 67: ...тавку с помощью мягкой простыни подложенной под основание Если перед сборкой не расстелить простынь то можно поцарапать лицевую поверхность основания Сборка столика подставки 4 После сборки столика подставки подсоедините металлические фитинги для предотвращения падения с помощью установочных винтов M4 35 мм черные Задняя сторона Передняя сторона Металлический фитинг для предотвращения падения Осно...

Page 68: ...на Основание Подсоединение светозащитного экрана В случае PDP LX6090 PDP LX6090H PDP LX609A с установленными боковыми громкоговорителями Порядок подсоединения Снимите одну сторону двухсторонней клеящей ленты на светозащитном экране и подсоедините светозащитный экран к основанию Задняя сторона Передняя сторона Внимание Будьте внимательны чтобы светозащитный экран не попал на установочные отверстия ...

Page 69: ...X6090H с установленными нижними громкоговорителями Порядок подсоединения 1 Снимите одну сторону двухсторонней клеящей ленты на подкладке и подсоедините подкладку в положении показанном на схеме ниже Задняя сторона Передняя сторона Внимание Будьте внимательны чтобы подкладка не попала на установочные отверстия опорных стоек Зафиксируйте ее на месте чтобы не было никаких зазоров При наличии зазора п...

Page 70: ...лей и телевизор Pioneer на ровную поверхность Выровняйте опоры столика подставки с установочными пазами дисплея и телевизора Pioneer и аккуратно вставьте опоры Убедитесь что опоры столика подставки не входят в контакт ни с чем другим кроме установочных пазов дисплея и телевизора Pioneer Контакт с любой другой поверхностью может привести к появлению царапин или деформации задней стороны дисплея или...

Page 71: ...предотвращения падения 2 Использование прочных шнуров для обеспечения надлежащего и прочного крепления на стену стойку или другой жесткий элемент конструкции Выполняйте эту работу одинаковым образом c левой и правой сторон Внимание Используйте крюки шнуры и фитинги которые имеются в продаже Рекомендуемый крюк Номинальный диаметр M8 Длина от 12 мм до 15 мм Шнур Крюк Фитинг M8 от 12 мм до 15 мм Спец...

Page 72: ...установке боковых громкоговорителей KRP TS01 Единицы мм При установке нижних громкоговорителей PDK TS35A Единицы мм Без громкоговорителей KRP TS01 Единицы мм 1 KRP 600P KRP 600M 2 PDP LX6090 PDP LX6090H PDP LX609A PDP LX6090 PDP LX6090H 1 KRP 600P KRP 600M 2 PDP LX6090 PDP LX6090H PDP LX609A Издано Pioneer Corporation Pioneer Corporation 2008 Все права защищены ...

Page 73: ......

Reviews: