background image

Using Teletext

14

72

En

Chapter 14

Using Teletext

Using the Teletext functions

What is Teletext?

Teletext broadcasts pages of information and entertainment to specially equipped 
television sets. Your flat screen TV receives Teletext signals broadcast by TV 
networks, and decodes them into graphical format for viewing. News, weather 
and sports information, stock exchange prices and programme previews are 
among many services available.

 Important

• Displaying Teletext pages for a long period of time, or for shorter periods of 

time everyday, may result in image retention.

Operating Teletext basics for analogue TV or 
external input sources

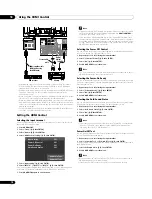
Turning on and off Teletext

1

Select a TV channel or external input source providing a Teletext 

programme.

2

Press 

m

 to display the Teletext (full screen).

3

Press 

m

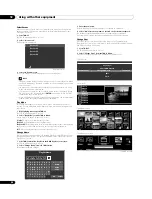
 again to display the Teletext on the right screen and normal image 

on the left screen.

Each time you press 

m

, the screen switches as shown to the left.

If you select a programme with no Teletext signal, “Cannot display Teletext.” 
appears.

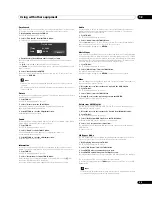
Selecting and operating Teletext pages

Use the following remote control buttons to select and operate Teletext pages.

Colour (RED/GREEN/YELLOW/BLUE):

You can select a group or block of pages displayed in the coloured brackets at the 
bottom of the screen by pressing the corresponding colour (

RED/GREEN/

YELLOW/BLUE

) on the remote control unit.

0

 to 

9

:

Directly select any page from 100 to 899 by using 

0

 to 

9

.

w


x

:

Press 

w

 to increase the page number.

Press 

x

 to decrease the page number.

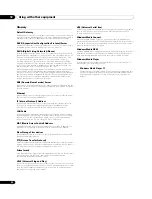
k

:

To display hidden information such as an answer to a quiz, press 

k

.

Press 

k

 again to hide the information.

:

To stop updating Teletext pages, press 

.

Press 

 again to release the hold mode.

l

:

Displays an Index page for the CEEFAX/FLOF format. Displays a TOP Over View 
page for the TOP format.

 Note

• Before displaying the Teletext, return the screen to the single-screen mode.

Teletext

Teletext

Summary of Contents for Kuro PDP-C509A

Page 1: ... 08G00001 ARB1580 A Printed in Japan ...

Page 2: ...ed for a long period of time or viewed repeatedly the displayed characters may be easily burned onto the screen If images of fixed patterns such as those of personal computer displays or game software are displayed for a long period of time the patterns may be easily burned onto the screen It is recommended to use your flat screen TV while paying attention to the matters described below particular...

Page 3: ...ARNING To prevent a fire hazard do not place any naked flame sources such as a lighted candle on the equipment D3 4 2 1 7a_A_En VENTILATION CAUTION When installing this unit make sure to leave space around the unit for ventilation to improve heat radiation For the minimum space required see page 14 WARNING Slots and openings in the cabinet are provided for ventilation to ensure reliable operation ...

Page 4: ...dby 19 Changing channels 19 Displaying a channel list 20 Changing the volume and sound 21 Switching the broadcast audio channel 21 Using the multiscreen functions 22 Freezing images 23 07 The HOME MENU 24 HOME MENU overview 24 Using the HOME MENU 25 08 Setting up 26 Setting up TV channels automatically 26 Setting up analogue TV channels manually 26 Reducing video noise 26 Setting Channel Lock 26 L...

Page 5: ...5 Connecting a set top box 45 Connecting a VCR 46 Connecting a game console or camcorder 46 Connecting a personal computer 47 Connecting an amplifier AV receiver 47 Using the HDMI Input 48 Connecting control cords 49 Operate the Home Media Gallery PDP LX609A PDP LX509A only 50 Run the Home Media Gallery 52 Use the TOOLS Menu 56 HMG Setup 60 Other useful functions 61 Glossary 62 Controlling other e...

Page 6: ...nstalling to ensure proper heat emission Distance the unit slightly from other equipment walls etc For the minimum space required around the unit see page 14 Do not fit the unit inside narrow spaces where ventilation is poor Do not cover with a cloth etc Clean the vents on the sides and rear of the unit to remove dust build up by using a vacuum cleaner set to its lowest suction setting Do not plac...

Page 7: ...he rear of the flat screen TV When moving the flat screen TV ask another person for help and use the handles attached to the rear of the flat screen TV Do not move the flat screen TV by holding only a single handle Do not use the handles to hang the product when installing or carrying the product for example Do not use the handles for the purpose of preventing the product from tilting over Fan mot...

Page 8: ...epping on them or objects from resting on them Check the cords at the plugs and product 13 The plasma display panel used in this product is made of glass Therefore it can break when the product is dropped or applied with impact Be careful not to be injured by broken glass pieces in case the plasma panel breaks 14 Overloading Do not overload AC outlets or extension cords Overloading can cause fire ...

Page 9: ...ight Be careful not to block the ventilation opening at the rear of the flat screen TV Be sure to install the flat screen TV on a flat surface because it contains glass The screw holes other than the illustrations above are to be used only for the specified products Never use them for mounting non specified products Do not mount or remove the flat screen TV to or from the stand with speakers attac...

Page 10: ...at all of the following accessories are supplied in the box Remote control unit Remote control unit PDP LX609A PDP LX509A PDP C509A AA size battery x 2 Cable clamp x 4 Power cord Ferrite core black PDP LX609A PDP LX509A Cleaning cloth Warranty card Operating instructions ...

Page 11: ... On 2 Power ON indicator 3 STANDBY indicator 4 SLEEP indicator 5 Room Light Sensor 6 Remote control sensor 7 USB port PDP LX609A and PDP LX509A for the Home Media Gallery functions PDP C509A used for service only 8 STANDBY ON button 9 INPUT button 10 VOLUME buttons 11 CHANNEL buttons 12 PHONES output terminal 13 INPUT 3 terminal Video 14 INPUT 3 terminals Audio 1 2 4 3 5 6 1 7 8 10 9 11 12 13 8 14...

Page 12: ... COMPONENT VIDEO Y PB PR 20 PC INPUT terminal Audio 21 CONTROL OUT terminal 22 DIGITAL OUT terminal OPTICAL 23 SPEAKERS terminals right left Do not connect any devices to the speaker terminals other than the speakers specified Do not leave speaker cable wires bare and exposed at the terminals Exposed wires can result in an electrical short causing malfunction or damage to the system T W W W T W W ...

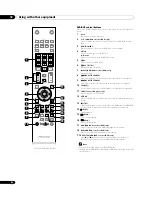
Page 13: ...TANDARD USER 15 g Sets the sound multiplex mode 16 c Switches the screen mode among 2 screen picture in picture and single screen 17 TV STB DVD DVR VCR These indicators show the current selection and status when you control other connected equipment using the supplied remote control unit 18 p y INFO Displays the channel information Displays the banner information 19 TV DTV Switches the mode betwee...

Page 14: ...ional Pioneer stand For details on installation refer to the instruction manual supplied with the stand Using the optional Pioneer speakers For details on installation refer to the instruction manual supplied with the speakers Moving the flat screen TV When installing on a rack etc hold the flat screen TV as shown below Because the flat screen TV is heavy be sure to have someone help you when movi...

Page 15: ...long Drill a hole in the middle at the rear of the tabletop panel before using a wood screw Perform this work the same way on the left and right sides Drill a hole in the middle at the rear of the tabletop panel before using a wood screw Perform this work the same way on the left and right sides Using a wall for stabilisation 1 Attach falling prevention bolts hooks to the flat screen TV 2 Use stro...

Page 16: ...ntenna The following is a brief explanation of the types of connections that are used for a coaxial cable Connect a 75 ohm coaxial cable commercially available to the ANT terminal Antenna cable commercially available If your outdoor antenna uses a 75 ohm coaxial cable with a standard DIN45325 plug IEC169 2 plug it into the antenna terminal at the rear of the flat screen TV Note If the antenna is n...

Page 17: ...ed two AA size batteries while inserting their respective negative polarity ends first Place batteries with their terminals corresponding to the and indicators in the battery compartment 3 Close the battery cover Caution Improper use of batteries can result in chemical leakage or an explosion Be sure to follow the instructions below When you replace the batteries use manganese or alkaline ones Pla...

Page 18: ...or flat screen TV or operate the remote control unit closer to the remote control sensor When any obstacle exists between the remote control unit and the remote control sensor the remote control unit may not function As the batteries become empty the remote control unit can function within a shorter distance from the remote control sensor Replace the batteries with new ones early enough The flat s...

Page 19: ...erational A minute flow of power feeds the system to maintain operational readiness If you are not going to use the flat screen TV for a long period of time be sure to remove the power cord from the power outlet Flat screen TV status indicators The table below shows the operational status of the flat screen TV You can check the current status of the system with the indicators on the flat screen TV...

Page 20: ...ist Note Pressing ENTER selects the desired channel Pressing EXIT or RETURN causes the list to disappear Home Media Gallery is unavailable for PDP C509A Setting your favourite channels Select up to 10 channels for each screen up to five screens You can then quickly jump to your favourite channels 1 Press HOME MENU 2 Select Setup then ENTER 3 Select Favourites Setup then ENTER 4 Select Channel Mode...

Page 21: ...witching the broadcast audio channel Depending on the broadcast you can switch the audio channel Press to change the audio channel Note Pressing TOOLS also causes the audio channel mode menu to appear The table below shows the available audio channels by broadcast audio type Note In each of the sound multiplex mode selected using the button the display changes depending on broadcasting signals bei...

Page 22: ...cture in picture mode Note Displaying a split screen for a long period of time or for shorter periods of time everyday may result in image retention 1 Press c to select the display mode Each time you press c the display mode is switched among 2 screen picture in picture and single screen In 2 screen or picture in picture mode press to switch the position of the two screens shown The left screen in...

Page 23: ... is restored and the corresponding menu is displayed When in the 2 screen mode images displayed on the right screen may look less fine depending on the images While in the 2 screen or picture in picture mode the analogue favourite channel list and the digital channel list are unavailable Freezing images Use the following procedure to capture and freeze one frame from a moving image that you are wa...

Page 24: ...tion off 33 Sleep Timer 43 Option Position 40 Auto Size 42 Side Mask 42 HDMI Input 48 HDMI Control Setting 70 Blue LED Dimmer 43 Orbiter 43 Video Pattern 43 Drive Mode 40 Colour System 41 Game Control Pref 41 Room Light Sensor 42 Screen Protection 43 Label Input 43 System Setup Auto Installation 26 Analogue TV Setup 26 Digital Tuner Setup 36 Digital Audio Output 47 Password 44 Language 27 Technica...

Page 25: ...til you access the desired submenu item The number of menu layers differs depending on the menu items 4 Press to select an option or parameter and then press ENTER For some menu items press instead of 5 Press HOME MENU again to exit the menu Note You can return to the upper menu levels by pressing RETURN Before operating with the remote control unit make sure to select the TV mode using its SELECT...

Page 26: ...ect System Setup then ENTER 4 Select Analogue TV Setup then ENTER The password entry screen appears Enter your four digit password using buttons 0 to 9 For the password see Using a password on page 44 5 Select Manual Adjust then ENTER 6 Select Programme Entry 7 Select a programme number You can select 1 through 99 8 Select Search 9 Enter a frequency using buttons 0 to 9 then ENTER You can also pre...

Page 27: ...Select Sort then ENTER The sort screen appears 3 Select a channel to be shifted then ENTER 4 Select a new location then ENTER Sorting is executed 5 Press HOME MENU to exit the menu Note To change a page on the Sort screen in step 2 select the arrow icon on the screen with then press ENTER Language setting You can select the language to be used for on screen display such as menus and instructions f...

Page 28: ... Description OPTIMUM Automatically adjusts the brightness of the image to the optimum level in accordance with the brightness level of the viewing area This setting is shared by both the external inputs and TV input sources PERFORMANCE For a highly defined image in a normal living room This setting is shared by both the external inputs and TV input sources DYNAMIC Sharp imaging with the maximum co...

Page 29: ...dually change may be seen on the screen This is not a malfunction Using the Picture Detail 1 Repeat steps 1 to 4 provided for Using PureCinema 2 Select Picture Detail then ENTER 3 Select an item to be adjusted then ENTER You can select DRE Picture Black Level ACL Enhancer Mode or Gamma 4 Select the desired parameter then ENTER Item button button Contrast For less contrast For more contrast Brightn...

Page 30: ... Performs such compensation that results in the optimum contrast characteristics for images Selections Off Deactivates ACL On Activates ACL Enhancer Mode Selects processing of the image s high frequency detailed areas to find the right balance between preserving picture detail and eliminating unwanted noise Selections 1 Selects Hard SHARPNESS image 2 Selects Natural SHARPNESS image 3 Selects Soft ...

Page 31: ...on again to return to the newly adjusted image Each press of the button toggles between Before and After 5 Repeat steps 2 and 4 for other parameters 6 Press HOME MENU to exit the menu Caution If you exit the menu by pressing HOME MENU or no operation is performed for 60 seconds all the parameter settings displayed last are stored in memory If you want to exit the menu without performing the adjust...

Page 32: ... To restore the factory defaults for the Treble Bass Balance and Sound Effect options press to select Reset in step 4 and then press ENTER A confirmation screen appears Press to select Yes and then press ENTER You cannot restore the factory default for AVC Pressing TOOLS while using Home Media Gallery functions also causes the Sound menu to appear PDP LX609A PDP LX509A only Sound Effect You can se...

Page 33: ...ng Energy Save You may use one of the three Energy Save modes to save power consumption 1 Press HOME MENU 2 Select Setup then ENTER 3 Select Power Control then ENTER 4 Select Energy Save then ENTER 5 Select Mode1 Mode2 or Off then ENTER 6 Press HOME MENU again to exit the menu Note When you change the Energy Save mode you may notice a change in the panel sound This is normal The Energy Save functi...

Page 34: ...rgy and extend the life of your flat screen TV have the screen turn Off To deactivate the screen follow the steps below 1 Press TOOLS The TOOLS Menu appears on screen 2 Select Picture Off then ENTER The screen display turns Off To restore the screen display press any buttons other than i i and e Note The Picture Off setting is not memorised by the system Item Description Off default No power manag...

Page 35: ... Digital A Analogue 2 Channel number 3 Station name 4 Programme title 5 Sound multiplex information 6 Current time 7 Programme time schedule 8 Next programme time schedule title 9 Parental guide information 10 Subtitle icon 11 Teletext icon 12 Signal information HD SD 13 Favourite icon A separate banner also appears at the bottom of the screen showing the AV Selection mode bottom left and screen s...

Page 36: ...to 9 3 Select Channel Options then ENTER The Channel Options screen with a list of registered channels appears 4 Select an individual channel then ENTER to select on off Select On for Channel Skip if you want the channel to be skipped when operating P P on the remote control unit or CHANNEL on the flat screen TV with Favourites set to Off Select On for Channel Lock if you want the channel not to b...

Page 37: ... ACT New South Wales Australian Capital Territory default VIC Victoria QLD Queensland SA South Australia WA Western Australia TAS Tasmania NT Northern Territory 4 Press HOME MENU to exit the menu Note You can select Digital Tuner Setup only when watching DTV channels Screen Saver The screen saver automatically starts when no operation is performed for three minutes while receiving DTV radio channe...

Page 38: ...vourites Lists all channels registered in the Favourites List for the broadcast network you are watching If not registered in the Favourites List the channel you are watching also appears in the list Programme information While watching programme information on the EPG screen select the desired programme and press TOOLS to display the Programme Information screen 1 Press TOOLS The TOOLS Menu appea...

Page 39: ...ow finished programmes Before operating with the remote control unit make sure to select the TV mode using its SELECT button See Controlling other equipment using the supplied remote control unit on page 63 Using other useful EPG functions Below are some useful functions that guide you through the EPG screen and save your time EPG Jump 1 Press TOOLS when the EPG screen Programme List Programme Inf...

Page 40: ...put source Depending on the displayed video the image position may not change even after adjustment When Dot by Dot is selected for the screen mode the Position menu is dimmed Adjusting image positions and clock automatically PC source only Use Auto Setup to automatically adjust the positions and clock of images coming from a personal computer 1 Repeat steps 1 to 3 provided for Switching the verti...

Page 41: ...ing a screen size manually Press f to switch among the screen size options selectable for the type of video signals currently received Each time you press f the selection is switched The selectable screen sizes differ depending on the types of input signals Important If images with black bands on both sides or top and bottom of the screen when using the 4 3 FULL 14 9 or CINEMA 14 9 modes for examp...

Page 42: ... Repeat steps 1 to 3 provided for Switching the vertical drive mode AV source only 2 Select Side Mask then ENTER 3 Select HD Wide Mode 4 Select Mode 1 or Mode 2 If you select Mode 1 Side Mask Detection is automatically set to WIDE 1 when side masks are detected with Wide Zoom for Auto Size setting If you select Mode 2 Side Mask Detection is automatically set to WIDE 2 when side masks are detected ...

Page 43: ...on the sleep timer becomes ineffective Screen Protection This function establishes multiple settings for a longer display life To select this option follow the procedure below 1 Repeat steps 1 to 3 provided for Switching the vertical drive mode AV source only 2 Select Screen Protection then ENTER The following settings are automatically entered Auto Size Wide Zoom Side Mask Detection Mode 1 Orbite...

Page 44: ...to be newly set using buttons 0 to 9 7 Enter the same password that you have entered in step 6 If a different password is entered the operation goes back to step 6 for reentry from the beginning You can try up to three times to reconfirm the new password before the Change Password screen is automatically exited 8 Press HOME MENU again to exit the menu Note Take a note of the newly set password and...

Page 45: ...ment Use either Component S Video or standard video cable for the video signal Use a stereo audio cable for the audio If you re using the standard video input you can use a red white yellow audio video cable DVD playback To watch a DVD press INPUT 2 on the remote control unit or press INPUT on the flat screen TV to select INPUT 2 Note Signal priority for the INPUT 2 terminals is 1 Component Video ...

Page 46: ...e INPUT 1 terminals is 1 S Video 2 Video Connect external equipment to only terminals that are to be actually used Refer to your VCR operation manual for the signal type Connecting a game console or camcorder Use the INPUT 3 terminals to connect a game console camcorder and other audiovisual equipment Displaying an image from the game console or camcorder To watch an image coming from the game con...

Page 47: ...ages are output to the AUDIO OUT terminals However audio accompanying the images are output to the SUB WOOFER OUT terminal When using the digital audio output terminal optical select settings according to your AV receiver 1 Press HOME MENU 2 Select Setup then ENTER 3 Select System Setup then ENTER 4 Select Digital Audio Output then ENTER Select Dolby Digital default or PCM 5 Press HOME MENU again ...

Page 48: ...is enables finer minute colour reproduction when a device that supports Deep Colour signals is connected to the flat screen TV When Deep Colour signals are received the colour depth appears on the InfoBanner see page 35 Note It may take a short while until the image is displayed depending on the equipment connected Make sure to use an HDMI compliant cable When inputting 1080p signals we recommend ...

Page 49: ... will be made to identify the type of audio signals when audio signals are received 4 Press HOME MENU to exit the menu Note If no sound is output specify another audio signal type For the audio signal types to be specified check the operation manual that came with the connected equipment Depending on the equipment to be connected you also need to connect analogue audio cables Connecting control co...

Page 50: ...n some supported file formats may fail to play properly when imported from an unknown USB device Note You cannot use the Home Media Gallery until dimmed elements on the menu screen turn white Some Home Media Gallery functions such as trick play during Fast Forward and Rewind Time Search and Search may not work depending on the media server s capability and functionality Home Media Gallery complies...

Page 51: ...dresses select No then enter IP Address and Subnet mask See Network Setup or HMG Setup to enter an address manually For information on DHCP refer to network device s operating instructions You may need to contact your service provider or network administrator when manually entering an IP Address Some media servers block or are programmed to block access to client servers When connecting the flat s...

Page 52: ...ome Media Gallery press EXIT or HMG Use the Media Navigator By selecting Media Navigator the previously selected server menu automatically appears on the screen When only one server is found the system automatically connects the server You can also use the TOOLS Menu to switch to another server or manually select a server from the Server List The screen automatically changes to the Server List if ...

Page 53: ...me Search Repeat 1 3 2 4 Thumbnail screen Thumbnail List screen List screen 1 Item being selected 2 Number of total items 3 Scroll bar displayed when one or more pages follow 4 Icon or thumbnail of the selected item if obtained Screen components Screen display options are List Thumbnail or Thumbnail List Press TOOLS then select Change View from the TOOLS Menu to choose from the screen display opti...

Page 54: ...t supports H 264 AVC format Follow the steps below 1 Insert the USB flash drive containing the content in a card reader to connect to the flat screen TV The USB device s Folder Contents List appears on screen Refer to the operation manual that came with the individual device for connections and setting 2 Select a Folder Contents List Use the arrow buttons to highlight an option then press ENTER 3 ...

Page 55: ...e submenu containing the required file or content Selecting a photo file from the HMG Playlist causes the Photo Player screen to appear just like selecting a file in the server Screen components The following information automatically appears on screen for a few seconds when Photo Player launches or playback status changes controlled by the remote for example Pressing the p button or selecting Inf...

Page 56: ...rom Favourites select Off Detailed Display Select this option to display the detailed information on the currently selected content This option is available on the Media Navigator Playlist List Movie Music Photo Folder Contents List screens 1 Press TOOLS The TOOLS Menu appears on screen 2 Select Detailed Display from the TOOLS Menu Detailed information appears Pressing RETURN causes the informatio...

Page 57: ...lder then press ENTER The Thumbnail screen appears Thumbnail List or List screen appears depending on the setting 4 Select the desired photo file The selected photo content appears in full screen 5 Press TOOLS The TOOLS Menu appears on screen 6 Select a slideshow option A Slide Show dialogue screen appears 7 Select Off Random Black Out Cross Sweep Horizontal Blinds Boxed In Out Panoramic or Scenic...

Page 58: ...nt in order when playing back the last content ends it returns to the first content to play again All Plays all selected folder content in order only once Change Name You can change the name of Playlist 1 through Playlist 5 in HMG Playlist To edit follow the directions below This option is available on the Playlist List Movie Music Photo screen 1 Press TOOLS while five Playlists in the HMG Playlis...

Page 59: ...on the Movie Player screen 1 Press TOOLS The TOOLS Menu appears on screen 2 Select Audio from the TOOLS Menu Pressing causes L R or L R to be selected If the content has multiple audio sources you can select L R or L R for each source After entering the setting press RETURN Music Player If you want to change BGM on any screen other than the music content playback screen use this option to jump to ...

Page 60: ...tent is a 16 9 picture HMG Setup Use the HMG Setup option for Network Setup Auto Connection Setup and Default Settings 1 Press HMG The Home Media Gallery menu appears on screen 2 Select HMG Setup from the menu Use the arrow buttons to highlight an option then press ENTER 3 Select Network Setup Auto Connection and Default Settings Network Setup Select whether to acquire the IP Address automatically...

Page 61: ...001 No details are available for the error 100 A communication error occurred 100 No further details are available for the error 101 No response from server 101 Timeout period reaches due to delayed server response 102 Disconnected from the network 102 Cables are disconnected 103 Response from server indicating that it is impossible to reply 103 Invalid response from the server 300 Content cannot ...

Page 62: ...has four pins A straight cable is used when connecting the flat screen TV to a home network via a hub A cross over cable is used when connecting directly to a PC Use category 5 CAT 5 LAN cables MAC Media Access Control Address An address attached to the port of any network device with an IP address The MAC address is expressed as 00 e0 36 01 23 xx and cannot be changed Mass Storage Class devices T...

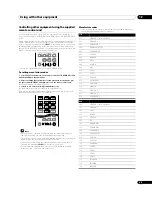
Page 63: ...de list to identify an appropriate code The mode indicator lights up for approximately one second and then goes off presetting the manufacture code is completed Note If you perform no operation for approximately one minute while a mode indicator is flashing the code presetting procedure is quitted If you enter a code not listed in the table a mode indicator flashes quickly for approximately one se...

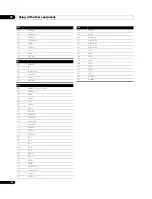
Page 64: ...2 504 AKAI 1 505 AKAI 2 506 AKAI 3 507 DAEWOO 508 GRUNDIG 1 509 GRUNDIG 2 510 GRUNDIG 3 511 GRUNDIG 4 512 HITACHI 1 513 HITACHI 2 514 HITACHI 3 515 JVC 1 516 JVC 2 517 JVC 3 518 JVC 4 519 JVC 5 520 LOEWE 1 521 LOEWE 2 522 MATSUI 523 ORION 524 PANASONIC 1 525 PANASONIC 2 526 PHILIPS 1 527 PHILIPS 2 528 PHILIPS 3 529 SANYO 530 SAMSUNG 1 531 SAMSUNG 2 532 SAMSUNG 3 533 SAMSUNG 4 534 SHARP 535 SONY 1 ...

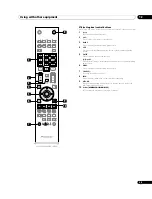
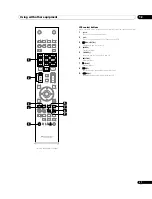
Page 65: ...casting guide screen 5 ENTER Press to activate the selected function Press to select items on the broadcasting menu screen or the broadcasting guide screen 6 MENU Press to display the broadcasting menu screen 7 SOURCE a Turns the set top box on and off 8 INFO Press to display information on the current broadcasting 9 RETURN When the broadcasting menu screen is in display press to restore the immed...

Page 66: ...d off the power of the DVD player or HDD DVD recorder DVR 11 TOOLS Pioneer BD player only Press to display the TOOLS Menu 12 RETURN When the DVD menu is in display press to restore the immediately previous screen 13 STOP Press to stop playback or recording With some DVD players or HDD DVD recorders DVRs pressing the button twice may open the disc tray 14 I PLAY Starts playback 15 V SCAN Press for ...

Page 67: ...s 2 P P Press to select channels of the TV tuner on the VCR 3 F PAUSE STILL Sets pauses and still pictures 4 REC Starts recording 5 SOURCE a Turns the power of the VCR on and off 6 STOP Stops playback 7 I PLAY Starts playback 8 V FF Fast forward the tape and allows picture search 9 S REW Rewinds the tape and allows picture search 1 4 3 5 8 9 6 2 7 for PDP LX609A PDP LX509A ...

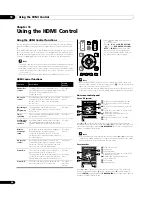
Page 68: ...t The proper input source is automatically selected and the content is played back on the flat screen TV as you press PLAY on the connected device Recorder player On screen control Recorder player operation can be controlled on screen or with the remote control unit of the flat screen TV play stop fast forward reverse etc Recorder player Recording of TV programme The programme now watching can be ...

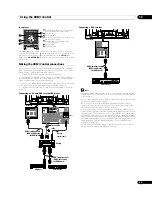
Page 69: ...necting an AV system be sure to place and connect it between the flat screen TV and recorder or player Do not connect an AV system that does not support the HDMI Control functions between the flat screen TV and a recorder player otherwise the HDMI Control functions may not operate properly When connecting an AV system that does not support the HDMI Control functions and a player recorder that supp...

Page 70: ...the Power Off Control You can select whether or not the connected device is turned Off when the flat screen TV is turned Off factory default is On 1 Repeat steps 1 to 4 in Selecting the input terminal 2 Select Power Off Control then ENTER 3 Select On then ENTER 4 Press HOME MENU to exit the menu Note The Power Off Control function is valid for the devices connected to any of HDMI terminals at the ...

Page 71: ...electable when the connected recorder or player is ready to operate You can also display the HDMI Control menu by pressing HDMI CONTROL on the remote control unit of the flat screen TV Item Description Disc Navigator Displays a title list of the connected recorder or player Timer REC DVR Displays an electronic programme guide EPG of the connected recorder Timer REC List DVR Displays a timer record...

Page 72: ...een and normal image on the left screen Each time you press m the screen switches as shown to the left If you select a programme with no Teletext signal Cannot display Teletext appears Selecting and operating Teletext pages Use the following remote control buttons to select and operate Teletext pages Colour RED GREEN YELLOW BLUE You can select a group or block of pages displayed in the coloured br...

Page 73: ... can display it on the screen by pressing m In this case the TTX is displayed in the InfoBanner see page 35 Turning Teletext on and off 1 Select a digital TV channel providing a Teletext programme 2 Press m to display the Teletext 3 Press m again to turn the display off Selecting and operating Teletext pages Use the following remote control buttons to select and operate Teletext pages Colour RED G...

Page 74: ...ction to other components correct See pages 45 to 49 Is a non compatible PC signal being input See page 47 Sound is reversed between the right and left Sound is output from only a single speaker Check if the speaker cable connections have been reversed between the right and left or if the speaker cable from either speaker has been disconnected See page 12 Has the balance been correctly adjusted Se...

Page 75: ...y It is strongly recommended to use 100BASE TX for playback quality and display speed Check the logical connections IP Address setup DHCP etc Confirm the IP Address is correct if acquired by Auto IP and Firewall setup Also check if the IP Address is properly acquired with DHCP on the Network Setup screen that follows the HMG Setup menu Using two or more application servers on a single PC may cause...

Page 76: ...liant insert the Flash Memory card into the multi card reader Confirm that the device is correctly inserted or removed No USB hub is supported When you connect a home network connect directly to the device s USB port Image or sound is interrupted or distorted Block noise appears Verify that the file complies with the supported format bit rate or profile Also check the file for damage Some files th...

Page 77: ... flat screen TV is high SD05 Internal protection circuits turning power OFF Possible short in the speaker cable Check the speaker cable connections between the flat screen TV and the speakers SD11 Powering off Internal temperature is too high Check temperature around TV Check if the ambient temperature of the flat screen TV is high Pin No Signal name Pin No Signal name 1 R 9 5 V 2 G 10 GND ground ...

Page 78: ...3 W Standby Weight 50 8 kg 112 0 lbs 33 8 kg 74 6 lbs Colour System PAL SECAM 3 58NTSC 4 43NTSC PAL60 TV Function Analogue Receiving System PAL B Tuner VHF UHF AU0 ch to AU69 ch CATV S2 ch to S44 ch Auto Channel Preset 99 ch Auto Preset Audio multiplex A2 TV Function Digital Receiving System DVB T 2K 8K COFDM Tuner VHF UHF VHF Band 177 5 MHz to 226 5 MHz and UHF Band 529 5 MHz to 816 5 MHz Auto Ch...

Page 79: ...are s ability to use WMDRM to play or copy protected content Revocation does not affect unprotected content When you download licenses for protected content you agree that Microsoft may include a revocation list with the licenses Content owners may require you to upgrade WMDRM to access their content If you decline an upgrade you will not be able to access content that requires the upgrade This pr...

Page 80: ... included with this distribution is covered by the same copyright terms except that the holder is Tim Hudson tjh cryptsoft com Copyright remains Eric Young s and as such any Copyright notices in the code are not to be removed If this package is used in a product Eric Young should be given attribution as the author of the parts of the library used This can be in the form of a textual message at pro...

Page 81: ...ng this sentence libpng versions 1 2 6 August 15 2004 through 1 2 25 February 18 2008 are Copyright 2004 2006 2008 Glenn Randers Pehrson and are distributed according to the same disclaimer and license as libpng 1 2 5 with the following individual added to the list of Contributing Authors Cosmin Truta libpng versions 1 0 7 July 1 2000 through 1 2 5 October 3 2002 are Copyright 2000 2002 Glenn Rand...

Page 82: ...r or with the express written consent of Sun Microsystems Inc SUN RPC IS PROVIDED AS IS WITH NO WARRANTIES OF ANY KIND INCLUDING THE WARRANTIES OF DESIGN MERCHANTIBILITY AND FITNESS FOR A PARTICULAR PURPOSE OR ARISING FROM A COURSE OF DEALING USAGE OR TRADE PRACTICE Sun RPC is provided with no support and without any obligation on the part of Sun Microsystems Inc to assist in its use correction mo...

Page 83: ... other recipients of the Program a copy of this License along with the Program You may charge a fee for the physical act of transferring a copy and you may at your option offer warranty protection in exchange for a fee 2 You may modify your copy or copies of the Program or any portion of it thus forming a work based on the Program and copy and distribute such modifications or work under the terms ...

Page 84: ...hed by the Free Software Foundation 10 If you wish to incorporate parts of the Program into other free programs whose distribution conditions are different write to the author to ask for permission For software which is copyrighted by the Free Software Foundation write to the Free Software Foundation we sometimes make exceptions for this Our decision will be guided by the two goals of preserving t...

Page 85: ...ay be a special need to encourage the widest possible use of a certain library so that it becomes a de facto standard To achieve this non free programs must be allowed to use the library A more frequent case is that a free library does the same job as widely used non free libraries In this case there is little to gain by limiting the free library to free software only so we use the Lesser General ...

Page 86: ...urce code for the Library including whatever changes were used in the work which must be distributed under Sections 1 and 2 above and if the work is an executable linked with the Library with the complete machine readable work that uses the Library as object code and or source code so that the user can modify the Library and then relink to produce a modified executable containing the modified Libr...

Page 87: ...PAIR OR CORRECTION 16 IN NO EVENT UNLESS REQUIRED BY APPLICABLE LAW OR AGREED TO IN WRITING WILL ANY COPYRIGHT HOLDER OR ANY OTHER PARTY WHO MAY MODIFY AND OR REDISTRIBUTE THE LIBRARY AS PERMITTED ABOVE BE LIABLE TO YOU FOR DAMAGES INCLUDING ANY GENERAL SPECIAL INCIDENTAL OR CONSEQUENTIAL DAMAGES ARISING OUT OF THE USE OR INABILITY TO USE THE LIBRARY INCLUDING BUT NOT LIMITED TO LOSS OF DATA OR DA...

Page 88: ... 08G00001 ARB1580 A Printed in Japan ...

Reviews: