background image

English

2

Thank you for buying this Pioneer product.
Please read through these operating instructions before 
using your speaker system so you will know how to make 
the most of its performance. After you have finished reading 
the instructions, put them away in a safe place for future 
reference.

CAUTION

About compatibility

This product is designed exclusively for use with the Pioneer 
flat screen TV. For more information on compatibility, please 
consult with your nearest Pioneer authorized dealer or 
service center.

About installation and setting

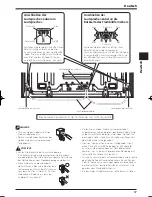
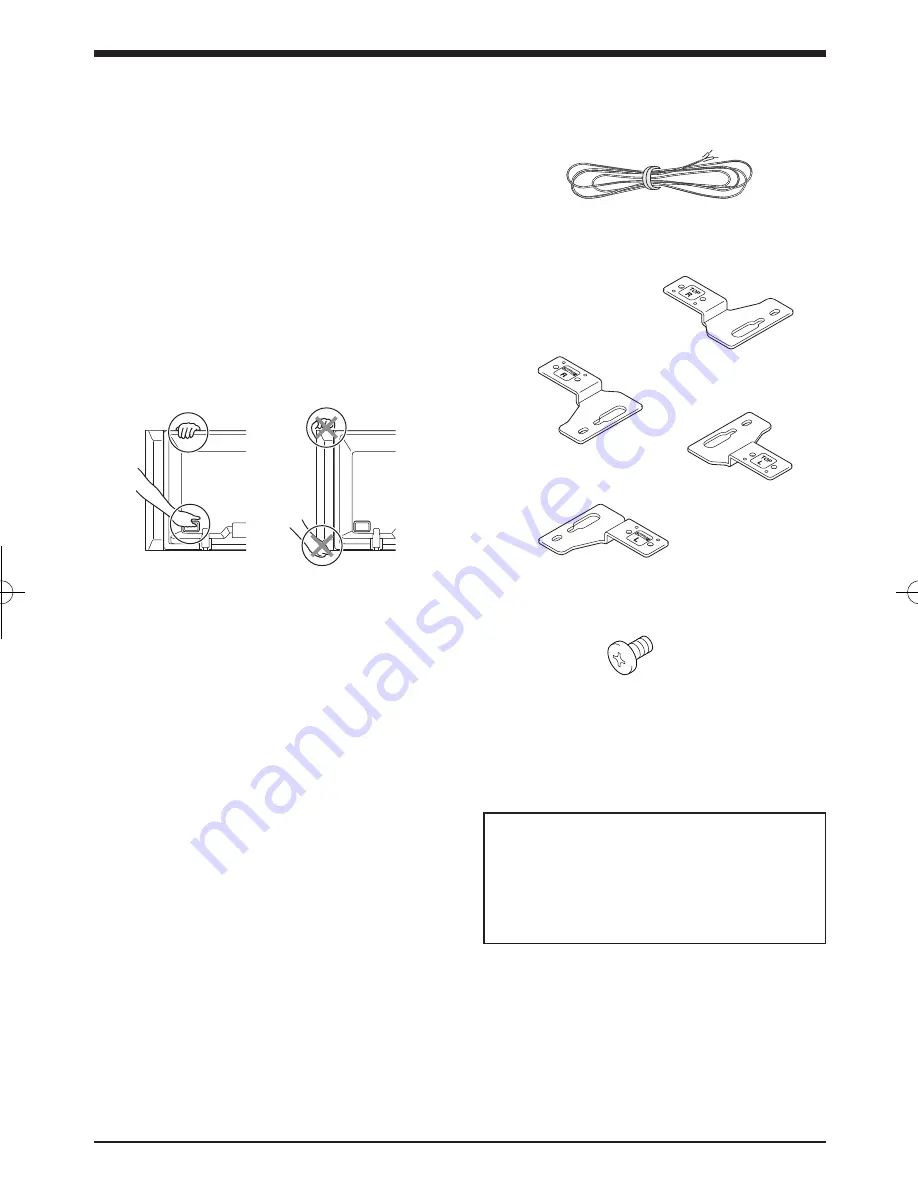
•  Do not move the flat screen TV by holding these speakers 

or speaker brackets. This could result in injury or damage 
to the brackets. When moving the TV, hold by the top and 
handles.

•  When installing the speaker, do not use any screws other 

than those supplied, otherwise the speaker may come off 
from the main unit and fall over.

•  When installing the speaker, tighten the screws firmly.
•  Please handle the speaker with sufficient care, as the 

grille net and the cabinet can become damaged or broken 
when they are subjected to strong external impacts.

•  Placing a CRT computer screen or CRT monitor near to 

the speaker may result in interference or color distortion. 
If this happens, distance the monitor from the speaker.

About the input

•  In order to prevent damage to the speaker system 

resulting from input overload, please observe the 
following precautions:

•  Do not connect these speakers to anything other than the 

specified flat screen TV. Doing so may result in damage 
or fire.

•  Be sure to turn the connected devices off and remove 

the power cord from the wall outlet beforehand when 
changing the connection or installation method.

•  When using a tone control function to greatly emphasize 

treble sounds, do not use excessive amplifier volume.

CHECKING THE ACCESSORIES

•  Speaker Cables × 2

•  Speaker Brackets

�������������

������������

����������������

���������������

•  Speaker Mounting Screws
  (M5 × 10 mm : Black) × 16 

•  Operating Instructions

Installation

•  Consult your dealer if you encounter any difficulties 

with this installation.

•  Pioneer is not liable for any damage resulting from 

improper installation, improper use, modification, or 
natural disasters.

Summary of Contents for KURO PDP-S64

Page 1: ......

Page 2: ...ith sufficient care as the grille net and the cabinet can become damaged or broken when they are subjected to strong external impacts Placing a CRT computer screen or CRT monitor near to the speaker may result in interference or color distortion If this happens distance the monitor from the speaker About the input In order to prevent damage to the speaker system resulting from input overload please...

Page 3: ... screen TV stand to the flat screen TV 1 Attaching the Speaker Brackets to the Speakers There are top and bottom speaker brackets for both the left and the right speaker Attach the appropriate brackets to the top and the bottom on the back of the speakers using the supplied screws It shows the attachment of the bracket on the right side It is attached on the left side by the same procedure ...

Page 4: ...e hole of the speaker bracket top over the screw lower the speaker onto it 4 Adjust the position of the speaker and then tighten the upper and lower screws firmly 5 Tighten the two screws at the top and bottom for each speaker total of four screws thus fixing the speakers to the flat screen TV 6 Pass the supplied speaker cable between the speaker and the flat screen TV below the speaker bracket from b...

Page 5: ...wing the copper wire Check if the end of the speaker cables are securely connected to the terminals by slightly tugging on the cable after making connections Loose connections may result in sound dropouts or noise If there is a short in the and cables caused by an exposed lead wire excessive load may be applied to the flat screen TV resulting in interrupted operation or malfunction Incorrect connec...

Page 6: ...h and hold the levers then pull it out from the hole NOTE The longer a clamp is in place the better chance of deterioration An older clamp is more easily damaged while being removed and may not be reusable When using the hung on wall unit NOTE First lay the flat screen TV on top of a soft sheet etc then attach the speakers 1 Attach the speakers to the flat screen TV See procedures 1 to 10 on pages ...

Page 7: ...s for two speakers Speaker Cables 2 Speaker Brackets TOP Left 1 BOTTOM Left 1 TOP Right 1 BOTTOM Right 1 Speaker Mounting Screws M5 10 mm 16 Operating Instructions 1 NOTE Specifications and design subject to possible modification without notice due to improvements CABINET MAINTENANCE Use a polishing cloth or dry cloth to wipe off dust and dirt When the cabinet is very dirty wipe with a soft cloth ...

Page 8: ...ec suffisamment de soin car autrement l enjoliveur frontal et le coffret risqueraient d être endommagés ou hors d usage en les soumettant à des chocs externes exagérés La présence d un écran d ordinateur ou d un moniteur à tube cathodique près des enceintes peut provoquer des interférences et une distorsion des couleurs Si c est le cas éloignez l écran par rapport aux enceintes À propos de l entrée...

Page 9: ...eur à écran plat Pioneer au téléviseur à écran plat 1 Fixer les supports d enceinte sur les enceintes Il y a un support de fixation inférieur et un support inférieure pour l enceint gauche et pour l enceinte droite Posez les bons supports en haut et en bas au dos des enceintes à l aide des vis fournies L illustration montre la pose des supports de droite Pour les supports de gauche procédez de la m...

Page 10: ... support de l enceinte haut par dessus la vis baissez l enceinte 4 Ajustez la position de l enceinte puis serrez complètement les vis du haut et du bas 5 Serrez les deux vis l une en haut et l autre en bas pour chaque enceinte total de quatre vis C est ainsi que vous fixez les enceintes sur le téléviseur à écran plat 6 Passez le câble d enceinte fourni entre l enceinte et le téléviseur à écran plat...

Page 11: ...uivre Vérifiez que les extrémités des câbles d enceinte sont bien branchées sur les bornes en tirant légèrement sur le câble une fois les branchements effectués Des câbles mal raccordés peuvent entraîner des interruptions du son ou du bruit En cas de court circuit dans les câbles et en raison d un fil de sortie exposé le téléviseur à écran plat risque de recevoir une charge excessive ce qui provoqu...

Page 12: ...QUE Plus un collier reste longtemps en place plus il risque de se détériorer Les vieux colliers ont tendance à s abîmer plus facilement lors de la dépose et vous risquez de ne pas pouvoir les réutiliser En cas d utilisation de l unité d installation murale REMARQUE Tout d abord couchez le téléviseur à écran plat sur sa face avant sur un morceau de tissu doux etc puis installez les enceintes 1 Fixe...

Page 13: ...0 mm 16 Mode d emploi 1 REMARQUE Les spécifications et la finition sont susceptibles d être modifiées sans préavis en vue de l amélioration ENTRETIEN DU COFFRET Utiliser un chiffon à polir ou un chiffon sec pour essuyer la poussière et éliminer les salissures Si le coffret est très sale le frotter avec un chiffon doux imbibé de liquide à nettoyer dilué d eau Ensuite essuyer à nouveau avec un chiff...

Page 14: ...llation des Lautsprechers darauf die Schrauben fest anzuziehen Die Lautsprecher sind vorsichtig zu behandeln da Ziergitter und Gehäuse durch starke Stöße und Erschütterungen verkratzt oder beschädigt werden können Wenn ein CRT Computer Monitor oder ein CRT Monitor in der Nähe des Lautsprechers aufgestellt wird kann dies Bildrauschen oder Farbstörungen verursachen In einem solchen Fall muss für ein...

Page 15: ...eher an 1 Anbringen der Lautsprecher Halterungen an den Lautsprechern Es gibt obere und untere Lautsprecher Halterungen für den linken und rechten Lautsprecher Befestigen Sie die jeweils vorgesehenen Halterungen unter Verwendung der mitgelieferten Schrauben oben und unten an der Rückseite der Lautsprecher Die Abbildung zeigt die Befestigung der Halterung an der rechten Seite Auf die gleiche Weise ...

Page 16: ...precher und dem Flachbildfernseher unter der Lautsprecher Halterung von unten durch 7 Schließen Sie die Lautsprecherkabel an den jeweiligen Lautsprecher an siehe nächste Seite 8 Führen Sie das jeweilige Kabel in die am betreffenden Lautsprecher befindliche Nut ein 9 Schließen Sie das andere Ende der Lautsprecherkabel an die Rückseite des Flachbildfernsehers an siehe nächste Seite 3 Hängen Sie die L...

Page 17: ...ehen ist Prüfen Sie nachdem Sie die Lautsprecherkabel angeschlossen haben ob die Enden dieser Kabel richtig an den Anschlüssen befestigt sind indem Sie leicht an den Kabeln ziehen Lose Anschlüsse können Tonausfall oder Geräusche zur Folge haben Wenn es verursacht durch einen freiliegenden Draht einen Kurzschluss im Kabel oder im Kabel gibt kann es zu Überspannungen am Flachbildfernseher kommen was...

Page 18: ...e das Band aus dem Loch HINWEIS Je länger eine Halterung angebracht ist um so wahrscheinlicher ist es dass ihre Eigenschaften schlechter werden Eine ältere Halterung wird leichter beschädigt wenn sie entfernt wird und kann dann möglicherweise nicht wiederverwendet werden Bei Verwendung der Wandmontage Einheit HINWEIS Legen Sie zuerst den Flachbildfernseher auf eine weiche Unterlage und montieren S...

Page 19: ...ungsanleitung 1 HINWEIS Die technischen Daten und das Design können aus Gründen der Weiterentwicklung jederzeit ohne vorherige Ankündigung geändert werden PFLEGE DES GEHÄUSES Zum Abwischen von Staub und Verschmutzung kann ein Poliertuch oder ein trockener Lappen verwendet werden Wenn das Gehäuse stark verschmutzt ist kann es mit einem weichen mit verdünntem Haushaltsreiniger angefeuchteten Lappen ...

Page 20: ...rmo e la cassa esterna possono danneggiarsi o rompersi se sottoposte a colpi esterni molto forti Se vicino all altoparlante si trova un monitor televisivo con tubo a raggi catodici questo schermo può subite interferenze e mostrare aberrazioni cromatiche Se questo accade allontanare il monitor dall altoparlante L ingresso di segnale Per evitare danni al sistema di altoparlanti dovuti a un sovraccar...

Page 21: ... TV Flat Screen Pioneer alla TV Flat Screen 1 Fissaggio dei supporti agli altoparlanti Vi sono supporti superiori e inferiori per gli altoparlanti destro e sinistro Fissate i supporti appropriati alla parte superiore e inferiore del retro degli altoparlanti usando le viti in dotazione Mostra il fissaggio corretto del supporto sul lato destro Viene fissato sul lato sinistro seguendo la stesso procedi...

Page 22: ...dell altoparlante superiore sopra la vite abbassate l altoparlante su di essa 4 Regolate la posizione dell altoparlante quindi stringete bene la vite superiore e inferiore 5 Stringete le due viti nella parte superiore e inferiore per ogni altoparlante quattro viti in totale e fissate così gli altoparlanti alla TV Flat Screen 6 Fate passare il cavo dell altoparlante in dotazione tra l altoparlante e...

Page 23: ...sibile Controllate che le estremità dei cavi dell altoparlante siano collegate saldamente ai terminali tirando leggermente il cavo dopo aver effettuato i collegamenti In caso contrario potrebbero verificarsi interruzioni acustiche o rumore Se si verifica un cortocircuito tra i cavi e provocato da un filo di piombo scoperto una carica eccessiva potrebbe essere applicata alla TV Flat Screen provocando ...

Page 24: ...e ferme le leve quindi estraetelo dal foro NOTA Se un morsetto è stato installato da molto tempo vi saranno maggiori probabilità che si deteriori Un morsetto vecchio è più facilmente danneggiabile mentre viene tolto e non può essere riutilizzato Per l uso dell unità da parete NOTA Innanzitutto appoggiate la TV Flat Screen sulla parte superiore di un panno morbido ecc quindi attaccate i supporti de...

Page 25: ... inferiore destra BOTTOM R 1 Viti di montaggio per l altoparlante M5 10 mm 16 Istruzioni per l uso 1 NOTA I dati tecnici e il design sono soggetti a variazioni senza preavviso a seguito di ulteriori miglioramenti del prodotto MANUTENZIONE DELLA CASSA ESTERNA Per togliere sporco e polvere utilizzare un panno per lucidare o un normale panno asciutto Se la cassa esterna è molto sporca pulirla con un ...

Page 26: ...luidspreker Wees uitermate voorzichtig met de luidsprekers Het rooster en de behuizing zouden kunnen worden beschadigd wanneer het luidsprekersysteem aan schokken of stoten onderhevig wordt gesteld Wanneer u een computerscherm of monitor met een beeldbuis in de buurt van de luidspreker plaatst kan dit resulteren in beeldstoringen of kleurvervorming Als dit het geval is moet u het scherm op een gro...

Page 27: ...V aan de Flat Screen TV te worden bevestigd 1 Bevestiging van de Luidsprekerbeugels aan de Luidsprekers Er zijn boven en onderluidsprekerbeugels voor de linker en rechter luidspreker Bevestig de juiste beugels aan de boven en onderzijde aan de achterzijde van de luidsprekers d m v de meegeleverde schroeven De bevestiging van de beugel wordt aan de rechterzijde getoond De bevestiging aan de linkerz...

Page 28: ... van de luidsprekerbeugel bovenste gedeelte over de schroef is geschoven laat u de luidspreker erin zakken 4 Stel de positie van de luidspreker bij en draai vervolgens de bovenste en onderste schroeven stevig aan 5 Draai de twee schroeven boven en beneden aan voor elke luidspreker totaal vier schroeven zodat de luidsprekers op de Flat Screen TV worden vastgezet 6 Leid het meegeleverde luidsprekers...

Page 29: ...nde van de luidsprekersnoeren goed is aangesloten op de eindklemmen door enigszins aan het snoer te trekken nadat de aansluitingen zijn gedaan Door loszittende aansluitingen kan de verbinding worden verbroken of ruis ontstaan Indien er kortsluiting plaatsvindt in de en snoeren door een blootliggend netsnoer is het mogelijk de Flat Screen TV teveel belast wordt waardoor de bediening onderbroken wor...

Page 30: ...ening om het te verwijderen N B Hoe langer een klem op zijn plaats blijft zitten hoe groter de kans op slijtage Een oudere klem raakt sneller beschadigd wanneer deze wordt verwijderd zodat hij niet opnieuw gebruikt kan worden Indien de eenheid voor wandbevestiging wordt gebruikt N B Leg eerst de Flat Screen TV op een zachte doek of iets dergelijks en bevestig daarna de luidsprekers 1 Bevestig de l...

Page 31: ...reker M5 10 mm 16 Handleiding 1 OPMERKING Technische gegevens en ontwerp zijn ter productverbetering zonder voorafgaande kennisgeving wijzigbaar ONDERHOUD VAN DE BEHUIZING Veeg stof en vuil met een poetsdoek of droge schone doek van de behuizing Bevochtig een zachte doek in een oplossing van water en een neutraal reinigingsmiddel en wring de doek goed uit voor het verwijderen van hardnekkige vlekk...

Page 32: ... que la red de rejilla y la caja del altavoz pueden dañarse o romperse si se encuentran sujetos a fuertes impactos externos Si pone una pantalla TRC o un monitor TRC cerca del altavoz pueden producirse interferencias o distorsión del color En tal caso aleje el monitor del altavoz Acerca de la entrada Para evitar daños al sistema de altavoces como consecuencia de una sobrecarga de entrada tenga en ...

Page 33: ... pantalla plana de Pioneer 1 Cómo montar los soportes para los altavoces en los altavoces Hay soportes superiores e inferiores para el altavoz de la derecha y para el de la izquierda Utilice los pernos suministrados para montar los soportes adecuados en la parte superior e inferior de la cara posterior de los altavoces Seguidamente se indica cómo montar el soporte del lado derecho para montar el d...

Page 34: ...la parte más ancha del agujero del soporte para el altavoz parte superior baje el altavoz de modo que descanse sobre él 4 Ajuste la posición del altavoz y a continuación asegure firmemente los pernos superior e inferior 5 Apriete los dos pernos en la parte superior e inferior de cada altavoz un total de cuatro pernos De este modo fijará los altavoces al televisor de pantalla plana 6 Pase el cable de...

Page 35: ...en conectados a los terminales una vez que haya realizado la conexión tire suavemente de cada uno de los cables Si las conexiones han quedado algo flojas es posible que se ocasionen pérdidas de sonido o ruido Si se produce un cortocircuito en los cables y causado por un cable desnudo es posible que el televisor de pantalla plana reciba una carga excesiva lo que se traduciría en un funcionamiento in...

Page 36: ... y extráigala del orificio NOTA Cuanto más tiempo haga que se haya instalado una abrazadera más probabilidades habrá de que la misma se deteriore Una abrazadera antigua se dañará con mayor facilidad al extraerla y es posible que no se pueda utilizar de nuevo Si el televisor se instala en la unidad para colgar de la pared NOTA Primero disponga de forma horizontal el televisor de pantalla plana sobre...

Page 37: ...BOTTOM R 1 Pernos de fijación del altavoz M5 10 mm 16 Manual de instrucciones 1 NOTA Las especificaciones y el diseño están sujetos a posibles cambios sin previo aviso a efectos de mejorar el producto MANTENIMIENTO DE LA CAJA DEL ALTAVOZ Para quitar la suciedad y el polvo utilice un paño abrillantador o un paño seco Si la caja del altavoz está muy sucia límpiela con un paño humedecido con algún pro...

Page 38: ... 請勿使用附送螺絲以外的螺絲 否 則揚聲器可能會從本機脫開 甚至於掉落 安裝揚聲器時 請將螺絲擰緊 當揚聲器受到外部的影響時 請充分注意揚聲器的 處理 以免損壞護網和音箱 在揚聲器附近放置 CRT 電腦屏幕或 CRT 監視器可 能會導致干擾或色彩失真 如果出現這種情況 請 使監視器遠離揚聲器 關於輸入端子 為防止因輸入過載而導致揚聲器系統損壞 請務必 遵循以下注意事項 請勿將揚聲器用於指定的平面電視之外的設備 否 則可能導致損壞或火災 改變連接或安裝方法時 務必先將連接設備的電源 關掉 並將電線插頭從牆壁上的插座中拔出 使用音調控制功能來增強高音時 請勿將放大器音 量開得太大 檢查配件 揚聲器連接線 x 2 揚聲器固定裝置 左側上方 左側下方 右側上方 右側下方 揚聲器固定螺絲 M5 x 10 mm 黑色 16 操作手冊 安裝 如果安裝遇到困難 請與經銷商聯絡 對於因安裝不當 使用不當 更...

Page 39: ...線扣 紮線扣 紮線扣 紮線扣 揚聲器連接線 揚聲器固定螺絲 揚聲器固定螺絲 揚聲器固定裝置 右側上方 揚聲器固定裝置 右側下方 平面電視配件 使用桌上支架時 備註 安裝揚聲器前 請先安裝平面電視 KRP TS01 系列桌上支架 或其他先鋒平面電視支架 1 結合揚聲器及固定裝置 左右揚聲器各設有一組用以固定上下方的裝置 請將正確的固定裝置安裝到揚聲器背面的上及下方 並以隨附 的螺絲鎖上 圖例所示為右側固定裝置之安裝 相同步驟亦適用於左側之固定裝置 將揚聲器的端子 位於底部 朝向您 揚聲器固定裝置 右側上方 槽縫的用途為固定至頂端 揚聲器固定裝置 右側下方 揚聲器固定裝置 右側下方 揚聲器固定裝置 右側上方 螺絲孔 螺絲孔 ...

Page 40: ...的槽縫較寬的一端套 入剛鎖上的螺絲 並往下移動使其卡至 定位 且暫時鎖入下方螺絲 將揚聲器固定裝置 上方 槽縫較寬的一端套入 螺絲後 將揚聲器往下移動使其卡至定位 以隨附的螺絲 將揚聲器固 定裝置及平面電視 位於底 部 結合並暫時鎖上 將槽縫較寬的一端 穿過螺絲後 往下 移動揚聲器 4 調整揚聲器位置 然後鎖緊上下螺絲 5 鎖緊各揚聲器上下方的兩顆螺絲 共四 顆 如此便可將揚聲器固定到平面電視 上 6 將隨附的揚聲器連接線 從下方穿過揚 聲器及平面電視中間 位於揚聲器固定 裝置下方 7 將揚聲器連接線接上揚聲器 請見次頁 8 將連接線塞入揚聲器溝槽中 揚聲器連接線 揚聲器端子 塞入溝槽 9 將揚聲器連接線的另一端連接至平面電 視的後方 請參閱次頁 ...

Page 41: ...連接到端子處 如果連接過鬆 將可能導致音效接收 不穩定或出現雜音 若因引線外露致使 與 連接線短路 將可能造 成平面電視的嚴重負載 導致操作中斷或故障 揚聲器連接線若未依正確極性插入平面電視左 右 端子時 將可能導致立體聲音訊強度不足 造成重 低音品質不佳 或音效不穩 綑紮連接線時 請勿用力拉扯 將揚聲器連接線接至平面電視的 後方 請正確依照平面電視揚聲器端子的極性接上連 接線 例如 連接線 灰色 應接到 端 子 紅色 連接線 黑色 應接到 端 子 黑色 灰色 黑色 黑色 灰色 紅色 紅色 請正確地依照揚聲器端子的極性來接上 連接線 連接線 灰色 應接到 端子 紅色 連接線 黑色 應接 到 端子 黑色 把揚聲器連接線接上揚聲器 黑色 灰色 黑色 紅色 揚聲器端子 揚聲器端子 揚聲器連接線 揚聲器端子 為使圖示清楚 圖中並未顯示桌上支架 ...

Page 42: ...備註 整理或綑紮連接線時 請勿過度擠壓連接線 若要解開壓條 請鬆開卡筍 若要取下扎線扣 請壓住固定片 然後從孔中拉出 卡筍 固定片 固定片 備註 扎線扣材質可能隨時間經過而變質 解開後可能造成損 壞且無法重新使用 平面電視後方 揚聲器連接線 紮線扣 紮線扣 使用壁掛裝置時 備註 請先把平面電視放在軟墊之類的物品上 再進行安裝揚聲器 1 將揚聲器安裝到平面電視上 請參閱第 39 42 頁步驟 1 至 10 將其他連接線及電源線接至平面電視 2 把平面電視放置在壁掛裝置的固定裝置 上 詳情請參閱壁掛裝置所隨附的操作手冊 注意 若需抬起平面電視時 請勿持握揚聲器部位 揚聲器可 能因而鬆開 請持握平面電視本體的上 下部位 ...

Page 43: ... x 876 高 mm x 64 深 mm 重量 揚聲器 一個 1 75 kg 揚聲器 兩個 附連接線 固定裝置及螺絲 4 1 kg 附件 二個揚聲器 揚聲器連接線 2 揚聲器固定裝置 左側上方 TOP L 1 左側下方 BOTTOM L 1 右側上方 TOP R 1 右側下方 BOTTOM R 1 揚聲器固定螺絲 M5 10 mm 16 操作手冊 1 注意 因產品改進 規格和設計若有變更 恕不另行通知 機殼維護 使用拋光布或乾布來擦拭灰塵和污垢 當機殼很髒時 用軟布蘸取經水稀釋後的清潔劑進 行擦拭 然後再用乾布擦淨 請勿使用家具蠟或清 潔劑 否則會損壞機殼表面 切勿對機殼或在機殼附近使用稀釋劑 苯 殺蟲劑 以及其它化學製品 因為它們會腐蝕本機表面 當使用含化學製品的拭布時 請仔細閱讀該拭布的 注意事項 日本先鋒公司出版 版權 2008 日本先鋒公司 版權所有 ...

Page 44: ...оторые имеются в комплекте в противном случае громкоговоритель может отделиться от основного корпуса и упасть При установке громкоговорителя крепко завинтите винты Пожалуйста обращайтесь с громкоговорителем с надлежащей заботой так как защитная сетка и корпус могут повредиться или разбиться при сильном внешнем воздействии При расположении компьютерного экрана CRT или монитора CRT возле громоговори...

Page 45: ...визора с Плоским Экраном При использовании подставки столика ВНИМАНИЕ До того как крепить громкоговоритель пожалуйста прикрепите столик подставку модели KRP TS01 или другой столик подставку телевизора с Плоским Экраном Pioneer к телевизору с Плоским Экраном 1 Прикрепление держателей громкоговорителей к громкоговорителям Есть верхние и нижние держатели громкоговорителей как для левого так и для пра...

Page 46: ...менно закрепите нижний держатель громкоговорителя на телевизор с Плоским Экраном при помощи имеющегося в комплекте винта одно место внизу Продев широкую часть отверстия через винт опустите громкоговоритель 4 Настройте положение громкоговорителя и затем плотно завинтите верхние и нижние винты 5 Завинтите два винта наверху и внизу каждого громкоговорителя всего четыре винта таким образом прикрепив г...

Page 47: ... нагрузкой что может привести к прекращению функционирования или неисправной работе Неправильные подсоединения кабеля громкоговорителя к правой или левой стороне терминалов телевизора с Плоским Экраном по полярности может привести к недостаточным эффектам стереозвука плохим нижним звуковым частотам или нестабильному звуковому образу Смотайте кабель не натягивая его Соединение кабелей громкоговорит...

Page 48: ...жим тем больше вероятность его износа Более старый зажим легче повреждается при снятии и может быть непригоден для повторного использования Задняя часть телевизора с Плоским Экраном Кабель громкоговорителя Кабельный зажим Кабельный зажим При использовании настенного устройства ВНИМАНИЕ Сначала поставьте телевизор с Плоским Экраном на мягкую поверхность и т д затем прикрепите держатели громкоговори...

Page 49: ...ерхнего левого TOP L 1 для нижнего левого BOTTOM L 1 для верхнего правого TOP R 1 для нижнего правого BOTTOM R 1 Винты для установки громкоговорителей M5 10 мм 16 Инструкции по эксплуатации 1 ВНИМАНИЕ Спецификации и конструкции могут быть модифицированы без предупреждения вследствие усовершенствований УХОД ЗА КОРПУСОМ Используйте ткань для полировки или сухую ткань для стирания пыли и грязи Когда ...

Page 50: ......

Reviews: