background image

3

En

En
g

lis

h

To avoid shorts in the electrical system, 
be sure to disconnect the (–) battery 
cable before installation.

 WARNING

When speaker output is used by 4 
channels , use speakers over 50 W 
(Maximum input power) and between 4 
Ω to 8 Ω (impedance value).  Do not use 1 
Ω to 3 Ω speakers for this unit.

When rear speaker output is used by 2 Ω 
of subwoofer, use speakers over 70 W 
(Maximum input power).
*Please refer to connection for a 
connection method.

The black cable is ground. When 
installing this unit or power amp (sold 
separately), make sure to connect the 
ground wire first. Ensure that the ground 
wire is properly connected to metal parts 
of the car’s body. The ground wire of the 
power amp and the one of this unit or 
any other device must be connected to 
the car separately with different screws. If 
the screw for the ground wire loosens or 
falls out, it could result in fire generation 
of smoke or malfunction.

When replacing the fuse, be sure to only 
use a fuse of the rating prescribed on this 
product.

This product cannot be installed in a 
vehicle without ACC (accessory) position 
on the ignition switch.

To avoid short-circuiting, cover the 
disconnected lead with insulating tape. It 
is especially important to insulate all 
unused speaker leads, which if left 
uncovered may cause a short circuit.

For connecting a power amp or other 
devices to this product, refer to the 
manual for the product to be connected.

The graphical symbol 

 placed on 

the product means direct current.

When the ignition switch is turned on 
(ACC ON), a control signal is output 
through the blue/white lead. Connect to 
an external power amp’s system remote 
control terminal, the auto-antenna relay 
control terminal, or the antenna booster 
power control terminal (max. 300 mA 12 
V DC). The control signal is output 
through the blue/white lead, even if the 
audio source is switched off.
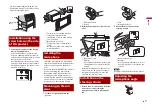
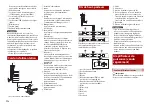
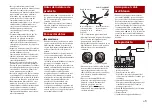
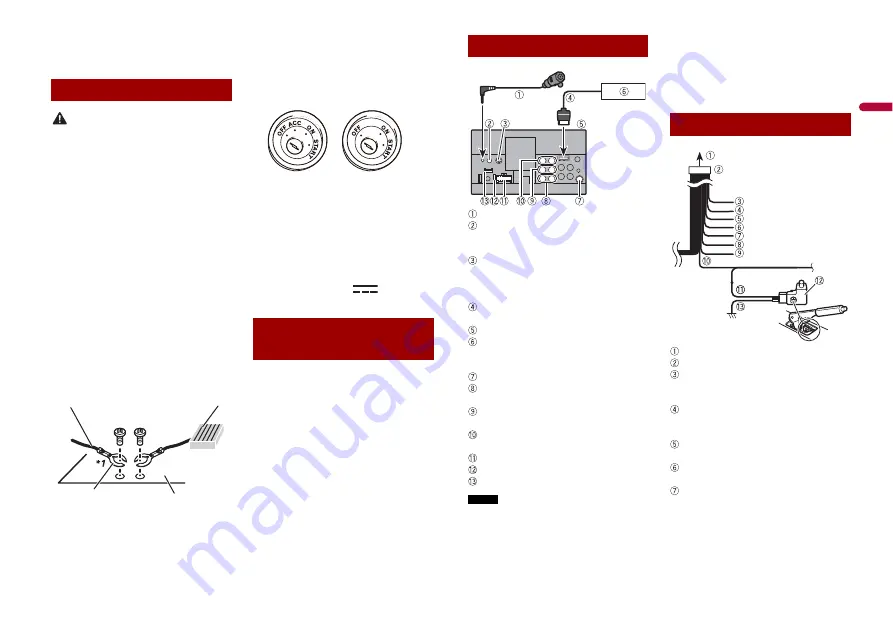
To prevent damage

Ground wire

POWER AMP

Other devices 
(Another electronic 
device in the car)

Metal parts of car’s 
body

*1 Non supplied for this unit

Notice for the blue/
white lead

ACC position

No ACC position

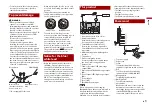
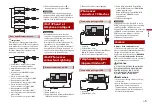
 Microphone 3 m (9 ft. 10-1/8 in.)
 Wired remote input

Hard-wired remote control adapter can 
be connected (sold separately).

 SiriusXM Connect Vehicle Tuner

Refer to the instruction manual for 
SiriusXM Connect Vehicle Tuner (sold 
separately).

 RGB cable (supplied with Navigation 

system)

 This product
 Pioneer navigation system

Contact your dealer to inquire about 
the connectable navigation unit.
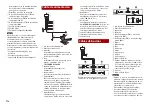
 Antenna jack
 Subwoofer output (STD)/Low range 

output (NW)

 Rear output (STD)/Middle range output 

(NW)

 Front output (STD)/High range output 

(NW)

 Power supply
 Fuse (10 A)
 iDatalink adapter input
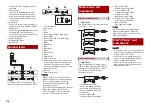
NOTE

Before using and/or connecting the 
iDatalink Maestro adapter, you will need to 
first flash the Maestro module with the 
appropriate vehicle and head unit 
firmware. You can find the device number 

that is required for the activation on the 
followings (refer to the Operation Manual.):

The label on the packaging of this 
product

The label on this product

The[Firmware Information] screen
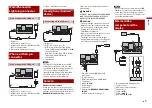
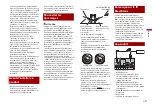
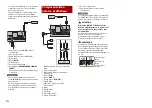
 To power supply
 Power cord
 Yellow

To terminal supplied with power 
regardless of ignition switch position.

 Red

To electric terminal controlled by 
ignition switch (12 V DC) ON/OFF

 Orange/white

To lighting switch terminal.

 Black (ground)

To vehicle (metal) body.

 Violet/white

Of the two lead wires connected to the 
back lamp, connect the one in which 
the voltage changes when the gear shift 
is in the REVERSE (R) position. This 
connection enables the unit to sense 

This product

Power cord

Summary of Contents for MVH-AV251BT

Page 1: ...English Français Español MVH AV251BT RDS AV RECEIVER AUTORADIO MULTIMÉDIA RDS AV RECEPTOR RDS Installation Manual Manuel d installation Manual de instalación ...

Page 2: ...nterior WARNING Pioneer does not recommend that you install this product yourself This product is designed for professional installation only We recommend that only authorized Pioneer service personnel who have special training and experience in mobile electronics set up and install this product NEVER SERVICE THIS PRODUCT YOURSELF Installing or servicing this product and its connecting cables may ...

Page 3: ... the auto antenna relay control terminal or the antenna booster power control terminal max 300 mA 12 V DC The control signal is output through the blue white lead even if the audio source is switched off To prevent damage Ground wire POWER AMP Other devices Anotherelectronic device in the car Metal parts of car s body 1 Non supplied for this unit Notice for the blue white lead ACC position No ACC ...

Page 4: ...his product is monaural For details refer to the Operation Manual With a two speaker system do not connect anything to the speaker leads that are not connected to speakers Speaker leads Important The speaker leads are not used when this connection is in use Important Front speaker and Rear speaker signals STD or middle range speaker and high range speaker signals NW are output from the speaker lea...

Page 5: ...onnector Connecting via the USB port Smartphone Android device Connecting via the USB port Camera allows you to check what is behind you while driving WARNING USE INPUT ONLY FOR REVERSE OR MIRROR IMAGE REAR VIEW CAMERA OTHER USE MAY RESULT IN INJURY OR DAMAGE CAUTION The screen image may appear reversed With the rear view camera you can keep an eye on trailers or back into a tight parking spot Do ...

Page 6: ...may work loose and the product may become detached Do not install this product where it may i obstruct the driver s vision ii impair the performance of any of the vehicle s operating systems or safety features including airbags hazard lamp buttons or iii impair the driver s ability to safely operate the vehicle Never install this product in front of or next to the place in the dashboard door or pi...

Page 7: ... Depending on the vehicle model the microphone cable length may be too short when you mount the microphone on the sun visor In such cases install the microphone on the steering column 1 Fit the microphone lead into the groove Installation using the screw holes on the side of this product Leave ample space 5 cm 5 cm Installing the microphone Mounting on the sun visor Microphone lead Groove 2 Attach...

Page 8: ...re de votre véhicule Respectez toujours les règles de conduite sécuritaire et toute la réglementation routière en vigueur Si vous avez du mal à utiliser ce produit stationnez votre véhicule dans un emplacement sûr et engagez le frein de stationnement avant d effectuer les réglages nécessaires N installez pas ce produit là où il risque i de gêner la vision du conducteur ii d affecter le fonctionnem...

Page 9: ...appareil ou d un amplificateur de puissance vendu séparément pensez à connecter d abord le fil de masse Assurez vous que le fil de masse est bien connecté à une partie métallique de la carrosserie du véhicule Le fil de masse de l amplificateur de puissance et celui de cet appareil ou de tout autre dispositif doivent être connectés au véhicule séparément avec des vis différentes Si la vis du fil de...

Page 10: ...o Mute de l équipement Autrement ne connectez rien au fil Audio Mute Bleu blanc Connectez le à la borne de commande de système de l amplificateur de puissance max 300 mA 12 V c c Vert pâle Ce fil sert à détecter si le frein de stationnement est engagé ou non Ce fil doit être connecté du côté alimentation du commutateur de frein de stationnement Côté alimentation Commutateur de frein de stationneme...

Page 11: ...iPod iPhone et téléphone intelligent iPod iPhone avec connecteur Lightning Connexion par le port USB iPhone avec connecteur Lightning Port USB Câble USB de 1 5 m Câble d interface USB pour iPod iPhone CD IU51 vendu séparément iPhone avec connecteur 30 broches Port USB Câble USB de 1 5 m Câble USB micro USB Type USB A micro USB B fourni avec CD MU200 vendu séparément Câble USB Type C Type USB A USB...

Page 12: ...rément Ce produit Jaune V IN Jaune V OUT Rouge blanc R IN L IN Entrée AUX Câble AV à mini prise vendu séparément Jaune Rouge blanc Vers jaune Vers rouge blanc Vers la sortie vidéo Composant vidéo externe et afficheur Vers les sorties audio Composant vidéo externe vendu séparément REMARQUE Le réglage adéquat est requis pour utiliser le composant vidéo externe Pour plus de détails reportez vous au M...

Page 13: ...e Emplacements près de la chaufferette des évents ou du climatiseur Emplacements exposés aux rayons directs du soleil comme le dessus du tableau de bord Emplacements pouvant être exposés à la pluie comme près d une portière ou sur le plancher du véhicule Installez ce produit à l horizontale avec une tolérance de 0 à 30 degrés sans dépasser 5 degrés sur la gauche ou sur la droite L installation ina...

Page 14: ... reconnaître la voix du conducteur si le pare soleil est en position basse 1 Détachez la base de microphone de l attache de microphone en glissant la base tout en appuyant sur la languette Languette Base de microphone 2 Montez le microphone sur la colonne de direction Ruban à double face adhésive Serre câbles Utilisez les serre câbles vendus séparément pour fixer le fil à l intérieur du véhicule s...

Page 15: ...9 Fr Français ...

Page 16: ...a opción de la cámara de visión trasera en caso de haberla adquirido si al hacerlo se distraerá de alguna forma y no podrá manejar su vehículo con seguridad Siempre respete las reglas para conducir con seguridad y el reglamento de tráfico vigente Si enfrenta dificultades al usar este producto deténgase estacione su vehículo en un lugar seguro y accione el freno de mano antes de realizar los ajuste...

Page 17: ...70 W entrada máxima de potencia Consulte la sección relativa a la conexión para conocer el método correcto El cable negro es la tierra Al instalar esta unidad o un amplificador de potencia se vende por separado asegúrese de conectar primero el cable de tierra Asegúrese de que el cable de tierra esté conectado correctamente a las piezas metálicas de la carrocería del vehículo El cable de tierra del...

Page 18: ...é moviendo hacia adelante o hacia atrás Amarillo negro Si utiliza un equipo con la función de Supresión de Audio conecte este cable Cable de alimentación al cable de Supresión de Audio de dicho equipo De lo contrario no conecte el cable de Supresión de Audio Azul blanco Conéctelo al terminal de control del amplificador de potencia del sistema máx 300 mA 12 V cc Verde claro Se utiliza para detectar...

Page 19: ...al de operación Para obtener información detallada sobre la conexión y las operaciones del teléfono inteligente consulte el Manual de operación Amplificador de potencia se vende por separado Sin amplificador interno Con amplificador interno iPod iPhone y teléfono inteligente Puerto USB Cable USB de 1 5 m Cable de interfaz USB para iPod iPhone CD IU52 se vende por separado iPhone con conector Light...

Page 20: ...olo la cámara de visión trasera a R C IN No conecte ningún otro equipo Se necesitan algunos otros ajustes adecuados para utilizar las cámaras de visión trasera Para obtener información detallada consulte el Manual de operación Visualización trasera con conectores de entrada RCA A la entrada de video Cables RCA se vende por separado Este producto Amarillo V IN Amarillo V OUT Rojo blanco R IN L IN E...

Page 21: ...mo Lugares cercanos a un calefactor conducto de ventilación o aire acondicionado Lugares expuestos a la luz solar directa por ejemplo arriba del tablero Lugares que podrían estar expuestos a la lluvia por ejemplo cerca de la puerta o en el piso del vehículo Instale este producto de forma horizontal sobre una superficie con una tolerancia de entre 0 y 30 grados no más de 5 grados de izquierda derec...

Page 22: ...ófono en el parasol cuando el parasol esté plegado hacia arriba No puede reconocer la voz del conductor si el parasol está abajo 1 Desconecte la base del micrófono de su clip deslizando la base a la vez que presiona la lengüeta Lengüeta Base del micrófono 2 Monte el micrófono en la columna de dirección Cinta de doble cara Abrazaderas Utilice abrazaderas que se venden por separado para fijar el cab...

Page 23: ...9 Es Español ...

Page 24: ... 2018 PIONEER CORPORATION All rights reserved 2018 PIONEER CORPORATION Tous droits de reproduction et de traduction réservés QRD3635 A UC ...

Reviews: