- 3 -
English
WARNING
This product contains chemicals known to
the State of California and other
governmental entities to cause cancer and
birth defects or other reproductive harm.
Wash hands after handling.
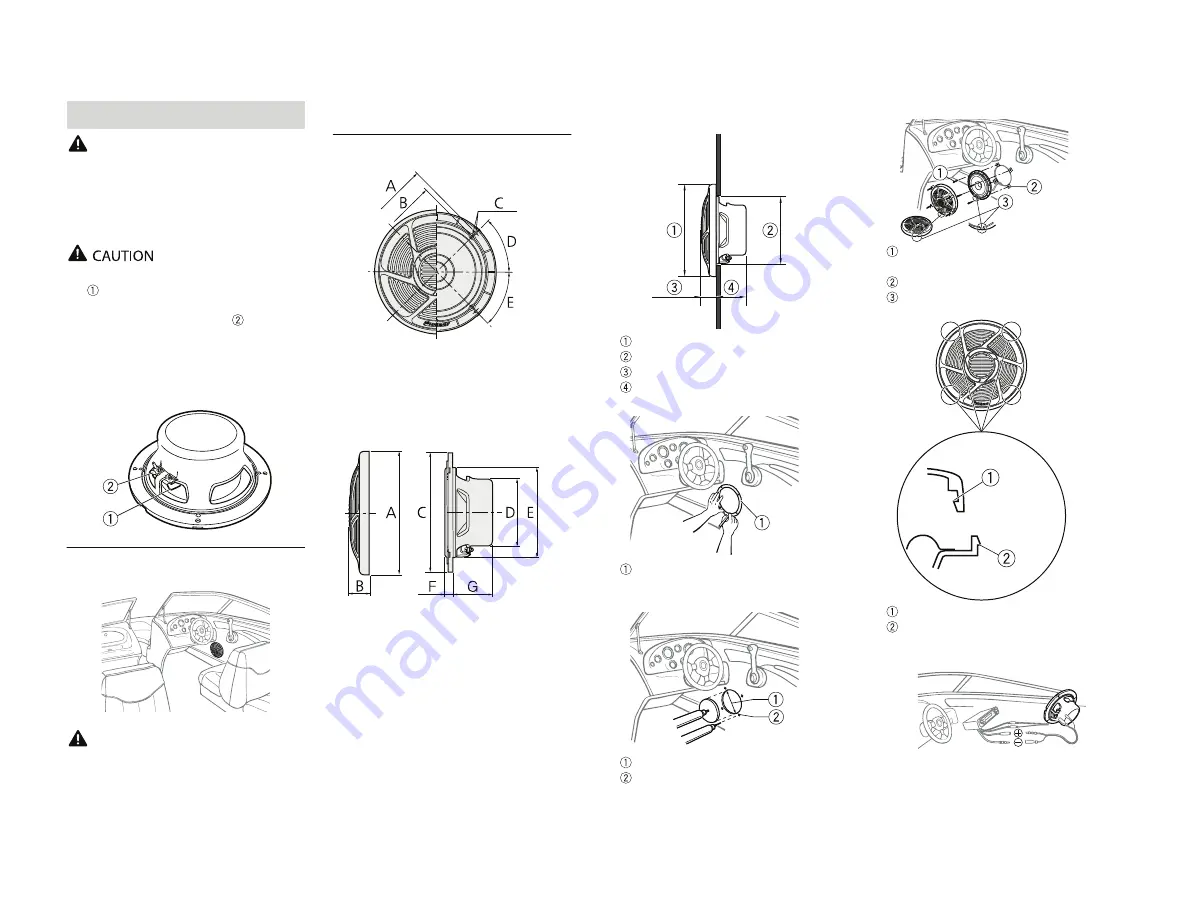
Example of mounting
CAUTION
Be sure to install at a place having no
possible problem with the boat's safety.
Consult your dealer on method of
installation.
Speaker installation
Parts included
Tapping
-
screws (ф 4 mm ×
3
0 mm) × 8
Speed nut × 8
1
2
3
4
Do not touch the speaker flexible wire
.
Do not change the direction of the
speaker terminal assembly
.
Make sure lead and speaker terminals do
not contact metal.
When making connections, refer also to
the instruction manual of the marine
stereo used.
Front
A
B
C
D
E
ф 156 mm (6
-
1/8 in. Dia.)
ф 142 mm (5
-
5/8 in. Dia.)
8
-
ф 4.5 mm holes (
3
/16 in. Dia.)
45°
45°
Side
A
B
C
D
E
F
G
ф 175 mm (6
-
7/8 in. Dia.)
28 mm (1
-
1/8 in.)
ф 168 mm (6
-
5/8 in. Dia.)
ф 94 mm (
3-3
/4 in. Dia.)
ф 127 mm (5 in. Dia.)
11 mm (1/2 in.)
56 mm (2
-
1/4 in.)
1
Determine the location of the speaker as
illustrated.
2
Make holes as illustrated.
3
Install the speakers as illustrated.
4
Connect to the unit.
ф 175 mm (6
-
7/8 in. Dia.)
ф 1
3
0 mm (5
-
1/8 in. Dia.)
28.5 mm (1
-
1/8 in.)
56 mm (2
-
1/4 in.)
Stencil
ф 1
3
0 mm (5
-
1/8 in. Dia.)
ф 4.5 mm (
3
/16 in. Dia.)
Tapping
-
screws (ф 4 mm ×
3
0
mm)
Speed nut
Drain hole
The inside concave
The convex


