113
How to mount standard optional items (PDK-5008/PDK-5008FT)
5
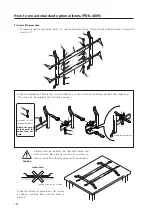
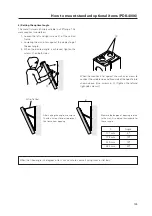
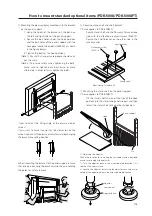
Mounting the plasma display mounted with the bracket
on the panel support
1. Hang the hooks of the bracket on the bolts on
the left and right sides of the panel support.
2. Secure the bolt holes under the hook portions
and the bolt holes of the panel support with the
hexagonal socket head bolts (M8X20) as shown
in the figure below.
3. Tighten the bolts at the hook portions.
(Note 1) Ensure that two or more people should carry
out this work.
(Note 2) To ensure safety when tightening the bolts,
make sure to tighten each bolt twice or more
alternately in order to firmly tighten the bolts.
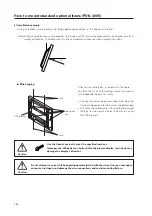
6
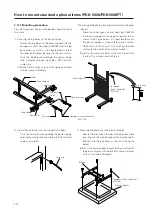
Securing stand shelf and shelf bracket
(*Same applies to PDK-5008FT)
Secure stand shelf and shelf bracket fixture on one
side with the attached ornament screw (M6X12).
Secure the shelf bracket on the other side in the
same manner.
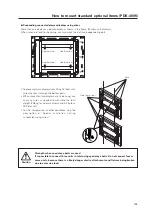
7
Mounting the stand shelf on the panel support
(*Same applies to PDK-5008FT)
Tilt the stand shelf and insert the tips of the hook
portions into the slits on the panel support, and then
return the stand shelf to the horizontal position.
1.3
2
1.3
''How to adjust the tilting angle of the plasma display
screen''
If you want to make it easier for the viewer to see the
screen, you can tilt the plasma display forward by changing
the bracket mounting position.
When mounting the bracket to the panel support, ensure
that two persons hang the bracket while they are holding
the poles for safety reasons.
5˚
0˚
Shelf bracket
Ornament screw
(M6 X 12)
Rear view of stand shelf
Stand shelf
Hook
Slit
Panel support
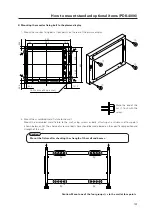
8
Adjusting the adjuster
When the location for installing the carryable stand is decided,
make sure to adjust the adjuster.
1) Turn the adjuster base in the arrow-pointed direction till it
touches the floor surface.
2) Secure the adjuster by turning the adjuster securing nut lo-
cated at the upper portion in the arrow-pointed direction.
Adjuster
securing nut
Adjuster base
Summary of Contents for PDK-5008
Page 5: ...5 Features ...
Page 11: ...11 Remote control ...
Page 21: ...21 Installation procedure ...
Page 57: ...57 Special installation Installation under the floor ...
Page 85: ...85 How to mount standard optional items PDK 4001 ...
Page 91: ...91 How to mount standard optional items PDK 4002 ...
Page 97: ...97 How to mount standard optional items PDK 4004 ...
Page 115: ...115 How to mount standard optional items PDK 5008 PDK 5008FT ...
Page 153: ...153 How to mount standard optional items Precautions for installing the optional speaker ...
Page 161: ...161 Before making adjustments ...


