background image

9

En

English

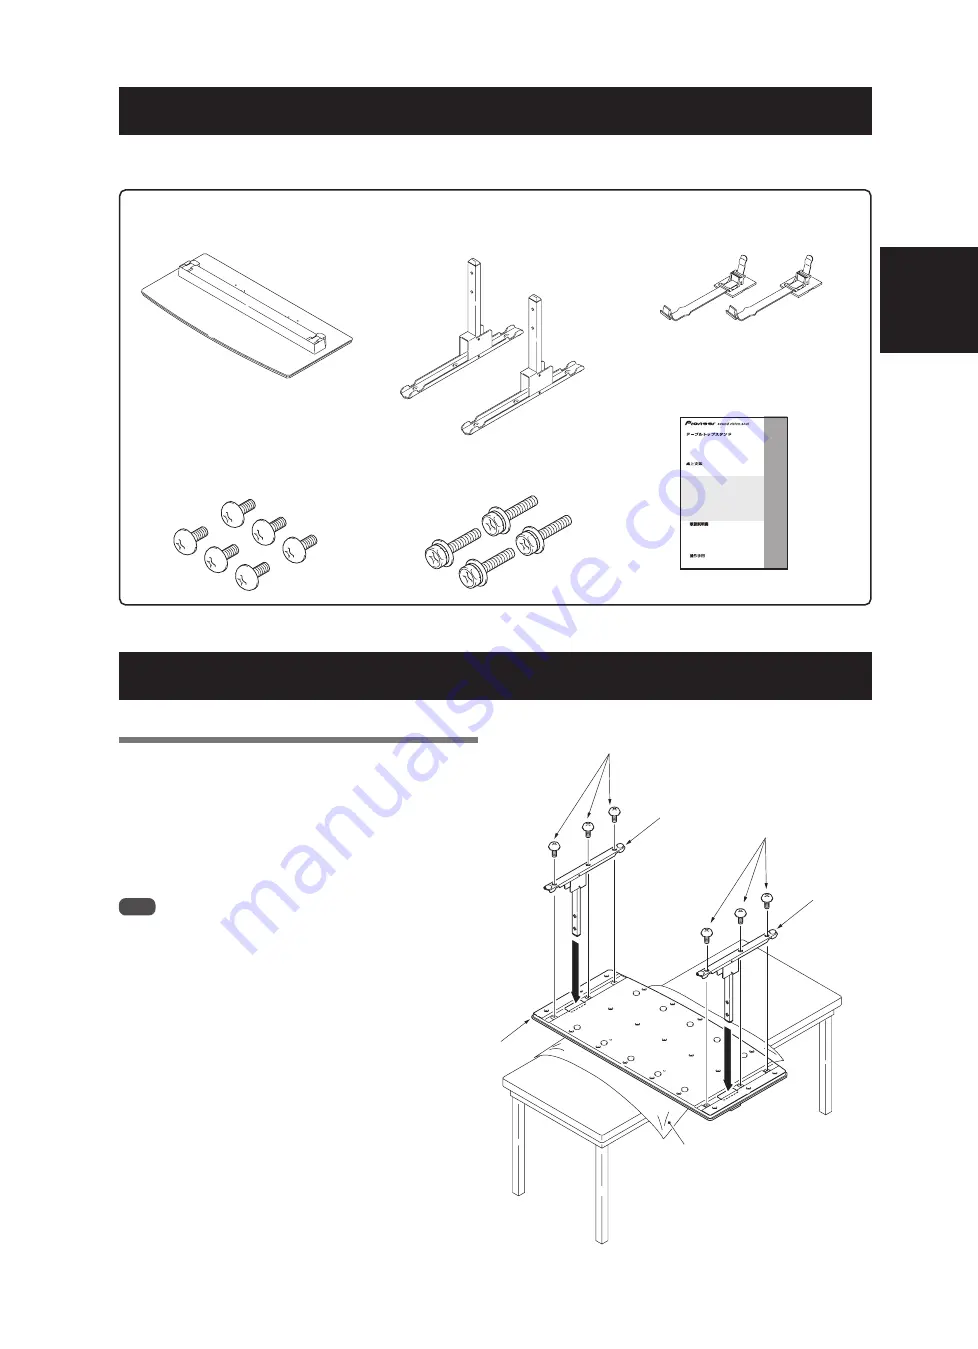
Checking the Standard Accessories

Check to make sure that you have all the standard accessories before assembly and installation.
• Note that a Phillips screwdriver (not included) is required for assembly.


Base cover x 1

Stand pipes

(left and right, interchangeable)  x 2


Screws

   (M5 x 10 mm: silver) x 6

Installation bolts

   (M6 x 20 mm: black) x 4

Operating instructions

   (this document) x 1

Assembling the Stand

Base cover

Screws
(M5 x 10 mm: silver)

Stand pipe

Stand pipe

Assembly Procedure

1

Turn the base cover over so the underside
is facing up.

2

Insert the stand pipes into the base cover.

3

Tighten the screws to stabilize the stand
pipes.

Note

Assemble the stand with a soft sheet placed under the base
cover.
If a sheet is not laid before assembly, the front surface of the

base cover may be scratched.

Cable clamps x 2

Operating instructions
Mode d’emploi
Bedienungsanleitung
Istruzioni per l’uso
Gebruiksaanwijzing
Manual de instrucciones

Table top stand
Support de couverture de table
Tischständer
Supporto di tavolo
Tafelbladstaander
Soporte de mesa

PDK-TS15

Screws
(M5 x 10 mm: silver)

Sheet

Summary of Contents for PDK-TS15

Page 1: ...structions Mode d emploi Bedienungsanleitung Istruzioni per l uso Gebruiksaanwijzing Manual de instrucciones Table top stand Pied de table Tischständer Supporto di tavolo Tafelbladstaander Soporte de mesa PDK TS15 ...

Page 2: ...弊社製プラズマテレビPDP 607HX専用のテーブ ルトップスタンドです その他の機器への取り付けに関しては対応しておりません 詳しくは お買い求めの販売店にご相談ください もくじ 取扱上の注意 2 同梱された部品の確認 3 スタンドの組み立て 3 プラズマテレビの取り付け方 4 テレビ台などに設置する場合 4 ケーブルのまとめ方 5 転倒防止 6 プラズマテレビをスタンドから取り外す場合 7 仕 様 7 寸法図 7 指定外のプラズマテレビへの取り付け 改造および 他の用途への使用はしないでください 取り付けなどに不具合があると転倒などの事故につ ながり大変危険です 設置場所について 設置場所にはスタンドとプラズマテレビの質量に十 分耐えられる強度をもつ場所を選定してください 必ず平坦で安定した場所に設置してください 屋外や温泉 海辺などの水場には設置しないでくだ さい 振動や衝撃の加わる...

Page 3: ...を行わないと ベースカバーの表面をキズ つける恐れがあります ベースカバー 1 スタンドパイプ L R 共通 2 ねじ M5 10 mm シルバー 6 取付ボルト M6 20 mm 黒 4 取扱説明書 本書 1 ケーブルクランパ 2 ベースカバー スタンドパイプ スタンドパイプ ねじ M5 10 mm シルバー ねじ M5 10 mm シルバー Operating instructions Mode d emploi Bedienungsanleitung Istruzioni per l uso Gebruiksaanwijzing Manual de instrucciones Table top stand Support de couverture de table Tischständer Supporto di tavolo Tafelbladstaander Soporte ...

Page 4: ...り 奥行きがなく 不安定なため 取り付けおよび設置は必ず 2 人以上で 行ってください 2 取付ボルトでプラズマテレビを固定する プラスドライバーを使用して 本体取付部を固定してく ださい テレビ台などに設置する場合 プラズマテレビを取り付けた本製品をテレビ台などに移動 設置する場合は 下記の点にご注意ください テレビ台などに設置する場合は 必ず2人でプラズマテ レビを持ってください 移動時のご注意 長い距離の移動をする際は 先にスピーカーを取り外 し 次にプラズマテレビ本体もスタンドから取り外 し 別々に移動してください プラズマテレビをスタンドから取り外す場合は 事故を 防止するために プラズマテレビをスタンドから取り外 す場合 7 ページ の手順を必ず守ってください 注意 設置上のご注意 テーブルトップスタンドの前側および後側は 必ず下図の指 示以上のスペースを確保して設置してくださ...

Page 5: ...取付穴にケーブルクランパを 差し込む 2 ケーブル類をまとめて ケーブルクランパの上 に置く 3 ケーブルクランパを閉じてから ケーブルク ランパの先端を引っ張って ケーブルを固定 する ケーブルクランパ ケーブルクランパ 取付穴 ケーブルクランパの緩め方 ケーブルクランパをきつく し過ぎたときは 左図のボ タンを押し ケーブルクラ ンパの先端を押して 緩め ます ボタン ケーブルクランパの開き方 指先でロックを 外します テレビ台などに設置する場合 テレビ台などに設置する際のご注意 スピーカーを持たないでください プラズマテレビの下部の取っ手と側面上部を 持ってください 注意 テレビ台などに設置する際は プラ ズマテレビの下部の取っ手と側面上 部を持ってください スピーカーを 持つと変形 破損の原因となります ...

Page 6: ...していませ ん 市販品をご使用ください テレビ台などに固定する方法 市販のねじを使って図のように固定してください ご注意 本機はかなり重量がありますので 設置するテレビ台はこの重 さに耐えられる堅牢なもので かつ十分な幅と奥行きがあり 転倒しない台を使用してください 市販のねじを使用するときは テレビ台の材質に合った 直径 6 mmのねじをご用意ください ねじの種類についてはお買い 上げの販売店や工事店にご相談ください 20 mm以上 6 mm 9 mm 15 mm 固定ねじ取付位置 単位 mm 95 300 585 375 本機は大型でかなり重量がありますので 転倒した場合 けがや事故の原因となる恐れがあります 安全にご使用いただくために 設置後は必ず転倒防止の処置をしてください 側面図 4 1 転倒防止用ボルト プラズマテレビ付属品 2 ヒモ 取付具 ...

Page 7: ...単位 mm プラズマテレビをスタンドから取り外す場合 1 あらかじめ平らな床などにプラズマテレビを寝 かせるスペースを作り キズおよび破損が生じ ないようにシートを敷く 2 スピーカーを取り外す 3 プラズマテレビの取り付け方 4ページ の手 順 2を参照し 取付ボルト 4 本 を外す 4 プラズマテレビの下部の取っ手と側面上部を 持って ゆっくり垂直に持ち上げる 5 手順1で用意したシートの上に 画面を下側に して静かに置く プラズマテレビをスタンドから取り外す場合は 事故を 防止するために以下の手順を必ず守ってください 注意 24 118 41 51 5 967 1000 211 60 1043 192 5 470 1470 ...

Page 8: ...it or use it for other purposes Improper installation is extremely dangerous because it may result in it falling over or other accident Installation Location Select a location that is strong enough to support the weight of the stand and the displays Make sure to place it in a level and stable location Do not install it outdoors at a hot spring or near a beach Do not install the stand where it may ...

Page 9: ...tand pipe Stand pipe Assembly Procedure 1 Turn the base cover over so the underside is facing up 2 Insert the stand pipes into the base cover 3 Tighten the screws to stabilize the stand pipes Note Assemble the stand with a soft sheet placed under the base cover If a sheet is not laid before assembly the front surface of the base cover may be scratched Cable clamps x 2 Operating instructions Mode d...

Page 10: ...Be sure to install it on a flat stable location Insert the screws in the holes vertically and tighten them firmly Installing the Product on a TV table etc Be sure to observe the following precautions when moving or installing this product with a Plasma Display into a TV table or other enclosure When installing on a TV table etc please be sure that the Plasma Display is held by two people Precautio...

Page 11: ...on 3 Close each cable clamp and then pull its extremity to make the cables immobile Opening a cable clamp Unlock here with a finger Cable clamps Cable clamp mounting holes 1 Insert the cable clamps into the cable clamp mounting holes Do not hold the speaker Hold the Plasma Display by the handle at the bottom with your other hand hold the top When installing in a TV table or other enclosure hold th...

Page 12: ... diameter 6 mm 1 4 inch with a length above 20 mm 13 16 inch Unit mm inch Preventing Equipment from Falling Over A table or an area of the floor with adequate strength should always be used to support the Plasma Display Failure to do so could result in personal injury and physical damage When installing the Plasma Display please take the necessary safety measures to prevent it from falling or over...

Page 13: ... procedure described below to prevent accidents 1 First clear a space on a flat floor etc where you can lay the Plasma Display flat then lay a sheet to protect it from scratches or other damage 2 Remove the speakers 3 Referring to step 2 in Attaching the Plasma Display Page 10 remove the installation bolts 4 screws 4 Holding the Plasma Display by its handles at the bottom with your other hand hold...

Page 14: ...ident Lieu d installation Sélectionnez un emplacement assez solide pour supporter le poids du support et de l écran Assurez vous de placer le produit à un emplacement stable et plat N installez pas le support à l extérieur à proximité d une source thermale ou sur une plage N installez pas le support à un endroit où il pourrait être soumis à des chocs ou à des vibrations Montage et installation Mon...

Page 15: ...st nécessaire pour assembler le support de base Couverture de table x 1 unité Colonnes de support gauche et droite interchangeables x 2 unités Vis M5 x 10 mm argentée x 6 unités Vis d installation M6 x 20 mm noir x 4 unités Mode d emploi ce document x 1 exemplaire Assemblage du support Vis M5 x 10 mm argentée Colonne de support Procédure de montage 1 Tournez le pied de table de façon à ce que le d...

Page 16: ...s de suivre la procédure décrite dans la partie Démontage de l écran à plasma du support à la page 19 Attention Attention Remarque Montez toujours l écran à plasma sur une surface plane et stable Introduisez les vis à la verticale et serrez les fort Méthode de fixation 1 Installation de l écran à plasma sur le support Mettez les colonnes de soutien en place au bas de l écran à plasma comme indiqué...

Page 17: ...obiliser les câbles Ouvrir un collier de câble Un geste du doigt suffit à tout relâcher Colliers de câble Trous de montage des colliers de câble 1 Insérez les colliers de câble dans les trous de montage destinés à cet effet Ne tenez pas l enceinte Prenez l écran plasma par la poignée située au dessous et tenez le par le haut de l autre main En cas d installation dans un meuble de télévision ou aut...

Page 18: ...amment solide large et profond Sans cela il risquerait de tomber Pour stabiliser l écran à plasma sur un meuble de télévision utilisez des vis de 6 mm de diamètre nominal Pour sélectionner les vis consultez si nécessaire un installateur professionnel Après avoir installé le support veillez à prendre les précautions nécessaires pour qu il ne tombe pas Prévenir toute chute de l équipement Choisissez...

Page 19: ...hapitre Installation et fixation de l écran à plasma page 16 retirez les 4 boulons 4 Tout en le tenant par les poignées qui sont situées dessous placez l écran à la verticale 5 Placez l écran à plasma avec soin sur la feuille citée lors de l étape 1 l écran regardant vers le bas Attention Caractéristiques techniques Dimensions extérieures 1000 mm largeur x 309 mm hauteur x 470 mm profondeur Poids ...

Page 20: ... Installation einen Platz der stabil genug ist das Gewicht des Tischständers und des Displays zu tragen Sorgen Sie dafür dass der Ständer und das betreffende Display auf einem ebenen und stabilen Platz installiert werden Installieren Sie beides nicht im Freien in der Nähe einer heißen Quelle oder in Strandnähe Installieren Sie die Einheit nicht an einem Platz an dem sie möglicherweise Vibrationen ...

Page 21: ...h ist Basisabdeckung x 1 Ständerelemente links und rechts austauschbar x 2 Schrauben M5 x 10 mm silberfarben x 6 Installationsschrauben M6 x 20 mm schwarz x 4 Bedienungsanleitung das vorliegende Dokument x 1 Montage des Tischständers Montage 1 Drehen Sie die Basisabdeckung um so dass die Unterseite nach oben zeigt 2 Führen Sie Ständerelemente in die Basisabdeckung ein 3 Ziehen Sie die Schrauben fe...

Page 22: ...wenn Sie das Plasmadisplay vom Ständer demontieren unbedingt so wie es auf Seite 25 in Demontieren des Plasmadisplays vom Ständer beschrieben ist Vorsicht Befestigungsmethode 1 Befestigen des Plasmadisplays am Ständer Passen Sie die Stützsäulen des Tischständers auf der Unterseite des Plasmadisplays an wie es in der Abbildung unten dargestellt ist und führen Sie sie dann langsam vertikal ein Achte...

Page 23: ...l zu fixieren Öffnen eines Kabelfixierers Entriegeln Sie hier mit einem Finger Kabelhalterungen Montageöffnungen für Kabelhalterungen auszuüben 1 Führen Sie die Kabelhalterungen in die dafür vorgesehenen Montageöffnungen ein Halten Sie die Einheit nicht am Lautsprecher fest Halten Sie das Plasmadisplay an dem unten befindlichen Handgriff während Sie mit der anderen Hand die Oberseite festhalten Ha...

Page 24: ...s nicht beachtet wird könnte das Plasmadisplay umstürzen Verwenden Sie zur Stabilisierung des Plasmadisplays auf einem Fernsehtisch Schrauben mit einem Nenndurchmesser von 6 mm Wählen sie die geeigneten Schrauben wenn erforderlich nach Konsultation eines versierten Monteurs Verwenden Sie bei der Installation des Tischständers besonderes Augenmerk darauf zu verhindern dass die Einheit umfallen kann...

Page 25: ...hritt 2 unter Montieren des Plasmadisplays Seite 22 die Installationsschrauben 4 Schrauben 4 Halten Sie das Plasmadisplay an seinen unten befindlichen Handgriffen während Sie es mit der anderen Hand oben halten und heben Sie es vertikal an 5 Legen Sie das Plasmadisplay langsam mit der Schirmfläche nach unten auf das in Schritt 1 ausgelegte Tuch oder die ausgelegte Decke Vorsicht Technische Daten A...

Page 26: ...ere i pesi del supporto e del display Assicuratevi di posizionarlo in piano e in modo stabile Non installatelo all aperto vicino a fonti di calore o a una spiaggia Non installate il supporto dove potrebbe essere esposto a vibrazioni o urti Montaggio e installazione Montate il supporto secondo le istruzioni di montaggio e fissate bene tutte le viti nelle posizioni predisposte Dopo l installazione d...

Page 27: ... base x 1 Gambe del supporto x 2 sinistra e destra intercambiabili Viti x 6 M5 x 10 mm argento Bulloni da installazione x 4 M6 x 20 mm nere Istruzioni per l uso x 1 questo manuale Montaggio del supporto Coperchio della base Gamba del supporto Procedura di montaggio 1 Girate il coperchio della base con la parte inferiore rivolta verso l alto 2 Inserite le gambe del supporto nel coperchio della base...

Page 28: ...nei punti indicati sotto usando il cacciavite Phillips Bulloni da installazione M6 x 20 mm nere Attenzione Montaggio del prodotto su scaffale TV ecc Assicuratevi di osservare le seguenti precauzioni quando trasportate o installate questo prodotto con un display a plasma su un scaffale TV o in altri spazi delimitati Se installate il Display a Plasma su un tavolino TV ecc assicuratevi che sia sosten...

Page 29: ...per fissare i cavi Apertura di un morsetto per cavi Aprite qui con un dito Morsetti per cavi Fori di montaggio dei morsetti per cavi 1 Inserite i morsetti per cavi nei relativi fori di montaggio Non tenetelo dall altoparlante Sollevate il display a plasma dalla maniglia sulla parte inferiore tenendo la parte superiore con l altra mano Se installate il display a plasma su uno scaffale TV o in altri...

Page 30: ...icientemente resistente largo e profondo In caso contrario l apparecchio potrebbe cadere Per installare il display a plasma su uno scaffale TV usate viti con diametro nominale di 6 mm Scegliete le viti adatte dopo aver consultato un installatore professionista se necessario Dopo il montaggio del supporto assicuratevi che l apparecchio non sia in condizioni di cadere Prevenire la caduta dell appare...

Page 31: ... nel capitolo Fissaggio del Display a Plasma Pagina 28 rimuovete i bulloni di installazione 4 viti 4 Tenendo il display a plasma dalle maniglie sulla parte inferiore e dalla parte superiore con l altra mano sollevatelo verticalmente 5 Collocate lentamente il display a plasma sul telo che avete preparato al punto 1 con lo schermo rivolto verso il basso Attenzione Dati tecnici Misure esterne 1000 mm...

Page 32: ...allatie Kies een plaats die sterk genoeg is om het gewicht van de staander en de displays te kunnen dragen Zorg ervoor dat de plaats van installatie vlak en stabiel is Plaats het apparaat niet buiten bij een warmwaterbron of nabij het strand Plaats de standaard niet waar deze blootstaat aan trillen of schokken Montage en installatie Monteer de tafelbladstaander overeenkomstig de montage instructie...

Page 33: ...k x 1 Opzetstukken links en rechts onderling verwisselbaar x 2 Schroeven M5 x 10 mm zilverkleurig x 6 Montagebouten M6 x 20 mm zwart x 4 Gebruiksaanwijzing deze handleiding x 1 Montage van de tafelbladstaander Voetstuk Schroeven M5 x 10 mm zilverkleurig Opzetstuk Wijze van montage 1 Keer het voetstuk om zodat de onderzijde naar boven wijst 2 Voeg de opzetstukken in het voetstuk 3 Draai de schroeve...

Page 34: ...rplaatsing Verwijder voorafgaande aan verplaatsing eerst de speakers en vervolgens de plasma display van de staander wanneer het product over een afstand van meer dan enkele meters wordt verplaatst en verplaats de speakers plasma display en de staander afzonderlijk Wanneer de plasma display van de staander wordt verwijderd volg dan de procedure in De plasma display loskoppelen van de staander op b...

Page 35: ...k vervolgens aan het uiteinde zodat de snoeren vast komen te liggen De kabelklem openen Ontsluit de kabelklem hier met de vinger Kabelklemmen Montagegaten voor de kabelklemmen 1 Geleid de kabelklemmen in de montagegaten voor de kabelklemmen Niet bij de speaker vasthouden Houd de plasma display bij de handgreep aan de onderzijde vast en uw andere hand bovenop de behuizing Houd de plasma display tij...

Page 36: ...te en diepte te worden gebruikt om de plasma display te ondersteunen Indien dit niet het geval is kan de plasma display omvallen Gebruik schroeven met een nominale diameter van 6 mm om de plasma display stabiel op een TV tafel te plaatsen Kies indien nodig in overleg met een erkende installateur de juiste schroeven Zorg ervoor nadat de staander is geïnstalleerd dat de apparatuur niet omvalt Zo zor...

Page 37: ...Verwijder de montagebouten 4 schroeven zoals aangegeven in stap 2 onder Bevestiging van de Plasma Display blz 34 4 Houd de plasma display vast bij de handgrepen aan de onderzijde met uw andere hand bovenop en til de display verticaal op 5 Plaats de plasma display langzaam op het doek dat in stap 1 werd neergelegd met het scherm naar beneden Uitgegeven door Pioneer Corporation Copyright 2006 Pionee...

Page 38: ...l soporte y de la pantalla Asegúrese de que el lugar de instalación sea una superficie llana y estable No instale el soporte en el exterior junto a una fuente termal o cerca de una playa No instale el soporte donde el mismo pueda estar sujeto a vibraciones o golpes Montaje e instalación Instale el soporte de acuerdo con las instrucciones de montaje y fije correctamente todos los tornillos en los l...

Page 39: ...e izquierda y derecha intercambiables x 2 Tornillos M5 x 10 mm plateados x 6 Tornillos de fijación M6 x 20 mm negros x 4 Manual de instrucciones este documento x 1 Cómo montar el soporte Base de apoyo Tornillos M5 x 10 mm plateados Columna de soporte Procedimiento de montaje 1 Déle la vuelta a la base de apoyo de manera que la parte inferior mire hacia arriba 2 Introduzca las columnas de soporte e...

Page 40: ... va a desplazar el producto a más de unos pocos metros desmonte primero los altavoces después desmonte la pantalla de plasma del soporte y lleve los altavoces la pantalla de plasma y el soporte por separado a su nueva ubicación Cuando vaya a desmontar la pantalla del plasma del soporte asegúrese de seguir el procedimiento descrito en la página 43 Desmontaje de la pantalla de plasma del soporte PRE...

Page 41: ...as para cables y seguidamente tire del extremo para inmovilizar los cables Cómo abrir una brida para cables Abrir con un dedo Bridas para cables Agujeros de montaje de las bridas para cables 1 Introduzca las bridas para cables en los agujeros de montaje de las bridas para cables No sujetar el altavoz Sujete la pantalla de plasma por el asa situada en la parte inferior al tiempo que con la otra man...

Page 42: ...ar que la misma se caiga o se vuelque en caso de emergencias como terremotos o de accidentes Si no adopta estas precauciones la pantalla de plasma puede caerse y causar lesiones Los tornillos alcayatas cadenas y otros accesorios que utilice para asegurar la pantalla de plasma e impedir que se vuelque variarán de acuerdo con la composición y el espesor de la superficie a la cual se fijará Seleccion...

Page 43: ...ma página 40 y extraiga los tornillos de instalación 4 tornillos 4 Sujete la pantalla de plasma por el asa situada en la parte inferior al tiempo que con la otra mano la sujeta por la parte superior y levántela de forma vertical 5 Coloque lentamente la pantalla de plasma sobre la sábana extendida según lo indicado en el paso 1 con la cara de la pantalla mirando hacia abajo PRECAUCIÓN Especificacio...

Page 44: ...將所有螺絲穩固的栓在指定 的地方 安裝顯示器以後 因為桌上支架沒有按照指示安裝 可能會 發生幾種狀況 如設備碎裂或是翻覆的意外發生 安裝顯示器時一定要有兩人或兩人以上去確認是否安裝妥當 安裝以前 將顯示器和周邊設備的電源關閉 然後再將電源 線插頭從插座拔除 為防止產品翻覆造成意外 請務必採取穩妥措施 請參閱第 48頁 重要警示 將位於設備下方的型號和序號記錄下來 型號 PDK TS15 序號 保留這些號碼以備不時之需 感謝您購買本Pioneer產品 為使您熟知本機的正確操作方式 務求詳閱本 操作手冊 在您閱讀完手冊的內容後 請妥為保存 以備日後參考之用 安裝 如果您在安裝時遇到任何問題 請與您的經銷商連絡 Pioneer對於因安裝錯誤 不當使用 修改或天災所造成 的任何意外或損害 恕概不負責 目錄 注意 44 核對標準隨附零件 45 組合支架 45 安裝電漿顯示器 46 將產品安裝至電視桌...

Page 45: ... 左右各一 可互換 2 螺絲 M5 x 10 mm 銀色 6 安裝螺栓 M6 x 20 mm 黑色 4 操作手冊 本分文件 1 纜線固定座 x 2 螺絲 M5 x 10 mm 銀色 Operating instructions Mode d emploi Bedienungsanleitung Istruzioni per l uso Gebruiksaanwijzing Manual de instrucciones Table top stand Support de couverture de table Tischständer Supporto di tavolo Tafelbladstaander Soporte de mesa PDK TS15 螺絲 M5 x 10 mm 銀色 底座板 立管 立管 軟墊 ...

Page 46: ...支架的插入狹 縫以外 請非常小心的不要將支撐柱狀條插入電漿電視的 任何地方 如果隨意插入電漿電視的任何零件有可能會導 致電漿面板和接頭的損壞 或是支架彎曲變形 如下圖所示 將支撐柱 狀條對齊電漿顯示器的 底部 注意 安裝螺栓 M6 x 20 mm 黑色 在將本產品連同電漿顯示器一同移至或安裝至電視桌或其他 箱櫃時 請確實遵守下列注意事項 在安裝到電視桌等裝置上時 請務必由兩人合力握住 移動時的預防措施 當需要將產品移動數公尺以外 先搬移揚聲器 然後 再從支架搬開電漿顯示器 而後才分別移動揚聲器 電漿顯示器 和支架 當從支架拆卸電漿顯示器時 請按照第49頁的 從支 架拆卸電漿顯示器 步驟 注意 安裝的預防措施 請確認你可以長久將桌上支架最少固定如下圖所標的前面和 後面的距離空間 最少 10 mm 電漿顯示器 電視桌 桌上支架 最少 30 mm 背面 建議電視桌厚度最少 500 mm 以上 前...

Page 47: ...入纜線固定座安裝孔內 2 將纜線捆紮好後放到各個纜線固定座上 3 收合各個纜線固定座 拉住其末端將纜線固定 纜線固定座 纜線固定座安裝孔 鬆開纜線固定座 若纜線固定座收合過緊 請壓下左側所指按鈕 然 後回推纜線固定座末端將 其鬆開 按鈕 打開纜線固定座 請用手指解開這裡 將產品安裝至電視桌等部位上 注意 安裝至電視桌或其他機架上之注意事項 切勿握住揚聲器 請一手握住電漿顯示器底部 再一手握住上 端 安裝於電視桌或其他機櫃上時 請 一手握住電漿顯示器底部 再一手 握住上端 若您是握住揚聲器 可 能會造成揚聲器損壞或扭曲 ...

Page 48: ...後再選擇適當的螺絲 9 mm 至 15 mm 最少20 mm 6 mm 桌用螺絲的位置 將腳架固定到電視桌上時 請使用額定直徑6 mm以及長度 20 mm的位置 單位 mm 95 300 585 375 側視圖 4 在安裝好支架之後 請特別小心確認設備不會翻覆 預防設備翻覆 可能會因為電漿顯示器的重量而發生摔落 使人受傷 為了安全起見 請確實特別小心 確定電漿顯示器不會摔落 M8 12 mm 至 15 mm 1 掛鉤 2 鋼索 固定配件 要有足夠強度的桌上或是地上才可永久支撐電漿顯示 器 如果強度不夠將可能導致個人傷害和身體的損害 當安裝電漿顯示器時 請先量測安全的尺度 如果發生 緊急狀況 比如地震或是意外 可以避免機台翻覆或是 翻倒 如果你沒有做這預防措施 那麼電漿顯示器有可能會翻覆 且造成傷害 使用螺絲 掛鉤 鏈條 和其他裝配來穩固電漿顯示器 以防翻倒會因為嵌入合成的材質或是表面厚度的...

Page 49: ...mm 24 118 41 51 5 967 1000 211 60 1043 192 5 470 1470 從支架拆卸電漿顯示器 從支架來拆解電漿顯示器 請參照以下所敘述的步驟 以 防意外的發生 1 先將平坦地面清空 這樣便能將電漿顯示器平 躺放好 然後舖張紙在上方 便可以防止被刮 傷或其他的傷害 2 將揚聲器搬開 3 請參照 安裝電漿顯示器 中的步驟2 第46 頁 將安裝螺栓拆下 4顆螺絲 4 一手握住電漿顯示器底部把手 再一手握住上 端 將顯示器垂直抬起 5 如步驟2將電漿顯示器慢慢的以紙張覆蓋 並 使螢幕面朝下 注意 日本先鋒公司出版 版權 2006日本先鋒公司 版權所有 ...

Page 50: ...Copyright 2006 Pioneer Corporation All rights reserved この取扱説明書は再生紙を使用しています Printed on recycled paper Imprimé sur papier recyclé Gedruckt auf Recyclingpapier Stampato su carta riciclata Gedrukt op recycled papier Impreso en papel reciclado 使用再生紙印刷 この取扱説明書の印刷には 植物性大豆油インキを使用 しています ...

Reviews: