background image

10

En

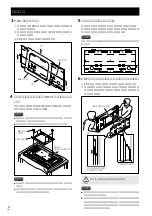
Installation Procedure

3

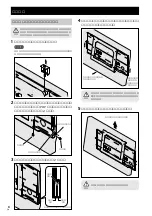
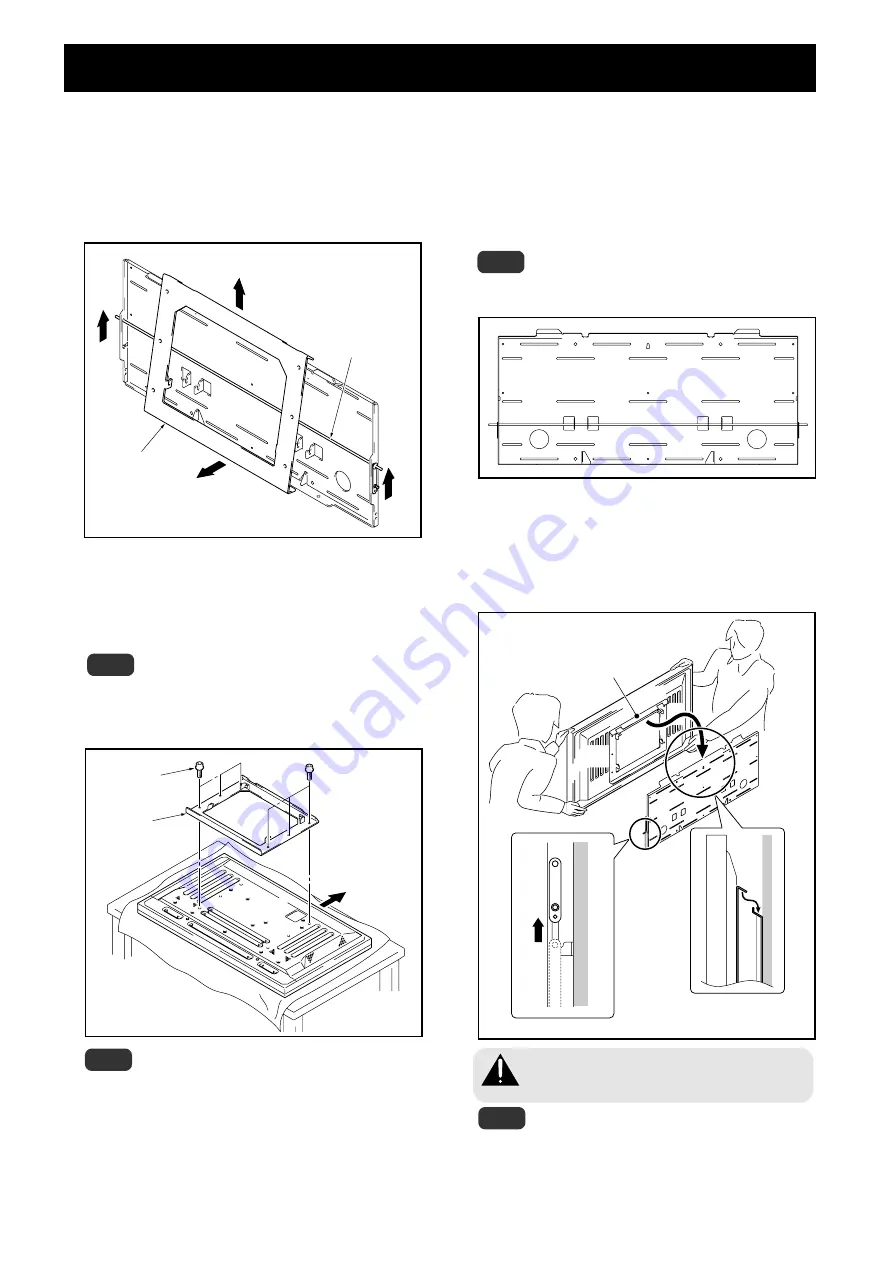
Removing the PDP side metal fitting.

1

Lift the lock bar to the position where the lock on the
PDP side metal fitting is released.

2

While holding the lock bar up, pull out the bottom of
the PDP side metal fitting.

3

Lift up and remove the PDP side metal fitting.

4

Attaching the PDP side metal fitting to the
plasma display.

Fix the PDP side metal fitting firmly to the plasma
display with bolts M8 (6 locations).

Note

Spread a sheet or similar material so that the display
will not be scratched or damaged.

Always install it on top of a stable table or similar
surface.

Note

If you plan to install speakers, install them at this
stage.

For the installation method, refer to the speaker
installation procedure in the operating instructions for
the plasma display.

5

Installing the wall side metal fitting on the
wall.

Fix it firmly in place symmetrically to the left and right (4
or more locations).
The screws and bolts used for this step vary according
to the strength and the materials of the wall, so prepare
these separately.

Note

Perform this installation work after confirming the strength
of the wall, columns, etc.

6

Hanging the hook of the PDP side metal
fitting on the wall side metal fitting

1

Hang the hook of the PDP side metal fitting on the
wall side metal fitting.

2

Raise the lock bar to attach the plasma display. Make
sure that the lock bar is fully lowered.

1

1

3

2

Lock bar

PDP side metal fitting

PDP side
metal fitting

Bolts M8

Top side of the
plasma display

Hook of the PDP side
metal fitting

Lift the lock bar to its unlocked position.

Hang the hook.

1

2

Always have at least 2 people do this task.

Caution

Note

If speakers are attached, do not hold the speakers to
perform this attachment.

Be careful that the wiring etc. is not caught in the
metal fitting or the plasma display. Be extremely
careful if there is a speaker attached to the bottom,
because if there is, wiring etc. is easily caught between
the wall and the speaker.

Summary of Contents for PDK-WM01

Page 1: ...nstrucciones 壁掛け型プラズマディスプレイ金具 HUNG ON WALL UNIT ECRAN MURAL WANDBEFESTIGUNGSEINHEIT UNITA DA PARETE EENHEID VOOR WANDBEVESTIGING UNIDAD PARA COLGAR DE LA PARED PDK WM01 据付工事 について 本機は十分な技術 技能を有する専門業者が据え付けを 行うことを前提に販売されているものです 据え付け 取 り付けは必ず工事専門業者または販売店にご依頼くださ い なお 据え付け 取り付けの不備 誤使用 改造 天災な どによる事故損傷については 弊社は一切責任を負いま せん ...

Page 2: ...故につ ながり大変危険です 設置場所について 設置場所は金具とディスプレイの重量に十分耐えう る強度をもつ場所を選定してください 人が容易にぶら下がったり寄り掛かれる場所には設 置しないでください 屋外や温泉 海辺の近くには設置しないでください 振動や衝撃の加わるような場所には設置しないでく ださい 壁の構造強度により取り付けできない場合がありま すので工事専門業者へご相談ください その他設置場所についてはプラズマディスプレイ本 体の取扱説明書を熟読し その内容を必ず守ってく ださい 組み立て 設置について 組み立ての手順を守り 指定の箇所はすべて確実に ネジ止めしてください 指定を守らないとプラズマディスプレイ取り付け後 に 破損や落下など思わぬ事故の原因となることが あります プラズマディスプレイの取り付け作業は安全のため 必ず 2 人以上で行ってください 作業の際には プラズマディス...

Page 3: ... 6 型 紙 1 取扱説明書 Operating instructions Mode d emploi Bedienungsanleitung Istruzioni per l uso Gebruiksaanwijzing Manual de instrucciones 壁掛け型プラズマディスプレイ金具 HUNG ON WALL UNIT ECRAN MURAL WANDBEFESTIGUNGSEINHEIT UNITA DA PARETE EENHEID VOOR WANDBEVESTIGING UNIDAD PARA COLGAR DE LA PARED PDK WM01 据付工事 について 本機は十分な技術 技能を有する専門業者が据え付けを 行うことを前提に販売されているものです 据え付け 取 り付けは必ず工事専門業者または販売店にご依頼くださ い なお 据え付け 取り付けの不備 誤...

Page 4: ...のス ピーカー取付手順をご覧ください 5 壁側金具を壁に取り付ける 左右対称の位置に固定 4 カ所以上 してください このとき使用するネジ ボルト類は壁の強度や材質によ り異なりますので 別途ご用意ください ご注意 取り付けの際には 壁や梁の強度を確認してから作業を行ってく ださい 6 PDP 側金具のフックを壁側金具に引っ掛ける 1 PDP 側金具のフックを壁側金具に引っ掛けます 2 ロックバーを引き上げてプラズマディスプレイを取り 付けてください ロックバーが完全に下がったか確認 してください ご注意 取り付けの際 スピーカーを付けた場合は スピーカー部分 を持たないでください 配線などが金具やプラズマディスプレイに挟まれたりしない ようにしてください 特に下側にスピーカーが取り付けられ た場合は 壁とスピーカーに配線などが挟まれ易くなります ので十分注意してください 1 1 3 2 ...

Page 5: ...の切り欠きに合 わせて傾き調整金具を挿入し ネジを回して取り付てく ださい 1 壁側金具と傾き調整金具の隙間がなくなるまでネジを 回します 壁側金具と傾き調整金具の隙間がなくなる と ネジが重くなりプラズマディスプレイが持ち上が り始めます 2 ネジを回して 傾きを調整してしてください 隙間 ネジ頭 傾き調整金具 傾き調整金具 ご注意 ネジによる傾きの調整範囲は プラズマディスプレイ外形で約 5mm ネジの回転は約3回転です ネジの回し過ぎに注意して ください ネジを回し過ぎると金具を破損する恐れがあります プラズマディスプレイ ロックバーをロックする 固定ネジ 1 フリー 位置 ロック 位置 固定ネジ 2 1 両サイドにスピーカーを取り付ける場合は 手順1 で外した固定ネジ M6 14mm で止めてくだ さい 2 下側にスピーカーを取り付ける場合および PDP 434BX PDP 434...

Page 6: ...めて外す ご注意 傾き調整金具を外さないでプラズマディスプレイを外すと 壁を キズつける場合があります 注意 作業を始める前にプラズマディスプレイと周辺機器の電 源を切り 電源プラグをコンセントから抜いてくださ い 必要に応じて配線ケーブル類も外してください 2 ロックプレートを止めているプッシュリベット および固定ネジと PDP 金具を止めている固 定ネジを外す 左右各 2 カ所 固定ネジ プッシュリベット ロックプレート 固定ネジ 3 ロックバーを解除する 左右各 2 カ所 ロック バー ロックバーをフリーの位置にする フリー 位置 ロック 位置 注意 プラズマディスプレイの下側を引き出すときに PDP側金具上部のフックが外れないように注意して ください 注意 必ず 2 人以上で作業を行ってください ...

Page 7: ... 455 540 910 145 27 135 135 45 45 225 682 5 940 1118 1268 スピーカー外寸 120 90 165 175 250 150 150 425 126 168 5 101 143 5 652 737 96 559 634 46 5 51 5 120 90 165 175 250 1120 1270 プラズマディスプレイ外寸 1290 1436 スピーカー外寸 46 5 51 5 108 496 6 0 2 φ PDP 434BX PDP 434TX 取付時 PDP 504HD PDP 504HDV PDP 434HD PDP 434HDV 取付時 単位 mm 寸法は 50 型の場合 中心線 画面センター 17 6 120 6 6 63 64 131 30 30 388 396 32 100 27 197 197 455 540 910 14...

Page 8: ...ns There have been cases where unforeseen accidents such as the equipment breaking or falling over occurred after the installation of the display because the stand was not installed as instructed The display must always be installed by two or more people to assure it is installed safely Before installation turn off the power for the display and peripheral devices then remove the power cord plug fr...

Page 9: ...osite side 6 mm for M8 use Bolts M8 x 6 Stencil x 1 取扱説明書 Operating instructions Mode d emploi Bedienungsanleitung Istruzioni per l uso Gebruiksaanwijzing Manual de instrucciones 壁掛け型プラズマディスプレイ金具 HUNG ON WALL UNIT ECRAN MURAL WANDBEFESTIGUNGSEINHEIT UNITA DA PARETE EENHEID VOOR WANDBEVESTIGING UNIDAD PARA COLGAR DE LA PARED PDK WM01 据付工事 について 本機は十分な技術 技能を有する専門業者が据え付けを 行うことを前提に販売されているものです 据え付け 取 り付...

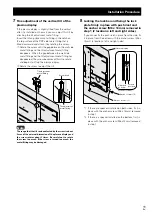
Page 10: ...the left and right 4 or more locations The screws and bolts used for this step vary according to the strength and the materials of the wall so prepare these separately Note Perform this installation work after confirming the strength of the wall columns etc 6 Hanging the hook of the PDP side metal fitting on the wall side metal fitting 1 Hang the hook of the PDP side metal fitting on the wall side...

Page 11: ...between the wall side metal fitting and the tilt adjustment metal fitting disappears When the gap between the wall side metal fitting and the tilt adjustment metal fitting has disappeared the screw becomes difficult to rotate and begins to lift up the plasma display 2 Rotate the screw to adjust the tilt Gap Screw head Tilt adjustment metal fitting Tilt adjustment metal fitting Note The range that ...

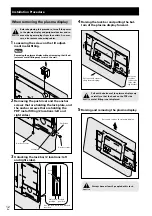
Page 12: ...e turn off the power to the plasma display and peripheral devices and re move their power plugs from the outlets As neces sary also remove connecting cables 2 Removing the push rivet and the anchor screws that are holding the lock plate and the anchor screws that are holding the PDP metal fitting 2 locations left and right sides Anchor screw Push rivet Lock plate Anchor screw 3 Unlocking the lock ...

Page 13: ...ter 17 6 x 120 6 6 x 63 64 97 388 30 30 396 32 27 197 197 98 455 540 910 145 27 135 135 45 45 225 682 5 940 1118 1268 The external dimension of a speaker 120 90 165 175 250 150 150 425 126 168 5 101 143 5 652 737 96 559 634 46 5 51 5 120 90 165 175 250 1120 1270 The external dimension of a plasma display 1290 1436 The external dimension of a speaker 46 5 51 5 108 496 φ 6 0 2 Unit mm Dimensions in ...

Page 14: ...nuel technique de Pioneer et respectez les consignes Assemblage et installation Assembler le support conformément aux instructions concernant l assemblage et fixer solidement toutes les vis aux endroits prévus à cet effet On a constaté des cas où des accidents imprévus sont survenus endommagement de l équipement chute etc après l installation de l écran d affichage parque le support n avait pas ét...

Page 15: ...ieren Hinweis an Montagebetriebe Bitte lesen Sie vor der Installation dieses Produkts gründlich die technische Anleitung von Pioneer und folgen Sie dessen Inhalt Montage und Installation Montieren Sie den Ständer gemäß den Montageanweisungen und befestigen Sie alle Schrauben sicher an den jeweils vorgesehenen Positionen Es hat Fälle gegeben in denen es nach der Installa tion des Displays zu unvorh...

Page 16: ... costruzioni Prima di installare questo prodotto leggere attentamente il manuale tecnico Pioneer e prestare attenzione al suo contenuto Assemblaggio e installazione Assemblate il supporto conformemente alle istruzioni per l assemblaggio e la sicurezza fissate tutte le viti nelle apposite sedi Esistono casi dove incidenti imprevisti come la rottura dell attrezzatura o la caduta possono verificarsi ...

Page 17: ... Pioneer voordat u met de installatie begint en respecteer de gegeven richtlijnen Montage en installatie Monteer de staander overeenkomstig de montage instructies en bevestig alle schroeven stevig vast op de daarvoor bestemde plaatsen Een ongeval zoals het breken of omvallen van de apparatuur heeft zich weleens voorgedaan nadat de display was geïnstalleerd omdat de staander niet was geïnstalleerd ...

Page 18: ...a la instalación o el montaje incorrectos el uso indebido el cambio de configuración desastres naturales o causas similares Montaje e instalación Monte el soporte de acuerdo con las instrucciones de montaje y atornille de forma segura todos los tornil los en los lugares indicados Ha habido casos de accidentes imprevistos como la rotura o caída del equipo después de la instalación de la pantalla po...

Page 19: ...工程 專業人員諮詢 有關其他裝配位置的問題 請您熟讀等離子顯示器主體的操 作說明書 並務必遵守其內容 組裝和設置 請遵守安裝順序 並將指定之處全部用螺釘緊固 若不遵守指定的安裝順序以及方法 在電漿顯示器安裝後 可能會造成破損或傾倒等意外事故 為了安全起見 電漿顯示器的安裝作業務必由2人以上共同 進行 作業時請切斷電漿顯示器和外部設備的電源 從插座中拔出 電源插頭 一旦各部分的螺絲發生鬆動 可能造成顯示器墜落等事 故 因此請務必擰緊螺絲 如果發現異常或不良的情況 請迅速向工程專業人員報 修 一旦顯示器配件內部和牆壁安裝部等不明顯處發生破損 可能產生顯示器墜落的危險 因此 對顯示器等進行點檢 修理 或對商店進行內部裝修等時 請您務必向工程專業 人員申請點檢 如果條件允許 建議您定期向工程專業人 員申請點檢 該顯示器固定配件如果長時間使用 可能因環境的不同而 產生使用年限的縮短 強度變弱 請您以...

Page 20: ...R ELECTRONICS AUSTRALIA PTY LTD 178 184 Boundary Road Braeside Victoria 3195 Australia TEL 61 39 586 6300 PIONEER ELECTRONICS ASIACENTRE PTE LTD 253 Alexandra Road 04 01 Singapore 159936 TEL 65 6472 1111 PIONEER HIGH FIDELITY TAIWAN CO LTD 13FL No44 Chung Shan North Road Sec 2 Taipei Taiwan TEL 886 2 2521 3588 PIONEER ELECTRONICS CHINA LTD Room 1704 06 17 F World Trade Centre 280 Gloucester Rd Cau...

Reviews: