background image

06

Basic Operations

22

En

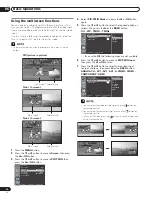
Using the multiscreen functions

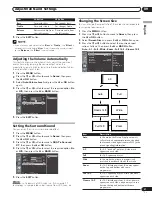
You can display a sub-picture within the main picture. In this
way you can watch a TV programme or monitor the video input
from any connected device while watching TV or another video
input.

Use this function following the procedures below to select the
Twin (2-screen) or PIP (picture in picture) mode.

• In the multiscreen function, the sound of a main input is always

output.

PIP (picture in picture)

Main input Sub-picture

Twin 1 (2-screen)

Main input

Sub-picture

Twin 2 (2-screen)

Main input

Sub-picture

1

Press the 

MENU

 button.

2

Press the 

c

 or 

d

 button to move to 

Screen

, then press

the 

\

 or 

OK

 button.

3

Press the 

c

 or 

d

 button to move to 

PIP/TWIN

, then

press the 

\

 or 

OK

 button.


Screen

Screen Size                                      Full
Main Input                         ANALOG CH

PIP/TWIN

AV1 Input                                    VIDEO
AV2 Output                       ANALOG CH
Screen Saver

Move               Enter               Return

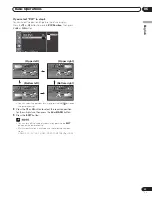
4

Select 

PIP/TWIN Mode

 and press the 

\

 or 

OK

 button

again.

5

Press the 

c

 or 

d

 button to select the required option as

follows, then press the 

[

 or the 

BACK

 button.

Off


 - PIP - TWIN1 - TWIN2

Off

PIP

TWIN1
TWIN2


PIP/TWIN

PIP/TWIN Mode                         PIP

PIP/TWIN Input                         AV1
PIP Position

Adjust                   Return

If you set to 

Off

, the following steps are not available.

6

Press the 

c

 or 

d

 button to move to 

PIP/TWIN Input

,

then press the 

\

 or 

OK

 button.

7

Press the 

c

 or 

d

 button to select the required input

source as follows, then press 

[

 or the 

BACK

 button.

ANALOG CH - AV1 - AV2 - AV3 - S-VIDEO - VIDEO -
COMPONENT - HDMI


PIP/TWIN

PIP/TWIN Mode                         PIP

PIP/TWIN  Input                        AV1

PIP Position

ANALOG CH

AV 1

AV 2
AV 3
S-VIDEO
VIDEO
COMPONENT 
HDMI

Move               Enter                  Cancel

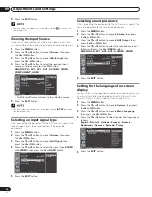
• You can select the mode by simply pressing the 

 button on

the remote control.

• You can select the source by simply pressing the 

 button on

the remote control.

• In Twin or PIP mode, press the 

 button to switch the position

of the 2-screen shown.

 07-PDP42RXE-Eng (18-23)

9/30/05, 12:16 PM

22

Summary of Contents for PDP-42RXE

Page 1: ...ver the benefits of registering your product online at www pioneer co uk or www pioneer eur com Découvrez les nombreux avantages offerts en enregistrant votre produit en ligne maintenant sur www pioneer fr ou www pioneer eur com Bitte nutzen Sie die Möglichkeit zur Registrierung Ihres Produktes unter www pioneer de oder www pioneer eur com ...

Page 2: ...r your socket outlets the plug must be cut off and a suitable plug fitted IMPORTANT FOR USE IN THE UNITED KINGDOM The cut off plug should be disposed of and must not be inserted into any 13 amp socket as this can result in electric shock The plug or adaptor or the distribution panel should be provided with 5 A fuse As the colours of the wires in the mains lead of this appliance may not correspond ...

Page 3: ...otentially dangerous conditions WARNING This symbol refers to a hazard or unsafe prac tice which can result in personal injury or property damage CAUTION This symbol refers to a hazard or unsafe prac tice which can result in severe personal injury or death WARNING To prevent a fire hazard do not place any naked flame sources such as a lighted candle on the equipment D3 4 2 1 7a_A_En VENTILATION CA...

Page 4: ...2 07 Menu Setup Menu configuration 24 Menu operations 24 08 Tuner Setup Setting up TV channels 25 Scanning Channels Automatically 25 Scanning Analogue Channels Manually 25 Editing Channel List 26 Display the Channel List 26 Setting the Current Date and Time 27 09 Adjustments and Settings Sleep Timer 28 Picture adjustments 28 Selecting the Picture Mode 28 Customizing the Picture Settings 29 Using t...

Page 5: ...oving image After using the Plasma Display System always switch the display to STANDBY mode Installation guidelines The Pioneer PureVision PDP 42RXE Plasma Display System incorporates a very thin design To ensure safety please take the proper measures to mount or install the Plasma Display in order to prevent the unit from tipping over in the event of vibration or accidental movement This product ...

Page 6: ...y Condensation Condensation may take place on the surface or inside of the product when the product is rapidly moved from a cold place to a warm place or just after a heater is switched on in winter morning for example When condensation takes place do not switch on the product and wait until condensation disappears Using the product with condensation may result in malfunction Cleaning the screen W...

Page 7: ...r several days a permanent after image may remain on the screen due to burning of the fluorescent materials Such images may become less noticeable if moving images are later displayed but they will not disappear completely The Auto Power Off function can be set to help prevent damage from screen burning see page 34 If you want to dispose this product do not mix it with general household waste Ther...

Page 8: ...cords must be routed properly to prevent people from stepping on them or objects from resting on them Check the cords at the plugs and product 13 The Plasma Display used in this product is made of glass Therefore it can break when the product is dropped or applied with impact Be careful not to be injured by broken glass pieces in case the plasma Display breaks 14 Overloading Do not overload AC out...

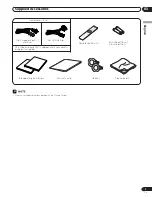
Page 9: ...e power cord supplied with the Plasma Display Power cord 1 83 m Remote control unit AAA size battery 2 Alkaline battery Warranty card Hook 2 Cleaning cloth For Europe except UK and Eire For UK and Eire Only the power cord that is appropriate in your country or region is supplied ...

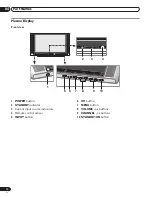
Page 10: ...y 1 POWER button 2 STANDBY indicator 3 Current input source indicators 4 Remote control sensor 5 INPUT button Front view POWER POWER 5 9 10 1 6 3 4 2 7 8 6 OK button 7 MENU button 8 VOLUME buttons 9 CHANNEL buttons 10 STANDBY ON button ...

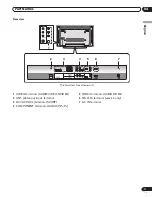
Page 11: ...3 AV1 AV2 AV3 terminals SCART 4 COMPONENT terminals AUDIO Y PB PR 5 HDMI terminals AUDIO HDMI 6 RS 232C terminal service only 7 AC IN terminal ANT AV 1 HDMI AV 2 INPUT COMPONENT L AUDIO AUDIO HDMI L R AV 3 Y R PB PR SERVICE ONLY AC IN INPUT AUDIO R L VIDEO S VIDEO 2 3 7 5 6 4 1 The terminals face downward ...

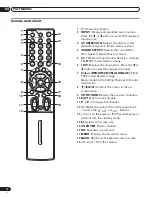
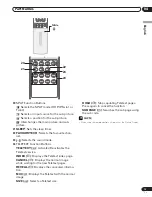
Page 12: ...a channel TELETEXT mode Selects a page 6 LIST Displays the channel list Press the c or d button to select the required channel 7 Colour RED GREEN YELLOW BLUE TELE TEXT mode Selects a page Menu mode in the Editing Channel List edits channel list 8 c d Controls the cursor in the on screen menu 9 CH RETURN Returns the previous channels 10 EXIT Exits from any display 11 P P Changes the channel 12 Mute...

Page 13: ...ourite chan nel 23 Selects the sound mode 24 TELETEXT Function Buttons TELETEXT Activates Deactivates the Teletext service INDEX Displays the Teletext index page CANCEL Displays the normal image while waiting for the new Teletext pages REVEAL Displays the concealed informa tion MIX Displays the Teletext with the normal image SIZE Selects a Teletext size Slide HOLD Stops updating Tetelext pages Pre...

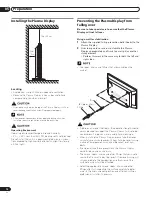
Page 14: ...ains to stabilize the Plasma Display appropriately and firmly to a wall pillar or other sturdy element Perform this work in the same way for both the left and right sides Use ropes chains and fittings that are available on the market A table or an area of the floor with adequate strength should always be used to support the Plasma Display Failure to do so could result in personal injury and physic...

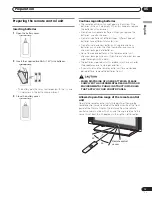
Page 15: ...use chemical leakage in old batteries Do not leave dead batteries in the remote control unit chemical leakage will occur If you find any chemical leakage wipe thoroughly with a cloth The batteries supplied with this product may have a shorter life expectancy due to storage conditions If you will not use the remote control unit for an extended period of time remove the batteries from it WHEN DISPOS...

Page 16: ...t operated through infrared remote control as a VCR nearby that equipment may not receive commands from its remote control unit properly or entirely If this is the case place that equipment at a location far enough from the Plasma Display Depending on the installation environment infrared rays from the Plasma Display may not allow this system to properly receive commands from the remote control un...

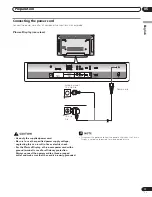
Page 17: ...er cord Be sure to use the specified power supply voltage neglecting this can result in fire or electric shock For the Plasma Display a three core power cord with a ground terminal is used for efficiency protection Always connect the power cord to a three pronged outlet and make sure that the cord is properly grounded Europe except UK and Eire UK and Eire Disconnect the power cord from the power o...

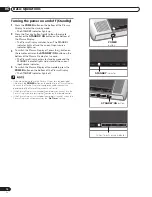
Page 18: ...and the STANDBY indicator lights up instead of the current input source indicator 4 To switch the Plasma Display off completely press the POWER button on the bottom of the Plasma Display The STANDBY indicator lights off If you are not going to use the Plasma Display for a long period of time press the POWER button on the bottom of the Plasma Display to switch the Plasma Display off completely and ...

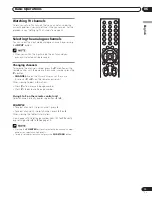
Page 19: ...asma Display has the same function as P P on the remote control unit When viewing Teletext information Press P to increase the page number Press P to decrease the page number Using 0 to 9 on the remote control unit Select channels directly by pressing buttons 0 to 9 EXAMPLE To select channel 5 1 digit channel press 5 To select channel 25 2 digit channel press 2 then 5 When viewing the Teletext inf...

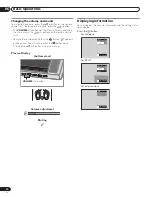
Page 20: ...e control unit To mute the sound output press the button appears on the screen To quit muting press the button again Pressing the button also quits muting Plasma Display bottom view P Volume adjustment Volume 4 Muting VOLUME buttons Displaying Information You can display the channel information and the setting status you selected Press the button For analogue A T V 3 C 9 Mono 8 30 am For SPLIT Mon...

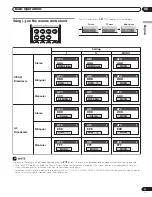
Page 21: ... MONO CCC ATV ý 1 MONO DDD ATV ý 1 MONO EEE ATV ý 1 MONO FFF ATV ý 1 MONO MONO MONO DUAL NICAM DUAL NICAM Mono NICAM Mono Stereo Stereo In each of the sound multiplex mode selected using the button the display changes depending on broadcasting signals being received Once the MONO mode is selected the Plasma Display System sound remains mono even if the system receives a stereo broadcast You must s...

Page 22: ... VIDEO AV2 Output ANALOG CH Screen Saver Move Enter Return 4 Select PIP TWIN Mode and press the or OK button again 5 Press the c or d button to select the required option as follows then press the or the BACK button Off PIP TWIN1 TWIN2 Off PIP TWIN1 TWIN2 PIP TWIN PIP TWIN Mode PIP PIP TWIN Input AV1 PIP Position Adjust Return If you set to Off the following steps are not available 6 Press the c o...

Page 23: ...n You can select the positions by simply pressing the button on the remote control 8 Press the c or d button to select the required position for the sub picture then press the or BACK button 9 Press the EXIT button You can turn off the sub picture by simply pressing the EXIT button on the remote control Multiscreen function is available with the following combina tions ANALOG CH AV1 2 3 S VIDEO VI...

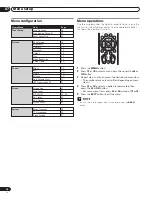
Page 24: ... until you access the desired submenu item The number of menu layers differs depending on menu items 4 Press c or d to select an option or parameter then press the or OK button For some menu items press or instead of c or d 5 Press the EXIT button to exit the menu You can return to the upper menu levels by pressing the BACK button Home Menu Item Page Tuner Setup Scan Channels 25 Scan Analog Channe...

Page 25: ...button to move to Scan Analog Channel then press the or OK button Tuner Setup Scan Channels Scan Analog Channel Edit Channel List Move Enter Return 4 Select Colour System and press the or OK button 5 Press the c or d button to select the desired colour system Auto PAL or SECAM then press the or BACK button 6 Press the c or d button to select Audio System then press the or OK button 7 Press the c o...

Page 26: ... tuning press the c or d button to move to Fine Tune then press the or button to obtain good picture and sound quality Colour System Auto Audio System BG Band VHF UHF Channel 2 Programme No 1 Name Channel Search Fine Tune Store Move Adjust Return Scan Analog Channel 18 Press the c or d button to move to Store then press the or OK button 19 Press the EXIT button Scan Analog Channel function is avai...

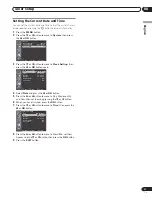
Page 27: ...djust Move Return Clock Setting Date 05 OCT 2005 Time 09 30 am On Timer 00 00 am Off Timer 00 00 am Auto Power Off Off Sleep Timer Off 4 Select Date and press the or OK button 5 Press the or button to move to Day Mon month and Year then set them by pressing the c or d button 6 When you have finished press the OK button 7 Press the c or d button to move to Time then press the or OK button Adjust Mo...

Page 28: ...s desired You can set the mode for each input source 5 Press the EXIT button You can select the modes by simply pressing the AV SELECTION button on the remote control Sleep Timer You can select a time period of 10 to 240 minutes after which the Plasma Display automatically switches to standby mode 1 Press the MENU button 2 Press the c or d button to move to System then press the a or OK button Mov...

Page 29: ...ness Contrast For less contrast For more contrast Sharpness For less sharpness For more sharpness Colour For less colour For more colour intensity intensity Tint Skin tones become Skin tones become purplish greenish 4 Press the BACK or MENU button to return to the picture menu 5 Press the EXIT button If you make any changes to the options the picture mode is automatically switched to User Using th...

Page 30: ... Effect and press the a or OK button again 4 Press the c or d button to select the required sound effect as follows then press the b or BACK button Flat Speech Movie Music User Flat Speech Movie Music User Sound Effect Bass Treble Balance Auto Volume Level SRS TruSurround XT Flat 50 50 R 1 Off On Adjust Return Item Description Flat Flat and pure sound Speech Suitable for the programmes with speech...

Page 31: ... then press the b or BACK button On Off Sound Effect Flat Bass 50 Treble 50 Balance R 1 Auto Volume Level Off SRS TruSurround XT On Adjust Return 5 Press the EXIT button is a trademark of SRS Labs Inc TruSurround XT technology is incorporated under license from SRS Labs Inc Changing the Screen Size You can change the aspect ratio of the screen to correspond to your viewing requirements 1 Press the...

Page 32: ...to select the signal type VIDEO or S VIDEO then press the b or BACK button Screen Screen Size Auto Main Input ANALOG CH PIP TWIN AV1 Input VIDEO AV2 Output ANALOG CH Screen Saver VIDEO S VIDEO Adjust Return 5 Press the EXIT button Selecting an output source After connecting the equipment to the AV2 terminal specify the source to be output to the connected equipment 1 Press the MENU button 2 Press ...

Page 33: ...IN AV1 Input VIDEO AV2 Output ANALOG CH Screen Saver Move Enter Return 3 Press the c or d button to move to Screen Saver then press the a or OK button 4 Select Orbiter and press the a or OK button again Screen Saver Orbiter On Orbiter Range Small Full White Off On Off Adjust Return 5 Press the c or d button to select the required option On or Off then press the b or BACK button 6 Press the c or d ...

Page 34: ...imer Off On Off Adjust Return 5 Press the c or d button to select On then press the b or BACK button 6 Press the OK button again Press the b or a button to move to the hour and minute set them by pressing the c or d button then press the OK button Clock Setting Date 05 OCT 2005 Time 09 30 am On Timer 07 00am Off Timer Off Auto Power Off Off Sleep Timer Off Adjust Move Return 7 Press the EXIT butto...

Page 35: ...3 1 Connect the SCART cable to the AV AV1 AV2 or AV3 terminal on the Plasma Display and to the SCART terminal on the required equipment 2 Turn the Plasma Display on then press the INPUT button to select AV1 AV2 or AV3 Refer to the operation manual of the required equipment for the signal type When you connect the equipment to the AV1 terminal set AV1 Input When you connect the equipment to the AV2...

Page 36: ...ercially available VCR DVD Player Set Top Box or other audio visual equipment Connecting to the External Input INPUT AUDIO R L VIDEO S VIDEO Audio Cable commercially available Video Cable commercially available S Video Cable commercially available 1 Connect the video cable to the VIDEO input jack on the Plasma Display and to the video output jack on the required equipment For equipment with an S V...

Page 37: ...480p 59 94 60Hz 1280 720p 59 94 60Hz 1 Connect the HDMI cable to the HDMI jack on the Plasma Display and to the DVD output jack on the required equipment 2 When connecting with DVI jack such as a DVD player connect the audio cable to the AUDIO INPUT L R jacks on the Plasma Display and to the audio output jacks on the required equipment 3 Turn the Plasma Display on then press the INPUT button to se...

Page 38: ...ormal screen Selecting and operating Teletext pages Use the following remote control buttons to select and operate Teletext pages Colour RED GREEN YELLOW BLUE You can select a group or block of pages displayed in the coloured brackets at the bottom of the screen by pressing the corresponding colour RED GREEN YELLOW BLUE on the remote control unit 0 to 9 Directly select any page from 100 to 899 by ...

Page 39: ...ck the volume Check the volume Check whether the button on the remote control has been pressed Adjust the colour settings Check if the correct broadcast system is selected Try to identify the electrical appliance that affects the Plasma Display then move it further away Plug the power cord of the Plasma Display into a different wall outlet Check the direction location and connections of your aeria...

Page 40: ...1 Plug shield SCART AV 1 1 Audio right output 2 Audio right input 3 Audio left output 4 Common earth for audio 5 Earth 6 Audio left input 7 Not used 8 Audio video control 9 Earth 10 Not used 11 Not used 12 Not used 13 Earth 14 Not used 15 Chroma S Video input 16 Not used 17 Earth for video 18 Earth 19 Video output 20 Video input S Video input 21 Plug shield SCART AV 2 1 Audio right output 2 Audio ...

Page 41: ...tion Receiving System B G D K I L L Tuner VHF UHF E2 E69ch F2 F10ch I21 I69ch IR A IR Jch CATV Hyper band S1 S41ch STEREO NICAM A2 Terminals Rear ANTENNA 75 Ω DIN Type for VHF UHF CATV in AV1 SCART AV in S VIDEO in TV out AV2 SCART AV in out RGB in AV3 SCART AV in out RGB in AV2 out User selectable COMPONENT COMPONENT VIDEO in AUDIO in HDMI HDMI in AUDIO in RS 232C Service only Side VIDEO S VIDEO ...

Page 42: ...HDMI the HDMI logo and High Definition Multimedia Interface are trademarks or registered trademarks of HDMI Licensing LLC The names of the companies or institutions are trademarks or registered trademarks of the respective companies or institutions Published by Pioneer Corporation Copyright 2005 Pioneer Corporation All rights reserved ...

Page 43: ...ut entraîner une blessure grave voire la mort AVERTISSEMENT Pour éviter les risques d incendie ne placez aucune flamme nue telle qu une bougie allumée sur l appareil D3 4 2 1 7a_A_Fr PRÉCAUTION DE VENTILATION Lors de l installation de l appareil veillez à laisser un espace suffisant autour de ses parois de manière à améliorer la dissipation de chaleur L espace minimum requis est indiqué à la page ...

Page 44: ...u 24 Utilisation des menus 24 08 Configuration du syntoniseur Réglage des canaux de télévision 25 Balayage automatique des canaux 25 Balayage manuel des canaux analogiques 25 Modification de la liste des canaux 26 Affichage de la liste des canaux 26 Réglage de la date et de l heure actuelles 27 09 Réglages et paramètres Minuterie de mise en veille 28 Réglages de l image 28 Sélection du mode d imag...

Page 45: ...on Le système d écran à plasma Pioneer PureVision PDP 42RXE présente une très faible épaisseur Pour des raisons de sécurité et pour éviter que l appareil ne puisse se renverser en cas de vibration ou contact accidentel veillez à fixer ou à installer le système d écran à plasma de la manière convenable Cet appareil doit être installé en faisant usage des pièces et des accessoires conçus par PIONEER...

Page 46: ...nt Mettez l appareil en service et faites le fonctionner régulièrement Condensation De la condensation peut se former à la surface ou à l intérieur de l appareil si vous le transportez rapidement d une pièce froide dans une pièce chaude ou bien lorsque le matin en hiver vous allumez un appareil de chauffage Si de la condensation se forme ne mettez pas l appareil en service et attendez qu elle ait ...

Page 47: ... la même image pendant une longue période peut provoquer une rémanence de cette image Cela peut spécialement se produire dans les circonstances suivantes 1 Image rémanente due à la charge électrique Si une image présentant des zones très lumineuses est affichée pendant plus d une minute une image rémanente produite par la charge électrique importante peut en résulter Cette image rémanente s estomp...

Page 48: ...le piétiner ni qu il soit écrasé par un meuble ou un objet lourd Examinez soigneusement le cheminement du câble d alimentation près de la prise secteur et au point de sortie de l appareil 13 Le panneau de l écran à plasma est en verre Il peut donc être brisé par la chute de l appareil ou par un choc En cas de casse du panneau veillez à ne pas être blessé par les débris 14 Surcharge Ne surchargez p...

Page 49: ...limentation 1 83 m Pour l Europe à l exception du Royaume Uni et de l Irlande Pour le Royaume Uni et l Irlande Seul le cordon d alimentation correspondant à votre pays ou région est fourni Carte de garantie Boîtier de télécommande Deux modes d emploi Piles au format AAA 2 Pile alcaline Crochet 2 Chiffon de nettoyage ...

Page 50: ...ma Vue de face POWER POWER 5 9 10 1 6 3 4 2 7 8 1 Touche POWER 2 Témoin STANDBY 3 Témoins de la source d entrée actuelle 4 Capteur de la télécommande 5 Touche INPUT 6 Touche OK 7 Touche MENU 8 Touches VOLUME 9 Touches CHANNEL 10 Touche STANDBY ON ...

Page 51: ...AV 3 Y R PB PR SERVICE ONLY AC IN INPUT AUDIO R L VIDEO S VIDEO 2 3 7 5 6 4 1 Les prises sont dirigées vers le bas 1 Prises VIDEO AUDIO VIDEO S VIDEO 2 Prise d entrée ANT Antenne 3 Prises AV1 AV2 AV3 SCART 4 Prises COMPONENT AUDIO Y PB PR 5 Prises HDMI AUDIO HDMI 6 Prise RS 232C service uniquement 7 Prise AC IN ...

Page 52: ...ne page Mode Menu dans la modification de la liste des canaux Cette touche permet de modifier la liste des canaux 8 c d Cette touche contrôle le curseur dans les menus d écran 9 CH RETURN Cette touche rétablit les canaux précédente 10 EXIT Cette touche permet de quitter n importe quel affichage 11 P P Ces touches permettent de changer de canal 12 Cette touche coupe le son Pour rétablir le son appu...

Page 53: ...ette touche sélectionne le mode audio 24 Touches de fonction TELETEXT TELETEXT Active ou désactive le service Télétexte INDEX Cette touche affiche la page d index Télétexte CANCEL Cette touche affiche l image normale en attendant les nouvelles pages Télétexte REVEAL Cette touche affiche l information cachée Faites glisser MIX Cette touche affiche le Télétexte avec l image normale SIZE Cette touche...

Page 54: ...s sur l écran à plasma 2 Utilisez des cordes solides ou des chaînes pour stabiliser solidement le dispositif contre un mur un pilier ou un autre élément stable Procédez de la même manière pour le côté droit et le côté gauche Utilisez des cordes des chaînes et des fixations en vente dans le commerce Choisissez toujours une table ou une portion de sol avec une force suffisante pour supporter l écran...

Page 55: ...ite de l électrolyte de la pile usagée Ne conservez pas de piles usagées dans le boîtier de télécommande car une fuite de l électrolyte pourrait en résulter En cas de fuite de l électrolyte nettoyez soigneusement le logement des piles avec un chiffon Les piles fournies avec cet appareil peuvent avoir une longévité plus courte que prévue du fait des conditions de stockage Retirez les piles du compa...

Page 56: ...à proximité de l écran un appareil commandé à distance par des signaux infrarouges par exemple un magnétoscope la réception des signaux émis par le boîtier de télécommande de l appareil peut être perturbée Dans ce cas éloignez cet appareil de l écran à plasma En fonction des caractéristiques de l installation les signaux infrarouges en provenance du panneau de l écran à plasma peuvent interdire la...

Page 57: ... tension d alimentation mentionnée dans le cas contraire cela pourrait provoquer un incendie ou une électrocution Pour une sécurité accrue l écran à plasma est doté d un cordon d alimentation à trois conducteurs avec prise de terre Veillez à brancher la fiche du cordon d alimentation sur une prise secteur à trois broches convenablement reliée à la terre Europe sauf R U et Irlande R U et Irlande Co...

Page 58: ... et le témoin STANDBY s allume au lieu du témoin de la source d entrée actuelle 4 Pour éteindre complètement l écran à plasma appuyez sur la touche POWER en bas de l écran à plasma Le témoin STANDBY s éteint Si vous n allez pas utiliser l écran à plasma pendant une période prolongée appuyez sur la touche POWER en bas de l écran à plasma pour éteindre l écran complètement et débranchez le cordon d ...

Page 59: ...nction que P P sur le boîtier de télécommande Lors de la visualisation des informations Télétexte Appuyez sur P pour augmenter le numéro de page Appuyez sur P pour diminuer le numéro de page Utilisation des touches 0 à 9 sur le boîtier de télécommande Sélectionnez directement les canaux en appuyant sur les touches 0 à 9 EXEMPLE Pour sélectionner le canal 5 canal à 1 chiffre appuyez sur 5 Pour séle...

Page 60: ...ortie du son appuyez sur la touche apparaît sur l écran Pour rétablir le son appuyez à nouveau sur la touche Un appui sur la touche rétablit le son également Écran à plasma Vue du bas P Réglage du volume Volume 4 Silencieux Touches VOLUME Affichage des informations Vous pouvez afficher l information du canal et l état du réglage que vous avez sélectionné Appuyez sur la touche Pour de l analogique ...

Page 61: ... ý 1 MONO FFF ATV ý 1 MONO MONO MONO DUAL NICAM DUAL NICAM Mono NICAM Mono Stereo Stereo Dans chaque mode sonore multiplex sélectionné avec la touche l affichage change en fonction des signaux d émissions reçus Après sélection du mode MONO les sons émis par l écran à plasma demeurent monophoniques même si l émission captée est en stéréo Vous devez revenir au mode I ou II si vous souhaitez à nouvea...

Page 62: ...n puis appuyez sur la touche ou OK 3 Appuyez sur la touche c ou d pour vous déplacer sur PIP TWIN puis appuyez sur la touche ou OK Dépl Intro Retour 4 Sélectionnez Mode PIP TWIN et appuyez à nouveau sur la touche ou OK 5 Appuyez sur la touche c ou d pour sélectionner l option désirée comme suit puis appuyez sur la touche ou BACK Arrêt PIP TWIN1 TWIN2 Arret PIP TWIN1 TWIN2 Ajuste Retour AV1 Si vous...

Page 63: ...ant simplement sur la touche de la télécommande 8 Appuyez sur la touche c ou d pour sélectionner la position désirée pour l image secondaire puis appuyez sur la touche ou la touche BACK 9 Appuyez sur la touche EXIT Vous pouvez désactiver l image secondaire en appuyant simplement sur la touche EXIT de la télécommande La fonction de partage d écran est disponible avec les combinaisons suivantes CN A...

Page 64: ...menu secondaire désiré Le nombre de couches d un menu varie en fonction des paramètres du menu 4 Appuyez sur c ou d pour sélectionner une option ou un paramètre puis appuyez sur la touche ou OK Dans le cas de certains paramètres de menu vous devez appuyer sur ou au lieu de c ou d 5 Appuyez sur la touche EXIT pour sortir du menu Vous pouvez accéder aux niveaux supérieurs du menu en appuyant sur la ...

Page 65: ... de câble Balayage manuel des canaux analogiques Vous pouvez choisir si vous voulez mémoriser les canaux 1 Appuyez sur la touche MENU 2 Appuyez sur la touche c ou d pour vous déplacer sur Inst du tuner puis appuyez sur la touche ou OK 3 Appuyez sur la touche c ou d pour vous déplacer sur Balayer canaux analog puis appuyez sur la touche ou OK 4 Sélectionnez Système couleur et appuyez sur la touche ...

Page 66: ...AV FAV FAV FAV 1 2 3 4 5 6 7 8 9 10 C01 C02 C03 FAV AAA BBB CCC DDD EEE FFF GGG 2 Pour syntoniser un canal spécifique dans la liste des canaux déplacez le curseur sur le canal désiré en appuyant sur la touche c ou d puis appuyez sur la touche OK Appuyez sur les touches P P pour vous déplacer à la page suivante ou précédente 15 Quand vous avez terminé d entrer le nom de canal appuyez sur la touche ...

Page 67: ... vous déplacer sur Réglage d horloge puis appuyez sur la touche ou OK 4 Sélectionnez Date et appuyez sur la touche ou OK 5 Appuyez sur la touche ou pour vous déplacer sur le jour le mois et l année puis réglez les en appuyant sur la touche c ou d 6 Une fois le réglage terminé appuyez sur la touche OK 7 Appuyez sur la touche c ou d pour vous déplacer sur Heure puis appuyez sur la touche ou OK 8 App...

Page 68: ...vous permet de personnaliser les réglages Vous pouvez définir le mode d image pour chaque source d entrée 5 Appuyez sur la touche EXIT Vous pouvez sélectionner les modes en appuyant simplement sur la touche AV SELECTION de la télécommande Minuterie de mise en veille Vous pouvez sélectionner un intervalle de temps de 10 à 240 minutes au bout duquel l écran à plasma se met en veille automatiquement ...

Page 69: ...té Couleur Diminution de l intensité des couleurs Teinte Les teintes chair deviennent plus violettes 4 Appuyez sur la touche BACK ou MENU pour revenir au menu Image 5 Appuyez sur la touche EXIT Si vous changez les options le mode d image revient automatiquement à Utilisat Augmentation de la luminosité Augmentation du contraste Augmentation de la netteté Augmentation de l intensité des couleurs Les...

Page 70: ...à nouveau sur la touche a ou OK 4 Appuyez sur la touche c ou d pour sélectionner l effet de son désiré comme suit puis appuyez sur la touche b ou BACK Sans effet Voix Cinéma Musique Utilisat Paramètre Description Sans effet Son pur et sans effet Voix Convient à des émissions parlées telles que les journaux télévisés etc Cinéma Vous pouvez profiter des effets de son comme dans une salle de cinéma M...

Page 71: ...est une marque de SRS Labs Inc TruSurround XT technologie est incorporé sous licence de SRS Labs Inc Modification de la taille de l écran Vous pouvez changer le format d image de l écran pour correspondre à vos besoins 1 Appuyez sur la touche MENU 2 Appuyez sur la touche c ou d pour vous déplacer sur Écran puis appuyez sur la touche a ou OK 3 Sélectionnez Taille d écran et appuyez à nouveau sur la...

Page 72: ... c ou d pour vous déplacer sur Entrée AV1 puis appuyez sur la touche a ou OK 4 Appuyez sur la touche c ou d pour sélectionner le type de signal VIDÉO ou S VIDÉO puis appuyez sur la touche b ou BACK 5 Appuyez sur la touche EXIT Sélection d une source de sortie Après avoir raccordé un équipement à la prise AV2 spécifiez la source à envoyer à l équipement raccordé 1 Appuyez sur la touche MENU 2 Appuy...

Page 73: ...ur la touche c ou d pour vous déplacer sur Économiseur d écran puis appuyez sur la touche a ou OK 4 Sélectionnez Orbiteur et appuyez à nouveau sur la touche a ou OK 5 Appuyez sur la touche c ou d pour sélectionner l option désirée Marche ou Arrêt puis appuyez sur la touche b ou BACK 6 Appuyez sur la touche c ou d pour vous déplacer sur Portée orbiteur puis appuyez sur la touche a ou OK 7 Appuyez s...

Page 74: ...touche a ou OK 5 Appuyez sur la touche c ou d pour sélectionner Marche puis appuyez sur la touche b ou BACK 6 Appuyez à nouveau sur la touche OK Appuyez sur la touche b ou a pour vous déplacer sur les heures et les minutes réglez les en appuyant sur la touche c ou d puis appuyez sur la touche OK 7 Appuyez sur la touche EXIT Une fois la minuterie de mise sous tension réglée un appui sur la touche a...

Page 75: ...ART AV 1 AV 2 AV 3 1 Raccordez le câble SCART à la prise AV AV1 AV2 ou AV3 de l écran à plasma et à la prise SCART de l équipement désiré 2 Mettez l écran à plasma sous tension puis appuyez sur la touche INPUT pour sélectionner AV1 AV2 ou AV3 Reportez vous au mode d emploi de l équipement désiré pour connaître le type de signal Lorsque vous raccordez l équipement à la prise AV1 sélectionnez Entrée...

Page 76: ...le vidéo à la prise d entrée VIDEO de l écran à plasma et à la prise de sortie vidéo de l appareil désiré Avec un équipement muni d une prise S VIDEO raccordez le câble S Vidéo entre la prise d entrée S VIDEO de l écran à plasma et la prise de sortie S Vidéo de l équipement désiré 2 Raccordez le câble audio à la prise d entrée AUDIO L R de l écran à plasma et à la prise de sortie audio de l appare...

Page 77: ...4 60Hz 1 Raccordez le câble HDMI à la prise HDMI de l écran à plasma et à la prise de sortie DVD de l appareil désiré 2 Lors de la connexion à une prise DVI comme celle d un lecteur DVD raccordez le câble audio aux prises AUDIO INPUT L R de l écran à plasma et aux prises de sortie audio de l appareil désiré 3 Mettez l écran à plasma sous tension puis appuyez sur la touche INPUT pour sélectionner H...

Page 78: ...es suivantes du boîtier de télécommande pour sélectionner et afficher les pages Télétexte Couleur ROUGE VERT JAUNE BLEU Vous pouvez sélectionner un groupe ou un ensemble de pages affichés entre crochets colorés en bas de l écran en appuyant sur les touches correspondantes Couleur ROUGE VERT JAUNE BLEU du boîtier de télécommande 0 à 9 Sélectionnez directement n importe quelle page de 100 à 899 à l ...

Page 79: ...es réglages de contraste et de luminosité de l image Vérifiez le volume Vérifiez le volume Vérifiez si vous avez bien appuyé sur la touche du boîtier de télécommande Réglez la couleur Vérifiez que le système de diffusion correct soit bien sélectionné Essayez d identifier l appareil électrique qui perturbe l écran à plasma puis éloignez le Branchez l écran à plasma sur une autre prise murale Vérifi...

Page 80: ...uche 4 Terre commune pour l audio 5 Terre pour le bleu 6 Entrée audio gauche 7 Entrée du bleu 8 Contrôle audio vidéo 9 Terre pour le vert 10 Non utilisé 11 Entrée du vert 12 Non utilisé 13 Terre pour le rouge 14 Non utilisé 15 Entrée du rouge 16 Contrôle Rouge Vert Bleu 17 Terre pour la vidéo 18 Terre pour le contrôle Rouge Vert Bleu 19 Sortie vidéo 20 Entrée vidéo 21 Blindage de la prise SCART AV...

Page 81: ...eur VHF UHF E2 E69ch F2 F10ch I21 I69ch IR A IR Jch CATV Hyper band S1 S41ch STEREO NICAM A2 Prises Arrière ANTENNA 75 Ω type DIN entrée VHF UHF CATV AV1 SCART entrée AV entrée S VIDEO sortie TV AV2 SCART entrée sortie AV entrée RGB AV3 SCART entrée sortie AV entrée RGB Sortie AV2 à sélectionner par l utilisateur COMPONENT Entrée COMPONENT VIDEO entrée AUDIO HDMI Entrée HDMI entrée AUDIO RS 232C U...

Page 82: ... marque de SRS Labs Inc TruSurround XT technologie est incorporé sous licence de SRS Labs Inc HDMI le logo HDMI et High Definition Multimedia Interface sont des marques de fabrique ou des marques déposées de HDMI Licensing LLC Les noms des sociétés ou des organismes sont des marques de commerce qui peuvent avoir fait l objet d un dépôt par leur propriétaire ...

Page 83: ...eine gefährliche oder unsichere Vorgehensweise hin die schwere Personenverletzungen verursachen oder Leben kosten kann WARNUNG Keine Quellen offener Flammen z B eine brennende Kerze auf dieses Gerät stellen D3 4 2 1 7a_A_Ge VORSICHTSHINWEIS ZUR BELÜFTUNG Bei der Aufstellung dieses Gerätes muss für einen ausreichenden Freiraum gesorgt werden um eine einwandfreie Wärmeabfuhr zu gewährleisten Bezügli...

Page 84: ...p Menükonfiguration 24 Menübedienung 24 08 Tuner Setup Einrichten von Fernsehkanälen 25 Automatisch Kanäle absuchen 25 Manuelles Absuchen der Analogkanäle 25 Bearbeit Kanal Liste 26 Die Kanalliste anzeigen 26 Einstellen des aktuellen Datums und der Uhrzeit 27 09 Justierungen und Einstellungen Timer 28 Bild Einstellungen 28 Wahl der Bildfunktion 28 Anpassen der Bildeinstellungen 29 Verwendung des R...

Page 85: ...Pioneer PureVision Plasma Display System PDP 42RXE zeichnet sich durch eine sehr flache Bauweise aus Aus Sicherheitsgründen sollten bei der Montage oder Aufstellung geeignete Maßnahmen getroffen werden um ein Umkippen bei Vibrationen oder unbeabsichtigter Berührung zu verhindern Zum Aufstellen des Produkts sollten ausschließlich die von PIONEER hierfür konstruierten Teile und Zubehörteile verwende...

Page 86: ... zum Beispiel an einem Wintermorgen unmittelbar nach Einschalten einer Heizung Wenn eine derartige Kondenswasserbildung stattgefunden hat schalten Sie das Produkt nicht ein sondern warten Sie bis die Feuchtigkeit verdunstet ist Gebrauch des Produkts unter Feuchtigkeitsniederschlag kann zu Funktionsstörungen führen Reinigen der Bildschirmoberfläche Wischen Sie die Bildschirmoberfläche zur Reinigung...

Page 87: ...mwelt und die menschliche Gesundheit vermieden werden Einbrenner und Nachbilder Wenn das selbe Bild zum Beispiel ein Standbild über längere Zeit angezeigt wird können Nachbilder entstehen Dies kann in den folgenden beiden Fällen auftreten 1 Nachbild wegen elektrischer Restladung Wenn Bildmuster mit sehr hoher Spitzenluminanz länger als 1 Minute angezeigt werden können Nachbilder wegen elektrischer...

Page 88: ...el sind so zu verlegen dass sie vor Tritten geschützt sind und keine schweren Gegenstände darauf abgestellt werden Kontrollieren Sie die Kabel insbesondere an den Steckern und am Produkt 13 Das Plasma Display enthält Glasteile Es kann brechen wenn es fallen gelassen oder Druck darauf ausgeübt wird Im Falle des Falles ist Vorsicht geboten um sich nicht an Scherben oder Splittern zu verletzen 14 Übe...

Page 89: ... das jeweils mitgelieferte Netzkabel Netzkabel 1 83 m Für Europa außer UK und Irland Für UK und Irland Nur das für Ihr Land bzw Gebiet geeignete Netzkabel ist mitgeliefert Zwei Bedienungsanleitungen Garantiekarte Fernbedienung Mignonzelle AAA 2 Alkalibatterien Haken 2 Reinigungstuch ...

Page 90: ...isplay Vorderseite POWER POWER 5 9 10 1 6 3 4 2 7 8 1 Taste POWER 2 Anzeige STANDBY 3 Anzeige der momentanen Eingangsquelle 4 Fernbedienungssensor 5 Taste INPUT 6 Taste OK 7 Taste MENU 8 Tasten VOLUME 9 Tasten CHANNEL 10 Taste STANDBY ON ...

Page 91: ...VICE ONLY AC IN INPUT AUDIO R L VIDEO S VIDEO 2 3 7 5 6 4 1 Die Anschlusse weisen nach unten 1 Anschlüsse VIDEO AUDIO VIDEO S VIDEO 2 Antenneneingang ANT 3 Anschlüsse AV1 AV2 AV3 SCART 4 Anschlüsse COMPONENT AUDIO Y PB PR 5 Anschlüsse HDMI AUDIO HDMI 6 Anschluss RS 232C bei Werksvoreinstellung 7 Anschluss AC IN Netzeingang ...

Page 92: ...ite 6 LIST Zeigt die Kanalliste an Drücken Sie die Taste c oder d um den zutreffenden Kanal zu wählen 7 Farbentasten ROT GRÜN GELB BLAU TELETEXT Modus Wählt eine Seite Menümodus in Bearbeiten der Kanalliste gestattet das Bearbeiten der Kanalliste 8 c d Steuert den Cursor im On Screen Menü 9 CH RETURN Kehrt zu den vorherigen Kanälen zurück 10 EXIT Verlässt jegliches Display 11 P P Wechselt den Kana...

Page 93: ...llung 24 VIDEOTEXT Funktionstasten TELETEXT Aktiviert Deaktiviert den Videotext INDEX Zeigt die Indexseite des Videotextes an CANCEL Zeigt das normale Bild an während die neue Seite des Videotextes geladen wird REVEAL Zeigt verdeckte Informationen an MIX Zeigt den Videotext mit dem normalen Bild an Schieben SIZE Wählt die Größe des Videotextfeld HOLD Beendet die Aktualisierung der Teletext Seiten ...

Page 94: ...ma Display an 2 Verwenden Sie starke Schnüre oder Ketten um das Gerät auf geeignete Weise sicher an einer Wand Säule oder einem anderen festen Bauelement zu stabilisieren Führen Sie diese Arbeit an beiden Seiten auf die gleiche Weise durch Verwenden Sie handelsübliche Seile Ketten und Befestigungsteile Der vorgesehene Tisch oder Bodenbereich muss ausreichende Festigkeit zum Tragen des Plasma Displ...

Page 95: ...Lebensdauer neuer Batterien verkürzen und eventuell ein Auslaufen alter Batterien zur Folge haben Lassen Sie keine leeren Batterien in der Fernbedienung Dadurch kann Batteriesäure austreten Etwaige ausgetretene Batteriesäure wischen Sie sorgsam mit einem Tuch ab Bei den Batterien die dem Produkt beiliegen kann die Lebensdauer lagerungsbedingt verkürzt sein Wenn die Fernbedienung voraussichtlich lä...

Page 96: ...sma Displays gehen schwache Infrarotstrahlen aus Wenn Sie in der näheren Umgebung Geräte betreiben die über Infrarot Fernbedienungen gesteuert werden wie z B Videorecorder können diese Instruktionen von den entsprechenden Fernbedienungen unter Umständen nicht richtig oder nicht vollständig empfangen werden Stellen Sie in diesem Fall die betroffenen Geräte weiter entfernt vom Plasma Display auf Je ...

Page 97: ...nnung den Vorgebungen entspricht bei Nichteinhaltung der Bestimmungen besteht Stromschlag und Brandgefahr Zum Schutz der Leistungsfähigkeit des Plasma Dis plays wird ein Netzkabel mit drei Adern mit Erdungskontakt verwendet Schließen Sie das den Netzstecker stets an eine 3 fach Schutzkontaktsteckdose an und stellen Sie sicher dass die Leitung richtig geerdet ist Europa außer UK und Irland Ziehen S...

Page 98: ...auf Bereitschaftsmodus geschaltet statt der Anzeige der momentanen Eingangsquelle leuchtet die STANDBY Anzeige auf 4 Um das Plasma Display völlig auszuschalten drücken Sie die Taste POWER unten auf dem Plasma Display Die STANDBY Anzeige erlischt Wenn Sie das Plasma Display voraussichtliche längere Zeit nicht benutzen drücken Sie die Taste POWER unten auf dem Plasma Display um das Gerät völlig ausz...

Page 99: ... Beim Betrachten von Videotext Drücken Sie P zum Erhöhen der Seitennummer Drücken Sie P zum Verringern der Seitennummer Mit 0 bis 9 an der Fernbedienung Wählen Sie die Kanäle direkt durch Drücken der Tasten 0 bis 9 BEISPIEL Zur Wahl von Kanal 5 einstelliger Kanal drücken Sie 5 Zur Wahl von Kanal 25 zweistelliger Kanal drücken Sie 2 dann 5 Beim Betrachten von Videotext Zum Aufrufen einer Seite mit ...

Page 100: ...chalten drücken Sie die Taste erscheint auf dem Bildschirm Drücken Sie die Taste erneut um die Stummschaltung wieder aufzuheben Die Stummschaltung kann auch durch Drücken von aufgehoben werden Plasma Display Unterseite P Regeln der Lautstärke Volume 4 Stumm Tasten VOLUME Anzeige von Daten Die von Ihnen gewählten Kanaldaten und der Einstellungsstatus können angezeigt werden Drücken Sie die Taste Fü...

Page 101: ...DUAL NICAM DUAL NICAM Mono NICAM Mono Stereo Stereo Bei jedem mit der Taste gewählten Tonmultiplexmodus ändert sich das Display in Abhängigkeit von den empfangenen Sendesignalen Nachdem der Modus MONO gewählt worden ist bleibt das Plasma Display System auf Mono geschaltet auch wenn das System ein Programm in Stereo empfängt Wenn Sie wieder Stereo hören möchten müssen Sie auf den Modus I oder II um...

Page 102: ...angen Drücken Sie dann die Taste oder OK 3 Drücken Sie die Taste c oder d um zu PIP TWIN zu gelangen Drücken Sie dann die Taste oder OK 4 Wählen Sie PIP TWIN Modus und drücken Sie erneut die Taste oder OK 5 Drücken Sie die Taste c oder d um die gewünschte Option wie folgt zu wählen Drücken Sie dann die Taste oder BACK Aus PIP TWIN1 TWIN2 AV1 Wenn Sie auf Aus schalten können Sie die folgenden Schri...

Page 103: ...len indem Sie die Taste an der Fernbedienung drücken 8 Drücken Sie die Taste c oder d um die gewünschten Position des Subpictures zu wählen Drücken Sie dann die Taste oder BACK 9 Drücken Sie die Taste EXIT Um das Subpicture auszuschalten drücken Sie die Taste EXIT an der Fernbedienung Die Multiscreen Funktion steht für folgende Kombinationen zur Verfügung ANALOG KAN AV1 2 3 S VIDEO VIDEO KOMPONENT...

Page 104: ...ermenü Punkt haben Die Anzahl der Menüebenen ist je nach Menüpunkt unterschiedlich 4 Drücken Sie c oder d zum Wählen einer Option oder eines Parameters Drücken Sie dann die Taste oder OK Bei manchen Menüpunkten drücken Sie oder anstelle von c oder d 5 Drücken Sie die Taste EXIT zum Verlassen des Menüs Sie können zu den oberen Menüebenen zurückgehen indem Sie die Taste BACK drücken Menü Home Gegens...

Page 105: ...cken Sie die Taste EXIT Bei Verwendung des Kabelkonverters kann es erforderlich sein die Kabelkonverter Ausgangskanäle manuell hinzuzufügen Manuelles Absuchen der Analogkanäle Sie können wählen ob Sie die Kanäle speichern wollen 1 Drücken Sie die Taste MENU 2 Drücken Sie die Taste c oder d um zu Tuner Setup zu gelangen Drücken Sie dann die Taste oder OK 3 Drücken Sie die Taste c oder d um zu Analo...

Page 106: ... bevorzugten Kanal zu einem anderen zu springen 6 Drücken Sie die Taste EXIT Drücken Sie die Tasten P P um zur nächsten oder vorhergehenden Seite zu gelangen Die Kanalliste zeigt die von der Kanäle Absuchen Funktion gefundenen Kanäle an Wenn Sie den Lieblingskanal Modus annullieren wollen drücken Sie die Taste FAVOURITE CH während FAV erscheint 13 Wenn Sie den Kanalnamen bearbeiten wollen drücken ...

Page 107: ...Information gedrückt wird 1 Drücken Sie die Taste MENU 2 Drücken Sie die Taste c oder d um zu System zu gelangen Drücken Sie dann die Taste oder OK 3 Drücken Sie die Taste c oder d um zu Einstellen der Uhr zu gelangen Drücken Sie dann die Taste oder OK erneut 4 Wählen Sie Datum und drücken Sie die Taste oder OK 5 Drücken Sie die Taste oder um zu Tag Mon Monat und Jahr zu gelangen und nehmen Sie di...

Page 108: ...Anwender Erlaubt es dem Anwender die Einstellung nach Bedarf anzupassen Sie können den Modus für jede Eingangsquelle einstellen 5 Drücken Sie die Taste EXIT Sie können die Modi wählen indem Sie die Taste AV SELECTION an der Fernbedienung drücken Timer Sie können einen Zeitraum von 10 bis 240 Minuten wählen nach dem das Plasma Display automatisch auf Bereitschaftsmodus schaltet 1 Drücken Sie die Ta...

Page 109: ... Taste EXIT Wenn Sie Änderungen an den Optionen vornehmen wird der Bild Modus automatisch auf Anwender umgeschaltet Verwendung des Rauschreduzierung Merkmals 1 Drücken Sie die Taste MENU 2 Drücken Sie die Taste c oder d um zu Bild zu gelangen Drücken Sie dann die Taste a oder OK 3 Drücken Sie die Taste c oder d um zu Rauschreduzier zu gelangen Drücken Sie dann die Taste a oder OK 4 Drücken Sie die...

Page 110: ...ie Taste c oder d um zu zu SRS TruSurround XT zu gelangen Drücken Sie dann die Taste a oder OK 4 Drücken Sie die Taste c oder d um die gewünschte Option Ein oder Aus zu wählen Drücken Sie dann die Taste b oder BACK Wahl des Klangeffekts Sie können den zu verwendenden Klangeffekt wählen 1 Drücken Sie die Taste MENU 2 Drücken Sie die Taste c oder d um zu Ton zu gelangen Drücken Sie dann die Taste a ...

Page 111: ...rd das Bild progressiv zu den Seiten des Bildschirms ausgedehnt Zoom Für 16 9 Letterbox Bilder Balken können bei bestimmten Programmen oben und unten im Bild erscheinen Voll 14 9 Für 14 9 gestauchte Bilder Eine dünne Seitenmaske erscheint an beiden Seiten Kino 14 9 Für 14 9 Letterbox Bilder Eine dünne Seitenmaske erscheint an beiden Seiten und Sie könnten auch bei bestimmten Programmen Balken oben...

Page 112: ...AN AV1 AV2 AV3 S VIDEO VIDEO 5 Drücken Sie die Taste EXIT Einstellen der für die Sprache der On Screen Anzeige Sie können eine Sprache für die On screen Anzeige wie Menüs unter den folgenden Sprachen wählen Englisch Deutsch Italienisch Spanisch Französisch Holländisch Schwedisch Russisch und Türkisch 1 Drücken Sie die Taste MENU 2 Drücken Sie die Taste c oder d um zu System zu gelangen Drücken Sie...

Page 113: ...ollweiß auf Ein zu stellen um kurzzeitiges oder permanentes Bildschirm Einbrennen zu vermeiden 1 Folgen Sie Schritt 1 bis 3 in Schirmschoner 2 Drücken Sie die Taste c oder d um zu Vollweiß zu gelangen Drücken Sie dann die Taste a oder OK 3 Drücken Sie die Taste c oder d um Ein zu wählen Wenn Sie den Vollweiß Modus annullieren drücken Sie die Taste EXIT Der Modus wird auch nach 20 Minuten annullier...

Page 114: ... Drücken der Taste a auf Timer Ein oder Aus geschaltet und durch Drücken der Taste OK wird die Zeit in Schritt 4 geändert Einstellen der Plasma Display Ausschaltzeit Sie können die Ausschaltzeit einstellen sodass das Plasma Display automatisch zur gewählten Zeit ausschaltet 1 Drücken Sie die Taste MENU 2 Drücken Sie die Taste c oder d um zu System zu gelangen Drücken Sie dann die Taste a oder OK 3...

Page 115: ...2 AV 3 1 Schließen Sie das SCART Kabel an den Anschluss AV AV1 AV2 oder AV3 am Plasma Display und an den SCART Anschluss am betreffenden Gerät an 2 Schalten Sie das Plasma Display ein und drücken Sie dann die Taste INPUT zur Wahl von AV1 AV2 oder AV3 Siehe Bedienungsanleitung des betreffenden Geräts für den Signaltyp Bei Anschließen des Geräts an den Anschluss AV1 stellen Sie auf AV1 Eingang Bei A...

Page 116: ...ideorecorder DVD Player Set Top Box oder anderes audiovisuelles Gerät Anschluss an den externen Eingang INPUT AUDIO R L VIDEO S VIDEO Audiokabel Fachhandel Videokabel Fachhandel S Videokabel Fachhandel 1 Schließen Sie das Videokabel an die VIDEO Eingangsbuchse am Plasma Display und an die Video Ausgangsbuchse am betreffenden Gerät an Für Geräte mit einer S VIDEO Buchse schließen Sie das S Videokab...

Page 117: ...80p 59 94 60Hz 1280 720p 59 94 60Hz HDMI Kabel Fachhandel Audiokabel Fachhandel DVD Player HDMI Gerät 1 Schließen Sie das HDMI Kabel an die HDMI Buchse am Plasma Display und die DVD Ausgangsbuchse am betreffenden Gerät an 2 Bei Anschluss an eine DVI Buchse wie bei einem DVD Player schließen Sie das Audiokabel an die AUDIO INPUT L R Buchsen am Plasma Display und die Audio Ausgangsbuchsen am betreff...

Page 118: ... Seiten Verwenden Sie die folgenden Fernbedienungstasten zum Wählen und Bedienen der Videotext Seiten Farbentasten ROT GRÜN GELB BLAU Sie können eine Gruppe oder einen Block von Seiten wählen die in den farbigen Klammern unten im Bildschirm angezeigt werden indem Sie die entsprechende Farbtaste ROT GRÜN GELB BLAU an der Fernbedienung drücken 0 bis 9 Wählen Sie direkt eine Seite von 100 bis 899 mit...

Page 119: ...rke Uberprüfen Sie ob die Taste an der Fernbedienung gedrückt wurde Justieren Sie die Farbeinstellungen Prüfen Sie ob das korrekte Sendesystem gewählt ist Versuchen Sie das elektrische Gerät zu identifizieren das das Plasma Display beeinträchtigt und stellen Sie es weiter entfernt auf Schließen Sie das Plasma Display an eine andere Steckdose an Prüfen Sie Richtung Lage und Anschlüsse Ihrer Antenne...

Page 120: ...AV 1 1 Audio rechter Ausgang 2 Audio rechter Eingang 3 Audio linker Ausgang 4 Gemeinsame Erde für Audio 5 Erde 6 Audio linker Eingang 7 Nicht belegt 8 Audio Video Steuerung 9 Erde 10 Nicht belegt 11 Nicht belegt 12 Nicht belegt 13 Erde 14 Nicht belegt 15 Chroma S Video Eingang 16 Nicht belegt 17 Erde für Video 18 Erde 19 Videoausgang 20 Videoeingang S Videoeingang 21 Stecker Abschirmung SCART AV 2...

Page 121: ...Kanal F2 F10 Kanal I21 I69 Kanal IR A IR J Kabelfernsehen Hyper Band Kanal S1 S41 STEREO NICAM A2 Anschlüsse Rückseite ANTENNA 75 Ω DIN Eingang für VHF UHF CATV AV1 SCART AV Eingang S VIDEO Eingang TV Ausgang AV2 SCART AV Ein Ausgang RGB Eingang AV3 SCART AV Ein Ausgang RGB Eingang AV2 Ausgang Anwender wählbar KOMPONENT COMPONENT VIDEO Eingang AUDIO Eingang HDMI HDMI Eingang AUDIO Eingang RS 232C ...

Page 122: ...MI Logo und High Definition Multimedia Interface sind Marken oder eingetragene Marken der HDMI Licensing LLC Alle anderen etwaigen bestehenden Marken oder sonstigen gewerblichen Schutzrechte an den hier zitierten Bezeichnungen erkennen wir an Veröffentlicht von Pioneer Corporation Urherrechtlich geschützt 2005 Pioneer Corporation Alle Rechte vorbehalten ...

Page 123: ......
Page 124: ...elsele Belgium TEL 03 570 05 11 PIONEER ELECTRONICS ASIACENTRE PTE LTD 253 Alexandra Road 04 01 Singapore 159936 TEL 65 6472 7555 PIONEER ELECTRONICS AUSTRALIA PTY LTD 178 184 Boundary Road Braeside Victoria 3195 Australia TEL 03 9586 6300 PIONEER ELECTRONICS DE MEXICO S A DE C V Blvd Manuel Avila Camacho 138 10 piso Col Lomas de Chapultepec Mexico D F 11000 TEL 55 9178 4270 Published by Pioneer C...

Reviews: