background image

32

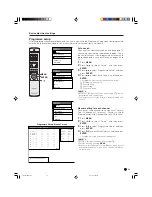
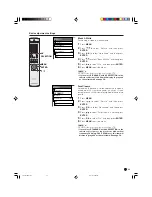
Adjustments items for PC source

Basic adjustment settings

button

For less contrast

For less brightness

For less colour
intensity

Skin tones become
purplish

For less sharpness

Selected item

Contrast

Bright

Colour

Tint

Sharp

Adjustments items for AV source

MENU

Picture

USER

Contrast

Bright

Red

Green

Blue

Reset

RETURN

[+30]

[0]

[0]

[0]

[0]

0

–30

–30

–30

–30

+40

+30

+30

+30

+30

MENU

Picture

DYNAMIC

Contrast

Bright

Colour

Tint

Sharp

Advanced

Reset

RETURN

[+30]

[0]

[0]

[0]

[0]

0

–30

–30

–30

–7

+40

+30

+30

+30

+7

A

• Select “Advanced” and then press 

ENTER

 to set “Colour

Temp”, “Black”, “Black & White” or “PureCinema” settings.
See pages 33 and 34.

button

For more contrast

For more brightness

For more colour
intensity

Skin tones become
greenish

For more sharpness

button

For less contrast

For less brightness

For weaker red

For weaker green

For weaker blue

Selected item

Contrast

Bright

Red

Green

Blue

button

For more contrast

For more brightness

For stronger red

For stronger green

For stronger blue

Picture adjustments

Adjust the picture to your preference with the following picture settings.

1

Press 

MENU

.

2

Press 

/  to select “Picture”, and then press

ENTER

.

• Picture menu displays.

3

Press  /  to select a specific adjustment item.

4

Press 

/  to adjust the item to your desired

position.

5

Press 

MENU

 to exit the menu.

A

• When all adjustments set to factory preset values,

1

 Press  /  to select “Reset”, and then press 

ENTER

.

2

 Press  /  to select “Yes”, and then press 

ENTER

.

• Return to the previous menu by pressing 

n

.

If you select “STANDARD”  with AV SELECTION on the
remote control unit, these items will display in gray
and not be selectable. See page 50.

AV selection mode

AV selection mode

ENTER

MENU

AV SELECTION

/

/

/

PDP-503HDE/(E)-c

8/31/02, 5:48 PM

32

Summary of Contents for PDP-433HDE

Page 1: ...Operating Instructions Mode d emploi Bedienungsanleitung PLASMA DISPLAY SYSTEM SYSTEME D ÉCRAN PLASMA PLASMA DISPLAY SYSTEM PDP 503HDE PDP 433HDE PDP 503HDE HYO1 9 3 02 1 30 PM 1 ...

Page 2: ...O REPLACE YOUR OBSOLETE OUTLET DO NOT DEFEAT THE SAFETY PURPOSE OF THE GROUNDING EARTHLING TYPE PLUG The following symbols are found on labels attached to the product They alert the operators and service personnel of this equipment to any potentially dangerous conditions WARNING This symbol refers to a hazard or unsafe practice which can result in personal injury or property damage CAUTION This sy...

Page 3: ...Labelling channels 28 Skipping channels 28 Setting the decoder 29 Setting the child lock 29 Sort 30 Language setting 31 Picture adjustments 32 Colour temperature 33 Black 33 Black White 34 PureCinema 34 Sound adjustment 35 Power control 36 Power control for AV source 36 Power control for PC source 37 Using external equipment 38 Watching a decoder image 39 Connecting a decoder 39 Displaying a progr...

Page 4: ...After playing a game or displaying a PC image or any still image it is best to view a normal moving picture in the WIDE or FULL screen setting for more than 3 times the length of the previous still moving image After using the Plasma Display System always switch the display to STAND BY mode Installation guidelines The Pioneer PureVision PDP 503HDE PDP 433HDE Plasma Display System incorporates a ve...

Page 5: ...ce specified on the specification label If you are not sure of the type of power supply used in your home consult your dealer or local power company 12 Power cord protection The power cords must be routed properly to prevent people from stepping on them or objects from resting on them Check the cords at the plugs and product 13 The plasma Display used in this product is made of glass Therefore it ...

Page 6: ... Stereo Sound SRS FOCUS Sound System 1 Multi System TV Tuner Built in TELETEXT Function TOP FLOF FASTEXT Picture and Picture Still Image function 12 Language On Screen Display 4 Video Input with 3 SCART terminals and PC XGA Input Component terminal Child Lock System PDP 503HDE E a 8 31 02 5 08 PM 4 ...

Page 7: ...Warranty card Media Receiver Power cord For Europe except U K and Eire For U K and Eire Remote control unit Two AA size batteries Alkaline battery System cable Two operating instructions A Always use the power cord supplied with the Plasma Display and the one supplied with the Media Receiver for each respective unit PDP 503HDE E a 8 31 02 5 08 PM 5 ...

Page 8: ...part and the back part in order that ventilation around back part is secured Using the optional PIONEER stand For details concerning installation please refer to the instruction manual provided with the stand Using the optional PIONEER speakers For details concerning installation please refer to the instruction manual provided with the speaker L Operating Environment Operating environment temperat...

Page 9: ...peaker installation please refer to the speaker instruction manual provided GRAY WHITE GRAY WHITE Setting the system 1 Connecting the system cable and the power cord to the Plasma Display 2 Connecting the system cable and the power cord to the Media Receiver L THESE SPEAKER TERMINALS CAN BE UNDER HAZARDOUS VOLTAGE WHEN YOU CONNECT OR DISCONNECT THE SPEAKER CABLES TO PREVENT THE RISK OF ELECTRIC SH...

Page 10: ...roduct Place batteries with their terminals corresponding to the e and f indicators in the battery compartment 3 Close the battery cover Cautions regarding batteries Improper use of batteries can result in chemical leakage or explosion Be sure to follow the instructions below Do not use manganese batteries When you replace the batteries use alkaline ones Place the batteries with their terminals co...

Page 11: ...TANDBY ON INPUT STANDBY ON VOLUME CHANNEL MAIN POWER button Power indicator STANDBY ON button INPUT button VOLUME r s buttons CHANNEL r s buttons Remote control sensor Plasma Display PDP 503HDE E a 8 31 02 5 08 PM 9 ...

Page 12: ...INPUT terminal ANALOG RGB CONTROL terminal Media Receiver If you re having problems operating the Media Receiver and want to return to normal screen even when it stays on the indicator lights green press CLEAR on the Media Receiver Pressing CLEAR resets the System as shown below AV SELECTION resets to STANDARD TV channel resets to channel 1 Multiscreen resets to normal Audio setting initialises SR...

Page 13: ...icture mode for sub page selecting 12 k TELETEXT mode Display hidden characters 13 MENU Display the Menu screen 14 fv TV External input mode Change the wide image mode TELETEXT mode Set the area of magnification full upper half lower half 15 b Select an input source TV INPUT 1 INPUT 2 INPUT 3 INPUT 4 PC 16 p Display the channel information 17 g Set the sound multiplex mode 18 h Set SRS and FOCUS S...

Page 14: ...tion Connecting to an antenna To enjoy a clearer picture use an outdoor antenna The following is a brief explanation of the types of connections that are used for coaxial cable Antenna cables commercially available If your outdoor antenna uses a 75 ohm coaxial cable with a standard DIN45325 plug IEC 169 2 plug it into the antenna terminal at the rear of the Media Receiver Connecting to the power c...

Page 15: ...ver The power indicator on the Media Receiver lights up red 2 Press MAIN POWER on the Plasma Display The System turns the power on The power indicator on the Plasma Display lights up green and the one on the Media Receiver lights up in green If the power indicators still light up red press any button from 0 to 9 on the remote control unit or STANDBY ON on the Plasma Display to turn the System on A...

Page 16: ...ing n Searching TV channels Auto Installation Setup Auto 01 02 55 25 85 25 03 102 25 04 05 06 07 08 09 10 11 142 25 148 25 Initial auto installation When the Plasma Display System power on for the first time after purchase the initial auto installation is invoked You can automatically set language country and channels in successive operations A See page 23 to try Auto installation from the setup m...

Page 17: ... automatically returns to the status before programme auto search 5 Automatic channel sorting When channel auto labelling finishes the Plasma Display System starts sorting the labelled channels A Cancel the setting by pressing n The system automatically returns to the status before programme auto search 6 Preset download When auto sorting finishes the Plasma Display System automatically downloads ...

Page 18: ...t the screen changes to the auto installation menu 7 Watching TV The setup menu disappears and you can watch the programmes on channel 1 12 SAT 1 B G PAL Using 0 9 on the remote control unit Select the channels directly by pressing buttons 0 to 9 a To select channel 2 a 1 digit channel press 2 To select channel 12 a 2 digit channel press o to select 2 digit input Then press 1 followed by 2 When vi...

Page 19: ...es not suddenly output loud sound as the volume level is set to 0 2 Press e again to cancel the mute Pressing ik k k k k l l l l l and g can also cancel the mute A See page 53 for details on the audio out function STANDBY ON INPUT STANDBY ON VOLUME CHANNEL VOLUME 20 20 ⴐ ⴑ Speaker MONITOR OUT Simple button operation for changing volume sound Using ik k k k k l l l l l on the remote control unit To...

Page 20: ...ptions SRS Sound Retrieval System Creates more a natural sound retrieving the spatial information from any stereo recording and restoring the original three dimensional sound field FOCUS Repositions a sound image from two speakers to a more optimal listening position or height without moving them FOCUS e SRS Produces both SRS and FOCUS effects Off Outputs the normal sound PDP 503HDE E b 8 31 02 5 ...

Page 21: ...witches between NICAM STEREO and MONO When receiving a bilingual signal Each time you press g the mode switches among NICAM p NICAM pp NICAM p pp and MONO When receiving a monaural signal Each time you press g the mode switches between NICAM MONO and MONO In the TV mode of A2 broadcasts When receiving a stereo signal Each time you press g the mode switches between STEREO and MONO When receiving a ...

Page 22: ...rations MENU Input Select WSS 4 3 Mode Position Audio Out Demo Colour Sys Language NR Description Select the kind of input signal of each input source When wide screen signal bits are present in the TELETEXT data you can view information in wide screen mode When you receive a 4 3 or 14 9 mode signal select 4 3 or WIDE display Adjusts the horizontal vertical position of the image displayed Select t...

Page 23: ...ker or stronger Adjusts audio output between left and right speakers All audio adjustment settings return the factory preset values MENU Auto Sync Fine Sync Audio Out Description Provides a clear input image Adjusts image H Pos V Pos clock and phase After selecting type of monitor output adjusts the volume of the main speaker or monitor output MENU Power Control Picture Audio Option Power Control ...

Page 24: ...screen image Adjusting Position displays to the desired position This setting cannot be stored Once the System shuts down or enters standby mode the setting is erased To move the picture around the screen again you must perform the above procedure again An on screen image from a PC source cannot be moved around Initialise the image position by pressing ENTER PDP 503HDE E c 8 31 02 5 47 PM 22 ...

Page 25: ... Setup and then press ENTER Password setting menu displays only when child lock is set See page 54 Setup menu displays when the child lock is not set Skip the step 3 3 Enter your 4 digit password with 0 9 to cancel the child lock when you set it See page 54 for details of cancelling the child lock 4 Press to select Auto Installation and then press ENTER Language menu displays 5 Press to select the...

Page 26: ...he procedure below to search TV channels A Cancel the setting by pressing n and the System automatically returns the status before programme auto search If no channels were found you should check your antenna connection and try auto installation again because it is finished See page 12 Auto labelling After finding new TV channels each network name are searched and displays A Cancel the setting by ...

Page 27: ...e programme auto search Don t shut down the System until Sorting channels displays Preset download When auto sorting finishes the channels are automatically stored in memory Sending programme 10 settings displays during each channel preset download Once all presets have downloaded Programme data sent successfully displays The System can only send preset channel information to a VCR when that devic...

Page 28: ...ss to select Auto Search and then press ENTER Programme auto search starts as shown below 1 Programme auto search 2 Auto labelling 3 Auto sorting 4 Preset download A Return to the previous menu by pressing n before programme auto search starts See pages 24 to 25 for the details on the programme auto search Programme setup After completing channel preset download you can try again with the Programm...

Page 29: ...5 MHz Press 1 7 9 7 5 ENTER 49 25 MHz Press 4 9 2 5 ENTER A Return to the previous menu by pressing n Exit the menu by pressing MENU Fine tuning menu Colour system On Programme Setup Manual menu 1 Press to select the channel you want to edit and then press ENTER The selected channel information displays 2 Press to select Colour sys and then press ENTER Receivable colour systems are listed 3 Press ...

Page 30: ...he name can be 5 characters or less A Return to the previous menu by pressing n Exit the menu by pressing MENU Skipping channels Channels with Skip set to On with Pk Pl are passed over even if you select them On Programme Setup Manual menu 1 Press to select the channel you want to edit and then press ENTER The selected channel information displays 2 Press to select Skip and then press ENTER Skip m...

Page 31: ...orks if not setting password See page 54 for the details on password setting Return to the previous menu by pressing n Exit the menu by pressing MENU Decoder menu Lock menu ENTER MENU Setting the decoder When connecting a decoder to you need assign the terminal input On Programme Setup Manual menu 1 Press to select the channel you want to edit and then press ENTER The selected channel information ...

Page 32: ...l positions can be sorted freely 1 Press MENU 2 Press to select Setup and then press ENTER 3 Press to select Programme Setup and then press ENTER 4 Press to select Sort and then press ENTER The channels are listed Black ones are set Skip to Off and blue are set Skip to On 5 Press to select the channel you want to move and then press ENTER 6 Move it to the desired position by pressing and then pres...

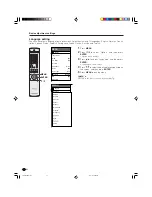
Page 33: ...nguage from option menu Select from among 12 languages English German French Italian Spanish Dutch Swedish Portuguese Greek Finnish Russian and Turkish ENTER MENU 1 Press MENU 2 Press to select Option and then press ENTER Option menu displays 3 Press to select Language and then press ENTER Language menu displays 4 Press to select the desired language listed on the screen and then press ENTER 5 Pre...

Page 34: ...trast For less brightness For weaker red For weaker green For weaker blue Selected item Contrast Bright Red Green Blue button For more contrast For more brightness For stronger red For stronger green For stronger blue Picture adjustments Adjust the picture to your preference with the following picture settings 1 Press MENU 2 Press to select Picture and then press ENTER Picture menu displays 3 Pres...

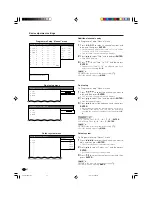
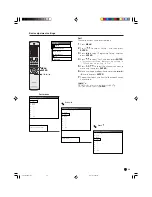
Page 35: ...s item will display in gray and not be selectable See page 50 Description White with Bluish tone White with Reddish tone Selected item High Mid High Mid Mid Low Low MENU Picture DYNAMIC Advanced Colour Temp High High Mid High Mid Mid Low Low Colour temperature Adjust the colour temperature to suit whitish tone 1 Press MENU 2 Press to select Picture and then press ENTER 3 Press to select Advanced a...

Page 36: ... to exit the menu A Return to the previous menu by pressing n If you select STANDARD with AV SELECTION on the remote control unit or input sources with vertical frequency 50 Hz e g PAL SECAM etc this item will display in gray and not be selectable See page 50 Black White For viewing a video in monochrome 1 Press MENU 2 Press to select Picture and then press ENTER 3 Press to select Advanced and the...

Page 37: ...s Balance Reset RETURN 0 0 0 15 15 Left 15 15 Right 1 Press MENU 2 Press to select Audio and then press ENTER Audio menu displays 3 Press to select a specific adjustment item 4 Press to adjust the item to your desired position 5 Press MENU to exit the menu A When all adjustments set to factory preset values 1 Press to select Reset and then press ENTER 2 Press to select Yes and then press ENTER Ret...

Page 38: ...unction may not operate No operation off When set to Enable the power will automatically shut down if the signal stays inactive for 3 hours 1 Press MENU 2 Press to select Power Control and then press ENTER 3 Press to select No operation off and then press ENTER 4 Press to select Enable and then press ENTER 5 Press MENU to exit the menu Five minutes before the power shuts down hazard warning displa...

Page 39: ...puter and the signal inputs again the System stays off The System turns on again by pressing STANDBY ON on the Plasma Display or 0 9 on the remote control unit The System is out of PC mode See page 13 If no signal inputs for 8 seconds the power shuts down When you start using the computer and the signal inputs again the System turns on Selected item Off Mode1 Mode2 ENTER MENU Power control for PC ...

Page 40: ...wer cord You can connect many types of external equipment to your Plasma Display System like a decoder VCR DVD player computer game console and camcorder To view external source images select the input source from b on the remote control unit or INPUT on the Plasma Display L To protect all equipment always turn off the Media Receiver before connecting to a decoder VCR DVD player computer game cons...

Page 41: ...ype on Input Select in the menu See page 49 The setting is stored and can be selected on the INPUT SOURCE menu To watch a decoder image select INPUT1 from the INPUT SOURCE menu using b on the remote control unit or INPUT on the Plasma Display See page 49 A Each time b is pressed the input source toggles If the decoder image does not come in clearly you may need to change the input signal type sett...

Page 42: ...n the VCR the TV automatically turns on from standby and displays a VCR image When you press the system standby button on the VCR the TV also enters standby mode A TV VCR advanced AV Link systems may not compatible with some external sources It is recommended to connect to the INPUT 2 terminal when using a decoder for ground wave signal input with a VCR If INPUT 2 signals preset in auto installati...

Page 43: ... While the Plasma Display System is in standby mode it automatically turns on and plays back the image from the audiovisual source e g VCR DVD System Standby When the connected audiovisual equipment e g VCR DVD enters standby mode so does the Plasma Display System WYSIWYR What You See Is What You Record When the remote control unit of the connected VCR has the WYSIWYR button you can automatically ...

Page 44: ... use the INPUT 3 terminal when connecting to a DVD player and other audiovisual equipment Displaying a DVD image When connecting to the INPUT 3 terminal select INPUT3 and set the correct input signal type on Input Select in the menu See page 49 The setting is stored and can be selected on the INPUT SOURCE menu To watch a DVD image select INPUT3 from INPUT SOURCE menu using b on the remote control ...

Page 45: ...some other audiovisual equipment are conveniently connected using the INPUT 4 terminals A The S video terminal has priority over the video terminals Displaying an image of the game player and camcorder When connecting to the INPUT 4 terminals select INPUT4 You only need to select the input source on the INPUT SOURCE menu To connect a game console or view a camcorder select INPUT4 from the INPUT SO...

Page 46: ... DDC1 2B compatible Refer to page 60 for a list of computer signals compatible with the Plasma Display System Signal names for 15 pin mini D sub connecter A Macintosh adaptor may be required for use for some Macintosh computers Displaying an image from a computer When connecting to a computer the correct input signal type is automatically detected See page 49 If the computer image does not come in...

Page 47: ...hrough the sensor on the System side After connecting to a CONTROL IN jack on another component its sensor will no longer receive signals To operate a component remotely point the remote control unit of the connected component at the remote control sensor on the System A Make sure the power is turned off when making connections Please complete all component connections before making control cord c...

Page 48: ...ully Use pliers to twist the clamp 90 pulling outward The clamp may deteriorate over time and become damaged if removed Gather cables into a bunch secure with provided bead bands A Cables can be routed to the right or left Using external equipment How to route cables Speed clamps and bead bands are included with this System for bunching cables Once properly bunched follow the steps below to route ...

Page 49: ...Reset and then press ENTER 2 Press to select Yes and then press ENTER Return to the previous menu by pressing n Adjustments are stored separately according to input source Image position returns to the factory preset value when H Pos or V Pos value is adjusted See page 22 Noise reduction NR AV mode only The noise of the picture can be reduced by the NR function 1 Press MENU 2 Press to select Optio...

Page 50: ...en press ENTER Return to the previous menu by pressing n ENTER MENU Description Centres the image by moving it to the left or right Centres the image by moving it to the up or down Adjusts the clock frequency Adjusts the clock phase Selected item H Pos V Pos Clock Phase Auto Sync adjustment PC mode only For automatically adjusting the computer image 1 Press MENU 2 Press to select Option and then p...

Page 51: ...rnal sources connected to those terminals INPUT3 COMPONENT or INPUT4 will display in gray and not be selectable Return to the previous menu by pressing n Input signal source Input signal setting For setting the signal type of external equipment 1 Press MENU 2 Press to select Option and then press ENTER 3 Press to select Input Select and then press ENTER 4 Press to select an input source you want t...

Page 52: ...ge on the screen 1 Press MENU 2 Press to select Option and then press ENTER 3 Press to select Colour Sys and then press ENTER 4 Press to select a compatible video signal system of your equipment and then press ENTER 5 Press MENU to exit the menu A Factory preset value is AUTO If AUTO is selected colour systems for each channel are automatically set If an image does not display clearly select anoth...

Page 53: ... or WIDE in the 4 3 Mode menu See page 52 A If the broadcast signal contains no WSS information Auto Selection will not function even when the WSS option is enabled 4 3 Mode set to 4 3 4 3 Mode set to WIDE 4 3 FULL 14 9 CINEMA 14 9 WIDE FULL ZOOM CINEMA Selected item 4 3 FULL 14 9 CINEMA 14 9 WIDE FULL ZOOM CINEMA Description For 4 3 standard pictures A side bar appears on each side For 14 9 squee...

Page 54: ...age does not switch to the correct screen format When the broadcast signal contains no WSS information the function will not work even if enabled See page 51 Picture aspect ratio AV mode only Allows you to select the aspect ratio of a video signal for standard 4 3 or full screen images 1 Press MENU 2 Press to select Option and then press ENTER 3 Press to select 4 3 Mode and then press ENTER 4 Pres...

Page 55: ...onal speakers is adjusted with ik l on the remote control unit or VOLUME on the Plasma Display Sound via the MONITOR OUT terminal is not adjustable and constantly outputs Sound via the MONITOR OUT terminal is adjusted with ik l on the remote control unit or VOLUME on the Plasma Display Sound via optional speakers is muted Selected item Fixed Variable SLEEP TIMER REMAIN 120 30 60 90 120 0 Audio out...

Page 56: ...anual is set to On you must enter a password See page 29 When you select a locked channel a password prompt message pops up Press ENTER to display the password input window Clearing the password Allows you to clear your password 1 Press MENU 2 Press to select Setup and then press ENTER Password input menu displays 3 Enter your 4 digit password with 0 9 and then press ENTER Setup menu displays 4 Pr...

Page 57: ...on the active screen which has sound output 3 Press b to select another input source on the active screen A selected image displays 4 Press c to exit dual screen A This function does not work under the following input conditions 1PC INPUT mode 2Two pictures from the same source e g INPUT 1 and INPUT 1 3Images from a high frequency signal source 4Two pictures with different vertical frequency e g P...

Page 58: ... frame captured from a moving image at the moment you press d 2 Update the still image by pressing ENTER Each time you press ENTER the image on the right screen updates 3 Press d to exit still image A This function does not work under the following input conditions 1PC INPUT mode 2Images from a high frequency signal source When this function is not available No still image display available will d...

Page 59: ...amme previews are among the many services available Teletext mode Teletext is turned on off with m on the remote control unit You can operate your Plasma Display System in Teletext mode directly by inputting commands with the remote control unit Turning on and off Teletext 1 Select a TV channel or external input source providing the Teletext programme 2 Press m to display the Teletext 3 Press m ag...

Page 60: ...resent page will change to the next previous page and simultaneously exit the subpage screen Displaying TOP Overview When receiving TOP Teletext you can read a TOP text overview 1 Press m to display Teletext 2 Press l to display the TOP Overview as shown left 3 Select the desired block or group by using 4 Press ENTER to display the selected block or group pages 5 Press l to exit the TOP Overview s...

Page 61: ...2 Adjust the picture tone See pages 32 to 34 Is the room too bright The picture may look dark in a room that is too bright Check the colour system setting See page 27 and 50 Check the input signal setting See page 49 The unit s internal temperature has increased Remove any objects blocking vent or clean See page 6 Check the power control setting See pages 36 and 37 Check the sleep timer setting Se...

Page 62: ...are registered trademarks of Apple Computer Inc Microsoft is a registered trademark of Microsoft Corporation DDC is a registered trademark of Video Electronics Standards Association Power Management is a registered trademark of Sun Microsystems Inc VGA and XGA are registered trademarks of International Business Machines Co Inc Remarks Macintosh 13 67 Hz Macintosh 16 Macintosh 19 Resolution Frequen...

Page 63: ...trol 9 Earth 10 AV LINK control 11 Not used 12 Not used 13 Earth 14 Not used 15 Chroma S Video input 16 Not used 17 Earth for video 18 Earth 19 Video output 20 Video input S video input 21 Plug shield SCART INPUT 3 1 Audio right output 2 Audio right input 3 Audio left output 4 Common earth for audio 5 Earth 6 Audio left input 7 Blue input 8 Audio video control 9 Earth 10 Not used 11 Green input 12...

Page 64: ...SCART AV in out S VIDEO in AV Link INPUT 3 SCART AV in out S VIDEO in RGB in Component Antenna 75 q Din Type for VHF UHF in INPUT 4 S VIDEO AV in PC 15 Pin mini D Sub Audio in Monitor Out Terminal Audio Variable Fixed S VIDEO out AV out Power Requirement AC 220 240 V 50 60 Hz 40 W 0 8 W Standby Dimensions 420 W 70 H 330 D mm Weight 4 4 kg Accessories Power Cord Remote control unit Two AA size batt...

Page 65: ...eteriorate slightly when an image with little movement such as a photograph or computer image is continuously displayed This is caused by the plasma panel s protection function which detects images with slight movement and automatically adjusts brightness to protect the display and is not a malfunction The screen saver function begins operating when the display detects no or little screen movement...

Page 66: ...t sur les étiquettes apposées sur le produit Ils alertent les utilisateurs de ce matériel ainsi que le personnel du service après vente sur toutes les situations qui présentent un danger potentiel DANGER Ce symbole concerne un risque ou une pratique dangereuse qui peut entraîner des blessures graves ou la mort ATTENTION Ce symbole concerne un risque ou une pratique dangereuse qui peut entraîner de...

Page 67: ...age de la langue 31 Réglages de l image 32 Température de couleur 33 Noir 33 Noir et blanc 34 PureCinema 34 Réglage du son 35 Commande d alimentation 36 Commande d alimentation pour source AV 36 Commande d alimentation pour source PC 37 Utilisation d appareils externes 38 Pour regarder l image d un décodeur 39 Raccordement d un décodeur 39 Affichage d un programme 39 Pour regarder l image d un mag...

Page 68: ... à moins de 2 heures à la fois Après la fin du jeu l affichage de l image d un PC ou d une image fixe il est préférable de voir une image mobile normale dans le réglage LARGE ou PLEIN pendant trois fois la durée de l image fixe précédente Après avoir utilisé l écran à plasma mettez toujours l écran en mode ATTENTE Instructions d installation Le système d écran à plasma Pioneer PureVision PDP 503HD...

Page 69: ...uette des spécifications Si vous n êtes pas sûr du type d alimentation utilisé dans votre région consultez votre revendeur ou la compagnie d électricité locale 12 Protection du cordon d alimentation Les cordons d alimentation doivent être acheminés correctement pour éviter d être piétinés ou d être encombrés par des objets Vérifiez les cordons aux fiches et sur l appareil 13 L écran à plasma utili...

Page 70: ...ICAM A2 Système sonore SRS FOCUS 1 Tuner TV multisystème Fonction TELETEXTE intégrée TOP FLOF FASTEXT Image dans l image Fonction d image fixe Affichage à l écran en 12 langues 4 entrées vidéo avec 3 prises Péritel et entrée PC XGA Prise pour périphérique Verrouillage pour enfant PDP 503HDE F a 9 3 02 4 15 PM 4 ...

Page 71: ...les Carte de garantie Récepteur de média Cordon d alimentation Pour l Europe excepté le Royaume Uni et l Eire Pour le Royaume Uni et l Eire Télécommande Deux piles AA Piles alcalines Câble système Deux modes d emploi B Utilisez toujours le cordon d alimentation fourni avec l écran à plasma et celui fourni avec le récepteur de média pour chaque appareil respectif PDP 503HDE F a 9 3 02 4 15 PM 5 ...

Page 72: ...ière afin d assurer la ventilation autour de l appareil Utilisation du socle PIONEER en option Pour les détails sur l installation reportez vous au mode d emploi fourni avec le socle Utilisation des haut parleurs PIONEER en option Pour les détails sur l installation reportez vous au mode d emploi fourni avec les haut parleurs M Environnement de fonctionnement Température et humidité de l environne...

Page 73: ...option reportez vous au mode d emploi fourni avec les haut parleurs GRIS BLANC GRIS BLANC Mise en place du système 1 Raccordement du câble système et du cordon d alimentation à l écran à plasma 2 Raccordement du câble système et du cordon d alimentation au récepteur de média M CES PRISES POUR HAUT PARLEURS PEUVENT ETRE SOUSTENSION DANGEREUSE LORSQUEVOUS BRANCHEZ OU DEBRANCHEZ LES CABLES DES HAUT P...

Page 74: ...orrespondre leurs bornes avec les indications e et f dans le compartiment 3 Refermez le couvercle Précautions sur les piles Une utilisation incorrecte des piles peut provoquer des fuites ou une explosion Veillez à suivre les instructions ci dessous N utilisez pas de piles au manganèse Utilisez des piles alcalines lors du remplacement Placez les piles en faisant correspondre leurs bornes avec les i...

Page 75: ...BY ON INPUT STANDBY ON VOLUME CHANNEL Touche MAIN POWER Indicateur d alimentation Touche STANDBY ON Touche INPUT Touches VOLUME r s Touches CHANNEL r s Capteur de télécommande Ecran à plasma PDP 503HDE F a 9 3 02 4 15 PM 9 ...

Page 76: ...r de média et si vous désirez retourner à l écran normal même si l appareil reste sous tension l indicateur est allumé en vert appuyez sur CLEAR du récepteur de média La pression sur CLEAR réinitialise le système comme indiqué ci dessous SELECTION AV revient à STANDARD Le canal télévisé revient sur le canal 1 Les écrans multiples reviennent à la normale Le réglage audio est initialisé SRS revient ...

Page 77: ... TELETEXTE Change le mode de l image pour la sélection de la sous page 12 k Mode TELETEXTE Affiche les caractères dissimulés 13 MENU Affiche l écran du menu 14 fv Mode d entrée TV externe Change le mode d image large Mode TELETEXTE Règle la zone d agrandissement totale moitié supérieure moitié inférieure 15 b Sélectionne une source d entrée TV Entrée 1 Entrée 2 Entrée 3 Entrée 4 PC 16 p Affiche le...

Page 78: ...rdement à une antenne Pour obtenir des images plus nettes utilisez une antenne externe Ce qui suit est une brève explication des types de raccordements utilisés pour le câble coaxial Antennes et câbles en vente dans le commerce Si votre antenne externe est dotée d un câble coaxial de 75 ohms avec fiche standard DIN45325 IEC 169 2 branchez la dans la prise d antenne à l arrière du récepteur de médi...

Page 79: ...e média L indicateur d alimentation sur le récepteur de média s allume en rouge 2 Appuyez sur MAIN POWER de l écran à plasma Le système se met sous tension L indicateur d alimentation de l écran à plasma s allume en vert et celui du récepteur de média en vert également Si les indicateurs d alimentation restent allumés en rouge appuyez sur une touche de 0 à 9 sur la télécommande ou sur STANDBY ON d...

Page 80: ...anaux télévisés Autoinstallation Installation Auto 01 02 55 25 85 25 03 102 25 04 05 06 07 08 09 10 11 142 25 148 25 Auto installation initiale L auto installation initiale a lieu lorsque le système d écran à plasma est mis sous tension pour la première fois après l achat Vous pouvez régler automatiquement la langue le pays et les canaux par opérations successives B Voir page 23 pour tenter l auto...

Page 81: ...ant la recherche automatique de programme 5 Tri automatique des canaux Lorsque l étiquetage automatique des canaux est terminé le système d écran à plasma commence à trier les canaux étiquetés B Annulez le réglage en appuyant sur n Le système revient automatiquement à l état avant la recherche automatique de programme 6 Téléchargement des préréglages Lorsque le tri automatique est terminé le systè...

Page 82: ...stallation 7 Pour regarder la télévision Le menu d installation disparaît et vous pouvez regarder les programmes sur le canal 1 12 SAT 1 B G PAL Utilisation de 0 9 sur la télécommande Sélectionnez directement les canaux en appuyant sur les touches 0 à 9 a Pour sélectionner le canal 2 un canal à un chiffre appuyez sur 2 Pour sélectionner le canal 12 un canal à deux chiffres appuyez sur o pour sélec...

Page 83: ...ein volume du système si le niveau du volume est réglé sur 0 2 Appuyez de nouveau sur e pour annuler la sourdine Appuyez sur ik k k k k l l l l l et g peut également annuler la sourdine B Voir page 53 pour les détails sur la fonction de sortie audio STANDBY ON INPUT STANDBY ON VOLUME CHANNEL VOLUME 20 20 ⴐ ⴑ Haut parleur MONITOR OUT Opération sur une touche pour changer le volume son Utilisation d...

Page 84: ...trieval System système de reprise du son Rend un son plus naturel en reprenant l information spatiale à partir d un enregistrement stéréo et en la remettant dans le champ sonore tri dimensionnel d origine FOCUS Repositionne une image avec le son provenant de deux haut parleurs sur une position d écoute ou une hauteur optimale sans les déplacer FOCUS e SRS Produit les deux effets SRS et FOCUS Arret...

Page 85: ...AM STÉREO à MONO Lors de la réception d un signal bilingue A chaque pression sur g le mode passe de NICAM p à NICAM pp NICAM p pp et MONO Lors de la réception d un signal monaural A chaque pression sur g le mode passe de NICAM MONO à MONO Dans le mode télévisé d émissions A2 Lors de la réception d un signal stéréo A chaque pression sur g le mode passe de STÉREO à MONO Lors de la réception d un sig...

Page 86: ...n Sortie audio Démo Systeme Couleur Langue NR Description Sélectionnez le type de signal pour chaque source d entrée Lorsque les bits des signaux de grand écran sont présents dans les données TELETEXTE vous pouvez regarder les informations dans le mode grand écran Si vous recevez un signal de mode 4 3 ou 14 9 sélectionnez l affichage 4 3 ou LARGE Règle la position horizontale verticale de l image ...

Page 87: ...aut parleurs gauche et droit Tous les réglages audio reviennent aux valeurs préréglées en usine MENU Sync Automat Sync fine Sortie audio Description Procure une image d entrée nette Règle la position horizontale et verticale de l image l horloge et la phase Après la sélection du type de sortie de l écran règle le volume du haut parleur principal ou de la sortie de l écran MENU Commande alimentatio...

Page 88: ...ion de réglage s affiche sur la position désirée Ce réglage ne peut pas être sauvegardé Il est effacé lorsque le système se ferme ou entre en mode d attente Pour déplacer de nouveau l image à l écran vous devrez exécuter de nouveau la procédure ci dessus L image à l écran provenant d un PC ne peut pas être déplacée Initialisez la position de l image en appuyant sur ENTER PDP 503HDE F c 9 3 02 4 18...

Page 89: ...t de passe ne s affiche que lorsque le verrouillage enfant est réglé Voir page 54 Le menu d installation s affiche lorsque le verrouillage enfant n est pas réglé Omettez l étape 3 3 Entrez votre mot de passe à 4 chiffres avec 0 9 pour annuler le verrouillage enfant lorsque vous l avez réglé Voir page 54 pour les détails sur l annulation du verrouillage enfant 4 Appuyez sur pour sélectionner Autoin...

Page 90: ...ssous pour rechercher les canaux télévisés B Annulez le réglage en appuyant sur n Le système revient automatiquement à l état précédant la recherche auto de programme Si aucun canal n a été trouvé vérifiez le branchement de l antenne et tentez de nouveau l auto installation car elle est terminée Voir page 12 Etiquetage auto Lorsqu un nouveau canal télévisé est trouvé le nom de la station est reche...

Page 91: ... le système avant que Tri des canaux ne s affiche Téléchargement des préréglages Lorsque le tri auto est terminé les canaux sont automatiquement sauvegardés en mémoire Envoi des réglages de programme 10 s affiche pendant chaque téléchargement des préréglages des canaux Lorsque tous les préréglages ont été téléchargés Envoi des données de programme réussi s affiche Le système ne peut envoyer des in...

Page 92: ...programme démarre comme indiqué ci dessous 1Recherche auto de programme 2Etiquetage auto 3Tri auto 4Téléchargement des préréglages B Revenez au menu précédent en appuyant surn avant que la recherche auto de programme ne démarre Voir pages 24 to 25 pour les détails sur la recherche auto de programme Installation du programme Après le téléchargement des préréglages des canaux vous pouvez tenter de n...

Page 93: ...puyant sur n Sortez du menu en appuyant sur MENU Menu Accord fin Système couleur Sur le menu Manuel d Installation programme 1 Appuyez sur pour sélectionner le canal à éditer et appuyez ensuite sur ENTER Les informations sur le canal sélectionné sont affichées 2 Appuyez sur pour sélectionner Syst Couleur et appuyez ensuite sur ENTER La liste des systèmes couleur recevables s affiche 3 Appuyez sur ...

Page 94: ...z au menu précédent en appuyant sur n Sortez du menu en appuyant sur MENU Omission des canaux Les canaux avec Omission réglée sur Marche avec Pk Pl sont omis même si vous les sélectionnez Sur le menu Manuel d Installation programme 1 Appuyez sur pour sélectionner le canal à éditer et appuyez ensuite sur ENTER Les informations sur le canal sélectionné sont affichées 2 Appuyez sur pour sélectionner ...

Page 95: ... mot de passe n est pas réglé Voir page 54 pour les détails sur le réglage du mot de passe Revenez au menu précédent en appuyant sur n Sortez du menu en appuyant sur MENU Menu décodeur Menu verrouillage ENTER MENU Réglage du décodeur Pour le raccordement d un décodeur vous devrez attribuer l entrée de la prise Sur le menu Manuel d Installation programme 1 Appuyez sur pour sélectionner le canal à é...

Page 96: ...stallation et appuyez ensuite sur ENTER 3 Appuyez sur pour sélectionner Installation programme et appuyez ensuite sur ENTER 4 Appuyez sur pour sélectionner Tri et appuyez ensuite sur ENTER La liste des canaux est présentée Les canaux en noir sont ceux pour lesquels Omission est réglé sur Arret et ceux en bleu sont ceux réglés sur Marche 5 Appuyez sur pour sélectionner le canal à déplacer et appuye...

Page 97: ...ionnez parmi 12 langues Anglais Allemand Français Italien Espagnol Néerlandais Suédois Portugais Grec Finlandais Russe et Turc ENTER MENU 1 Appuyez sur MENU 2 Appuyez sur pour sélectionner Options et appuyez ensuite sur ENTER Le menu Options est affiché 3 Appuyez sur pour sélectionner Langue et appuyez ensuite sur ENTER Le menu Langue est affiché 4 Appuyez sur pour sélectionner la langue désirée d...

Page 98: ...tténuer le rouge Pour atténuer le vert Pour atténuer le bleu Rubrique sélectionnée Contraste Luminos Rouge Vert Bleu touche Pour augmenter le contraste Pour augmenter la luminosité Pour accentuer le rouge Pour accentuer le vert Pour accentuer le bleu ENTER MENU AV SELECTION Réglages de l image Ajustez l image selon vos préférences avec les réglages de l image suivants 1 Appuyez sur MENU 2 Appuyez ...

Page 99: ...ris et ne peut pas être sélectionnée Voir page 50 Description Blanc avec nuance bleue Blanc avec nuance rouge Rubrique sélectionnée Haut Moyen Haut Moyen Moyen Bas Bas MENU Image DYNAMIQUE Avancé Temp Couleur Haut Haut Moyen Haut Moyen Moyen Bas Bas Température de couleur Réglez la température de couleur pour convenir aux tons blancs 1 Appuyez sur MENU 2 Appuyez sur pour sélectionner Image et appu...

Page 100: ... Revenez au menu précédent en appuyant sur n Si vous sélectionnez STANDARD pour AV SELECTION avec la télécommande ou des sources d entrée avec fréquence verticale de 50 Hz par ex PAL SECAM cette rubrique est affichée en gris et ne peut pas être sélectionnée Voir page 50 Noir et blanc Pour regarder une vidéo en monochrome 1 Appuyez sur MENU 2 Appuyez sur pour sélectionner Image et appuyez ensuite s...

Page 101: ...z sur MENU 2 Appuyez sur pour sélectionner Audio et appuyez ensuite sur ENTER Le menu Audio est affiché 3 Appuyez sur pour sélectionner une rubrique de réglage spécifique 4 Appuyez sur pour régler la rubrique sur la position désirée 5 Appuyez sur MENU pour sortir du menu B Pour remettre tous les réglages sur les valeurs préréglées en usine 1 Appuyez sur pour sélectionner Réinitial et appuyez ensui...

Page 102: ...d opération arrêt Si le réglage est sur Activer l appareil se met automatiquement hors tension si le signal reste inactif pendant 3 heures 1 Appuyez sur MENU 2 Appuyez sur pour sélectionner Commande alimentation et appuyez ensuite sur ENTER 3 Appuyez sur pour sélectionner Pas d opé arrêt et appuyez ensuite sur ENTER 4 Appuyez sur pour sélectionner Activer et appuyez ensuite sur ENTER 5 Appuyez sur...

Page 103: ...i des signaux sont de nouveau entrés Le système se remet sous tension en appuyant sur STANDBY ON sur l écran à plasma ou sur 0 9 de la télécommande Le système est sorti du mode PC Voir page 13 Si aucun signal n est entré pendant 8 minutes le système se met hors tension Le système se met sous tension lorsque vous commencez à utiliser l ordinateur et que les signaux sont de nouveau entrés Rubrique s...

Page 104: ...différents types d appareils externes comme par exemple un décodeur un magnétoscope un lecteur DVD un ordinateur une console de jeu et un caméscope sur le système d écran à plasma Pour regarder des images provenant d une source externe sélectionnez la source d entrée avec b de la télécommande ou INPUT sur l écran à plasma M Pour protéger les appareils mettez toujours le récepteur de média hors ten...

Page 105: ... dans le menu Voir page 49 Le réglage est sauvegardé et peut être sélectionné dans le menu SOURCE ENTRÉE Pour regarder l image d un décodeur sélectionnez Entrée 1 à partir du menu SOURCE ENTRÉE avec b de la télécommande ou INPUT sur l écran à plasma Voir page 49 B A chaque pression sur b la source d entrée change Si l image du décodeur n est pas claire vous devrez changer le réglage du type de sig...

Page 106: ...oscope le téléviseur se met automatiquement sous tension à partir du mode d attente et affiche l image du magnétoscope Lorsque vous appuyez sur la touche d attente du système du magnétoscope le téléviseur entre également en mode d attente B Les systèmes TV magnétoscopes avancés AV Link peuvent ne pas être compatibles avec certaines sources externes Nous vous recommandons de brancher sur la prise I...

Page 107: ...e il se met automatiquement sous tension et procède à la lecture de l image de l appareil audiovisuel magnétoscope ou lecteur DVD par ex Système en attente Lorsque l appareil audiovisuel raccordé magnétoscope ou lecteur DVD par ex entre en mode d attente le système d écran plasma fait de même WYSIWYR What You See Is What You Record Vous enregistrez ce que vous voyez Lorsque la télécommande du magn...

Page 108: ...ez utiliser la prise INPUT 3 pour raccorder un lecteur DVD et un autre appareil audiovisuel Affichage d une image DVD Lors du raccordement à la prise INPUT 3 sélectionnez Entrée 3 et réglez le type de signal d entrée correct dans Sélection d entrée dans le menu Voir page 49 Le réglage est sauvegardé et peut être sélectionné dans le menu SOURCE ENTRÉE Pour regarder une image DVD sélectionnez Entrée...

Page 109: ...cope et un autre appareil audiovisuel peuvent être raccordés en utilisant les prises INPUT 4 B La prise S vidéo a priorité sur les prises vidéo Affichage de l image d une console de jeu et d un caméscope Pour le raccordement sur les prises INPUT 4 sélectionnez Entrée 4 Vous n avez qu à sélectionner la source d entrée dans le menu SOURCE ENTRÉE Pour raccorder une console de jeu ou regarder l image ...

Page 110: ... du PC sont compatibles DDC1 2B Reportez vous en page 60 pour la liste des signaux d ordinateur compatibles avec le système d écran plasma Noms des signaux pour connecteur mini D sub 15 broches B Un adaptateur Macintosh peut être requis pour utiliser certains ordinateurs Macintosh Affichage de l image d un ordinateur Lors du raccordement d un ordinateur le type de signal d entrée correct est autom...

Page 111: ...r le capteur du côté système Après le raccordement sur une prise d entrée CONTROL IN d un autre composant son capteur ne reçoit plus de signaux Pour faire fonctionner un composant à distance dirigez la télécommande du composant raccordé vers le capteur de télécommande du système B Veillez à ce que les appareils soient hors tension pendant les raccordements Terminez tous les raccordements des compo...

Page 112: ...our tordre le collier de 90 en tirant vers l extérieur Le collier peut se détériorer avec le temps et être endommagé s il est retiré Liez les câbles en faisceau fixez avec les serre câbles fournis B Les câbles peuvent être acheminés vers la droite ou la gauche Utilisation d appareils externes Comment acheminer les câbles Des colliers rapides et des serre câbles sont inclus avec le système pour lie...

Page 113: ...initial et appuyez ensuite sur ENTER 2 Appuyez sur pour sélectionner Oui et appuyez ensuite sur ENTER Revenez à l écran précédent en appuyant sur n Les réglages sont sauvegardés séparément selon la source d entrée La position de l image revient à la valeur préréglée en usine lorsque Pos hori ou Pos vert est réglé Voir page 22 Options MENU NR Haut Haut Bas Arret Diminution de son NR mode AV uniquem...

Page 114: ...sélectionner Oui et appuyez ensuite sur ENTER Revenez à l écran précédent en appuyant sur n ENTER MENU Description Centre l image en la déplaçant vers la gauche ou la droite Centre l image en la déplaçant de haut en bas Règle la fréquence de l horloge Règle la phase de l horloge Rubrique sélectionnée Pos hori Pos vert Horloge Phase Réglage Sync Automat mode PC uniquement Pour régler automatiquemen...

Page 115: ...REIL ou Entrée 4 est affichée en gris et ne peut pas être sélectionnée Revenez à l écran précédent en appuyant sur n Source de signal d entrée Réglage du signal d entrée Pour régler le type de signal de l appareil externe 1 Appuyez sur MENU 2 Appuyez sur pour sélectionner Options et appuyez ensuite sur ENTER 3 Appuyez sur pour sélectionner Sélection d entrée et appuyez ensuite sur ENTER 4 Appuyez ...

Page 116: ... MENU 2 Appuyez sur pour sélectionner Options et appuyez ensuite sur ENTER 3 Appuyez sur pour sélectionner Systeme Couleur et appuyez ensuite sur ENTER 4 Appuyez sur pour sélectionner un système signal vidéo compatible avec votre appareil et appuyez ensuite sur ENTER 5 Appuyez sur MENU pour sortir du menu B La valeur préréglée en usine est AUTO Si AUTO est sélectionné les systèmes pour chaque cana...

Page 117: ... du Mode 4 3 Voir page 52 B Si le signal de l émission ne contient pas d information WSS Auto Sélection ne fonctionne pas même si l option WSS est activée Mode 4 3 réglé sur 4 3 Mode 4 3 réglé sur LARGE 4 3 PLEIN 14 9 CINEMA 14 9 LARGE PLEIN ZOOM CINEMA Rubrique sélectionnée 4 3 PLEIN 14 9 CINEMA 14 9 LARGE PLEIN ZOOM CINEMA Description Pour les images 4 3 standard Une barre latérale apparaît de c...

Page 118: ...ge ne passe pas au format d écran correct Si le signal de l émission ne contient pas d information WSS la fonction n est pas opérationnelle même si elle est activée Voir page 51 Rapport hauteur largeur de l image mode AV uniquement Vous permet de sélectionner le rapport hauteur largeur du signal vidéo pour les images standard 4 3 ou plein écran 1 Appuyez sur MENU 2 Appuyez sur pour sélectionner Op...

Page 119: ...aut parleurs en option se règle avec ik l sur la télécommande ou VOLUME de l écran à plasma Le son de la prise MONITOR OUTPUT n est pas réglable et sort en permanence Le son de la prise MONITOR OUTPUT se règle avec ik l sur la télécommande ou VOLUME sur l écran à plasma Le son par les haut parleurs en option est coupé Rubrique sélectionnée Fixe Variable MINUT EXTINCTION TEMPS RESTANT 120 30 60 90 ...

Page 120: ...t réglé sur Marche vous devez entrer un mot de passe Voir page 29 Si vous sélectionnez un canal verrouillé un message demandant le mot de passe apparaît Appuyez sur ENTER pour afficher la fenêtre d entrée du mot de passe Annulation du mot de passe Vous permet d annuler le mot de passe 1 Appuyez sur MENU 2 Appuyez sur pour sélectionner Installation et appuyez ensuite sur ENTER Le menu d entrée du m...

Page 121: ... a une sortie son 3 Appuyez sur b pour sélectionner une autre source d entrée sur l écran activé L image sélectionnée s affiche 4 Appuyez sur c pour sortir du double écran B Cette fonction n est pas opérationnelle dans les conditions d entrée suivantes 1 Mode d entrée PC 2 Deux images provenant de la même source Entrée 1 et Entrée 1 par ex 3 Images venant d une source de signal haute fréquence 4 D...

Page 122: ...age mobile au moment où vous avez appuyé sur d 2 Actualisez l image fixe en appuyant sur ENTER A chaque pression sur ENTER l image sur l écran droit est actualisée 3 Appuyez sur d pour sortir de l image fixe B Cette fonction n est pas opérationnelle dans les conditions d entrée suivantes 1 Mode d entrée PC 2 Images venant d une source de signal haute fréquence Si cette fonction n est pas disponibl...

Page 123: ...bles Mode Télétexte Le Télétexte est activé désactivé avec m de la télécommande Vous pouvez faire fonctionner le système d écran à plasma directement en mode Télétexte en entrant les commandes avec la télécommande Activer et désactiver le Télétexte 1 Sélectionnez un canal télévisé ou une source d entrée externe fournissant le programme Télétexte 2 Appuyez sur m pour afficher le Télétexte 3 Appuyez...

Page 124: ... à la page suivante précédente et sort simultanément de l écran de la sous page Affichage de la vue d ensemble TOP Lors de la réception du Télétexte TOP vous pouvez lire une vue d ensemble du texte TOP 1 Appuyez sur m pour afficher le Télétexte 2 Appuyez sur l pour afficher la vue d ensemble TOP comme indiqué à gauche 3 Sélectionnez le bloc ou le groupe désiré en utilisant 4 Appuyez sur ENTER pour...

Page 125: ...t 52 Réglez la tonalité de l image Voir pages 32 à 34 La pièce est elle trop claire L image peut paraître sombre dans une pièce trop éclairée Vérifiez le réglage du système couleur Voir page 27 et 50 Vérifiez le réglage du signal d entrée Voir page 49 La température interne de l appareil a augmenté Retirez les objets bloquant les évents ou nettoyez Voir page 6 Vérifiez le réglage de commande d ali...

Page 126: ...Macintosh sont des marques déposées d Apple Computer Inc Microsoft est une marque déposée de Microsoft Corporation DDC est une marque déposée de Video Electronics Standards Association Power Management est une marque déposée de Sun Microsystems Inc VGA et XGA sont des marques déposées d International Business Machines Co Inc Remarques Macintosh 13 67 Hz Macintosh 16 Macintosh 19 Résolution Fréquen...

Page 127: ...ommande AV LINK 11 Non utilisée 12 Non utilisée 13 Terre 14 Non utilisée 15 Entrée Chroma S Vidéo 16 Non utilisée 17 Terre pour vidéo 18 Terre 19 Sortie vidéo 20 Entrée vidéo entrée S vidéo 21 Protection de prise Péritel INPUT 3 1 Sortie audio droite 2 Entrée audio droite 3 Sortie audio gauche 4 Terre commune pour audio 5 Terre 6 Entrée audio gauche 7 Entrée bleue 8 Commande audio vidéo 9 Terre 10...

Page 128: ...ons 420 L 70 H 330 P mm Poids 4 4 kg Accessoires Cordon d alimentation télécommande deux piles AA câble système Deux modes d emploi Système de réception Tuner Arrière INPUT 1 Avant Arrière La conception et les spécifications sont susceptibles d être modifiées sans préavis Fiche technique Rubrique Ecran à plasma de 50 pouces Modèle PDP 503PE Nombre de pixels 1280g768 pixels Amplificateur audio 12 W...

Page 129: ...égèrement si une image fixe telle qu une photo ou une page d ordinateur est affichée en permanence Cela est dû à la fonction de protection de l écran à plasma qui détecte les images fixes et diminue automatiquement leur luminosité La fonction d économie d écran se met en service lorsque l écran ne détecte aucun mouvement ou seulement peu de mouvement pendant 3 minutes environ M Persistance des ima...

Page 130: ...LEKTRIKER AUSGEWECHSELT WERDEN VERSUCHEN SIE NICHT DEN SCHUTZKONTAKT MISSBRÄUCHLICH ZU UMGEHEN Die nachstehenden Symbole befinden sich auf am Gerät angebrachten Aufklebern Sie machen den Benutzer und das Wartungspersonal auf mögliche Gefahren aufmerksam WARNUNG Dieses Symbol weist auf eine gefährliche oder unsichere Handlung hin die zu Personen oder Sachschäden führen kann VORSICHT Dieses Symbol w...

Page 131: ...geben von Kanalnamen 28 Überspringen von Kanälen 28 Einstellen des Decodereingangs 29 Einstellen der Kindersicherung Lock 29 Sortieren 30 Sprache Einstellung 31 Bildeinstellungen 32 Farbtemperatur 33 Schwarz 33 Schwarzweiß 34 PureCinema 34 Klangregelung 35 Stromregelung 36 Stromregelung bei AV Quelle 36 Stromregelung bei PC Quelle 37 Einsatz externer Geräte 38 Wiedergabe von einem Decoder 39 Ansch...

Page 132: ...ber mindestens die dreifache Dauer der vorherigen Standbildwiedergabe ein normales bewegtes Bild zu betrachten Schalten Sie das Display nach Benutzung des Plasma Display Systems stets auf den Bereitschaftsmodus Standby Grundregeln für die Aufstellung Das Pioneer PureVision Plasma Display System PDP 503HDE PDP 433HDE zeichnet sich durch eine sehr flache Bauweise aus Aus Sicherheitsgründen sollten b...

Page 133: ... Spannungsversorgung muss den Angaben auf dem Typenschild entsprechen Bitte erkundigen Sie sich bei Ihrem Händler oder beim E Werk wenn Sie nicht sicher sind ob Ihr Haushaltsnetz für das Produkt geeignet ist 12 Netzkabel Schutz Die Netzkabel sind so zu verlegen dass sie vor Tritten geschützt sind und keine schweren Objekte darauf abgestellt werden Kontrollieren Sie die Kabel insbesondere an den St...

Page 134: ... NICAM A2 Stereoklang SRS FOCUS Soundsystem 1 Multisystem Fernsehtuner Integrierte TELETEXT Funktion TOP FLOF FASTEXT Bildschirmteilung Standbildfunktion 12 Anzeigesprachen für On Screen Display 4 Videoeingänge mit 3 Scart Buchsen und PC Eingang XGA Komponentenanschluss Kindersicherung PDP 503HDE D a 9 3 02 1 20 PM 4 ...

Page 135: ...bänder Drei Kugelbänder Garantiekarte Media Receiver Netzkabel für Europa außer UK und Irland für UK und Irland Fernbedienung Zwei Mignonzellen R6 bzw AA Alkalibatterien Systemkabel Zwei Bedienungsanleitungen D Verwenden Sie für das Plasma Display und den Media Receiver stets das jeweils mitgelieferte Netzkabel PDP 503HDE D a 9 3 02 1 20 PM 5 ...

Page 136: ...ie beim Aufstellen auf ausreichenden Freiraum um den oberen Teil und die Rückseite damit ausreichende Luft um die Rückseite zirkulieren kann Verwendung des PIONEER Ständers Sonderausstattung Näheres zur Montage finden Sie in der dem Ständer beiliegenden Anleitung Verwendung der PIONEER Lautsprecher Sonderausstattung Näheres zur Installierung finden Sie in der Bedienungsanleitung der Lautsprecher P...

Page 137: ...onderausstattung finden Sie in der dazugehörigen Bedienungsanleitung GRAU WEISS GRAU WEISS Verbinden des Systems 1 Anschließen des Systemkabels und Netzkabels an das Plasma Display 2 Anschließen des Systemkabels und Netzkabels an den Media Receiver P AN DEN LAUTSPRECHERKLEMMEN KÖNNEN HOHE SPANNUNGEN ANLIEGEN WEGEN STROMSCHLAGGEFAHR DÜRFEN BEIM ANSCHLIESSEN ODER ABTRENNEN DER LAUTSPRECHERKABEL KEIN...

Page 138: ...echenden Markierungen e und f im Batteriefach ausgerichtet sind 3 Schließen Sie den Batteriefachdeckel Vorsichtsmaßnahmen zu den Batterien Bei unsachgemäßer Benutzung von Batterien besteht die Gefahr dass Batteriesäure austritt oder die Batterien platzen Befolgen Sie unbedingt die nachstehenden Anweisungen Verwenden Sie keine Manganbatterien Als Ersatzbatterien sind Alkalizellen zu verwenden Legen...

Page 139: ...Taste Hauptnetzschalter POWER Anzeige Einschaltanzeige STANDBY ON Taste Bereitschaftsmodus Einschalttaste INPUT Taste Eingangswahltaste VOLUME Tasten r s Lautstärkeregeltasten CHANNEL Tasten r s Kanalwahltasten Fernbedienungssensor Plasma Display PDP 503HDE D a 9 3 02 1 20 PM 9 ...

Page 140: ... Eingang analog RGB CONTROL Steuerbuchsen Media Receiver Wenn Sie wegen eines Bedienungsproblems beim Media Receiver zum normalen Bildschirm zurückkehren möchten während das Gerät eingeschaltet bleibt Lampe leuchtet grün drücken Sie dazu bitte CLEAR am Media Receiver Durch Drücken von CLEAR stellt sich das System wie nachstehend gezeigt zurück Die AV Wahl stellt sich auf STANDARD zurück Der Fernse...

Page 141: ...hlt eine Seite 11 j TELETEXT Modus Ändert den Bildmodus zum Wählen von Unterseiten 12 k TELETEXT Modus Zum Anzeigen verdeckter Zeichen 13 MENU Zeigt das Menü an 14 fv TV Extern Eingangsmodus Ändert den Breitbildmodus TELETEXT Modus Wählt den zu vergrößernden Bereich ganz obere Hälfte untere Hälfte 15 b Wählt eine Eingangsquelle TV Eingang 1 Eingang 2 Eingang 3 Eingang 4 PC 16 p Zeigt die Kanaldate...

Page 142: ...enne Um ein sauberes Bild zu erhalten empfiehlt sich der Anschluss einer Außenantenne Nachstehend finden Sie eine kurze Beschreibung der bei Verwendung eines Koaxialkabels vorzunehmenden Anschlüsse Antennenkabel im Fachhandel erhältlich Falls Ihre Außenantenne ein 75 Ohm Koaxialkabel mit standardmäßigem DIN 45325 Stecker IEC 169 2 verwendet schließen Sie diesen bitte an die Antenneneingangsbuchse ...

Page 143: ...haltanzeige am Media Receiver leuchtet rot auf 2 Drücken Sie MAIN POWER am Plasma Display Das System schaltet die Stromversorgung ein Die Einschaltanzeige am Plasma Display leuchtet grün auf und die Einschaltanzeige am Media Receiver wechselt auf grün Falls die Einschaltanzeigen weiterhin rot leuchten Drücken Sie zum Einschalten des Systems bitte eine beliebige Taste von 0 bis 9 an der Fernbedienu...

Page 144: ...he Autoinstallation Set up Auto 01 02 55 25 85 25 03 102 25 04 05 06 07 08 09 10 11 142 25 148 25 Anfängliche Autoinstallation Wenn das Plasma Display System nach dem Kauf das erste Mal eingeschaltet wird läuft automatisch die anfängliche Autoinstallation an mit der Sie der Reihe nach die Sprache das Land und die Kanäle programmieren können D Näheres zum Starten der Autoinstallation über das Setup...

Page 145: ...h in den Status vor der automatischen Programmsuche zurück 5 Automatisches Sortieren der Kanäle Wenn die automatische Eingabe der Kanalnamen beendet ist beginnt das Plasma Display System mit dem Sortieren der benannten Kanäle D Durch Drücken von n kann die Einstellung abgebrochen werden Das System kehrt dadurch automatisch in den Status vor der automatischen Programmsuche zurück 6 Abspeichern inPr...

Page 146: ...Menü 7 Fernsehempfang Das Einstellmenü erlischt und Sie können das Programm von Kanal 1 betrachten 12 SAT 1 B G PAL Mit 0 9 an der Fernbedienung Wählen Sie die Kanäle direkt durch Drücken der Tasten 0 bis 9 e Für Kanal 2 als Kanal mit einstelliger Nummer drücken Sie 2 Für Kanal 12 als Kanal mit zweistelliger Nummer schalten Sie mit o auf zweistellige Eingabe und drücken dann 1 gefolgt von 2 Beim B...

Page 147: ...pontan auf laute Wiedergabe sondern stellt die Lautstärke auf 0 2 Drücken Sie e erneut um die Stummschaltung aufzuheben Die Stummschaltung kann auch durch Drücken von ik k k k k l l l l l und g aufgehoben werden D Näheres zur Funktion des Audioausgangs siehe S 53 STANDBY ON INPUT STANDBY ON VOLUME CHANNEL VOLUME 20 20 ⴐ ⴑ Lautsprecher MONITOR OUT Lautstärke und Toneinstellungen per Tastendruck Mit...

Page 148: ...und Retrieval System Erzeugt einen natürlicher wirkenden Klang durch Rückgewinnung der in Stereoaufnahmen enthaltenen Rauminformation und Wiederherstellung des urprünglichen dreidimensionalen Schallfelds FOCUS Verlagert das Klangbild von zwei Lautsprechern auf eine günstigere Hörposition oder Höhe ohne dazu die Lautsprecher zu bewegen FOCUS e SRS Kombiniert den SRS mit dem FOCUS Effekt aus Für Aus...

Page 149: ...d MONO Bei Empfang eines bilingualen Signals Wiederholtes Drücken von g schaltet den Modus zwischen NICAM p NICAM pp NICAM p pp und MONO weiter Bei Empfang eines monauralen Signals Mit jedem Drücken von g wechselt der Modus zwischen NICAM MONO und MONO Im TV Modus von A2 Programmen Bei Empfang eines Stereosignals Mit jedem Drücken von g wechselt der Modus zwischen STEREO und MONO Bei Empfang eines...

Page 150: ...ng MENÜ Eingangswahl WSS 4 3 Modus Position Audioausgang Demo Farb System Sprache NR Beschreibung Zum Wählen des Signaltyps für die einzelnen Eingangsquellen Wenn TELETEXT Daten Breitbild Signalbits enthalten kann der Text im Breitbildformat betrachtet werden Wenn ein Signal mit 4 3 oder 14 9 Modus anliegt 4 3 bzw BREITBILD Anzeige wählen Zum Einstellen der horizontalen vertikalen Lage des angezei...

Page 151: ...eln der Pegelverteilung zwischen linkem und rechtem Lautsprecher Zum Zurückstellen aller Audio Einstellungen auf die Werksvorgaben MENÜ Auto Sync Fein Sync Audioausgang Beschreibung Sorgt für ein sauberes Eingangsbild Zum Feineinstellen des Bildes über H Pos V Pos Clock und Phase Nach Einstellen des Monitorausgang Typs kann die Lautstärke für die Hauptlautsprecher oder den Monitorausgang geregelt ...

Page 152: ...schirm die jeweilige Einstellposition an Diese Einstellung ist nicht speicherbar Wenn das System ausgeschaltet wird oder in den Bereitschaftsmodus eintritt wird die Einstellung gelöscht Zum erneuten Umpositionieren ist das obige Vorgehen zu wiederholen Ein On Screen Bild von einer PC Quelle kann nicht umpositioniert werden Initialisieren Sie die Bildposition durch Drücken von ENTER PDP 503HDE D c ...

Page 153: ...ü erscheint nur wenn Kindersicherung eingestellt ist Siehe Seite 54 Das Setup Menü erscheint wenn keine Kindersicherung eingestellt ist In diesem Falle entfällt Schritt 3 3 Geben Sie mit 0 9 Ihr vierstelliges Kennwort Passwort ein wenn Kindersicherung eingestellt ist um diese zu deaktieren Näheres zum Deaktivieren der Kindersicherung siehe Seite 54 4 Wählen Sie mit Autoinstallation und drücken Sie...

Page 154: ... abgebrochen werden Das System kehrt daraufhin automatisch in den Status vor der automatischen Programmsuche zurück Falls keine Kanäle gefunden werden kontrollieren Sie bitte den Anschluss der Antenne Starten Sie die Autoinstallation anschließend erneut da diese abgeschlossen wurde Siehe Seite 12 Automatische Eingabe der Kanalnamen Wenn neue Fernsehkanäle gefunden wurden sucht das System nach den ...

Page 155: ...tus vor der automatischen Programmsuche zurück Schalten Sie das System nicht aus bevor Sortieren der Kanäle angezeigt wird Abspeichern in Presets Wenn das automatische Sortieren beendet ist werden die Kanäle automatisch abgespeichert Während des Herunterladens eines Kanals erscheint Einstellungen des Sendeprogramms 10 Wenn alle Kanäle abgespeichert sind erscheint Programmdaten erfolgreich gesandt ...

Page 156: ...gende Sequenz 1Automatische Programmsuche 2Automatische Eingabe der Kanalnamen 3Automatisches Sortieren 4Abspeichern in Presets D Sie können zum vorherigen Menü zurückkehren indem Sie vor dem Starten der automatischen Programmsuche n drücken Näheres zur automatischen Programmsuche siehe S 24 und 25 Programm Setup Auch wenn bereits Kanäle auf die Presets abgespeichert wurden können Sie im Programm ...

Page 157: ...gen Menü zurückkehren Zum Verlassen des Menüs drücken Sie MENU Farbsystem Feineinstellmenü Im Programm Setup Menü Manuelle 1 Wählen Sie mit den zu bearbeitenden Kanal und drücken Sie ENTER Der Status des gewählten Kanals wird angezeigt 2 Wählen Sie mit Farbsystem und drücken Sie ENTER Die Liste der empfangbaren Farbsysteme erscheint 3 Wählen Sie mit das verwendete Farbsystem und drücken Sie ENTER ...

Page 158: ... n können Sie zum vorherigen Menü zurückkehren Zum Verlassen des Menüs drücken Sie MENU Überspringen von Kanälen Kanäle bei denen Überspringen mit P P auf ein eingestellt wurde werden übersprungen auch wenn sie gewählt werden Im Programm Setup Menü Manuelle 1 Wählen Sie mit den zu bearbeitenden Kanal und drücken Sie ENTER Der Status des gewählten Kanals wird angezeigt 2 Wählen Sie mit Überspringen...

Page 159: ...auch ein Kennwort eingestellt ist Näheres zum Einstellen des Kennworts siehe Seite 54 Mit n können Sie zum vorherigen Menü zurückkehren Zum Verlassen des Menüs drücken Sie MENU Decoder Menü Kindersicherung Menü ENTER MENU Einstellen des Decodereingangs Wenn ein Decoder verwendet wird ist dessen Eingang anzuweisen Im Programm Setup Menü Manuelle 1 Wählen Sie mit den zu bearbeitenden Kanal und drück...

Page 160: ...1 Drücken Sie MENU 2 Wählen Sie mit Setup und drücken Sie ENTER 3 Wählen Sie mit Programm Setup und drücken Sie ENTER 4 Wählen Sie mit Sortieren und drücken Sie ENTER Die Liste der Kanäle erscheint Bei schwarzer Nummer ist Überspringen auf aus und bei blauer Nummer auf ein eingestellt 5 Wählen Sie mit den zu verlegenden Kanal und drücken Sie ENTER 6 Bewegen Sie den zu verlegenden Kanal mit zur gew...

Page 161: ...stehen 12 Sprachen Englisch Deutsch Französisch Italienisch Spanisch Niederländisch Schwedisch Portugiesisch Griechisch Finnisch Russisch und Türkisch ENTER MENU 1 Drücken Sie MENU 2 Wählen Sie mit Optionen und drücken Sie ENTER Das Optionen Menü erscheint 3 Wählen Sie mit Sprache und drücken Sie ENTER Das Sprachenmenü erscheint 4 Wählen Sie mit in der angezeigten Liste die gewünschte Sprache und ...

Page 162: ...en des Kontrasts Zum Absenken der Helligkeit Zum Abschwächen von Rot Zum Abschwächen von Grün Zum Abschwächen von Blau Gewählter Punkt Kontrast Helligkeit Rot Grün Blau Taste Zum Verstärken des Kontrasts Zum Erhöhen der Helligkeit Zum Betonen von Rot Zum Betonen von Grün Zum Betonen von Blau ENTER MENU AV SELECTION Bildeinstellungen Stellen Sie das Bild anhand der nachstehenden Einstellungen wunsc...

Page 163: ...au angezeigt und ist nicht wählbar Siehe Seite 50 Beschreibung Weiß mit bläulichem Ton Weiß mit rötlichem Ton Gewählter Punkt Weißwert Mittelhoch Mittel Mitteltief Schwarzwert MENÜ Bild DYNAMISCH Weiterführend Farb Temp Weißwert Weißwert Mittelhoch Mittel Mitteltief Schwarzwert Farbtemperatur Stellen Sie den Weißton über die Farbtemperatur passend ein 1 Drücken Sie MENU 2 Wählen Sie mit Bild und d...

Page 164: ...es Menüs D Mit n können Sie zum vorherigen Menü zurückkehren Wenn Sie mit AV SELECTION an der Fernbedienung STANDARD gewählt haben oder das Eingangssignal eine Vertikalfrequenz von 50 Hz besitzt z B PAL und SECAM wird dieser Punkt grau angezeigt und ist nicht wählbar Siehe Seite 50 Schwarzweiß Für Schwarzweiß Wiedergabe von Videos 1 Drücken Sie MENU 2 Wählen Sie mit Bild und drücken Sie ENTER 3 Wä...

Page 165: ...eset RÜCKKEHR 0 0 0 15 15 Li 15 15 Re 1 Drücken Sie MENU 2 Wählen Sie mit Audio und drücken Sie ENTER Das Audio Menü erscheint 3 Wählen Sie mit den einzustellenden Gegenstand 4 Nehmen Sie mit die gewünschte Einstellung vor 5 Drücken Sie MENU zum Verlassen des Menüs D Zum Zurückstellen aller Einstellungen auf die Werksvorgaben 1Wählen Sie mit Reset und drücken Sie ENTER 2Wählen Sie mit Ja und drück...

Page 166: ...l nicht an Kein Betrieb aus Wenn diese Funktion auf Aktiviert gestellt ist schaltet sich das System automatisch aus wenn länger als 3 Stunden kein Signal aktiv ist 1 Drücken Sie MENU 2 Wählen Sie mit Stromregelung und drücken Sie ENTER 3 Wählen Sie mit Kein Betr aus und drücken Sie ENTER 4 Wählen Sie mit Aktiviert und drücken Sie ENTER 5 Drücken Sie MENU zum Verlassen des Menüs Ab fünf Minuten vor...

Page 167: ... Computer wieder ein Signal eingeht Das System schaltet sich wieder ein wenn Sie STANDBY ON am Plasma Display oder 0 9 an der Fernbedienung drücken ist dann aber nicht mehr im PC Modus Siehe Seite 13 Das System schaltet sich aus wenn länger als 8 Sekunden kein Signal eingeht Wenn danach vom Computer wieder ein Signal eingeht schaltet sich das System wieder ein Gewählter Punkt aus Modus 1 Modus 2 E...

Page 168: ...g für den Anschluss eine breiten Palette an externen Geräten wie Videorecorder DVD Spieler Computer Spielekonsolen und Camcorder Zum Betrachten des Bilds einer externen Signalquelle wählen Sie mit b an der Fernbedienung oder INPUT am Plasma Display den entsprechenden Eingang P Zum Schutz der gesamten Anlage ist stets der Media Receiver auszuschalten bevor Sie einen Videorecorder DVD Spieler Comput...

Page 169: ...ite 49 Die Einstellung wird gespeichert und kann im Menü EING QUELLE gewählt werden Zum Betrachten des Bilds vom Decoder wählen Sie mit b an der Fernbedienung oder INPUT am Plasma Display Eingang 1 im Menü EING QUELLE Siehe Seite 49 D Mit jedem Drücken von b wechselt entsprechend die Eingangsquelle Falls das Decoderbild nicht sauber wiedergegeben wird kann es erforderlich sein die Einstellung des ...

Page 170: ...recorder schaltet sich der Fernseher automatisch aus dem Bereitschaftsmodus ein und gibt das Recorderbild wieder Wenn die System Standby Taste am Videorecorder gedrückt wird schaltet auch der Fernseher auf Bereitschaft D Fortgeschrittene AV Link Systeme für TV VCR Verbundbetrieb sind mit manchen externen Quellen u U nicht kompatibel Es wird empfohlen den Anschluss INPUT 2 zu belegen wenn ein Decod...

Page 171: ...asma Display System auf Bereitschaft geschaltet ist schaltet es sich automatisch ein und gibt das Bild der Audio Video Signalquelle z B Videorecorder oder DVD Spieler wieder System Standby Wenn das Audio Video Gerät z B Videorecorder oder DVD Spieler in Bereitschaft geht schaltet auch das Plasma Display System auf Bereitschaft WYSIWYR What You See Is What You Record Wenn die Fernbedienung des ange...

Page 172: ... kann zum Anschließen eines DVD Spielers oder anderen Audio Video Gerätes verwendet werden Wiedergeben des DVD Bilds Wählen Sie bei Anschluss an Buchse INPUT 3 im Menü Eingang3 und stellen Sie unter Eingangswahl den korrekten Signaltyp ein Siehe Seite 49 Die Einstellung wird gespeichert und kann im Menü EING QUELLE gewählt werden Zum Betrachten des DVD Bilds wählen Sie mit b an der Fernbedienung o...

Page 173: ... Weise eine Spielekonsole ein Camcorder oder ein anderes Audio Video Gerät angeschlossen werden D Die S Video Buchse hat Priorität über die Videobuchsen Wiedergeben des Spielekonsolen oder Camcorderbilds Bei Anschluss an die Buchsen von INPUT 4 wählen Sie bitte Eingang4 Sie müssen lediglich die Eingangsquelle im Menü EING QUELLE wählen Zum Betrachten des Spielekonsolen oder Camcorderbilds wählen S...

Page 174: ...tibilität des Plasma Display Systems mit Computersignalen finden Sie auf Seite 60 Signalbelegung der 15 poligen Mini D Sub Steckbuchse D Für den Anschluss bestimmter Macintosh Computer kann ein Macintosh Adapter erforderlich sein Wiedergeben eines Computerbilds Bei Anschluss eines Computers wird der korrekte Eingangssignaltyp automatisch erkannt Siehe Seite 49 Falls das Bildsignal des Computers ni...

Page 175: ...gesteuert werden Nach dem Anschluss des Steuerkabels an die CONTROL IN Buchse eines anderen Gerätes spricht dessen Sensor nicht mehr auf die Fernbedienung an Zur Steuerung des Gerätes ist dessen Fernbedienung auf den Fernbedienungssensor des Systems zu richten D Vergewissern Sie sich vor dem Vornehmen der Anschlüsse dass die Stromversorgung ausgeschaltet ist Bitte schließen Sie die Steuerkabel ers...

Page 176: ...Sie den Verschluss mit einer Zange um 90 und ziehen Sie dann nach außen Es ist möglich dass sich das Halteband mit der Zeit nicht mehr öffnen lässt oder beim Öffnen beschädigt wird Die Kabel zusammenfassen und mit den mitgelieferten Kugelbändern sichern D Die Kabel können nach rechts oder links verlegt werden Einsatz externer Geräte Zum Verlegen der Kabel Diesem System liegen Schnellverschluss Hal...

Page 177: ...Ja und drücken Sie ENTER Mit n können Sie zum vorherigen Menü zurückkehren Die Einstellungen werden nach Eingangsquellen getrennt gespeichert Beim Einstellen von H Pos oder V Pos kehrt das Bild in die Position der Werksvorgabe zurück Siehe Seite 22 Reduzierung bzw Unterdrückung von Bildstörungen NR nur AV Modus Mittels der NR Funktion lassen sich Bildstörungen reduzieren bzw unterdrücken 1 Drücken...

Page 178: ...ge durch Verschieben nach links oder rechts Zum Zentrieren der Bildlage durch Verschieben nach oben oder unten Passt die Taktfrequenz an Passt die Lage der Taktphase an Gewählter Punkt H Pos V Pos Clock Phase Auto Sync Anpassung nur PC Modus Für automatische Anpassung des Bildsignals von einem Computer 1 Drücken Sie MENU 2 Wählen Sie mit Optionen und drücken Sie ENTER 3 Wählen Sie mit Auto Sync un...

Page 179: ...4 werden grau dargestellt und sind nicht wählbar wenn dort keine Signalquelle angeschlossen ist Mit n können Sie zum vorherigen Menü zurückkehren Eingangssignalquelle Eingangssignal Einstellung Zum Einstellen des Signaltyps einer externen Signalquelle 1 Drücken Sie MENU 2 Wählen Sie mit Optionen und drücken Sie ENTER 3 Wählen Sie mit Eingangswahl und drücken Sie ENTER 4 Wählen Sie mit den belegten...

Page 180: ...onen und drücken Sie ENTER 3 Wählen Sie mit Farb System und drücken Sie ENTER 4 Wählen Sie mit ein kompatibles Videosignalsystem Ihrer Anlage und drücken Sie ENTER 5 Drücken Sie MENU um das Menü zu verlassen D Als Werksvorgabe ist AUTO eingestellt Wenn AUTO gewählt ist werden die Farbsysteme für die einzelnen Eingänge automatisch eingestellt Falls kein sauberes Bild erscheint wählen Sie bitte ein ...

Page 181: ...r Breitbild im 4 3 Modusmenü Siehe Seite 52 D Auch wenn die WSS Option aktiviert ist arbeitet die automatische Wahlfunktion nicht wenn das Sendersignal keine WSS Daten enthält 4 3 Modus bei Wahl von 4 3 4 3 VOLL 14 9 KINO 14 9 BREITBILD VOLL ZOOM KINO Gewählter Punkt 4 3 VOLL 14 9 KINO 14 9 BREITBILD VOLL ZOOM KINO Beschreibung Für Bilder im 4 3 Standardformat Auf beiden Seiten erscheinen Balken F...

Page 182: ...Bild nicht im korrekten Bildformat erscheint Wenn das Sendersignal keine WSS Daten enthält arbeitet die WSS Funktion auch dann nicht wenn sie aktiviert wurde Siehe Seite 51 Bildseitenverhältnis nur AV Modus Ermöglicht es bei einem Videosignal das Bildseitenverhältnis auf Standard 4 3 oder den vollen Bildschirm einzustellen 1 Drücken Sie MENU 2 Wählen Sie mit Optionen und drücken Sie ENTER 3 Wählen...

Page 183: ...ln den Ton der Lautsprecher Sonderausstattung Das Signal an MONITOR OUT ist nicht regelbar und wird konstant ausgegeben ik l an der Fernbedienung und VOLUME am Plasma Display regeln das Tonsignal des MONITOR OUT Ausgangs Der Ton der Lautsprecher Sonderausstattung ist stummgeschaltet Gewählter Punkt Fix Variabel TIMER AUS RESTZEIT 120 30 60 90 120 0 Audioausgang Zum Einstellen welcher Audioausgang ...

Page 184: ...Manuelle auf ein gestellt ist das Kennwort Passwort einzugeben Siehe Seite 29 Wenn ein gesperrter Kanal gewählt wird erscheint die Eingabe Aufforderung Drücken Sie ENTER um das Eingabefenster aufzurufen Löschen des Kennworts Das eingegebene Kennwort kann wieder gelöscht werden 1 Drücken Sie MENU 2 Wählen Sie mit Setup und drücken Sie ENTER Das Kennwort Eingabemenü erscheint 3 Geben Sie mit 0 9 Ihr...

Page 185: ...dem aktiven Bildschirm angezeigt für den der Ton wiedergegeben wird 3 Drücken Sie b zum Wählen einer anderen Eingangsquelle für den aktiven Bildschirm Das gewählte Bild erscheint 4 Drücken Sie c zum Verlassen des Dual Screen Modus D Diese Funktion arbeitet nicht unter den folgenden Eingangsbedingungen 1 Im PC Eingangsmodus 2 Bei identischer Quelle auf beiden Seiten z B EINGANG 1 und EINGANG 1 3 Be...

Page 186: ...lbild aus einem bewegten Bild bei dem d gedrückt wurde 2 Aktualisieren Sie das Standbild durch Drücken von ENTER Mit jedem Drücken von ENTER wird das Standbild auf dem rechten Bildschirm aktualisiert 3 Drücken Sie d zum Beenden des Standbilds D Diese Funktion arbeitet nicht unter den folgenden Eingangsbedingungen 1Im PC Eingangsmodus 2Bei Bildern von einer Hochfrequenz Signalquelle Wenn diese Funk...

Page 187: ...nd Börsennachrichten und Programmvorschauen Teletext Modus Teletext kann mit m an der Fernbedienung ein und ausgeschaltet werden Das Plasma Display System kann im Teletext Modus direkt über die Fernbedienung gesteuert werden Ein und Ausschalten des Teletexts 1 Wählen Sie einen Fernsehkanal oder eine externe Signalquelle mit Teletext 2 Drücken Sie m zum Anzeigen des Teletexts 3 Drücken Sie m erneut...

Page 188: ...l l drücken wechselt die Seite zur nächsten vorhergehenden Seite Gleichzeitig damit wird der Unterseiten Bildschirm geschlossen Anzeigen der TOP Übersicht Bei Empfang von TOP Teletext kann eine TOP Textübersicht aufgerufen werden 1 Drücken Sie m für Teletext 2 Drücken Sie l zum Aufrufen der links gezeigten TOP Übersicht 3 Wählen Sie mit einen Block oder eine Gruppe 4 Drücken Sie ENTER zum Anzeigen...

Page 189: ...zu hell In zu hellen Räumen kann das Bild dunkel wirken Farbsystem Einstellung kontrollieren Siehe S 27 u 50 Eingangssignal Einstellung kontrollieren Siehe S 49 Innentemperatur des Gerätes erhöht Reinigen und alle die Belüftung behindernden Objekte entfernen Siehe S 6 Stromregelung Einstellung kontrollieren Siehe S 36 u 37 Ausschalttimer Einstellung kontrollieren Siehe S 53 Externe Komponenten ric...

Page 190: ...hützte Warenzeichen der Apple Computer Inc Microsoft ist ein geschütztes Warenzeichen der Microsoft Corporation DDC ist ein geschütztes Warenzeichen der Video Electronics Standards Association Power Management ist ein geschütztes Warenzeichen der Sun Microsystems Inc VGA und XGA sind geschützte Warenzeichen der International Business Machines Co Inc Anmerkungen Macintosh 13 67 Hz Macintosh 16 Maci...

Page 191: ...rde 10 AV LINK Steuerung 11 Nicht belegt 12 Nicht belegt 13 Erde 14 Nicht belegt 15 Eingang Chroma S Video 16 Nicht belegt 17 Erde für Video 18 Erde 19 Ausgang Video 20 Eingang Video Eingang S Video 21 Steckerabschirmung SCART INPUT 3 1 Ausgang Audio rechts 2 Eingang Audio rechts 3 Ausgang Audio links 4 Gemeinsame Erde für Audio 5 Erde 6 Eingang Audio links 7 Eingang Blau 8 Audio Video Steuerung 9...

Page 192: ... B x 70 H x 330 T mm Gewicht 4 4 kg Zubehör Netzkabel Fernbedienung zwei Batterien R6 Systemkabel zwei Bedienungsanleitungen Empfangssystem Tuner Rückseite INPUT 1 Vorderseite Rückseite Änderungen der Konstruktion und technischen Daten ohne Ankündigung vorbehalten Technische Daten Gegenstand 50o Plasma Display Modell PDP 503PE Anzahl Pixel 1280g768 Pixel Audioverstärker 12 We12 W 10 Klirr Stromver...

Page 193: ... Dies wird durch die Bildschirmschutzfunktion des Plasma Panels bewirkt die solche Bilder erkennt und zum Schutz des Bildschirms automatisch die Bildhelligkeit absenkt und stellt keine Störung dar Die Bildschirmschutzfunktion wird aktiv wenn das angezeigte Bild ca 3 Minuten lang keine oder nur geringe Bewegung aufweist P Nachwirken und Nachbilder auf dem Plasma Panel Wenn über lange Zeit das selbe...

Page 194: ...2 Canada PIONEER EUROPE NV Haven 1087 Keetberglaan 1 B 9120 Melsele Belgium TEL 03 570 05 11 PIONEER ELECTRONICS AUSTRALIA PTY LTD 178 184 Boundary Road Braeside Victoria 3195 Australia TEL 03 9586 6300 PIONEER ELECTRONICS DE MEXICO S A DE C V San Lorenzo 1009 3er Piso Desp 302 Col Del Valle Mexico D F C P 03100 TEL 5 688 52 90 Printed in Japan Imprimé au Japon Gedruckt in Japan TINS A494WJZZ PDP ...

Reviews: