background image

08

Grundeinstellungen

28

Ge

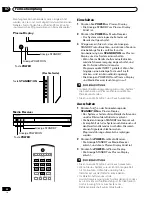
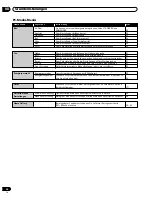
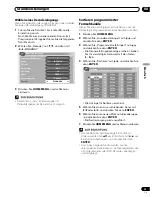
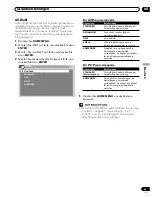
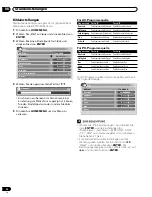
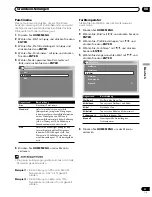
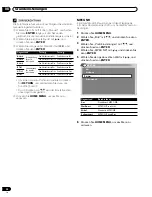
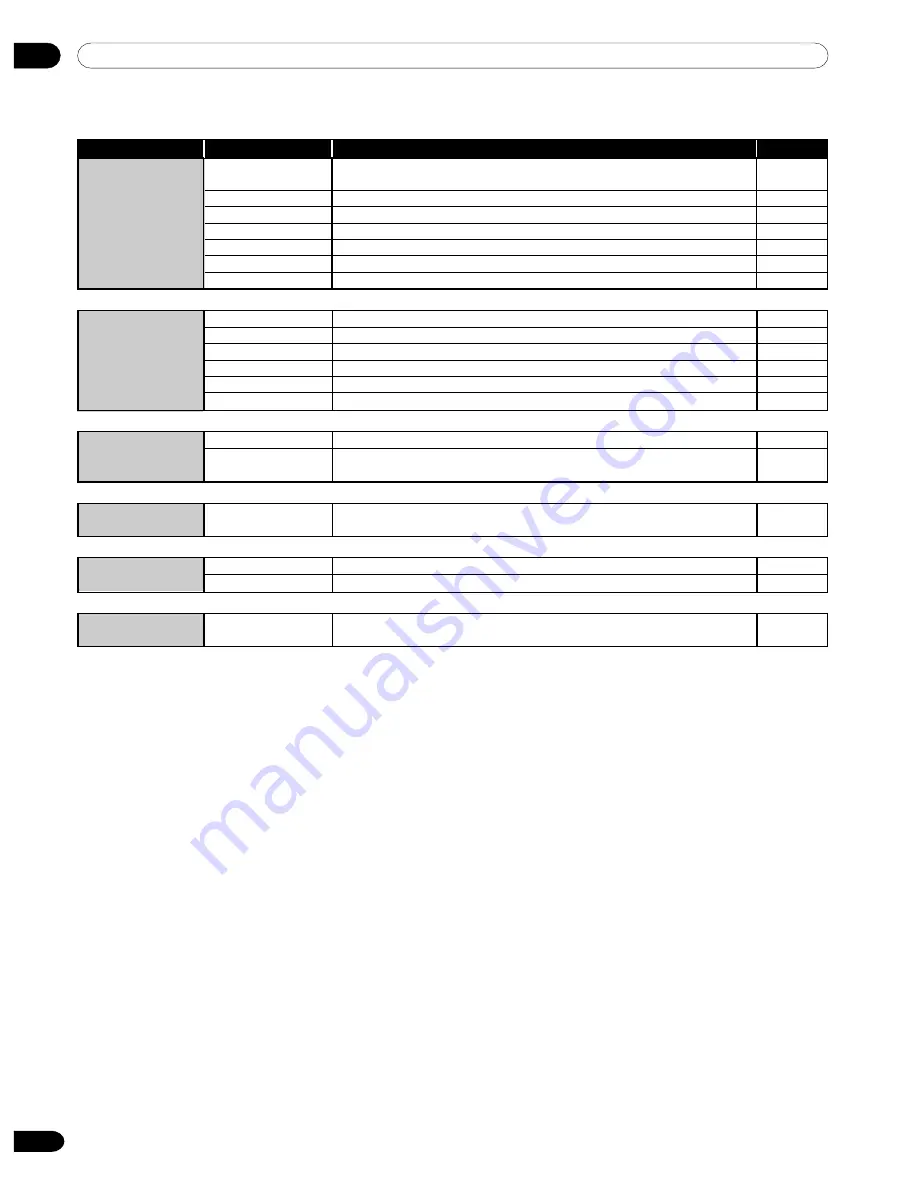
PC-Modus-Menüs

Home Menu

Gegenstand

Beschreibung

Seite

Bild

AV-Wahl

Sie können unter zwei Anzeigemodusoptionen wählen: STANDARD und
ANWENDER.

35

Kontrast

Zum Einstellen des Bildkontrastes.

36

Helligkeit

Zum Einstellen der Bildhelligkeit.

36

Rot

Zum Einstellen der Rot-Farbintensität.

36

Grün

Zum Einstellen der Grün-Farbintensität.

36

Blau

Zum Einstellen der Blau-Farbintensität.

36

Reset

Zum Zurückstellen aller Bildeinstellungen auf die Werksvorgaben.

36

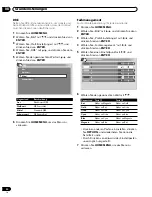
Ton

Höhen

Zum Abschwächen und Betonen der Höhenwiedergabe.

41

Bass

Zum Abschwächen und Betonen der Basswiedergabe.

41

Balance

Zum Regeln der Pegelverteilung zwischen linkem und rechtem Lautsprecher.

41

Reset

Zum Zurückstellen aller Audio-Einstellungen auf die Werksvorgaben.

41

FOCUS

Verlagert das Klangbild nach oben und sorgt für klare Klangkonturen.

41

Front Surround

Liefert dreidimensionale Klangeffekte und/oder tiefe, satte Bässe.

42

Energiesparmodi

Energiesparmodus

Spart Strom durch Absenken der Bildhelligkeit.

42

Energiemanagement

Schaltet das System automatisch auf den Bereitschaftsmodus, wenn vom PC
kein Signal erhalten wird.

44

Timer

Schaltet das System bei Ablauf der vorgewählten Zeit automatisch auf den
Bereitschaftsmodus.

70

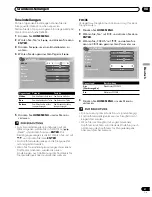
Weiterführende

Automatische Einstellung Optimiert Bildpositionen und vertikale Korrektur automatisch.

64

Einstellungen

Manuelle Einstellung

Ermöglicht manuelle Einstellung der Bildpositionen und vertikalen Korrektur.

65

Home Gallery

Bei eingelegter Speicherkarte können Sie auf dieser Karte gespeicherte
JPEG-Bilder betrachten.

54–58

Summary of Contents for PDP 434HDE

Page 1: ...PLASMA DISPLAY SYSTEM SYSTEME D ÉCRAN PLASMA PLASMA DISPLAY SYSTEM PDP 504HDE PDP 434HDE Operating Instructions Mode d emploi Bedienungsanleitung ...

Page 2: ...Receiver 13A Plasma Display fuse Should the fuse need to be replaced a BSI or ASTA approved BS 1362 fuse marked or and of the same rating as above which is also indicated on the pin face of the plug must be used Always refit the fuse cover after replacing the fuse Never use the plug without the fuse cover fitted In the unlikely event of the socket outlet in your home not being compatible with the ...

Page 3: ...SAFETY PURPOSE OF THE GROUNDING EARTHLING TYPE PLUG The following symbols are found on labels attached to the product They alert the operators and service personnel of this equipment to any potentially dangerous conditions WARNING This symbol refers to a hazard or unsafe practice which can result in personal injury or property damage CAUTION This symbol refers to a hazard or unsafe practice which ...

Page 4: ...rting batteries 20 Cautions regarding batteries 20 Basic connections 21 Connecting to an antenna 21 Connecting the power cord 21 07 Watching TV Turning on the power 22 Turning off the power 22 Changing channels 23 Changing the volume and sound 24 Using the multiscreen functions 26 Splitting the screen 26 Freezing images 26 08 Basic Adjustment Settings Using the menu 27 AV mode menus 27 PC mode men...

Page 5: ... 56 Starting the Slide Show Setup screen 57 Starting the Slide Show screen 58 Adjusting the picture quality 58 Connecting control cords 59 About SR 59 11 Using the Electronic Programme Guide EPG Setting up for using the EPG 60 Updating EPG information automatically 60 Specifying an EPG information provider 60 Restricting the display of EPG information 61 Searching programmes 61 Viewing programme i...

Page 6: ...ng for more than 3 times the length of the previous still moving image After using the Plasma Display System always switch the display to STANDBY mode Installation guidelines The Pioneer PureVision PDP 504HDE PDP 434HDE Plasma Display System incorporates a very thin design To ensure safety please take the proper measures to mount or install the Plasma Display in order to prevent the unit from tipp...

Page 7: ...oving images are displayed The time for the after images to disappear depends on the lumi nance of the still images and the time they had been displayed 2 After image lag image due to burning Avoid displaying the same image on the Plasma Display continuously over a long period of time If the same image is displayed continuously for several hours or for shorter periods of time over several days a p...

Page 8: ...sting on them Check the cords at the plugs and product 13 The plasma Display used in this product is made of glass Therefore it can break when the product is dropped or applied with impact Be careful not to be injured by broken glass pieces in case the plasma Display breaks 14 Overloading Do not overload AC outlets or extension cords Overloading can cause fire or electric shock 15 Entering of obje...

Page 9: ...is strongly recommended to use the optional PIONEER mounting products PIONEER shall not be liable for any personal injury or product damage that results from the use of mounting items other than the optional PIONEER products Installation Precautions Observe the following precautions when installing with any items such as the optional stand When using the optional stand brackets or equivalent items...

Page 10: ...riod of time the functions of the product may be adversely af fected Switch on and run the product occasionally Condensation Condensation may take place on the surface or inside of the product when the product is rapidly moved from a cold place to a warm place or just after a heater is switched on in winter morning for example When condensation takes place do not switch on the product and wait unt...

Page 11: ...nd Screw hole cap x 4 Stand System cable 3 m Power cord 2 m Cleaning cloth Speed clamp x 3 Bead band x 3 For Europe except U K and Eire For U K and Eire For Europe except U K and Eire For U K and Eire AA size battery x 2 Manganese battery Only the power code that is appropriate in your country or region is supplied Only the power code that is appropriate in your country or region is supplied Speak...

Page 12: ...or 4 Remote control sensor 1 2 4 3 5 6 7 8 right view Front view 5 STANDBY ON button 6 INPUT button 7 VOLUME buttons 8 CHANNEL buttons 0 9 Rear view 9 SYSTEM CABLE terminal BLACK 0 SYSTEM CABLE terminal WHITE SPEAKER right left terminals AC INLET terminal The terminals have faced downward ...

Page 13: ... SELECT switch 0 INPUT 2 terminal SCART INPUT 3 terminal SCART MONITOR OUT terminal S VIDEO MONITOR OUT terminal VIDEO MONITOR OUT terminals AUDIO SYSTEM CABLE terminal WHITE SYSTEM CABLE terminal BLACK 6 INPUT 4 terminal VIDEO 7 INPUT 4 terminals AUDIO 8 PC INPUT terminal AUDIO 9 PC INPUT terminal ANALOG RGB 0 PC CARD slot PC CARD eject button 1 2 3 5 4 6 8 9 7 0 SERVICE ONLY i o link A SELECT CO...

Page 14: ...TEXT mode Displays hidden characters n RETURN Restores the previous menu screen Selects a desired item on the setting screen p y Displays the channel information f TV External input mode Changes the wide screen size v TELETEXT mode Switches Teletext images full upper half lower half d Freezes a frame from a moving image Press again to cancel the function u TELETEXT mode Stops updating Teletext pag...

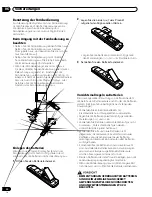
Page 15: ... toward the remote control sensor t located at the bottom right of the front panel of the Plasma Display The distance from the remote control sensor must be within 7 m and the angle relative to the sensor must be within 30 degrees in the right left upward or downward direction When the remote control unit does not func tion properly When any obstacle exists between the remote control unit and the ...

Page 16: ...ers Do not place a VCR or any other device on top of the Media Receiver When installing allow enough space on the sides and above the Media Receiver Do not block the cooling vent on any side of the Media Receiver or the rear ventilation fan open ing of the Media Receiver Over 10 cm Over 5 cm Over 5 cm Over 5 cm Over 5 cm Over 5 cm Over 5 cm Over 10 cm ...

Page 17: ...ion stand screws You can remove the shock absorbing pads Keep the shock absorbing pads and screws They are required when you place the Media Receiver in the horizontal position Plug the screw holes using the caps provided When you have installed the Media Receiver vertically always use the accompanying stand If you place the unit directly on the floor the cooling vents will be blocked which will r...

Page 18: ...e to the Plasma Display THESE SPEAKER TERMINALS CAN BE UNDER HAZARDOUS VOLTAGE WHEN YOU CONNECT OR DISCONNECT THE SPEAKER CABLES TO PREVENT THE RISK OF ELECTRIC SHOCK DO NOT TOUCH UNINSULATED PARTS BEFORE DISCONNECTING THE POWER CORD Connecting the system cable to the Media Receiver For details on optional PIONEER speaker installation refer to the speaker instruction manual provided Plasma Display...

Page 19: ...eed clamps Insert 1 into an appropriate hole on the rear of the Plasma Display and snap 2 into the back of 1 to lock the clamp Speed clamps are designed to be difficult to undo once in place Please attach them carefully Use pliers to twist the clamp 90 pulling outward The clamp may deteriorate over time and become damaged if removed 1 2 Speaker cable Speed clamps Speaker cable Speaker cable Cable ...

Page 20: ...s supplied with the product Place batteries with their terminals corresponding to the and indicators in the battery com partment 3 Close the battery cover Cautions regarding batteries Improper use of batteries can result in chemical leakage or explosion Be sure to follow the instructions below Do not use alkaline batteries When you replace the batteries use manganese ones Place the batteries with ...

Page 21: ... K and Eire U K and Eire SERVICE ONLY i o link A SELECT CONTROL SUB WOOFER OUTPUT INPUT 3 COMPONENT S VIDEO VIDEO R AUDIO L MONITOR OUTPUT Y PB PR VIDEO I N OUT INPUT 1 INPUT 2 INPUT 3 AC INLET BLACK WHITE SYSTEM CABLE INPUT 2 3 SERVICE ONLY i o link A SELECT CONTROL SUB WOOFER OUTPUT INPUT 3 COMPONENT S VIDEO VIDEO R AUDIO L MONITOR OUTPUT Y PB PR VIDEO I N OUT INPUT 1 INPUT 2 INPUT 3 AC INLET BL...

Page 22: ...cators on the Plasma Display and Media Receiver light up in green In this manual system mean the Plasma Display Panel and Media Receiver You can also reverse steps 1 and 2 Turning off the power 1 Press a on the remote control unit or STANDBY ON on the Plasma Display The system enters standby mode and the image on the screen disappears Both STANDBY indicators light up in red It is recommended to pl...

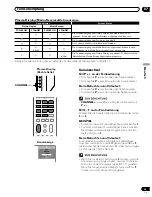
Page 23: ...e directly which is 3 digit page number from 100 to 899 by pressing buttons 0 to 9 With Teletext you do not use o See page 45 In the standby mode when you press 0 the power turns on and the on screen image comes from the INPUT 1 source Or when you press any button from 1 to 9 a TV image displays CHANNEL Plasma Display Media Receiver status indicators Indicator Status System Status Plasma Display M...

Page 24: ...the remote control unit To increase the volume press i To decrease the volume press i VOLUME on the Plasma Display operates the same as i Using e on the remote control unit e mutes the current sound output 1 Press e M appears on the screen 2 Press e again to cancel the mute mode Pressing i can also cancel the mute mode ...

Page 25: ...ut source is INPUT 1 to 4 or PC does not change the type of sound In this case sound is determined by the video source Each time you press g MTS toggles as shown below p mode pp mode MONO mode p pp MONO 1 AAA NICAM STEREO 10 00 1 AAA NICAM STEREO 10 00 1 AAA MONO 10 00 2 BBB NICAM p 10 00 2 BBB NICAM pp 10 00 2 BBB MONO 10 00 3 CCC NICAM MONO 10 00 3 CCC NICAM MONO 10 00 3 CCC MONO 10 00 4 DDD STE...

Page 26: ... The multiscreen function cannot display images from the same input source at the same time If you make such an attempt a warning message appears When you press HOME MENU the single screen mode is restored and the corresponding menu is displayed When in the 2 screen mode images displayed on the right screen may look less fine depending on im ages Freezing images Use the following procedure to capt...

Page 27: ... is performed for three hours 43 Sleep Timer Automatically places the system into the standby mode when the selected time elapses 70 Option Position Adjusts the vertical and horizontal positions of displayed images 64 WSS Allows you to view information in the wide screen mode when wide screen signals are included in Teletext data 68 4 3 Mode Select the aspect ratio of video signals 69 Colour Syste...

Page 28: ...eakers 41 Reset All audio adjustment settings return to the factory defaults 41 FOCUS Shifts the sound coming direction sound images upward and produces clear sound contours 41 Front Surround Provides three dimensional sound effects and or deep rich bass 42 Power Control Energy Save Saves power by decreasing picture brightness 42 Power Management Automatically places the system into the standby mo...

Page 29: ...lly set language coun try and channels in successive operations 1 Press to select Language and then press to select a language Auto Installation Country Installation Language English Austria Start You can select from among 12 languages English German French Italian Spanish Dutch Swedish Portuguese Greek Finnish Russian and Turkish 2 Press to select Country and then press to select your country 3 P...

Page 30: ...ions and then retry Auto Search Setting up TV channels manually This section describes how to set up TV channels manually Using Manual Adjust Use Manual Adjust to set up TV channels manually 1 Press HOME MENU 2 Press to select Setup and then press ENTER 3 Press to select Programme Setup and then press ENTER The password entry screen appears Enter your 4 digit password using buttons 0 9 4 Press to ...

Page 31: ...Off View No 1 B G Auto 9 Press to select Store and then press to select Yes Manual Adjust Search System Programme Entry Colour System Store Label Child Lock Decoder 42 75MHz B G Auto Off View 1 Yes With Yes selected you can select the channel using P P With No selected you cannot select the channel using P P To set up for another channel repeat steps 5 to 9 10 Press HOME MENU to exit the menu The ...

Page 32: ...r up to five characters To correct entered characters select or on the screen and then press ENTER The cursor moves to the proceeding or subsequent character To delete the current character select Delete on the screen and then press ENTER To put a space for the current character select Space on the screen and then press ENTER 5 To complete the name entry press or to select OK on the screen and the...

Page 33: ... HOME MENU 2 Press to select Setup and then press ENTER 3 Press to select Programme Setup and then press ENTER The password entry screen appears Enter your 4 digit password using buttons 0 9 4 Press to select Sort and then press ENTER Sort 1 4 56789 01 01234 02 55555 03 01234 04 56789 05 01234 06 56789 07 01234 08 01234 09 10 11 12 13 14 15 16 17 01234 18 19 20 21 22 23 24 25 56789 01234 56789 012...

Page 34: ...o select a language Language Teletext Menu West Europe English 5 Press to select Teletext and then press to select a language 6 Press HOME MENU to exit the menu Clock setting Use the following procedure to set the time correctly 1 Press HOME MENU 2 Press to select Setup and then press ENTER 3 Press to select Clock and then press ENTER 4 Press to select Clock Set Programme and then press to select ...

Page 35: ... MOVIE GAME USER For AV source Item Description STANDARD For a highly defined image in a normally bright room DYNAMIC For a very sharp image with the maximum contrast MOVIE For a movie GAME Lowers image brightness for easier viewing USER Allows the user to customize settings as desired You can set the mode for each input source For PC source Item Description STANDARD For a highly defined image in ...

Page 36: ...ness Colour For less colour intensity For more colour intensity Tint Skin tones become Skin tones become purplish greenish Sharpness For less sharpness For more sharpness For PC source Item button button Contrast For less contrast For more contrast Brightness For less brightness For more brightness Red For weaker red For stronger red Green For weaker green For stronger green Blue For weaker blue F...

Page 37: ... on theater screens by converting to 72 Hz when displaying DVD images e g movies having 24 frames per second 6 Press HOME MENU to exit the menu Not all parameters can be selected for some types of input signals Example 1 ADV cannot be selected when PAL or SECAM signals are being input Example 2 Standard cannot be selected when 480p or 720p signals are being input Colour temperature Adjust the colo...

Page 38: ...re using the following procedure 1 Select Manual in step 5 above and then press and hold ENTER for more than three seconds to display the manual adjustment screen 2 Press to select an item to be adjusted and then press ENTER 3 Press to select the desired level and then press ENTER Item button button R High For weaker red For stronger red G High For weaker green For stronger green B High For weaker...

Page 39: ... Off High Mid Low Item Description Off Deactivates the DNR High Enhanced DNR Mid Standard DNR Low Moderate DNR 6 Press HOME MENU to exit the menu CTI Use the CTI Colour Transient Improvement to make images have clearer colour contours 1 Press HOME MENU 2 Press to select Picture and then press ENTER 3 Press to select Pro Adjust and then press ENTER 4 Press to select CTI and then press ENTER 5 Press...

Page 40: ...rm fine hue adjustment for each basic colour 1 Press HOME MENU 2 Press to select Picture and then press ENTER 3 Press to select Pro Adjust and then press ENTER 4 Press to select Colour Management and then press ENTER 5 Press to select an item to be adjusted and then press ENTER Colour Management 0 0 0 0 0 0 Y R G C B M 6 Press to select the desired level Item button button Red Closer to magenta Cl...

Page 41: ...mation screen appears Press to select Yes and then press ENTER You cannot adjust the sound quality for listening with phones If you perform sound adjustments with phones connected the new settings will become effective for sound from the speakers after the phones are discon nected FOCUS This shifts the sound coming direction sound images upward and produces clear sound contours 1 Press HOME MENU 2...

Page 42: ... WOW technology is incorporated under license from SRS Labs Inc The effect of this function differs depending on signals You cannot set up the sound field for listening with phones If you set up the sound field with phones connected the new setting will become effective for sound from the speakers after the phones are disconnected Power Control Power Control provides convenient functions for power...

Page 43: ...e standby mode a message appears every minute The system may not be placed into the standby mode when noise signals are present at the Media Receiver after a TV program finishes No Operation off The system will be automatically placed into the standby mode when no operation is performed for three hours 1 Press HOME MENU 2 Press to select Power Control and then press ENTER 3 Press to select No Oper...

Page 44: ...ode when no signal is received from the personal computer for eight minutes Even when you start using the computer and a signal is received again the system stays off The system is switched on again by pressing STANDBY ON on the Plasma Display or 0 9 on the remote control unit The system is out of PC mode See page 22 Mode2 Places the system into the standby mode when no signal is received from the...

Page 45: ...ramme with no Teletext signal Cannot display Teletext appears Selecting and operating Teletext pages Use the following remote control buttons to select and operate Teletext pages Colour RED GREEN YELLOW BLUE You can select a group or block of pages displayed in the coloured brackets at the bottom of the screen by pressing the corresponding colour RED GREEN YELLOW BLUE on the remote control unit 0 ...

Page 46: ...desired block or group pages and then press ENTER When the TOP Over View screen is in display no other buttons are available than i i g e and a Displaying subpages You can display several subpages as they are transmit ted Subpage screen 203 203 TEXT 01 44 37 P P Life Promis 01 02 03 04 1 Press m to display Teletext If you open a page containing subpages the subpages are automatically displayed in ...

Page 47: ... types of external equipment to your Plasma Display System like a decoder VCR DVD player personal computer game console and camcorder To view images coming from external equipment select the input source using the INPUT buttons on the remote control or the INPUT button on the Plasma Display Media Receiver rear view SCART cable commercially available To protect all equipment always turn off the Med...

Page 48: ...r WYSIWYR Displaying a VCR image To watch a VCR image press INPUT 2 on the remote control unit or press INPUT on the Plasma Display to select INPUT2 When you press the play button on the VCR the system automatically turns on from standby and displays a VCR image TV VCR advanced AV link systems may not be compatible with some external sources VCR Media Receiver rear view SCART cable commercially av...

Page 49: ...e connected audiovisual equipment e g VCR via the INPUT 2 or 3 terminal The i o Link A functions work only when the audiovi sual equipment is connected to the INPUT 2 or 3 terminal on the Media Receiver with i o Link A via a fully wired 21 pin SCART Either INPUT 2 or 3 is available for i o Link A depend ing on the switch on the rear of the Media Receiver Using this switch select the input terminal...

Page 50: ...n deactivated Video is always selected for signals other than RGB because the system cannot identify among RGB Y C S Video and CVBS Video signals for example receiving Y C S Video signals results in mono chrome display DVD player Media Receiver rear view SCART cable commercially available When using component cable select COMPONENT for Input Select in the menu See page 65 At the same time connect ...

Page 51: ...on sole or camcorder To watch an image coming from the game console or camcorder press INPUT 4 on the remote control unit or press INPUT on the Plasma Display to select INPUT4 Composite video cables commercially available Media Receiver front view Game console Camcorder S Video cable commercially available The INPUT 4 terminals are checked for cable connec tions in the order where 1 S Video 2 Vide...

Page 52: ...from the personal com puter press PC on the remote control unit or press INPUT on the Plasma Display to select PC When connecting to a personal computer the correct input signal type is automatically detected If the personal computer image does not come in clearly you may need to use Auto Setup menu See page 64 The PC terminals cannot be used for audiovisual equipment Computer compatibility chart ...

Page 53: ...T Y PB PR VIDEO I N OUT INPUT 1 INPUT 2 INPUT 3 AC INLET BLACK WHITE SYSTEM CABLE INPUT 2 3 INPUT 1 INPUT 2 INPUT 3 AV Receiver Subwoofer This connection is not required when connecting an AV amp equipped with the surround function to a subwoofer For details refer to the operation manual for the audio equipment to be connected Signals are always output to the MONITOR OUTPUT terminal regardless of ...

Page 54: ...lay images modified or edited using a personal computer or other equipment Inserting a memory card 1 Open the front door on the Media Receiver 2 Hold the memory card with its top side faced upward and then insert it into the PC CARD slot Insert the memory card as far as it goes When you insert the memory card while the system is on the initial Home Gallery screen appears 3 Close the front door on ...

Page 55: ...t use the Home menu to start the initial Home Gallery screen 1 Press HOME MENU 2 Press to select Home Gallery and then press ENTER Selecting a folder The initial Home Gallery screen shows folders saved in the memory card Different types of icons appear depending on the contents of folders Designates a folder that contains another folder Designates a folder that contains one or more image files Des...

Page 56: ...l 3 Save date To quit the Home Gallery function press HOME MENU Starting a standard single image screen When the thumbnail screen is in display press and to highlight a desired image and then press ENTER The thumbnail screen is quitted and only the selected image is displayed Home Gallery RETURN HOMEMENU Return Select End Full Screen Display a Picture Zoom In Zoom Out Rotation Picture information ...

Page 57: ...sed 4 Press to select Playback Mode and then press to select Auto or Manual With Auto selected images are automatically changed at the specified intervals With Manual selected images are changed each time you press P P Slide Show Setup Display Mode Normal Full Playback Order Name Order Random Number OfTimes Of Playback Single time Loop Playback Mode Auto Manual Interval sec 3 90 60 30 20 10 5 5 If...

Page 58: ...l selected for Playback Mode press P P to change images While images are automatically changed you can stop and hold automatic image change for approximately 90 seconds by pressing d 2 When quitting the Slide Show screen press RETURN to restore the thumbnail screen or HOME MENU to quit the Home Gallery function With Random selected for Playback Order se lected you cannot press P to manually change...

Page 59: ...ions Complete all component connections before making control cord connections The control cables commercially available are monau ral cables with mini plugs no resistance SERVICE ONLY i o link A SELECT CONTROL SUB WOOFER OUTPUT INPUT 3 COMPONENT S VIDEO VIDEO R AUDIO L MONITOR OUTPUT Y PB PR VIDEO I N OUT INPUT 1 INPUT 2 INPUT 3 AC INLET BLACK WHITE SYSTEM CABLE INPUT 2 3 INPUT 1 INPUT 2 INPUT 3 ...

Page 60: ... Auto Update and then press to select Disable or Enable Data Provider EPG Disable Off Station Matching Data Auto Update Item Description Disable Deactivates the EPG factory default Enable Automatically acquires EPG information at midnight and when watching a broadcast ing station specified as an EPG information provider 4 Press HOME MENU to exit the menu Specifying an EPG information provider Spec...

Page 61: ...s that can be actually received and watched 4 Press HOME MENU to exit the menu Searching programmes 1 Press EPG 2 Press the colour button to select a search parameter 3 Press to perform selection for the parameter Time Date Theme Station now 04 07 News Movie Show All 05 30 09 40 09 45 10 00 EPG Fr 04 07 10 25 Exit EPG A list of searched programmes appear 4 Press EPG to exit the menu For Time or Da...

Page 62: ...ogramme using a record ing equipment When recording equipment such as a VCR or DVD recorder is in connection you may use the Electronic Programme Guide to preset TV programmes for record ing 1 Press EPG 2 Press to select the desired programme and then press ENTER Tu 15 07 12 46 Record 13 00 13 30 Program information Exit EPG EPG RETURN Information about the selected programme appears 3 Press the r...

Page 63: ...o Link A activated using a SCART cable For programmes preset for recording using the EPG you can perform deletion or change only on the recording equipment VCR or DVD recorder which is a transfer destination Selecting a programme for immediate watch Using the EPG you can also select a TV programme currently on air to immediately start watching 1 Press EPG 2 Press to select the desired programme cu...

Page 64: ... press ENTER A confirmation screen appears Press to select Yes and then press ENTER Adjustments are stored separately according to input source Adjusting image positions and clock automatically PC mode only Use Auto Setup to automatically adjust positions and clock of images coming from a personal computer 1 Press HOME MENU 2 Press to select Option and then press ENTER 3 Press to select Auto Setup...

Page 65: ...s HOME MENU to exit the menu If no image appears or images appear in inappropri ate colours specify another video signal type For the signal types to be specified check the opera tion manual that came with the connected equip ment Adjusting image positions and clock manually PC mode only Usually you can easily adjust the positions and clock of images using Auto Setup Use Manual Setup to opti mize ...

Page 66: ...ur System and then press ENTER 4 Press to select a video signal system and then press ENTER Colour System Auto PAL SECAM NTSC 4 43NTSC You can select Auto PAL SECAM NTSC or 4 43NTSC With Auto selected input signals are automatically identified 5 Press HOME MENU to exit the menu The factory default is Auto You need to perform colour system setting for each of INPUT 1 to 4 For colour system setting ...

Page 67: ... the top and bottom with some programmes CINEMA For 14 9 letterbox pictures Bars may appear on the top and bottom on some programmes PC mode except for XGA signals Item Description 4 3 Fills the screen without altering the input signal aspect ratio FULL Full 16 9 screen display Dot by Dot Matches input signal with same number of screen pixels PC mode for XGA signals Ex 1024 768 input at PDP 504HDE...

Page 68: ...n formats 1 Press HOME MENU 2 Press to select Option and then press ENTER 3 Press to select WSS and then press ENTER 4 Press to select On and then press ENTER WSS Off On Item Description On Activates the WSS function Off Deactivates the WSS function factory default 5 Press HOME MENU to exit the menu Manually select an appropriate screen size if an image does not automatically switches to a correct...

Page 69: ...3 WIDE 5 Press HOME MENU to exit the menu Changing the brightness at both sides of the screen Side Mask With the 4 3 FULL 14 9 CINEMA 14 9 screen size selected for the AV mode you can change the brightness of the gray side masks that appear at both sides of the screen 1 Press HOME MENU 2 Press to select Option and then press ENTER 3 Press to select Side Mask and then press ENTER 4 Press to select ...

Page 70: ...propriate programmes You need to enter a password when watching programmes with Block specified Before the system is shipped 1234 is preset as the factory default password You can however change the pass word as you want When using the Home menu you select Auto Installa tion Programme Setup or Password a screen prompting password entry appears to prevent others from changing the programme settings...

Page 71: ...u is closed 7 Press HOME MENU to exit the menu Take a note of the newly set password and keep it handy Cut along the dotted line and file after reading and filling out We suggested you write down your password so you don t forget it PDP 504HDE PDP 434HDE Your password No If you forget the password When the message Please Input Your Password is displayed in step 3 above press the ENTER button on th...

Page 72: ...lasma Display See page 15 Are you using it under strong or fluorescent lighting Is a fluorescent light illuminated to remote control sensor Check if the input source for video or PC has been unintentionally selected although you want to watch a TV channel See page 23 Check if you have selected a channel blocked with Child Lock See page 32 Enter a password to temporarily cancel Child Lock See page ...

Page 73: ... in speaker cable and the speakers SD1 1 Powering off Internal temperature too high Check if the ambient temperature of the Plasma Display and the Check temperature around media receiver Media Receiver is high Signal names for 15 pin mini D sub connecter 15 14 13 12 9 11 10 8 7 6 5 4 3 2 1 Front view Pin No Signal name 1 R 2 G 3 B 4 Not connected 5 Not connected 6 GND ground 7 GND ground 8 GND gro...

Page 74: ...onnecting pin assignments for SCART Various audio and video devices may be connected via the SCART terminals 8 Audio video control 9 Earth 10 AV link control 11 Not used 12 Not used 13 Earth 14 Not used 15 Chroma S Video input 16 Not used 17 Earth for video 18 Earth 19 Video output 20 Video input S Video input 21 Plug shield SCART INPUT 3 1 Audio right output 2 Audio right input 3 Audio left outpu...

Page 75: ...tion Receiving System B G D K I L L Tuner VHF UHF E2 E69ch F2 F10ch I21 I69ch IR A IR Jch CATV Hyper band S1 S41ch Auto Channel Preset 99 ch Auto Preset Auto Label Auto Sort STEREO NICAM A2 Terminals Rear INPUT 1 SCART AV in RGB in TV out INPUT 2 SCART AV in out S VIDEO in AV link 1 INPUT 3 SCART AV in out S VIDEO in RGB in AV link 1 Component Video in Antenna 75 Ω Din Type for VHF UHF in Front IN...

Page 76: ...ks of Apple Computer Inc Microsoft is a registered trademark of Microsoft Corporation DDC is a registered trademark of Video Electronics Standards Association Power Management is a registered trademark of Sun Microsystems Inc VGA and XGA are registered trademarks of International Business Machines Co Inc The names of the companies or institutions are trademarks or registered trademarks of the resp...

Page 77: ......

Page 78: ......

Page 79: ...RRE DE LA FICHE DU CORDON D ALIMENTATION Les symboles suivants figurent sur les étiquettes apposées sur l appareil Ils appellent l attention des utilisateurs et du personnel d entretien sur des dangers potentiels AVERTISSEMENT Ce symbole signale une pratique dangereuse ou contraire à la sécurité qui peut entraîner une blessure ou des dégâts matériels DANGER Ce symbole signale une pratique dangereu...

Page 80: ...ment du cordon d alimentation 21 07 Pour regarder la télévision Mise en service 22 Mise hors service 22 Sélection des canaux 23 Modification du niveau sonore 24 Utilisation des fonctions d affichage 26 Partage d écran 26 Gel d une image 26 08 Réglages de base Utilisation du menu 27 Menus des modes AV 27 Menus des modes PC 28 Touches de commande pour les menus 29 Réglage automatique des canaux de t...

Page 81: ...ncement d une page standard à une image 56 Configuration de lancement de diaporama 57 Lancement du diaporama 58 Réglage de la qualité de l image 58 Raccordement des câbles de commande 59 Quelques mots sur SR 59 11 Utilisation du guide électronique de programme EPG Opérations préalables à l utilisation du guide EPG 60 Mise à jour automatique des informations EPG 60 Désignation du fournisseur EPG 60...

Page 82: ...s de repasser en veille STANDBY Instructions d installation Le système d écran à plasma Pioneer PureVision PDP 504HDE PDP 434HDE présente une très faible épaisseur Pour des raisons de sécurité et pour éviter que l appareil ne puisse se renverser en cas de vibration ou contact accidentel veillez à fixer ou à installer le système d écran à plasma de la manière convenable Cet appareil doit être insta...

Page 83: ...a remplace Le temps requis pour la disparition de l image dépend de la luminosité de l image fixe qui lui a donné naissance et du temps d exposition de cette image 2 Image rémanente due au brûlage Évitez d afficher sur l écran à plasma la même image pendant longtemps Si la même image demeure sur l écran pendant plusieurs heures ou encore apparaît tous les jours au cours d une période plus courte m...

Page 84: ...inement du câble d alimentation près de la prise secteur et au point de sortie de l appareil 13 Le panneau de l écran à plasma est en verre Il peut donc être brisé par la chute de l appareil ou par un choc En cas de casse du panneau veillez à ne pas être blessé par les débris 14 Surcharge Ne surchargez pas les prises secteur ou les rallonges Cela peut entraîner un incendie ou encore vous exposer à...

Page 85: ... utiliser les accessoires PIONEER de fixation PIONEER ne saurait être tenue responsable des blessures ou dommages matériels qui résulteraient de l utilisation d accessoires de fixation autres que ceux conçus et fabriqués par PIONEER Précautions d installation Observez les précautions suivantes si vous effectuez une installation mettant en ouvre des accessoires tels que le support en option Si vous...

Page 86: ...l non utilisé pendant longtemps son fonctionnement peut en souffrir profondément Mettez l appareil en service et faites le fonctionner régulièrement Condensation De la condensation peut se former à la surface ou à l intérieur de l appareil si vous le transportez rapidement d une pièce froide dans une pièce chaude ou bien lorsque le matin en hiver vous allumez un appareil de chauffage Si de la cond...

Page 87: ... 2 m Chiffon de nettoyage Collier rapide x 3 Collier à œil x 3 Pour l Europe à l exception de l Eire et du Royaume Uni Pour l Eire et le Royaume Uni Pour l Europe à l exception de l Eire et du Royaume Uni Pour l Eire et le Royaume Uni Pile AA x 2 pile au manganèse Seul le cordon d alimentation convenant pour le pays ou la région de distribution est fourni Seul le cordon d alimentation convenant po...

Page 88: ...teur de télécommande 1 2 4 3 5 6 7 8 vue de droite Vue de face 5 Touche STANDBY ON 6 Touche INPUT 7 Touches VOLUME 8 Touches CHANNEL 0 9 Vue de dos 9 Prise SYSTEM CABLE NOIR 0 Prise SYSTEM CABLE BLANC Prises pour les enceintes gauche droite Prise AC INLET Les prises sont tournées vers le bas ...

Page 89: ...teur de liaison d entrée sortie A 0 Prise INPUT 2 SCART Prise INPUT 3 SCART Prise MONITOR OUT S VIDEO Prise MONITOR OUT VIDEO Prises MONITOR OUT AUDIO Prise SYSTEM CABLE BLANC Prise SYSTEM CABLE NOIR 6 Prise INPUT 4 VIDEO 7 Prises INPUT 4 AUDIO 8 Prise PC INPUT AUDIO 9 Prise PC INPUT ANALOG RGB 0 Fente pour PC CARD Touche d éjection pour PC CARD 1 2 3 5 4 6 8 9 7 0 SERVICE ONLY i o link A SELECT C...

Page 90: ...s masqués n RETURN Cette touche rétablit la page de menu précédente Cette commande sélectionne un poste d une page de réglage p y Cette touche affiche les informations sur le canal f En mode téléviseur entrée extérieure elle modifie la taille de l écran large v En mode TELEXTEXT elle sélectionne les images télétexte totalité de l écran moitié supérieure moitié inférieure d Cette touche gèle une im...

Page 91: ...e du boîtier de télécommande Agissez sur le boîtier de télécommande en le dirigeant vers le capteur t qui est placé à la partie inférieure droite de l écran à plasma La distance du boîtier au capteur doit être inférieure à 7 mètres et l angle du faisceau avec la face de l écran doit être à 30 degrés quelle que soit la position du boîtier dans l espace Si le boîtier de télécommande ne fonctionne pa...

Page 92: ...reil pas même un magnétoscope sur le dessus du récepteur Média Ménagez suffisamment d espace sur les côtés et au dessus du récepteur Média N obstruez ni les ouïes d aération ni la sortie du ventilateur de refroidissement qui se trouve à l arrière du récepteur Média Plus de 10 cm Plus de 5 cm Plus de 5 cm Plus de 5 cm Plus de 5 cm Plus de 5 cm Plus de 5 cm Plus de 10 cm ...

Page 93: ... retirer les garnitures antichoc Conservez les garnitures antichoc et les vis Vous en aurez besoin si vous décidez de monter le récepteur Média dans la position horizontale Bouchez les perçages de vis au moyen des caches fournis Pour monter le récepteur Média verticalement ne faites usage que du support fourni Si vous posez le récepteur directement sur le plancher les évents d aération se trouvero...

Page 94: ...EUVENT ETRE PORTÉES A DES TENSIONS DANGEREUSES ALORS QUE BRANCHEZ OU DÉBRANCHEZ LES CABLES D ENCEINTE POUR ÉVITER UNE SECOUSSE ÉLECTRIQUE NE TOUCHEZ PAS LA PARTIE DÉNUDÉE DU CABLE AVANT DE DÉBRANCHER LA FICHE DU CORDON D ALIMENTATION Raccordement du câble système au récepteur Média Pour de plus amples détails concernant l installation des enceintes PIONEER en option reportez vous au mode d emploi ...

Page 95: ...rtie 1 dans le perçage convenable à l arrière de l écran à plasma puis engagez la partie 2 dans la partie 1 pour assurer la fermeture du collier Les colliers rapides sont conçus pour être difficiles à déposer une fois qu ils sont en place et fermés Effectuez leur pose avec soin Utilisez une paire de pinces pour tourner le collier de 90 puis tirez vers l extérieur Le collier peut se détériorer avec...

Page 96: ...specter les polarités et gravées dans le logement 3 Fermez le couvercle du logement des piles Précautions relatives aux piles L utilisation incorrecte des piles peut entraîner la fuite de l électrolyte voire leur explosion Respectez les instructions qui suivent N utilisez pas des piles alcalines Utilisez des piles manganèses comme piles de remplacement Positionnez les piles de manière à respecter ...

Page 97: ... Royaume Uni Eire et Royaume Uni Eire et Royaume Uni SERVICE ONLY i o link A SELECT CONTROL SUB WOOFER OUTPUT INPUT 3 COMPONENT S VIDEO VIDEO R AUDIO L MONITOR OUTPUT Y PB PR VIDEO I N OUT INPUT 1 INPUT 2 INPUT 3 AC INLET BLACK WHITE SYSTEM CABLE INPUT 2 3 SERVICE ONLY i o link A SELECT CONTROL SUB WOOFER OUTPUT INPUT 3 COMPONENT S VIDEO VIDEO R AUDIO L MONITOR OUTPUT Y PB PR VIDEO I N OUT INPUT 1...

Page 98: ...ns POWER ON de l écran à plasma et du récepteur Média s éclairent couleur verte Dans ce mode d emploi le terme système fait référence à l ensemble comprenant l écran à plasma et le récepteur Média Vous pouvez également inverser les opérations 1 et 2 Mise hors service 1 Appuyez sur a sur le boîtier de télécommande ou sur STANDBY ON sur l écran à plasma Le système passe en veille et l image disparaî...

Page 99: ...ès direct à une page dont le numéro à 3 chiffres est compris entre 100 et 899 grâce aux touches 0 à 9 Dans le cas du télétexte vous n avez pas besoin d utiliser la touche o Reportez vous à la page 45 En veille une pression sur la touche 0 provoque la mise en service et l image provenant de la source reliée à INPUT 1 apparaît sur l écran Ou bien si vous appuyez sur une des touches 1 à 9 l image tél...

Page 100: ...r le niveau sonore appuyez sur i Pour diminuer le niveau sonore appuyez sur i Les touches VOLUME de l écran à plasma agissent de la même manière que les touches i Utilisation de la touche e du boîtier de télécommande La touche e coupe les sons 1 Appuyez sur e Le symbole M apparaît sur l écran 2 Appuyez une nouvelle fois sur e pour rétablir les sons Une pression sur la touche i rétablit également l...

Page 101: ...un type de sons donné Mode p Mode pp Mode MONO p pp MONO 1 AAA NICAM STEREO 10 00 1 AAA NICAM STEREO 10 00 1 AAA MONO 10 00 2 BBB NICAM p 10 00 2 BBB NICAM pp 10 00 2 BBB MONO 10 00 3 CCC NICAM MONO 10 00 3 CCC NICAM MONO 10 00 3 CCC MONO 10 00 4 DDD STEREO 10 00 4 DDD STEREO 10 00 4 DDD MONO 10 00 5 EEE DUAL p 10 00 5 EEE DUAL pp 10 00 5 EEE MONO 10 00 6 FFF MONO 10 00 6 FFF MONO 10 00 6 FFF MONO...

Page 102: ... de changer de canal La fonction d affichage ne permet pas de faire apparaître sur l écran en même temps deux images provenant de la même source Si vous tentez cette opération un message d avertissement vous informe qu elle est impossible Lorsque vous appuyez sur HOME MENU une seule image est affichée et le menu correspondant apparaît Lorsque 2 images sont affichées celle de droite peut parfois pa...

Page 103: ...inction Ce paramètre place le système en veille à l expiration d une durée donnée 70 Options Position Ce paramètre agit sur la position horizontale et la position verticale des images 64 WSS Ce paramètre permet d afficher les informations télétexte sur écran large si un signal d écran large accompagne les données 68 Mode 4 3 Ce paramètre définit le format de l image due aux signaux vidéo 69 Systèm...

Page 104: ...es son sont rétablies 41 FOCUS Ce paramètre déplace vers le haut le point d où proviennent les sons image sonore et produit des contours sonores très définis 41 Surround avant Ce paramètre crée des effets sonores tridimensionnels accompagnés de graves riches et profonds 42 Commande Économie d énergie Ce paramètre réduit la luminosité de l image afin de diminuer la consommation alimentation d énerg...

Page 105: ...ale débute Vous avez alors le moyen de choisir la langue et le pays et de régler les canaux par une suite d opérations successives 1 Utilisez pour sélectionner Langue puis pour sélectionner une langue Autoinstallation Pays Installation Langue Français Austria Début La langue peut être choisie parmi les 12 suivantes Allemand Anglais Espagnol Finnois Français Grec Italien Néerlandais Portugais Russe...

Page 106: ...l des canaux de télévision Cette section traite de la manière d effectuer le réglage manuel des canaux Utilisation de Réglage manuel Utilisez la fonction Réglage manuel pour effectuer le réglage manuel des canaux de télévision 1 Appuyez sur HOME MENU 2 Utilisez pour sélectionner Installation puis appuyez sur ENTER 3 Utilisez pour sélectionner Installation programme puis appuyez sur ENTER La page d...

Page 107: ...Mémoriser puis pour sélectionner Oui Réglage manuel Recherche Système Entrer programme Système couleur Mémoriser Verrouil Enfants 42 75MHz B G Auto Arrêt Visionner 1 Oui Étiquette Décodeur Après avoir sélectionné Oui vous avez la possibilité de choisir les canaux au moyen de P P Après avoir sélectionné Non vous n avez pas la possibilité de choisir les canaux au moyen de P P Pour régler un autre ca...

Page 108: ...r les autres caractères maximum 5 Pour corriger un caractère tapé sélectionnez sur l écran ou puis appuyez sur ENTER Le curseur se place sur le caractère qui précède ou sur celui qui suit Pour effacer le caractère sélectionner sur l écran Effacer puis appuyez sur ENTER Pour taper une espace à l emplacement actuel sélectionnez sur l écran Espace puis appuyez sur ENTER 5 Pour valider le nom utilisez...

Page 109: ...Installation puis appuyez sur ENTER 3 Utilisez pour sélectionner Installation programme puis appuyez sur ENTER La page de saisie du mot de passe s affiche Tapez un mot de passe à 4 chiffres en vous servant des touches 0 à 9 4 Utilisez pour sélectionner Arranger puis appuyez sur ENTER Arranger 1 4 56789 01 01234 02 55555 03 01234 04 56789 05 01234 06 56789 07 01234 08 01234 09 10 11 12 13 14 15 16 ...

Page 110: ...électionner Télétexte puis pour sélectionner une langue 6 Appuyez sur HOME MENU pour quitter le menu Réglage de l horloge Utilisez la méthode suivante pour régler l heure 1 Appuyez sur HOME MENU 2 Utilisez pour sélectionner Installation puis appuyez sur ENTER 3 Utilisez pour sélectionner Horloge puis appuyez sur ENTER 4 Utilisez pour sélectionner Programme du réglage horloge puis pour sélectionner...

Page 111: ...DARD Pour obtenir une image très bien définie dans une pièce de luminosité normale DYNAMIQUE Pour obtenir une image très nette présentant un contraste maximum CINÉMA Pour les films JEU La luminosité de l image est diminuée afin qu elle soit plus agréable à regarder UTILISATEUR Ce paramètre vous donne le moyen de personnaliser les réglages Vous pouvez définir le mode pour chaque source Dans le cas ...

Page 112: ...des couleurs Teinte Les teintes chair Les teintes chair deviennent plus deviennent plus vertes violettes Netteté Diminution de Augmentation de la netteté la netteté Dans le cas d un ordinateur personnel Paramètre Touche Touche Contraste Diminution du Augmentation du contraste contraste Luminos Diminution de Augmentation de la luminosité la luminosité Rouge Le rouge est diminué Le rouge est augment...

Page 113: ...s images de DVD par exemple films cadencées à 24 images s 6 Appuyez sur HOME MENU pour quitter le menu Tous les paramètres ne sont pas disponibles pour tous les types de signaux d entrée Exemple 1 Il n est pas possible de sélectionner ADV lorsque les signaux d entrée sont de type PAL ou SECAM Exemple 2 Il n est pas possible de sélectionner Standard lorsque les signaux d entrée sont de type 480p ou...

Page 114: ...ature de couleur en procédant comme suit 1 Au cours de l opération 5 ci dessus sélectionnez Manuel puis appuyez pendant plus de 3 secondes sur ENTER de façon que s affiche la page de réglage manuel 2 Utilisez pour sélectionner le poste à définir puis appuyez sur ENTER 3 Utilisez pour sélectionner la valeur désirée puis appuyez sur ENTER Paramètre Touche Touche R élevé Le rouge est Le rouge est dim...

Page 115: ...yen Bas Paramètre Description Arrêt DNR n est pas actif Haut DNR accentuée Moyen DNR standard Bas DNR modérée 6 Appuyez sur HOME MENU pour quitter le menu CTI Utilisez CTI Amélioration des transitions de couleurs pour obtenir des couleurs aux contours mieux définis 1 Appuyez sur HOME MENU 2 Utilisez pour sélectionner Image puis appuyez sur ENTER 3 Utilisez pour sélectionner Réglage pro puis appuye...

Page 116: ... chaque couleur de base 1 Appuyez sur HOME MENU 2 Utilisez pour sélectionner Image puis appuyez sur ENTER 3 Utilisez pour sélectionner Réglage pro puis appuyez sur ENTER 4 Utilisez pour sélectionner Administration coul puis appuyez sur ENTER 5 Utilisez pour sélectionner le poste à définir puis appuyez sur ENTER Administration coul 0 0 0 0 0 0 Y R G C B M 6 Utilisez pour sélectionner la valeur dési...

Page 117: ...rmation s affiche Utilisez pour sélectionner Oui puis appuyez sur ENTER Vous ne pouvez pas régler les caractéristiques des sons appliqués sur le casque Si vous effectuez un réglage des sons alors que le casque est branché les nouvelles valeurs adoptées ne deviennent effectives pour les sons émis par les enceintes qu après avoir débranché le casque FOCUS Ce paramètre déplace vers le haut le point d...

Page 118: ...S Labs Inc L effet de cette fonction dépend du signal Vous ne pouvez pas régler le champ sonore pour les signaux appliqués sur le casque Si vous effectuez un réglage du champ sonore alors que le casque est branché les nouvelles valeurs adoptées ne deviennent effectives pour les sons émis par les enceintes qu après avoir débranché le casque Gestion de l alimentation La gestion de l alimentation off...

Page 119: ...précèdent la mise en veille du système Il se peut que le système ne soit pas placé en veille si du bruit est présent à l entrée du récepteur Média à la fin d une émission de télévision Mise hors service en l absence d opération Ce paramètre place le système en veille si aucune opération n est exécutée pendant 3 heures 1 Appuyez sur HOME MENU 2 Utilisez pour sélectionner Commande alimentation puis ...

Page 120: ...t 8 minutes Lorsque vous recommencez à utiliser l ordinateur et bien qu un signal soit alors reçu le système demeure en veille Le système est remis en service par une pression sur la touche STANDBY ON sur le système d écran à plasma ou sur une des touches 0 à 9 sur boîtier de télécommande Le système n est pas en mode ordinateur personnel Reportez vous à la page 22 Mode2 Le système est placé en vei...

Page 121: ...sage Ne peut pas afficher le télétexte apparaît sur l écran Sélection et emploi d une page télétexte Utilisez les touches suivantes du boîtier de télécommande pour sélectionner et employer les pages de télétexte Couleur ROUGE VERT JAUNE BLEU Vous pouvez sélectionner un groupe ou un ensemble de pages notés entre crochets à la partie inférieure de l écran en utilisant pour cela les touches de couleu...

Page 122: ...puis appuyez sur ENTER Lorsque les éléments généraux de TOP sont affichés seules les touches i i g e et a jouent un rôle Affichage d une page secondaire Vous pouvez afficher les pages secondaires au fur et à mesure de leur transmission Page secondaire 203 203 TEXT 01 44 37 P P Life Promis 01 02 03 04 1 Appuyez sur m pour afficher la page de télétexte Si vous ouvrez une page de laquelle découlent d...

Page 123: ...es d appareil au système d écran à plasma par exemple un décodeur un magnétoscope un lecteur de DVD un ordinateur personnel une console de jeu ou un caméscope Pour regarder les images provenant d un appareil extérieur sélectionnez la source correspondante au moyen des touches INPUT du boîtier de télécommande ou de la touche INPUT de l écran à plasma Récepteur Média vue de dos Câble péritel disponi...

Page 124: ...yez simplement sur la commande d enregistrement du magnétoscope What You See Is What You Record Telle image tel enregistrement Consultez le mode d emploi du magnétoscope car certains modèles possèdent une touche spécifique à Telle image tel enregistrement Lorsque vous appuyez sur la touche de lecture sur le magnétoscope le système quitte la veille et se met en service puis affiche les images prove...

Page 125: ...l audiovisuel par exemple le magnétoscope relié à la prise INPUT 2 ou 3 Les fonctions d entrée sortie Link A ne sont disponibles que si l appareil audiovisuel est relié à la prise INPUT 2 ou 3 du récepteur Média au moyen d un câble péritel à 21 broches toutes câblées Soit INPUT 2 soit INPUT 3 est disponible pour l entrée sortie Link A cela dépend de la position qu occupe le sélecteur qui se trouve...

Page 126: ...rovenant d un lecteur de DVD Pour regarder les images provenant du lecteur de DVD appuyez sur INPUT 3 sur boîtier de télécommande ou sur INPUT sur l écran à plasma de manière à sélectionner ENTRÉE3 Câble pour les composantes vidéo disponible dans le commerce Si l image du lecteur de DVD n est pas nette changez le type du signal d entrée en utilisant pour cela le menu Reportez vous aux pages 65 et ...

Page 127: ...un caméscope Pour regarder les images provenant de la console de jeu ou du caméscope appuyez sur INPUT 4 sur le boîtier de télécommande ou sur INPUT sur l écran à plasma de manière à sélectionner ENTRÉE4 Câble pour vidéo composite disponible dans le commerce Récepteur Média vue de face Console de jeu caméscope Câble S vidéo disponible dans le commerce Les prises INPUT 4 sont testées pour connaître...

Page 128: ...dinateur personnel appuyez sur PC sur le boîtier de télécommande ou sur INPUT sur l écran à plasma de manière à sélectionner PC Après le raccordement de l ordinateur personnel le type convenable du signal d entrée est automatiquement détecté Si les images provenant de l ordinateur personnel ne sont pas nettes utilisez le menu Autoinstallation Reportez vous à la page 64 Les prises PC ne conviennent...

Page 129: ...NPUT 2 INPUT 3 AC INLET BLACK WHITE SYSTEM CABLE INPUT 2 3 INPUT 1 INPUT 2 INPUT 3 Récepteur audiovisuel Caisson de graves Cette liaison n est pas nécessaire si vous avez relié un amplificateur audiovisuel possédant des fonctions de correction d ambiance à un caisson de graves Pour de plus amples détails reportez vous au mode d emploi qui accompagne les appareils audio reliés Les signaux de sortie...

Page 130: ...arte de mémoire 1 Ouvrez le volet de la face avant du récepteur Média 2 Tenez la carte de mémoire de manière que sa face supérieure soit tournée vers le haut puis introduisez la dans la fente PC CARD Introduisez la carte aussi loin que possible Si vous introduisez la carte de mémoire alors que le système est en service la page initiale de Home Gallery apparaît 3 Fermez le volet de la face avant du...

Page 131: ... 1 Appuyez sur HOME MENU 2 Utilisez pour sélectionner Home Gallery puis appuyez sur ENTER Sélection d un dossier La page initiale de Home Gallery fournit la liste des dossiers que contient la carte de mémoire Différentes icônes sont utilisées en fonction de la nature de chaque dossier Cette icône désigne un dossier contenant un autre dossier Cette icône désigne un dossier contenant un ou plusieurs...

Page 132: ...puyez sur HOME MENU Lancement d une page standard à une image Une page de vignettes étant affichée utilisez et pour mettre en valeur une image puis appuyez sur ENTER La page de vignettes se ferme et seule l image sélectionnée est maintenant affichée Home Gallery RETURN HOMEMENU Retour Sélectionner Fin Ecran plein Afficher une image Zoom avant Zoom arrière Rotation Information image IMG_0011 JPG 22...

Page 133: ...puyiez sur RETURN 4 Utilisez pour sélectionner Mode de lecture puis pour sélectionner Auto ou Manuel Si vous avez sélectionné Auto les images sont changées à intervalle régulier Si vous avez sélectionné Manuel les images sont changées chaque fois que vous appuyez sur P P Configuration diaporama Mode affichage Normal Plein Ordre de lecture Ordre des noms Aléatoire Nombre de fois la lecture Temps in...

Page 134: ... pour Mode de lecture utilisez P P pour changer les images Tandis que les images sont automatiquement changées vous pouvez arrêter momentanément 90 secondes cette opération en appuyant sur d 2 À la fin du diaporama appuyez sur RETURN pour rétablir la page des vignettes ou bien appuyez sur HOME MENU pour quitter la fonction Home Gallery Si vous avez sélectionné Aléatoire pour Mode de lecture la tou...

Page 135: ...vous occuper de ceux qui concernent les câbles de commande Les câbles de commande disponible dans le commerce sont des câbles à un conducteur pourvus de minifiches sans résistance SERVICE ONLY i o link A SELECT CONTROL SUB WOOFER OUTPUT INPUT 3 COMPONENT S VIDEO VIDEO R AUDIO L MONITOR OUTPUT Y PB PR VIDEO I N OUT INPUT 1 INPUT 2 INPUT 3 AC INLET BLACK WHITE SYSTEM CABLE INPUT 2 3 INPUT 1 INPUT 2 ...

Page 136: ... pour sélectionner Désactiver ou Activer Fournisseur de données EPG Désactiver Arrêt Correspondance des stations Données auto actualisées Paramètre Description Désactiver EPG n est pas actif valeur par défaut Activer Les informations EPG sont automatiquement acquises à minuit et lorsque vous regardez une émission diffusée par une station désignée comme fournissant des informations EPG 4 Appuyez su...

Page 137: ...qu il est possible de recevoir et de regarder 4 Appuyez sur HOME MENU pour quitter le menu Recherche d émissions 1 Appuyez sur EPG 2 Appuyez sur une touche de couleur pour sélectionner le critère de recherche 3 Appuyez sur pour exécuter la recherche conformément au critère Heure Date Thème Station Maintenant 04 07 Infos Cinéma Spectacle Tout 05 30 09 40 09 45 10 00 EPG VEN 04 07 10 25 Sortie EPG U...

Page 138: ...un appareil Si un appareil d enregistrement magnétoscope ou graveur de DVD est relié au système vous pouvez utiliser EPG pour le préparer à l enregistrement de certaines émissions de télévision 1 Appuyez sur EPG 2 Utilisez pour sélectionner l émission désirée puis appuyez sur ENTER MAR 15 07 12 46 Enregistrer 13 00 13 30 Information de programmes Sortie EPG EPG RETURN Les informations concernant c...

Page 139: ...le péritel et que le système d entrée sortie Link A est en fonctionnement Les programmations d enregistrement effectuées en utilisant EPG ne peuvent être effacées ou modifiées que sur l appareil d enregistrement magnétoscope ou graveur de DVD qui est l appareil cible Choix de l émission à regarder immédiatement Vous avez la possibilité d utiliser EPG pour choisir l émission de télévision actuellem...

Page 140: ...ctionner Oui puis appuyez sur ENTER Les réglages sont conservées individuellement pour chaque source Réglage automatique de la position de l image et de l horloge mode PC uniquement Grâce à Autoinstallation vous pouvez régler la position des images provenant de l ordinateur personnel et de l horloge 1 Appuyez sur HOME MENU 2 Utilisez pour sélectionner Options puis appuyez sur ENTER 3 Utilisez pour...

Page 141: ...aît ou si les couleurs sont inhabituelles choisissez un autre type de signal Pour de plus amples détails concernant les types de signal reportez vous au mode d emploi qui accompagne l appareil relié Réglage manuel de la position de l image et de l horloge mode PC uniquement En principe le réglage automatique apporté par l auto installation est suffisant Toutefois vous pouvez optimiser la position ...

Page 142: ... 4 Utilisez pour sélectionner le standard vidéo puis appuyez sur ENTER Système couleur Auto PAL SECAM NTSC 4 43NTSC Vous pouvez choisir parmi les standards suivants Auto PAL SECAM NTSC et 4 43NTSC Si vous choisissez Auto le standard des signaux d entrée est automatiquement détecté 5 Appuyez sur HOME MENU pour quitter le menu La valeur par défaut est Auto Vous devez procéder au choix du standard co...

Page 143: ...s de l image CINÉMA Pour afficher des images 14 9 allongées Dans certains cas une bande peut être visible en haut et en bas de l image Mode PC sauf pour les signaux XGA Paramètre Description 4 3 L image occupe la totalité de la surface de l écran mais son format n est pas modifié PLEIN Image 16 9 plein écran Pt par Pt À un pixel du signal d entrée correspond un pixel sur l écran Mode PC pour les s...

Page 144: ...ENU 2 Utilisez pour sélectionner Options puis appuyez sur ENTER 3 Utilisez pour sélectionner WSS puis appuyez sur ENTER 4 Utilisez pour sélectionner Marche puis appuyez sur ENTER WSS Arrêt Marche Paramètre Description Marche WSS est actif Arrêt WSS est inactif valeur par défaut 5 Appuyez sur HOME MENU pour quitter le menu Choisissez manuellement le format d image convenable si la sélection automat...

Page 145: ... n est utilisé 4 3 LARGE 5 Appuyez sur HOME MENU pour quitter le menu Modification de la luminosité de chaque côté de l écran cache latéral Si vous avez sélectionné le format 4 3 PLEIN 14 9 CINÉMA 14 9 pour le mode AV vous avez la possibilité de modifier la luminosité du cache latéral gris qui est visible sur l écran 1 Appuyez sur HOME MENU 2 Utilisez pour sélectionner Options puis appuyez sur ENT...

Page 146: ...de protéger les enfants Il vous faut alors taper un mot de passe pour que les émissions pour lesquelles la valeur Bloquer a été choisie puissent être regardées Le mot de passe par défaut est 1234 Vous pouvez bien évidemment changer ce mot de passe Lorsque vous utilisez le menu Home pour sélectionner Autoinstallation Installation programme ou Mot de passe une page de frappe de mot de passe apparaît...

Page 147: ...ur quitter le menu Notez par écrit le nouveau mot de passe et conservez le soigneusement Coupez le long du pointillé et conservez ce talon par devers vous Nous vous proposons d écrire ici le mot de passe PDP 504HDE PDP 434HDE Mot de passe Si vous oubliez le mot de passe Lorsque le message Intro votre code svp s affiche au cours de l opération 3 ci dessus maintenez la pression d un doigt sur la tou...

Page 148: ...uissant ou fluorescent Un éclairage fluorescent illumine t il le capteur de télécommande Assurez vous que la source sélectionnée n est pas par hasard une source vidéo ou l ordinateur personnel alors que vous désirez regarder une émission de télévision Reportez vous à la page 23 Assurez vous que vous n avez pas choisi une chaîne interdite aux enfants Reportez vous à la page 32 Tapez le mot de passe...

Page 149: ...uit dans le câble de l enceinte SD1 1 S éteint Température interne trop élevée Assurez vous que la température de l écran à plasma et du récepteur Vérifier la température dans le récepteur du média Média n est pas trop élevée Bornage du connecteur mini D sub à 15 broches 15 14 13 12 9 11 10 8 7 6 5 4 3 2 1 Vue de face N de broche Nom du signal 1 R 2 V 3 B 4 Non reliée 5 Non reliée 6 GND Masse 7 GN...

Page 150: ...e péritel Divers appareils audio et vidéo peuvent être interconnectés grâce aux prises péritel 8 Commande audio vidéo 9 Masse 10 Commande de la liaison AV 11 Non utilisée 12 Non utilisée 13 Masse 14 Non utilisée 15 Entrée chrominance pour S vidéo 16 Non utilisée 17 Masse pour la vidéo 18 Masse 19 Sortie vidéo 20 Entrée vidéo entrée S vidéo 21 Blindage de la prise Prise péritel INPUT 3 1 Sortie aud...

Page 151: ...1 I69 IR A IR J Télévision par câble Hyper bande canaux S1 S41 Préréglage automatique des canaux 99 canaux préréglage automatique étiquetage automatique classement automatique Stéréophonie NICAM A2 Prises Arrière INPUT 1 Péritel entrée AV entre RVB sortie télévision INPUT 2 Péritel entrée sortie AV entrée S VIDEO liaison AV 1 INPUT 3 Péritel entrée sortie AV entrée S VIDEO entrée RVB liaison AV 1 ...

Page 152: ...es par Apple Computer Inc Microsoft est une marque déposée par Microsoft Corporation DDC est une marque déposée par Video Electronics Standards Association Power Management est une marque déposée par Sun Microsystems Inc VGA et XGA sont des marques déposées par International Business Machines Co Inc Les noms de société ou d organisme sont des marques de commerce qui peuvent avoir fait l objet d un...

Page 153: ......

Page 154: ......

Page 155: ...WECHSELT WERDEN VERSUCHEN SIE NICHT DEN SCHUTZKONTAKT MISSBRÄUCHLICH ZU UMGEHEN DienachstehendenSymbolebefindensichaufam Gerät angebrachten Aufklebern Sie machen den BenutzerunddasWartungspersonalaufmögliche Gefahren aufmerksam WARNUNG Dieses Symbol weist auf eine gefährliche oder unsichere Vorgehensweise hin die zu Personenverletzungen oder Sachschäden führen kann VORSICHT Dieses Symbol weist auf...

Page 156: ...inlegen der Batterien 20 Vorsichtsmaßregeln zu Batterien 20 Basisanschlüsse 21 Anschließen einer Antenne 21 Anschließen des Netzkabels 21 07 Fernsehempfang Einschalten 22 Ausschalten 22 Kanalwechsel 23 Lautstärke und Toneinstellungen 24 Gebrauch der Multiscreen Funktionen 26 Bildschirmteilung 26 Standbild 26 08 Grundeinstellungen Menü Übersicht 27 AV Modus Menüs 27 PC Modus Menüs 28 Menüsteuertast...

Page 157: ...lbildanzeige 56 Starten Einstellung der Dia Show 57 Starten der Dia Show 58 Einstellen der Bildqualität 58 Anschließen von Steuerkabeln 59 Zu SR 59 11 Verwendung der Elektronischen Programmführung EPG Vorbereitung zur Verwendung von EPG 60 Automatisches Aktualisieren der EPG Daten 60 Bestimmen eines EPG Datenanbieters 60 Begrenzen der EPG Datenanzeige 61 Suchen nach Programmen 61 Anzeigen von Prog...

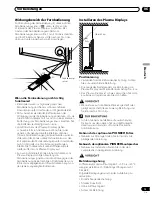
Page 158: ...fts Modus Standby Grundregeln zur Aufstellung Das Pioneer PureVision Plasma Display System PDP 504HDE PDP 434HDE zeichnet sich durch eine sehr flache Bauweise aus Aus Sicherheitsgründen sollten bei der Montage oder Aufstellung geeignete Maßnahmen getroffen werden um ein Umkippen bei Vibrationen oder unbeabsichtigter Berührung zu verhindern Zum Aufstellen des Produkts sollten ausschließlich die von...

Page 159: ...rgegeben werden Die Zeitdauer bis zur Auflösung der Nachbilder hängt von der Luminanz der ehemaligen Standbilder und deren Anzeigedauer ab 2 Nachbild durch Einbrennen Meiden Sie Wiedergabe desselben Bilds über eine längere Zeit Wenn dasselbe Bild fortwährend mehrere Stunden lang oder für kürzere Zeit jedoch über mehrere Tage hinweg angezeigt wird kann es am Plasma Display einbrennen und ein perman...

Page 160: ... keine schweren Gegenstände darauf abgestellt werden Kontrollieren Sie die Kabel insbesondere an den Steckern und am Produkt 13 Das Plasma Display enthält Glasteile Es kann brechen wenn es fallen gelassen oder Druck darauf ausgeübt wird Im Falle des Falles ist Vorsicht geboten um sich nicht an Scherben oder Splittern zu verletzen 14 Überlastung Netzsteckdosen und Verlängerungskabel dürfen nicht üb...

Page 161: ...ör zu verwenden PIONEER übernimmt keine Verantwortung für Personenverletzungen und Produkteschäden die sich auf den Gebrauch von anderen Befestigungsteilen als den optionalen PIONEER Produkten zurückführen lassen Beim Installieren zu beachten Beachten Sie beim Installieren jedes Artikels wie z B des optionalen Fußes bitte die folgenden Punkte Bei Gebrauch des optionalen Fußes von Halterungen oder ...

Page 162: ...g Feuchtigkeit kann sich an der Oberfläche oder im Inneren des Produkts niederschlagen wenn es schnell von einer kalten an eine warme Stelle gebracht wird oder zum Beispiel an einem Wintermorgen unmittelbar nach Einschalten einer Heizung Wenn eine derartige Kondenswasserbildung stattgefunden hat schalten Sie das Produkt nicht ein sondern warten Sie bis die Feuchtigkeit verdunstet ist Gebrauch des ...

Page 163: ... x 4 Fuß Systemkabel 3 m Netzkabel 2 m Reinigungstuch Schnellverschlussklemme x 3 Kugelband x 3 Für Europa außer UK und Irland Für UK und Irland Für Europa außer UK und Irland Für UK und Irland Zwei Mignonzellen AA Manganbatterie Nur das für Ihr Land bzw Gebiet geeignete Netzkabel ist mitgeliefert Nur das für Ihr Land bzw Gebiet geeignete Netzkabel ist mitgeliefert Lautsprecherkissen x 3 Bei Insta...

Page 164: ...rnbedienungssensor 1 2 4 3 5 6 7 8 Rechte Seite Vorderseite 5 Taste STANDBY ON 6 Taste INPUT 7 Tasten VOLUME 8 Tasten CHANNEL 0 9 Rückseite 9 Anschluss SYSTEM CABLE SCHWARZ 0 Anschluss SYSTEM CABLE WEISS Lautsprecheranschlüsse rechts links Anschluss AC INLET Netzeingang Anschlüsse weisen nach unten ...

Page 165: ...Anschluss INPUT 2 SCART Anschluss INPUT 3 SCART Anschluss MONITOR OUT S VIDEO Anschluss MONITOR OUT VIDEO Anschlüsse MONITOR OUT AUDIO Anschluss SYSTEM CABLE WEISS Anschluss SYSTEM CABLE SCHWARZ 6 Anschluss INPUT 4 VIDEO 7 Anschlüsse INPUT 4 AUDIO 8 Anschluss PC INPUT AUDIO 9 Anschluss PC INPUT ANALOG RGB 0 Schacht PC CARD PC CARD Auswurftaste 1 2 3 5 4 6 8 9 7 0 SERVICE ONLY i o link A SELECT CON...

Page 166: ... an n RETURN Zum Zurückkehren zum vorherigen Menü Zum Wählen des gewünschten Punkts im Einstellmenü p y Zeigt die Kanaldaten an f TV Extern Eingangsmodus Ändert den Breitbildmodus v VIDEOTEXT Modus Zum Umschalten von Videotext Bildern voll obere Hälfte untere Hälfte d Zum Einfrieren eines Vollbilds aus einem bewegten Bild Wird erneut gedrückt um die Funktion wieder aufzuheben u VIDEOTEXT Modus Sto...

Page 167: ...ist diese auf den Fernbedienungssensor t unten rechts an der Vorderseite des Plasma Displays zu richten Der Abstand der Fernbedienungseinheit vom Fernbedienungssensor sollte 7 m nicht überschreiten und ihr Winkel zum Sensor sollte nach rechts links oben und unten innerhalb von 30 Grad liegen Wenn die Fernbedienung nicht richtig funktioniert Bei Hindernissen im Signalweg zwischen Fernbedienung und ...

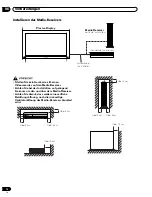
Page 168: ...e kein Gerät wie z B einen Videorecorder auf den Media Receiver Achten Sie bei der Installation auf genügend Freiraum um den und über dem Media Receiver Achten Sie darauf dass weder eine seitliche Belüftungsöffnung noch die rückseitige Ventilatoröffnung des Media Receivers blockiert wird Über 10 cm Über 5 cm Über 5 cm Über 5 cm Über 5 cm Über 5 cm Über 5 cm Über 10 cm ...

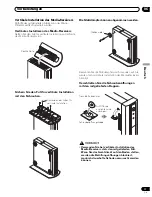
Page 169: ...ikale Installation Die Stoßdämpfer können abgenommen werden Bewahren Sie die Stoßdämpfer und Schrauben auf Sie werden für horizontale Installation des Media Receivers benötigt Verschließen Sie die Schraubenöffnungen mit den mitgelieferten Kappen Verwenden Sie bei vertikaler Installation des Media Receivers stets den mitgelieferten Fuß Wenn Sie das Gerät direkt auf den Boden stellen werden die Belü...

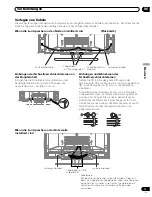
Page 170: ...ma Display AN DEN LAUTSPRECHERKLEMMEN KÖNNEN HOHE SPANNUNGEN ANLIEGEN WEGEN STROMSCHLAGGEFAHR DÜRFEN BEIM ANSCHLIESSEN ODER ABTRENNEN DER LAUTSPRECHERKABEL KEINE UNISOLIERTEN TEILE BERÜHRT WERDEN BEVOR DER NETZSTECKER GEZOGEN WURDE Anschluss des Systemkabels an den Media Receiver Näheres zur Installation optionaler PIONEER Lautsprecher finden Sie in der den Lautsprechern beiliegenden Anleitung Pla...

Page 171: ...e 1 in eine geeignete Öffnung an der Rückseite des Plasma Displays ein und schnappen Sie 2 in die Rückseite von 1 ein um die Klemme zu arretieren Schnellverschlussklemmen lassen sich nicht wieder ohne weiteres lösen nachdem sie einmal angebracht worden sind Bringen Sie sie daher bedachtsam an Drehen Sie die Klemme mit einer Zange um 90 und ziehen Sie sie nach außen Die Klemme kann im Laufe der Zei...

Page 172: ...Mignonzellen AA ein Legen Sie die Batterien polaritätsrichtig gemäß den Markierungen und im Batteriefach ein 3 Schließen Sie den Batteriefachdeckel Vorsichtsmaßregeln zu Batterien Bei unsachgemäßer Benutzung von Batterien besteht die Gefahr dass Batteriesäure austritt oder die Batterien platzen Befolgen Sie unbedingt die nachstehenden Anweisungen Verwenden Sie keine Alkalibatterien Als Ersatzbatte...

Page 173: ...ßer UK und Irland Europa außer UK und Irland UK und Irland UK und Irland SERVICE ONLY i o link A SELECT CONTROL SUB WOOFER OUTPUT INPUT 3 COMPONENT S VIDEO VIDEO R AUDIO L MONITOR OUTPUT Y PB PR VIDEO I N OUT INPUT 1 INPUT 2 INPUT 3 AC INLET BLACK WHITE SYSTEM CABLE INPUT 2 3 SERVICE ONLY i o link A SELECT CONTROL SUB WOOFER OUTPUT INPUT 3 COMPONENT S VIDEO VIDEO R AUDIO L MONITOR OUTPUT Y PB PR V...

Page 174: ... Die Anzeigen POWER ON am Plasma Display und Media Receiver leuchten grün auf In dieser Bedienungsanleitung wird unter System die Kombination an Plasma Display und Media Receiver verstanden Sie können die Schritte 1 und 2 auch umkehren Ausschalten 1 Drücken Sie a an der Fernbedienung oder STANDBY ON am Plasma Display Das System schaltet auf den Bereitschaftsmodus und das Bild auf dem Bildschirm er...

Page 175: ...hende Nummer ein Bei Videotext wird o nicht verwendet Siehe Seite 45 Wenn Sie im Bereitschaftsmodus 0 drücken wird die Stromversorgung eingeschaltet und das On Screen Bild wird von der Programmquelle INPUT 1 geliefert Wenn Sie hingegen eine beliebige Taste von 1 bis 9 drücken wird ein Fernsehbild angezeigt CHANNEL Plasma Display Media Receiver Statusanzeigen Anzeigestatus System Status Plasma Disp...

Page 176: ... i zum Erhöhen der Lautstärke Drücken Sie i zum Vermindern der Lautstärke VOLUME am Plasma Display funktioniert wie i Mit e an der Fernbedienung e schaltet die momentane Tonausgabe stumm 1 Drücken Sie e M erscheint am Bildschirm 2 Drücken Sie e erneut um die Stummschaltung wieder aufzuheben Die Stummschaltung kann auch durch Drücken von i aufgehoben werden ...

Page 177: ... auf INPUT 1 bis 4 oder PC geschaltet ist ändert sich der Tontyp nicht In diesem Fall wird der Ton durch die Video Programmquelle bestimmt Mit jedem Druck auf g wird MTS wie unten gezeigt umgeschaltet Modus p Modus pp Modus MONO p pp MONO 1 AAA NICAM STEREO 10 00 1 AAA NICAM STEREO 10 00 1 AAA MONO 10 00 2 BBB NICAM p 10 00 2 BBB NICAM pp 10 00 2 BBB MONO 10 00 3 CCC NICAM MONO 10 00 3 CCC NICAM M...

Page 178: ...ben Eingangsprogrammquelle nicht gleichzeitig angezeigt werden Wenn Sie einen derartigen Versuch unternehmen erscheint eine Warnmeldung Wenn Sie HOME MENU tdrücken wird auf den Einzelbildschirmmodus zurückgeschaltet und das entsprechende Menü erscheint Bei Doppelanzeige erscheinen Bilder auf dem rechten Screen je nach Bildmaterial unter Umständen etwas grob Standbild Sie können ein Vollbild der mo...

Page 179: ... das System bei Ablauf der vorgewählten Zeit automatisch auf den Bereitschaftsmodus 70 Weiterführende Position Zum Einstellen der vertikalen horizontalen Lage des angezeigten Bilds 64 Einstellungen WSS Wenn Videotext Daten Breitbildsignale enthalten kann der Text im Breitbildformat betrachtet werden 68 4 3 Modus Zur Wahl des Bildverhältnisses der Videosignale 69 Farbsystem Zum Wählen des kompatibl...

Page 180: ...er 41 Reset Zum Zurückstellen aller Audio Einstellungen auf die Werksvorgaben 41 FOCUS Verlagert das Klangbild nach oben und sorgt für klare Klangkonturen 41 Front Surround Liefert dreidimensionale Klangeffekte und oder tiefe satte Bässe 42 Energiesparmodi Energiesparmodus Spart Strom durch Absenken der Bildhelligkeit 42 Energiemanagement Schaltet das System automatisch auf den Bereitschaftsmodus ...

Page 181: ... Land und Kanäle der Reihe nach automatisch programmieren 1 Wählen Sie Sprache mit und wählen Sie dann mit eine Sprache aus Autoinstallation Land Installation Sprache Deutsch Austria Start Wählen Sie unter 12 Sprachen Englisch Deutsch Französisch Italienisch Spanisch Niederländisch Schwedisch Portugiesisch Griechisch Finnisch Russisch und Türkisch 2 Wählen Sie Land mit und wählen Sie dann mit Ihr ...

Page 182: ...s Programmieren von Fernsehkanälen In diesem Abschnitt wird beschrieben wie Fernsehkanäle manuell programmiert werden können Verwendung von Manuelle Einstellung In diesem Abschnitt wird beschrieben wie Fernsehkanäle mit Manuelle Einstellung programmiert werden können 1 Drücken Sie HOME MENU 2 Wählen Sie Grundeinstellungen mit und drücken Sie dann ENTER 3 Wählen Sie Programm Einstellungen mit und d...

Page 183: ...ann mit Ja Manuelle Einstellung Suche System Programmplatz Eingabe Farbsystem Speichern Name Kindersicherung Decoder 42 75MHz B G Auto Aus Ansicht 1 Ja Unter Vorgabe von Ja kann der Kanal mit P P gewählt werden Unter Vorgabe von Nein kann der Kanal nicht mit P P gewählt werden Für Programmierung eines anderen Kanals wiederholen Sie die Schritte 5 bis 9 10 Drücken Sie HOME MENU um das Menü zu verla...

Page 184: ...ingegebener Zeichen wählen Sie oder am Bildschirm und drücken Sie dann ENTER Der Cursor rückt weiter Zum Löschen des aktuellen Zeichens wählen Sie Löschen am Bildschirm und drücken Sie dann ENTER Zum Setzen einer Leerstelle für das aktuelle Zeichen wählen Sie Leerstelle am Bildschirm und drücken Sie dann ENTER 5 Zum Abschluss der Namenseingabe wählen Sie mit oder OK am Bildschirm und drücken Sie d...

Page 185: ...t und drücken Sie dann ENTER 3 Wählen Sie Programm Einstellungen mit und drücken Sie dann ENTER Die Kennwort Eingabeanzeige erscheint Geben Sie Ihr vierstelliges Kennwort mit den Tasten 0 9 ein 4 Wählen Sie Sortieren mit und drücken Sie dann ENTER Sortieren 1 4 56789 01 01234 02 55555 03 01234 04 56789 05 01234 06 56789 07 01234 08 01234 09 10 11 12 13 14 15 16 17 01234 18 19 20 21 22 23 24 25 567...

Page 186: ...n Sie Videotext mit und wählen Sie dann mit eine Sprache aus 6 Drücken Sie HOME MENU um das Menü zu verlassen Einstellen der Uhr Um die Zeit richtig einzustellen gehen Sie wie nachfolgend beschrieben vor 1 Drücken Sie HOME MENU 2 Wählen Sie Grundeinstellungen mit und drücken Sie dann ENTER 3 Wählen Sie Uhr mit und drücken Sie dann ENTER 4 Wählen Sie Automatische Uhreinstellung mit und wählen Sie d...

Page 187: ...t hoher Auflösung bei normaler Raumbeleuchtung DYNAMISCH Für ein sehr scharfes Bild mit maximalem Kontrast FILM Für einen Film SPIELE Senkt die Bildhelligkeit um das Betrachten angenehmer zu machen ANWENDER Ermöglicht es dem Anwender die Einstellungen wunschgemäß vorzunehmen Sie können den Modus für jede Eingangsprogrammquelle einstellen Für PC Programmquelle Gegenstand Beschreibung STANDARD Für e...

Page 188: ...er Farbintensität Zum Erhöhen der Farbintensität Tint Hauttöne werden blaustichig Hauttöne werden grünstichig Schärfe Zum Vermindern der Schärfe Zum Erhöhen der Schärfe Für PC Programmquelle Gegenstand Taste Taste Kontrast Zum Vermindern des Kontrastes Zum Erhöhen des Kontrastes Helligkeit Zum Vermindern der Helligkeit Zum Erhöhen der Helligkeit Rot Zum Abschwächen von Rot Zum Betonen von Rot Grün...

Page 189: ...ngen indem bei DVD Wiedergabe z B von Filmen mit 24 Vollbildern pro Sekunde eine Umwandlung auf 72 Hz durchgeführt wird 6 Drücken Sie HOME MENU um das Menü zu verlassen Bei gewissen Eingangssignaltypen können nicht alle Parameter gewählt werden Beispiel 1 Bei Zuführung von PAL oder SECAM Signalen kann ADV nicht gewählt werden Beispiel 2 Bei Zuführung von 480p oder 720p Signalen kann Standard nicht...

Page 190: ... Wählen Sie in Schritt 5 oben Manuell und halten Sie dann ENTER länger als drei Sekunden gedrückt bis die manuelle Einstellanzeige erscheint 2 Wählen Sie einen Einstellpunkt mit und drücken Sie dann ENTER 3 Wählen Sie den gewünschten Wert mit und drücken Sie dann ENTER Gegenstandm Taste Taste R Hoch Zum Abschwächen von Rot Zum Betonen von Rot G Hoch Zum Abschwächen von Grün Zum Betonen von Grün B ...

Page 191: ...Gegenstand Beschreibung Aus Deaktiviert DNR Weißwert DNR verstärkt Mittel Standard DNR Schwarzwert DNR gemäßigt 6 Drücken Sie HOME MENU um das Menü zu verlassen CTI Setzen Sie CTI Farbflächentrennung ein um dem Bild deutlichere Farbkonturen zu geben 1 Drücken Sie HOME MENU 2 Wählen Sie Bild mit und drücken Sie dann ENTER 3 Wählen Sie Profi Einstellungen mit und drücken Sie dann ENTER 4 Wählen Sie ...

Page 192: ...ent Zur Farbtonfeineinstellung für jede Grundfarbe 1 Drücken Sie HOME MENU 2 Wählen Sie Bild mit und drücken Sie dann ENTER 3 Wählen Sie Profi Einstellungen mit und drücken Sie dann ENTER 4 Wählen Sie Farbmanagement mit und drücken Sie dann ENTER 5 Wählen Sie einen Einstellpunkt mit und drücken Sie dann ENTER Farbmanagement 0 0 0 0 0 0 Y R G C B M 6 Wählen Sie den gewünschten Wert mit GegenstandmT...

Page 193: ...n ENTER Die Bestätigungsanzeige erscheint Wählen Sie Ja mit und drücken Sie dann ENTER Für Kopfhörerwiedergabe kann die Klangqualität nicht eingestellt werden Wenn Sie Toneinstellungen mit angeschlossenem Kopfhörer vornehmen werden die neuen Einstellungen nach Abtrennung des Kopfhörers für Klangwiedergabe über Lautsprecher wirksam FOCUS Verlagert das Klangbild nach oben und sorgt für klare Klangko...

Page 194: ...ie wird unter Lizenz von SRS Labs Inc mit eingeschlossen Die Auswirkung dieser Funktion ist signalabhängig Für Kopfhörerwiedergabe kann das Klangfeld nicht eingerichtet werden Wenn Sie das Klangfeld mit angeschlossenem Kopfhörer einrichten wird die neue Einstellung nach Abtrennung des Kopfhörers für Klangwiedergabe über Lautsprecher wirksam Energiesparmodi Mit den Energiesparmodi können Sie auf pr...

Page 195: ...ine Meldung angezeigt Wenn nach Beendigung eines Fernsehprogramms noch Störsignale am Media Receiver anliegen wird das System unter Umständen nicht auf den Bereitschaftsmodus geschaltet Keine Bedienung aus Schaltet das System automatisch auf den Bereitschaftsmodus wenn drei Stunden lang keine Bedienung vorgenommen wird 1 Drücken Sie HOME MENU 2 Wählen Sie Energiesparmodi mit und drücken Sie dann E...

Page 196: ...en wird Auch wenn Sie den Computer wieder in Betrieb zu nehmen beginnen und der Signalempfang wieder hergestellt ist bleibt das System ausgeschaltet Sie können das System wieder einschalten indem Sie STANDBY ON am Plasma Display oder 0 9 an der Fernbedienung drücken Das System befindet sich nicht im PC Modus Siehe Seite 22 Modus2 Schaltet das System auf den Bereitschaftsmodus wenn vom PC acht Seku...

Page 197: ...eotextsignal gewählt haben wird Teletext kann nicht angezeigt werden angezeigt Wählen und Steuern von Videotextseiten Mit den folgenden Tasten an der Fernbedienung können Sie Videotextseiten wählen und steuern Farbe ROT GRÜN GELB BLAU Sie können eine Gruppe oder einen Block von Seiten die in farbigen Klammern an der Unterseite des Bildschirms angezeigt sind wählen indem Sie die entsprechende Farbe...

Page 198: ...n Sie dann ENTER Während die TOP Übersicht angezeigt ist sind keine anderen Tasten als i i g e und a wirksam Anzeigen von Unterseiten Sie können mehrere Unterseiten wie empfangen anzeigen Unterseiten Bildschirm 203 203 TEXT 01 44 37 P P Life Promis 01 02 03 04 1 Drücken Sie m um Videotext anzuzeigen Wenn Sie eine Seite öffnen die Unterseiten enthält werden die Unterseiten der Reihe nach automatisc...

Page 199: ...a Display System bietet Eignung für den Anschluss einer breiten Palette an externen Geräten wie Decoder Videorecorder DVD Spieler Computer Spielekonsolen und Camcorder Zum Betrachten des Bilds einer externen Signalquelle wählen Sie mit den INPUT Tasten an der Fernbedienung oder der INPUT Taste am Plasma Display den entsprechenden Eingang Media Receiver Rückseite SCART Kabel im Fachhandel erhältlic...

Page 200: ...CR Aufnahmetaste ein Programm aufgezeichnet werden WYSIWYR Genaueres entnehmen Sie bitte der Bedienungsanleitung des Videorecorders manche Recorder besitzen z B eine Taste speziell für WYSIWYR Auf Drücken der Wiedergabetaste am Videorecorder schaltet sich das System automatisch aus dem Bereitschaftsmodus ein und gibt das Recorderbild wieder Fortgeschrittene AV Link Systeme für TV VCR Verbundbetrie...

Page 201: ...er 3 automatisch an den Tuner des angeschlossenen Audio Video Geräts z B Videorecorder übertragen werden i o Link A arbeitet nur wenn das Audio Video Gerät über ein voll verdrahtetes 21 poliges SCART Kabel an INPUT 2 oder 3 des Media Receivers angeschlossen ist Je nach Einstellung des Schalters an der Rückseite des Media Receivers steht entweder INPUT 2 oder 3 für i o Link A zur Verfügung Wählen S...

Page 202: ...hlt da das System nicht zwischen RGB Y C S Video und CVBS Video unterscheiden kann Empfang von Y C S Video Signalen führt zum Beispiel zu monochromer Anzeige DVD Spieler Media Receiver Rückseite SCART Kabel im Fachhandel erhältlich Bei Gebrauch eines Komponentenkabels wählen Sie COMPONENTE für Eingangswahl im Menü Siehe Seite 65 Schließen Sie gleichzeitig ein SCART Kabel an Audio Eingangssignalque...

Page 203: ...len oder Camcorderbilds Für Wiedergabe von einer Spielekonsole oder einem Camcorder drücken Sie INPUT 4 an der Fernbedienung oder INPUT am Plasma Display um EINGANG4 zu wählen Composite Videokabel im Fachhandel erhältlich Media Receiver Vorderseite Spielekonsole Camcorder S Video Kabel im Fachhandel erhältlich Der Kabelanschluss an INPUT 4 wird der Reihe nach geprüft auf 1 S Video 2 Video Verbinde...

Page 204: ... PC an der Fernbedienung oder INPUT am Plasma Display um PC zu wählen Bei Verbindung mit einem Personal Computer wird der korrekte Eingangssignaltyp automatisch erkannt Wenn das Computerbild nicht sauber wiedergegeben wird müssen Sie unter Umständen automatische Einstellung durchführen über das Menü Automatische Einstellung Siehe Seite 64 PC Anschlüsse können nicht für Audio Video Geräte verwendet...

Page 205: ... N OUT INPUT 1 INPUT 2 INPUT 3 AC INLET BLACK WHITE SYSTEM CABLE INPUT 2 3 INPUT 1 INPUT 2 INPUT 3 AV Receiver Subwoofer Wenn ein AV Verstärker mit Surround Funktion an einen Subwoofer angeschlossen wird ist diese Verbindung nicht erforderlich Einzelheiten entnehmen Sie bitte der Bedienungsanleitung für das anzuschließende Audio Gerät Ungeachtet der Kanäle und des Eingangs werden die Signale stets...

Page 206: ...dapters oder der verwendeten Speicherkarte können Bilder unter Umständen nicht angezeigt werden Mit einem Personal Computer oder anderer Ausrüstung modifizierte oder bearbeitete Bilder können unter Umständen nicht angezeigt werden Einsetzen einer Speicherkarte 1 Öffnen Sie die Frontklappe am Media Receiver 2 Halten Sie die Speicherkarte mit der Oberseite nach oben weisend und setzen Sie sie in den...

Page 207: ...e vom Home Menu aus abgerufen werden 1 Drücken Sie HOME MENU 2 Wählen Sie Home Gallery mit und drücken Sie dann ENTER Wählen eines Ordners Die Home Gallery Startanzeige enthält Ordner die auf der Speicherkarte angelegt worden sind Die Ordner werden je nach Inhalt durch verschiedene Symbole repräsentiert Bezeichnet einen Ordner der einen anderen Ordner enthält Bezeichnet einen Ordner der eine oder ...

Page 208: ...cherdatum Zum Verlassen der Home Gallery Funktion drücken Sie HOME MENU Starten einer Standard Einzelbildanzeige Bei Miniaturansichtanzeige heben Sie das gewünschte Bild mit und hervor und drücken Sie dann ENTER Die Miniaturansichtanzeige wird verlassen und nur das gewählte Bild wird angezeigt Home Gallery RETURN HOMEMENU Rückkehr Wählen Ende Vollbild Ein Bild anzeigen Reinzoomen Rauszoomen Drehun...

Page 209: ... mit Wenn Sie Auto gewählt haben werden die Bilder automatisch zum vorgegebenen Intervall gewechselt Wenn Sie Manuell gewählt haben werden die Bilder mit jedem Druck auf P P gewechselt Einstellung der Dia Show Anzeigemodus Normal Voll Reihenfolge der Wiedergabe Reihenfolge der Namen Zufall Anzahl der Wiedergabezeiten Einzelzeit Schleife Wiedergabe Modus Auto Manuell Intervall Sek 3 90 60 30 20 10 ...

Page 210: ...cken Sie P P um Bilder zu wechseln Automatischen Bildwechsel können Sie stoppen und etwa 90 Sekunden lang anhalten indem Sie d drücken 2 Beim Verlassen der Dia Show Anzeige drücken Sie RETURN um zur Miniaturansichtanzeige zurückzukehren oder HOME MENU um die Home Gallery Funktion zu verlassen Wenn Sie Zufall für Reihenfolge der Wiedergabe gewählt haben können Bilder durch Drücken von P nicht manue...

Page 211: ...tellen Sie alle Komponentenanschlüsse her bevor Sie Steuerkabel anschließen Als Steuerkabel im Fachhandel erhältlich dienen Monauralkabel mit Ministeckern kein Widerstand SERVICE ONLY i o link A SELECT CONTROL SUB WOOFER OUTPUT INPUT 3 COMPONENT S VIDEO VIDEO R AUDIO L MONITOR OUTPUT Y PB PR VIDEO I N OUT INPUT 1 INPUT 2 INPUT 3 AC INLET BLACK WHITE SYSTEM CABLE INPUT 2 3 INPUT 1 INPUT 2 INPUT 3 C...

Page 212: ...sche Aktualisierung der Daten mit und dann Deaktiviert oder Aktiviert mit Datenanbieter EPG Deaktiviert Aus Ordnen die Station Automatische Aktualisierung der Daten Gegenstand Beschreibung Deaktiviert Deaktiviert EPG Werksvorgabe Aktiviert Liest automatisch EPG Daten um Mitternacht und bei Empfang einer als EPG Datenanbieter bestimmten Sendestation ein 4 Drücken Sie HOME MENU um das Menü zu verlas...

Page 213: ...ich empfangen und betrachtet werden können 4 Drücken Sie HOME MENU um das Menü zu verlassen Suchen nach Programmen 1 Drücken Sie EPG 2 Drücken Sie die Farbtaste zur Wahl eines Suchparameters 3 Wählen Sie den Parameter mit Zeit Datum Thema Station Jetzt 04 07 Nachrichten Film Show Alles 05 30 09 40 09 45 10 00 EPG Fr 04 07 10 25 Beenden EPG Entsprechende Programme werden aufgelistet 4 Drücken Sie E...

Page 214: ... Aufnahmegerät Wenn Sie ein Aufnahmegerät wie einen Videorecorder oder einen DVD Recorder angeschlossen haben können Sie mithilfe der Elektronischen Programmführung Fernsehprogramme für Aufnahme voreinstellen 1 Drücken Sie EPG 2 Wählen Sie das gewünschte Programm mit und drücken Sie dann ENTER Di 15 07 12 46 Aufnahme 13 00 13 30 Programminformation Beenden EPG EPG RETURN Daten zum gewählten Progra...

Page 215: ... o Link A mit einem SCART Kabel an INPUT 2 oder 3 angeschlossen ist Mit EPG für Aufnahme vorgewählte Programme können nur am angesteuerten Aufnahmegerät Videorecorder oder DVD Recorder gelöscht oder geändert werden Wählen eines Programms für sofortigen Empfang Sie können sich mit EPG auch ein gerade laufendes Programm unverzüglich auf den Bildschirm holen 1 Drücken Sie EPG 2 Wählen Sie das gewünsc...

Page 216: ...le gespeichert Automatisches Einstellen der Bildlage und vertikalen Korrektur nur PC Modus Verwenden Sie die Automatische Einstellung zur Bestimmung der Lage und vertikalen Korrektur von Bildern von einem Personal Computer 1 Drücken Sie HOME MENU 2 Wählen Sie Weiterführende Einstellungen mit und drücken Sie dann ENTER 3 Wählen Sie Automatische Einstellung mit und drücken Sie dann ENTER Weiterführe...

Page 217: ...scheint Wählen Sie Ja mit und drücken Sie dann ENTER Wählen eines Eingangssignaltyps Nachdem an INPUT 1 INPUT 2 oder INPUT 3 Anschlüsse vorgenommen worden sind geben Sie den Typ der Videosignale an die von den angeschlossenen Geräten zu erwarten sind Bezüglich Signaltypen siehe Bedienungsanleitung für das entsprechende angeschlossene Gerät Bevor Sie das Menü abrufen drücken Sie INPUT 1 INPUT 2 ode...

Page 218: ...Sie Farbsystem mit und drücken Sie dann ENTER 4 Wählen Sie ein Videosignalsystem mit und drücken Sie dann ENTER Farbsystem Auto PAL SECAM NTSC 4 43NTSC Wählen Sie unter Auto PAL SECAM NTSC und 4 43NTSC Bei Wahl von Auto werden Eingangssignale automatisch erkannt 5 Drücken Sie HOME MENU um das Menü zu verlassen Die Werksvorgabe ist Auto Das Farbsystem muss für INPUT 1 bis 4 einzeln eingestellt werd...

Page 219: ...das Bild zunehmend zu jeder Seite des Bildschirms gestreckt VOLL Für 16 9 komprimiertes Bild ZOOM Für 16 9 Letter Box Bild Bei gewissen Programmen können Balken am oberen und unteren Rand auftreten KINO Für 14 9 Letter Box Bild Bei gewissen Programmen können Balken am oberen und unteren Rand auftreten PC Modus außer für XGA Signale Gegenstand Beschreibung 4 3 Füllt den Bildschirm ohne Änderung des...

Page 220: ...ücken Sie HOME MENU 2 Wählen Sie Weiterführende Einstellungen mit und drücken Sie dann ENTER 3 Wählen Sie WSS mit und drücken Sie dann ENTER 4 Wählen Sie Ein mit und drücken Sie dann ENTER WSS Aus Ein Gegenstand Beschreibung Ein Aktiviert die WSS Funktion Aus Deaktiviert die WSS Funktion Werksvorgabe 5 Drücken Sie HOME MENU um das Menü zu verlassen Wenn das Bildschirmformat automatisch nicht korre...

Page 221: ...gabe 4 3 BREITBILD 5 Drücken Sie HOME MENU um das Menü zu verlassen Ändern der Helligkeit an beiden Bildschirmseiten Seitenmaske Bei Wahl des Bildschirmformats 4 3 VOLL 14 9 KINO 14 9 für den AV Modus kann die Helligkeit der grauen Seitenmasken an den beiden Bildschirmseiten geändert werden 1 Drücken Sie HOME MENU 2 Wählen Sie Weiterführende Einstellungen mit und drücken Sie dann ENTER 3 Wählen Si...

Page 222: ...rogramme ansehen können Um gesperrte Programme ansehen zu können muss ein Kennwort eingegeben werden Die Werksvorgabe für das Kennwort ist 1234 Das Kennwort kann wunschgemäß geändert werden Wenn Sie bei Verwendung des Home Menus Autoinstallation Programm Einstellungen oder Kennwort wählen verlangt eine Meldung die Eingabe des Kennworts sodass unbefugte Personen Programm Einstellungen nicht einfach...

Page 223: ...rt ändern Neues Passwort eingeben Neues Passw bestät 5 Geben Sie ein neues vierstelliges Kennwort mit den Tasten 0 9 ein 6 Geben Sie dasselbe Kennwort das Sie in Schritt 5 eingegeben haben noch einmal ein Wenn die eingegebenen Kennwörter nicht übereinstimmen erfolgt Rückschaltung auf Schritt 5 sodass das Kennwort von Anfang an neu eingegeben werden kann Wenn die Kennwortänderung dreimal nicht erfo...

Page 224: ...ht in den Fernbedienungssensor Prüfen Sie ob versehentlich die Eingangsquelle für Video oder PC gewählt worden ist obwohl Sie ein Fernsehprogramm sehen möchten Siehe Seite 23 Kontrollieren Sie ob ein Kanal gewählt worden ist der mit der Kindersicherung gesperrt ist Siehe Seite 32 Geben Sie ein Kennwort ein um die Kindersicherung vorübergehend aufzuheben Siehe Seite 70 Sind die Verbindungen mit and...

Page 225: ...rderlich Code Meldung Prüfen SD04 Es wird ausgeschaltet Interne Temperatur ist zu hoch Prüfen Sie auf hohe Temperatur um das Plasma Display Temperatur rund um PDP überprüfen SD05 Es wird ausgeschaltet Interne Schutzschaltungen sind Prüfen Sie die Lautsprecherkabel Verbindungen zwischen Plasma aktiviert Gibt es einen Kurzschluß im Lautsprecherkabel Display und den Lautsprechern SD1 1 Es wird ausges...

Page 226: ...elegung Verschiedene Audio und Video Geräte können über die SCART Anschlüsse mit dem System verbunden werden 8 Audio Video Steuerung 9 Erde 10 AV Link Steuerung 11 Nicht belegt 12 Nicht belegt 13 Erde 14 Nicht belegt 15 Eingang Chroma S Video 16 Nicht belegt 17 Erde für Video 18 Erde 19 AusgangVideo 20 Eingang Video Eingang S Video 21 Steckerabschirmung SCART INPUT 3 1 Ausgang Audio rechts 2 Einga...

Page 227: ...K I L L Tuner VHF UHF E2 E69ch F2 F10ch I21 I69ch IR A IR Jch CATV Hyperband S1 S41ch Auto Channel Preset 99 ch Autom Kanalspeicherung Autom Kanalbezeichnung Autom Kanalsortierung STEREO NICAM A2 Anschlüsse Hinten INPUT 1 SCART AV in RGB in TV out INPUT 2 SCART AV in out S VIDEO in AV link 1 INPUT 3 SCART AV in out S VIDEO in RGB in AV link 1 Component Video in Antenne 75 Ω DIN Eingang für VHF UHF...

Page 228: ...er Apple Computer Inc Microsoft ist ein eingetragenes Warenzeichen der Microsoft Corporation DDC ist ein eingetragenes Warenzeichen der Video Electronics Standards Association Power Management ist ein eingetragenes Warenzeichen der Sun Microsystems Inc VGA und XGA sind eingetragene Warenzeichen der International Business Machines Co Inc Namen der erwähnten Firmen oder Institutionen sind Warenzeich...

Page 229: ......

Page 230: ......

Page 231: ......

Page 232: ...lifornia 90801 1540 U S A PIONEER ELECTRONICS OF CANADA INC 300 Allstate Parkway Markham Ontario L3R OP2 Canada PIONEER EUROPE NV Haven 1087 Keetberglaan 1 B 9120 Melsele Belgium TEL 03 570 05 11 PIONEER ELECTRONICS AUSTRALIA PTY LTD 178 184 Boundary Road Braeside Victoria 3195 Australia TEL 03 9586 6300 PIONEER ELECTRONICS DE MEXICO S A DE C V Blvd Manuel Avila Camacho 138 10 piso Col Lomas de Ch...

Page 233: ...About HDMI Quelques mots sur HDMI Zu HDMI Informazioni sulla funzione HDMI Over HDMI Om HDMI Acerca de HDMI ...

Page 234: ...he HDMI terminal factory default Enable Activates the HDMI terminal 6 Press HOME MENU to exit the menu SERVICE ONLY i o link A SELECT CONTROL SUB WOOFER OUTPUT INPUT 3 COMPONENT S VIDEO VIDEO R AUDIO L MONITOR OUTPUT HDMI Y PB PR VIDEO I N OUT INPUT 1 INPUT 2 INPUT 3 AC INLET BLACK WHITE SYSTEM CABLE INPUT 2 3 INPUT 3 INPUT 1 INPUT 2 INPUT 3 Media Receiver rear view SCART cable commercially availa...

Page 235: ...olours specify another digital video signal type For the digital signal types to be specified check the operation manual that came with the connected equipment To specify the type of audio signals 1 Press HOME MENU 2 Press to select Option and then press ENTER 3 Press to select HDMI Input and then press ENTER 4 Press to select Audio and then press ENTER 5 Press to select the type of audio signals ...

Page 236: ...r La prise HDMI n est pas active valeur par défaut Activer La prise HDMI est active 6 Appuyez sur HOME MENU pour quitter le menu SERVICE ONLY i o link A SELECT CONTROL SUB WOOFER OUTPUT INPUT 3 COMPONENT S VIDEO VIDEO R AUDIO L MONITOR OUTPUT HDMI Y PB PR VIDEO I N OUT INPUT 1 INPUT 2 INPUT 3 AC INLET BLACK WHITE SYSTEM CABLE INPUT 2 3 INPUT 3 INPUT 1 INPUT 2 INPUT 3 Récepteur Média vue de dos Câb...

Page 237: ...vidéonumérique Pour de plus amples détails concernant les types de signal reportez vous au mode d emploi qui accompagne l appareil relié Pour préciser le type des signaux audionumériques 1 Appuyez sur HOME MENU 2 Utilisez pour sélectionner Options puis appuyez sur ENTER 3 Utilisez pour sélectionner Entrée HDMI puis appuyez sur ENTER 4 Utilisez pour sélectionner Audio puis appuyez sur ENTER 5 Utili...

Page 238: ...enstand Beschreibung Deaktiviert Deaktiviert den HDMI Anschluss Werksvorgabe Aktiviert Aktiviert den HDMI Anschluss 6 Drücken Sie HOME MENU um das Menü zu verlassen SERVICE ONLY i o link A SELECT CONTROL SUB WOOFER OUTPUT INPUT 3 COMPONENT S VIDEO VIDEO R AUDIO L MONITOR OUTPUT HDMI Y PB PR VIDEO I N OUT INPUT 1 INPUT 2 INPUT 3 AC INLET BLACK WHITE SYSTEM CABLE INPUT 2 3 INPUT 3 INPUT 1 INPUT 2 IN...

Page 239: ...igitalen Videosignaltyp vor Bezüglich der anzugebenden digitalen Signaltypen siehe Bedienungsanleitung für das entsprechende angeschlossene Gerät Angeben des Typs der Audiosignale 1 Drücken Sie HOME MENU 2 Wählen Sie Weiterführende Einstellungen mit und drücken Sie dann ENTER 3 Wählen Sie HDMI Eingabe mit und drücken Sie dann ENTER 4 Wählen Sie Audio mit und drücken Sie dann ENTER 5 Wählen Sie ein...

Page 240: ...re il terminale HDMI attivatelo e quindi specificate il tipo di segnale audio e video che desiderate ricevere dall unità collegata Per quanto riguarda questi tipi di segnale consultate il manuale di istruzioni dell unità collegata Per attivare il terminale HDMI 1 Premete HOME MENU 2 Premete sino a selezionare Opzioni e quindi premete ENTER 3 Premete sino a selezionare Entrada HDMI e quindi premete...

Page 241: ...uanto riguarda i tipi di segnale digitale che si possono specificare consultate il manuale di istruzioni dell unità collegata Per specificare il tipo di segnali audio digitali 1 Premete HOME MENU 2 Premete sino a selezionare Opzioni e quindi premete ENTER 3 Premete sino a selezionare Entrada HDMI e quindi premete ENTER 4 Premete sino a selezionare Audio e quindi premete ENTER 5 Premete sino a sele...

Page 242: ...elen Onderdeel Omschrijving Uitschakelen Schakelt de HDMI aansluitingen uit fabrieksinstelling Inschakelen Schakelt de HDMI aansluitingen in 6 Druk op HOME MENU om het menu te sluiten SERVICE ONLY i o link A SELECT CONTROL SUB WOOFER OUTPUT INPUT 3 COMPONENT S VIDEO VIDEO R AUDIO L MONITOR OUTPUT HDMI Y PB PR VIDEO I N OUT INPUT 1 INPUT 2 INPUT 3 AC INLET BLACK WHITE SYSTEM CABLE INPUT 2 3 INPUT 3...

Page 243: ... dan een ander type digitaal videosignaal Voor het juiste type digitale videosignalen dient u de handleiding van de aangesloten apparatuur te raadplegen Instellen van het type audiosignalen 1 Druk op HOME MENU 2 Druk op selecteer Optie en druk op ENTER 3 Druk op selecteer HDMI In en druk op ENTER 4 Druk op selecteer Audio en druk op ENTER 5 Druk op selecteer juiste type audiosignaal en druk op ENT...

Page 244: ...ktivera Aktivera Objekt Beskrivning Avaktivera Stänger av HDMI kontakten fabriksinställd Aktivera Aktiverar HDMI kontakten 6 Tryck på HOME MENU för att stänga menyn SERVICE ONLY i o link A SELECT CONTROL SUB WOOFER OUTPUT INPUT 3 COMPONENT S VIDEO VIDEO R AUDIO L MONITOR OUTPUT HDMI Y PB PR VIDEO I N OUT INPUT 1 INPUT 2 INPUT 3 AC INLET BLACK WHITE SYSTEM CABLE INPUT 2 3 INPUT 3 INPUT 1 INPUT 2 IN...

Page 245: ... digital videosignaltyp Mera information om de olika digitala signalerna hittar du i bruksanvisningarna för de apparater som du anslutit Specificera typen av ljudsignaler 1 Tryck på HOME MENU 2 Tryck på för att markera Alternativ och tryck sedan på ENTER 3 Tryck på för att markera HDMI ingång och tryck sedan på ENTER 4 Tryck på för att välja Audio och tryck sedan på ENTER 5 Tryck på för att välja ...

Page 246: ...n Desactivar Desactiva el terminal HDMI valor predeterminado Activar Activa el terminal HDMI 6 Pulse HOME MENU para salir del menú SERVICE ONLY i o link A SELECT CONTROL SUB WOOFER OUTPUT INPUT 3 COMPONENT S VIDEO VIDEO R AUDIO L MONITOR OUTPUT HDMI Y PB PR VIDEO I N OUT INPUT 1 INPUT 2 INPUT 3 AC INLET BLACK WHITE SYSTEM CABLE INPUT 2 3 INPUT 3 INPUT 1 INPUT 2 INPUT 3 Media Receiver vista trasera...

Page 247: ...ales Para el tipo de señales digitales que se debe especificar consulte el manual de instrucciones que acompaña el equipo conectado Para especificar el tipo de señales de audio 1 Pulse HOME MENU 2 Pulse para seleccionar Opción y a continuación pulse ENTER 3 Pulse para seleccionar Entrada HDMI y a continuación pulse ENTER 4 Pulse para seleccionar Audio y a continuación pulse ENTER 5 Pulse para sele...

Page 248: ...Keetberglaan 1 B 9120 Melsele Belgium TEL 03 570 05 11 PIONEER ELECTRONICS AUSTRALIA PTY LTD 178 184 Boundary Road Braeside Victoria 3195 Australia TEL 03 9586 6300 PIONEER ELECTRONICS DE MEXICO S A DE C V Blvd Manuel Avila Camacho 138 10 piso Col Lomas de Chapultepec Mexico D F 11000 TEL 52 55 9178 4270 FAX 52 55 5202 3714 Published by Pioneer Corporation Copyright 2003 Pioneer Corporation All ri...

Reviews: