background image

3

English

English

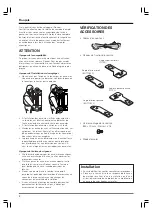
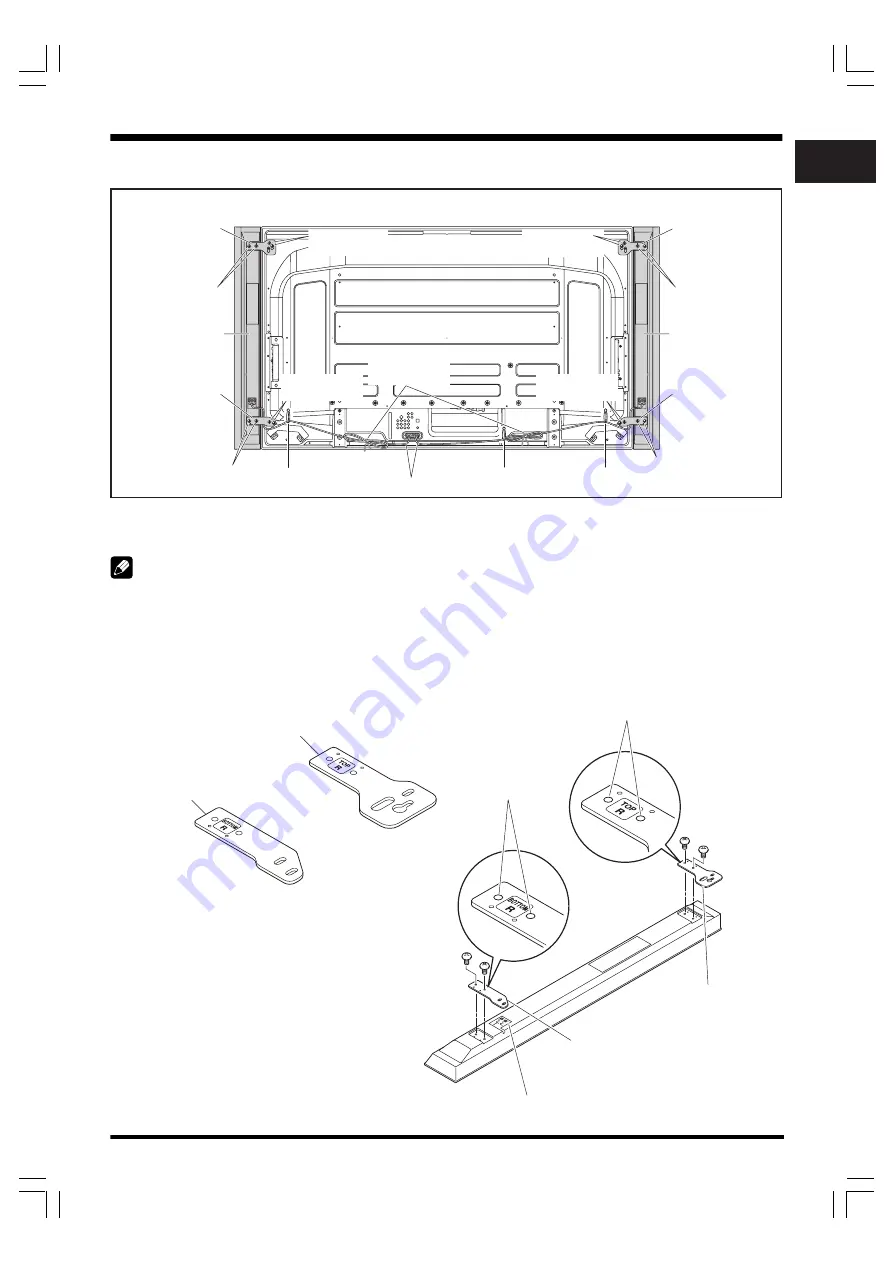
Plasma television with the speaker installed

Speaker mounting fitting 
(for TOP-Right)

Speaker mounting fitting 
(for TOP-Left)

Speaker mounting fitting 
(for BOTTOM-Right)

Speaker mounting fitting 
(for BOTTOM-Left)

Speaker

Speaker mounting screw 
(M5 x 10 mm)

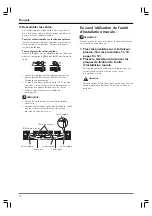
Bead band 
(Accessories of the 
plasma television)

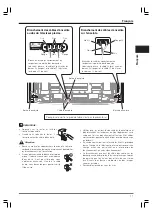
Speaker mounting 
screw (M5 x 10 mm)

Speaker mounting 
screw (M5 x 10 mm)

Speaker mounting screw 
(M5 x 10 mm)

Speaker mounting 
screw (M5 x 10 mm)

Speaker mounting 
screw (M5 x 10 mm)

Speaker

Speaker mounting screw 
(M5 x 10 mm)

Speaker cable

Speaker mounting screw 
(M5 x 10 mm)

Speed clamp

Speed clamp

Speed clamp

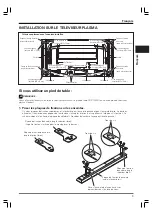
INSTALLATION ON THE PLASMA TELEVISION

When using the table top stand:

NOTE:

Before attaching the speaker, please attach the PDK-TS30A series table top stand (or another Pioneer plasma television stand) to
the plasma television.

1. Attaching the Speaker Mounting Fittings to the Speakers.

There are top and bottom speaker mounting fittings for both the left and the right speaker. Attach the appropriate fittings
to the top and the bottom on the back of the speakers using the supplied screws.
(It shows the attachment of the fitting on the right side. It is attached on the left side by the same procedure.)

Speaker mounting fitting (For TOP-Right)
(The skinny slot is used for mounting to the top.)

Speaker mounting fitting
(For BOTTOM-Right)

Screw Holes

Screw Holes

Speaker mounting
fitting (For TOP-Right)

Speaker mounting fitting
(For BOTTOM-Right)

Place the speaker so its terminals
(bottom) are facing you.

Summary of Contents for PDP-S61

Page 1: ...nstructions Mode d emploi Bedienungsanleitung Istruzioni di utilizzo Handleiding Manual de instrucciones Speaker System Enceintes acoustiques Lautsprechersystem Sistema di diffusori Luidsprekersysteem Sistema de altavoces ...

Page 2: ...alling the speaker do not use any screws other than those supplied otherwise the speaker may come off from the main unit and fall over When installing the speaker tighten the screws firmly Please handle the speaker with sufficient care as the grille net and the cabinet can become damaged or broken when they are subjected to strong external impacts Placing a CRT computer screen or CRT monitor near ...

Page 3: ... When using the table top stand NOTE Before attaching the speaker please attach the PDK TS30A series table top stand or another Pioneer plasma television stand to the plasma television 1 Attaching the Speaker Mounting Fittings to the Speakers There are top and bottom speaker mounting fittings for both the left and the right speaker Attach the appropriate fittings to the top and the bottom on the b...

Page 4: ...ition of the speaker and then tighten the upper and lower screws firmly 5 Tighten the two screws at the top and bottom for each speaker total of four screws thus fixing the speakers to the display 6 Pass the supplied speaker cable between the speaker and the plasma television below the speaker mounting fitting from below 7 Connect the speaker cables to the speaker see next page 8 Insert the cable ...

Page 5: ...to the plasma television resulting in interrupted operation or malfunction Incorrect connections of the speaker cable to the right or left of the plasma television terminals with respect to the polarity may result in insufficient stereo sound effects delivering poor bass sounds or unstable sound image Bundle the cable without pulling For illustrative purposes the table top stand is not presented h...

Page 6: ...ver time and become damaged if removed Be careful not to subject any connecting cables to strain NOTE Use the bead bands and speed clamps as necessary When tidying up your speaker cables make sure to bundle them so that they are not subjected to any pressure Whenusingthehungonwallunit NOTE First lay the plasma television on top of a soft sheet etc then attach the speakers 1 Attach the speakers to ...

Page 7: ...orway may return their used electronic products free of charge to designated collection facilities or to a retailer if you purchase a similar new one For countries not mentioned above please contact your local authorities for the correct method of disposal By doing so you will ensure that your disposed product undergoes the necessary treatment recovery and recycling and thus prevent potential nega...

Page 8: ...nt l enjoliveur frontal et le coffret risqueraient d être endommagés ou hors d usage en les soumettant à des chocs externes exagérés La présence d un écran d ordinateur ou d un moniteur à tube cathodique près des enceintes peut provoquer des interférences et une distorsion des couleurs Si c est le cas éloignez l écran par rapport aux enceintes À propos de l entrée des signaux Afin d éviter d endom...

Page 9: ...LEVISEUR PLASMA Si vous utilisez un pied de table REMARQUE Avant d installer l enceinte installez le téléviseur plasma sur le pied de table PDK TS30A ou un autre pied de téléviseur plasma Pioneer 1 Poser les plaques de fixation sur les enceintes Il y a des plaques de fixation supérieures et inférieures pour l enceinte gauche et pour l enceinte droite Au dos des enceintes fixez les bonnes plaques d...

Page 10: ...ez les deux vis en haut et en bas pour chaque enceinte quatre vis au total Ceci fixe les enceintes à l écran 6 Passez le câble d enceinte fourni entre l enceinte et le téléviseur plasma sous la plaque de fixation d enceinte par le dessous 7 Branchez les câbles d enceinte sur les enceintes voir page suivante 8 Insérez le câble dans la rainure située sur l enceinte 9 Branchez l autre extrémité des c...

Page 11: ...r un fil exposé le téléviseur plasma peut recevoir une charge excessive entraînant une interruption du fonctionnement ou un dysfonctionnement Le branchement incorrect du câble d enceinte sur les bornes gauche ou droite du téléviseur plasma en termes de polarité peut entraîner des effets de son stéréo insuffisants des basses médiocres ou des images sonores instables Rassemblez les câbles sans les t...

Page 12: ...s retirez Veillez à ne pas forcer sur les câbles de raccordement REMARQUE Utilisez les colliers à œil et les colliers rapides si nécessaire Lorsque vous arrangez vos câbles d enceinte veillez à ce qu ils soient rassemblés sans qu aucune pression ne s exerce sur eux En cas d utilisation de l unité d installation murale REMARQUE Avant d installer les enceintes posez le téléviseur plasma sur un drap ...

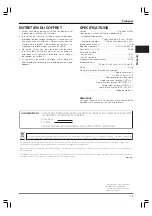
Page 13: ...auche TOP L 1 Angle inférieur gauche BOTTOM L 1 Angle supérieur droit TOP R 1 Angle inférieur droit BOTTOM R 1 Mode d emploi 1 REMARQUE Les spécifications et la finition sont susceptibles d être modifiées sans préavis en vue de l amélioration VEUILLEZ REPORTER CI DESSOUS LES NUMEROS DE MODELE ET DE SERIE DE L EQUIPEMENT CES NUMEROS APPARAISSENT A L ARRIERE Nº MODELE Nº SERIE VEUILLEZ CONSERVER CES...

Page 14: ...Erschütterungen verkratzt bzw beschädigt werden können Wenn ein CRT Computer Monitor oder ein CRT Monitor in der Nähe des Lautsprechers aufgestellt wird kann dies Bildrauschen oder Farbstörungen verursachen In einem solchen Fall muss für einen größeren Abstand des Monitors vom Lautsprecher gesorgt werden Hinweise zum Eingang Um eine Beschädigung des Lautsprechersystems durch ein zu starkes Eingang...

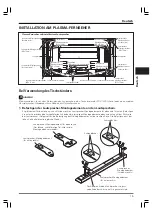
Page 15: ...S Bitte montieren Sie vor dem Befestigen des Lautsprechers den Tischständer der PDK TS30A Serie oder einen anderen Plasmafernseher Ständer der Firma Pioneer am Plasma Fernseher 1 Befestigen der Lautsprecher Montageelemente an den Lautsprechern Es gibt sowohl für den linken als auch für den rechten Lautsprecher Montageelemente für oben und für unten Befestigen Sie unter Verwendung der mitgelieferte...

Page 16: ...hrauben oben und unten für jeden Lautsprecher insgesamt vier Schrauben oben und unten fest und fixieren Sie so die Lautsprecher am Display 6 Verlegen Sie das mitgelieferte Lautsprecherkabel zwischen den Lautsprecher und dem Plasma Fernseher unter dem Lautsprecher Montageelement hindurch von unten 7 Schließen Sie die Lautsprecherkabel an den jeweiligen Lautsprecher an siehe nächste Seite 8 Führen S...

Page 17: ...e Anschlüsse oder die Installationsweise der angeschlossenen Geräte ändern unbedingt darauf dass die Geräte ausgeschaltet sind und der Stromstecker aus der Steckdose gezogen worden ist Wenn Sie das Lautsprecherkabel zu weit einführen so dass die Isolation den Lautsprecheranschluss berührt kann es sein dasskeinTonzuhörenist FührenSiedaherdas Kabel so ein dass der Kupferdraht zu sehen ist PrüfenSie ...

Page 18: ...tigt werden und die Klemme kann auch beschädigt werden wenn sie entfernt wird Achten Sie sorgfältig darauf die Anschlusskabel keinen größeren Belastungen auszusetzen HINWEIS Verwenden sie die Kugelbänder und die Schnellverschlussklemmen je nach Erfordernis Wenn Sie Ihre Lautsprecherkabel zusammenbinden dann achten Sie darauf dass sie keinem Druck ausgesetzt werden Bei Verwendung der Wandmontage Ei...

Page 19: ...rechts BOTTOM R 1 Bedienungsanleitung 1 HINWEIS Die technischen Daten und das Design können aus Gründen der Weiterentwicklung jederzeit ohne vorherige Ankündigung geändert werden Notieren Sie unten die Modellnummer sowie die Seriennummer der Einheit Sie finden diese Nummern auf deren Rückseite Modellnummer Seriennummer Verwahren Sie diese Nummern für den Fall dass Sie sie künftig brauchen Wichtige...

Page 20: ...ossono danneggiarsi o rompersi se sottoposte a colpi esterni molto forti Se vicino all altoparlante si trova un monitor televisivo con tubo a raggi catodici questo schermo può subite interferenze e mostrare aberrazioni cromatiche Se questo accade allontanare il monitor dall altoparlante L ingresso di segnale Per evitare danni al sistema di altoparlanti dovuti a un sovraccarico d ingresso osservare...

Page 21: ...Fascette di chiusura rapida INSTALLAZIONE SUL TELEVISORE AL PLASMA Per l uso del supporto di tavolo NOTA Prima di attaccare l altoparlante fissate il supporto di tavolo della serie PDK TS30A o un altro supporto per televisori al plasma Pioneer al televisore al plasma 1 Fissaggio delle giunzioni di montaggio all altoparlante Ci sono giunzioni di montaggio dell altoparlante superiore e inferiore sia...

Page 22: ...ri di ogni altoparlante quattro viti in totale Così facendo fisserete gli altoparlanti allo schermo 6 Fate passare i cavi dell altoparlante in dotazione tra l altoparlante e il televisore al plasma sotto le giunzioni di montaggio dell altoparlante da sotto 7 Collegate i cavi dell altoparlante all altoparlante vedi pagina successiva 8 Inserite il cavo nella scanalatura dell altoparlante 9 Collegate...

Page 23: ... di cambiare il metodo di collegamento o di installazione Se il cavo dell altoparlante viene inserito troppo distante e il materiale isolante tocca il terminale dell altoparlante non si riceverà alcun suono Vi preghiamo di inserirlo in modo tale che il filo di rame sia visibile Controllate che le estremità dei cavi dell altoparlante siano collegate saldamente ai terminali tirando leggermente il ca...

Page 24: ...potrebbe rovinarsi Fate attenzione a non sottoporre i cavi di collegamento a tensioni NOTA Usate le fascette rinforzate e le fascette a chiusura rapida secondo la necessità Quando riordinate i vostri cavi dell altoparlante assicuratevi di legarli insieme in modo che non siano soggetti ad alcuna pressione Per l uso dell unità da parete NOTA Prima appoggiate il televisore al plasma su un panno morbi...

Page 25: ...are un panno per lucidare o un normale panno asciutto Se la cassa esterna è molto sporca pulirla con un panno morbido bagnato con acqua e detergente quindi passare di nuovo un panno asciutto Non utilizzare cera per mobili o detersivi Potrebbero danneggiare la superficie della cassa esterna Non usare mai diluenti benzina insetticidi spray e altri prodotti chimici sulla cassa esterna o nelle vicinan...

Page 26: ...Wees uitermate voorzichtig met de luidsprekers Het rooster en de behuizing zouden kunnen worden beschadigd wanneer het luidsprekersysteem aan schokken of stoten onderhevig wordt gesteld Wanneer u een computerscherm of monitor met een beeldbuis in de buurt van de luidspreker plaatst kan dit resulteren in beeldstoringen of kleurvervorming Als dit het geval is moet u het scherm op een grotere afstand...

Page 27: ...dstaander wordt gebruikt N B Voordat de luidspreker wordt bevestigd dient de PDK TS30A serie tafelbladstaander of andere Pioneer plasma televisiestaander op de plasma televisie te worden bevestigd 1 Aansluiting van de montage onderdelen op de luidsprekers Er zijn boven en ondermontage onderdelen voor de linker en de rechterluidspreker Bevestig de juiste onderdelen aan de boven en onderzijde aan de...

Page 28: ...5 Draai de twee schroeven boven en beneden aan voor elke luidspreker totaal vier schroeven zodat de luidsprekers op de display worden vastgezet 6 Leid het meegeleverde luidsprekersnoer tussen de luidspreker en de plasma televisie onder het montagestuk van de luidspreker van onderop 7 Sluit de luidsprekersnoeren aan op de luidspreker zie volgende bladzijde 8 Voeg het snoer in de sponning op de luid...

Page 29: ...luiting of installatie wijzigt Indien u het luidsprekersnoer te ver insteekt zodat de isolatie de eindklem van de luidspreker raakt wordt er geen geluid geproduceerd Het snoer dient zodanig te worden ingestoken dat de koperdraad zichtbaar is Controleer of het uiteinde van de luidsprekersnoeren goed is aangesloten op de eindklemmen door enigszins aan het snoer te trekken nadat de aansluitingen zijn...

Page 30: ...digd raken wanneer deze verwijderd wordt Zorg ervoor dat aan te sluiten snoeren niet onder druk staan N B Gebruik de kralenbandjes en de snelklemmen waar nodig Wanneer u de luidsprekersnoeren ordent zorg er dan voor dat ze zodanig worden samengevoegd dat ze niet onder druk komen te staan Indien de eenheid voor wandbevestiging wordt gebruikt N B Leg de plasma televisie eerst bovenop een zachte doek...

Page 31: ... Veeg stof en vuil met een poetsdoek of droge schone doek van de behuizing Bevochtig een zachte doek in een oplossing van water en een neutraal reinigingsmiddel en wring de doek goed uit voor het verwijderen van hardnekkige vlekken Veeg na met een droge doek Gebruik geen meubelwas of andere reinigingsmiddelen daar deze de behuizing aan kunnen tasten Gebruik beslist geen thinner benzine insectenspr...

Page 32: ...oces con mucho cuidado ya que la red de rejilla y el gabinete pueden dañarse o romperse cuando se encuentran sujetos a fuertes impactos externos Si pone una pantalla de TRC de ordenador o un monitor de TRC cerca del altavoz pueden producirse interferencias o distorsión del color Sí así sucede aleje el monitor del altavoz Acerca de la entrada Para evitar daños al sistema de altavoces de una sobreca...

Page 33: ...liza el soporte de mesa NOTA Antes de instalar el altavoz acople el soporte de mesa de la serie PDK TS30A u otro soporte para televisores de plasma Pioneer al televisor de plasma 1 Cómo fijar los accesorios de montaje de los altavoces en los altavoces Hay accesorios de montaje superior e inferior para el altavoz de la derecha y para el de la izquierda Utilice los pernos suministrados para fijar lo...

Page 34: ... inferior 5 Apriete los dos pernos en la parte superior e inferior de cada altavoz un total de cuatro pernos De este modo fijará los altavoces al televisor 6 Pase el cable de altavoz suministrado entre el altavoz y el televisor de plasma por debajo del accesorio de montaje del altavoz desde abajo 7 Conecte los cables de altavoz al altavoz consulte la página siguiente 8 Introduzca el cable por la r...

Page 35: ...oma de pared Si introduce el cable de altavoz de modo que el aislamiento esté tocando el terminal de altavoz es posible que no obtenga ningún sonido No lo introduzca demasiado de forma que el hilo de cobre quede visible Para comprobar que los extremos de los cables de altavoz están bien conectados a los terminales una vez que haya realizado la conexión tire suavemente de cada uno de los cables Si ...

Page 36: ...re y resulte dañada si se extrae Asegúrese de que ninguno de los cables conectores queda tirante NOTA Utilice las abrazaderas de cuentas y las abrazaderas rápidas según estime necesario Cuando organice los cables de altavoz asegúrese de que los enrolla sobre sí mismos de modo que no queden sometidos a ninguna presión 1 2 Abrazaderas de cuentas Abrazadera rápida Cable de altavoz Abrazaderas de cuen...

Page 37: ...nciales para el entorno y la salud humana MANTENIMIENTODELGABINETE Para quitar la suciedad y el polro utilice un paño de limpieza o paño seco Cuando la superficie está muy sucia limpie con un paño embebido en algún agente limpiador neutro diluido cinco o seis veces en agua exprima bien y luego vuelva a limpiar con un paño seco No utilice ceras o agentes limpiadores para muebles No utilice diluyent...

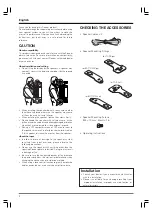
Page 38: ...請藉由托住顯示器頂部及其把手來搬動 顯示器 檢查配件 揚聲器連接線 x 2 揚聲器固定裝置 揚聲器固定螺絲 M5 x 10 mm 黑色 x 16 操作手冊 安裝揚聲器時 請勿使用附送螺絲以外的螺絲 否則 揚聲器可能會從本機脫開 甚至於掉落 安裝揚聲器時 請將螺絲擰緊 當揚聲器受到外部的影響時 請充分注意揚聲器的處 理 以免損壞護網和音箱 在揚聲器附近放置CRT電腦屏幕或CRT監視器可能會 導致干擾或色彩失真 如果出現這種情況 請使監視 器遠離揚聲器 關於輸入端子 為防止因輸入過載而導致揚聲器系統損壞 請務必遵 循以下注意事項 請勿將該揚聲器用於指定的先鋒電漿電視之外的設 備 否則可能導致損壞或火災 改變連接或安裝方法時 務必先將連接設備的電源關 掉 並將電線插頭從牆壁上的插座中拔出 使用音調控制功能來增強高音時 請勿將放大器音量 開得太大 左側上方 TOP L 左側下方 BOTTOM L ...

Page 39: ...定螺絲 M5 x 10 mm 揚聲器固定螺絲 M5 x 10 mm 揚聲器固定螺絲 M5 x 10 mm 揚聲器 揚聲器固定螺絲 M5 x 10 mm 揚聲器連接線 揚聲器固定螺絲 M5 x 10 mm 扎線扣 扎線扣 扎線扣 使用桌上支架時 備註 在安裝揚聲器前 請先為電漿電視安裝PDK TS30A系列桌上支架 或其他先鋒電漿電視支架 1 結合揚聲器與固定裝置 左右揚聲器各有一組用來固定上下方的裝置 請將正確的固定裝置安裝到揚聲器背面的上 下方 並以隨附的螺絲鎖 上 圖例所示者為右側固定裝置之安裝 相同步驟亦適用於左側之固定裝置 揚聲器固定裝置 右側上方 槽縫的用途為固定至頂端 螺絲孔 螺絲孔 揚聲器固定裝置 右側上方 揚聲器固定裝置 右側下方 將揚聲器的端子 位於底部 朝向您 揚聲器固定裝置 右側下方 ...

Page 40: ...下方螺絲 將揚聲器固定裝置 上方 槽縫較寬的一端穿過螺 絲 然後將揚聲器往下移動使其卡至定位 將槽縫較寬的一端 穿過螺絲後 往下 移動揚聲器 4 調整揚聲器位置 然後鎖緊上下螺絲 5 鎖緊揚聲器上下方的兩顆螺絲 共四 顆 如此便可將揚聲器固定到顯示器 上 6 將隨附的揚聲器連接線從下方穿過揚聲 器與電漿電視中間 在揚聲器固定裝置 下方 7 將揚聲器連接線接上揚聲器 請見次 頁 8 將連接線塞入揚聲器溝槽中 9 將揚聲器連接線的另一端接到電漿電視 的後方 請見次頁 揚聲器固定螺絲孔 顯示器背面上方 顯示器上方 5 mm 預留約 5 mm 的空間 暫時鎖上隨附的螺 絲 結合揚聲器固 定 裝 置 與 顯 示 器 底部的一處 揚聲器連接線 揚聲器端子 塞入溝槽 ...

Page 41: ...固地連接到端子處 如果連接過鬆 將可能導致音 效接收不穩定或出現雜音 若因引線外露致使 與 連接線短路 將可能造成 電漿電視的嚴重負載 導致操作中斷或故障 揚聲器連接線若未依正確極性插入電漿電視左 右端 子時 將可能導致立體聲音訊強度不足 造成重低音 品質低落 或音效不穩 綑紮連接線時 請勿用力拉扯 黑色 灰色 揚聲器端子 揚聲器端子 揚聲器連接線 揚聲器端子 灰色 灰色 黑色 黑色 紅色 紅色 將揚聲器連接線接到電漿電視的 後方 請正確地依照電漿電視揚聲器端子的極性來接 上連接線 連接線 灰色 應接到 端 子 紅色 連接線 黑色 應接到 端子 黑色 把揚聲器連接線接上揚聲器 請正確地依照揚聲器端子的極性來接上連接線 連接線 灰色 應接到 端子 紅色 連接線 黑色 應接到 端子 黑色 紅色 黑色 為使圖示清楚 圖中並未顯示桌上支架 ...

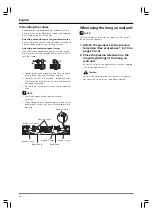
Page 42: ...如需抬起顯示器時 請勿持握揚聲器部位 揚聲器可 能鬆開 因此請持握顯示器本體的上 下部 p 綑紮連接線 電漿電視隨附有扎線扣及壓條 以便您整理及收納過 長的連接線 將扎線扣裝到電漿電視上 視您安排線路的方式而定 將扎線扣裝到下方標示有 符號的孔中 繫上及鬆開扎線扣 將 1 插入電漿電視後方正確的孔中 並將 2 扣入 1 背面的洞中以鎖上扎線扣 扎線扣一旦扣上便很難鬆開 請小心使用 用鉗子將扎線釦轉動 90 朝外拉出 扎線扣材質可能隨時間經過而變質 解開後可能 損壞 請注意勿損及連接線的任何部位 備註 請視需要使用壓條及扎線扣 在整理您的揚聲器連接線時 請注意綑紮方式 勿壓傷連接線 1 2 顯示器後方 扎線扣 扎線扣 壓條 扎線扣 揚聲器連接線 扎線扣 壓條 ...

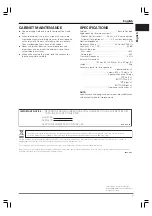
Page 43: ... 所用揚聲器 兩路系統 低音喇叭 用於低音 6 6 cm x 10 6 cm 圓型 高音喇叭 用於高音 2 5 cm 半球頂型 標稱阻抗 6 Ω 頻率範圍 60 Hz 到 30 000 Hz 靈敏度 1 m 1 W 80 dB 容許輸入功率 最大輸入功率 18 W 額定輸入功率 6 W 交叉頻率 4 kHz 外形尺寸 105 mm 寬 x 882 mm 高 x 65 mm 深 重量 1 9 kg 附件 二個揚聲器 揚聲器連接線 x 2 螺絲 M5 x 10 mm x 16 揚聲器固定裝置 左側上方 TOP L x 1 左側下方 BOTTOM L x 1 右側上方 TOP R x 1 右側下方 BOTTOM R x 1 操作手冊 x 1 備註 因產品改進 規格和設計若有變更 恕不另行通知 日本先鋒公司出版 版權 2007日本先鋒公司 版權所有 ...

Page 44: ...ICE CUSTOMER SUPPORT CENTER 4 1 MEGURO 1 CHOME MEGURO KU TOKYO 153 8654 JAPAN S022_En Printed in China Imprimé en Chine SRD1337 A PIONEER CORPORATION 4 1 Meguro 1 Chome Meguro ku Tokyo 153 8654 Japan PIONEER ELECTRONICS USA INC P O BOX 1540 Long Beach California 90801 1540 U S A TEL 800 421 1404 PIONEER ELECTRONICS OF CANADA INC 300 Allstate Parkway Markham Ontario L3R 0P2 Canada TEL 1 877 283 590...

Reviews: