background image

10

En/Fr

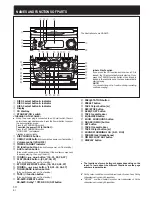
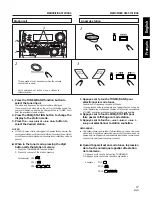
NAMES AND FUNCTIONS OF PARTS

The illustration shows XR-A670.

7

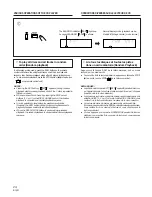
 Auto Play Function

If you press the CD function button when a CD is
loaded, the CD automatically starts playing. If you
press the TAPEI/II function button when a tape is
loaded in the cassette deck, the tape automatically
starts playing.

NOTE:

You cannot change the function during recording
and tape copying.

1 2 3

4

6
7
8

5

0

9

&

FREQ/STATION button

*

PRESET button

(

TAPE 

I

 Eject button (

0

)

)

REC/STOP button

_

ASES/COPY button

+

TAPE 

I

 cassette door

¡

EQUALIZER button

ZOOM  SURROUND button

£

P.BASS (DEMO) button

¢

SET button

TAPE 

II

 cassette door

§

TAPE 

II

 Eject button (

0

)

SOUND MORPHING JOG (S. M. JOG)

PHONES jack (Headphones)

ª

TIMER/CLOCK ADJ button

º

DISPLAY button

*

÷

The functions of some buttons changes depending on the
input. To learn about rhe different functions see the page
numbers in parenthesis.

**

÷

Dolby noise reduction manufactured under license from Dolby
Laboratories Licensing Corporation.

÷

“DOLBY” and the double-D symbol are trademarks of Dolby
Laboratories Licensing Corporation.

1

DISC-1 select button & indicator

2

DISC-2 select button & indicator

3

DISC-3 select button & indicator

4

Display

5

CD disc tray

6

STANDBY/ON  switch

<TURNING ON THE POWER>

÷

When the power plug is connected to an AC wall outlet, the unit
enters the demonstration mode. Press the Power button to cancel
the demonstration mode.
Press the STANDBY/ON switch .

To switch the power OFF (STANDBY):

Press the STANDBY/ON switch.
“GOOD BYE” is displayed.
Standby indicator lights.

7

DISC CHANGE button

8

OPEN/CLOSE button 

(Also switches power on if in standby.)

9

Volume control (VOLUME)

0

TIMER STANDBY indicator

-

CD function button 

(Also switches power on if in standby.)

=

AUX function button

(Also switches power on if in standby. If the auxiliary component
is already playing, then you'll hear it.)

~


¡

 • 

¢

 button 

(15, 21, 22, 26, 27)

!

PLAY/PAUSE button 

(21, 22, 26, 27)

(Also switches power on if in standby.)

@

STOP/ST.MEMORY button 

(16, 21, 22, 26, 27)

#

TUNING – 

4

 • 

button 

(15, 21, 22, 26, 27)

$

TUNER/BAND function button

(Also switches power on if in standby.)

%

TAPE 

I

/

II

 function button

(Also switches power on if in standby.)

^

XR-A370 : REPEAT button
XR-A670 : Dolby**


2


NR ON/OFF button

SO

UN

D M

ORPHING

JO

G

¡ ™ £ ¢

@ ! ~ = -

%

^

&

*

(

)
_
+

§

ª

º

$ #

Summary of Contents for SA-6700

Page 1: ...Operating Instructions Mode d emploi STEREO CD CASSETTE DECK RECEIVER AMPLI TUNER LECTEUR CD DOUBLE PLATINE A CASSETTE XR A370 XR A670 SPEAKER SYSTEM ENCEINTES ACOUSTIQUES S A3700 S A5700 S A6700 ...

Page 2: ... ENCENDIE NE PAS EXPOSER CET APPAREIL A L HUMIDITE OU A LA PLUIE Energy saving design This system is designed to use minimal electricity when power is switched OFF during Standby Regarding the value of the Power Consumption in standby mode refer to specifications on page 47 Conception visant à réduire la consomma tion électrique Cet ensemble a été conçu de telle sorte que la consomma tion d énergi...

Page 3: ...ans la prise de courant Lorsque vous appuyez plus de 3 secondes sur la touche P BASS DEMO en mode STANDBY le mode DEMO est également activé En mode Demo divers modèles apparaissent à l écran Le mode DEMO peut être désactivé en appuyant sur la touche STANDBY ON ou sur la touche de fonction Lorsque vous appuyez plus de 3 secondes sur la touche P BASS DEMO en mode DEMO la démonstration s arrête et la...

Page 4: ...l enregistrement minuté 42 Changer les réglages de la minuterie 43 Si vous faites une erreur en réglant la minuterie 43 ARRET AUTOMATIQUE 44 Arrêt automatique Mettre automatiquement hors tension 44 DEPANNAGE 46 CARACTERISTIQUES TECHNIQUES 48 CAUTIONS REGARDING HANDLING 3 CONFIRM SUPPLIED ACCESSORIES 5 LOADING BATTERIES INTO THE REMOTE CONTROL UNIT 5 REMOTE CONTROL OPERATIONS 5 CONNECTIONS 6 NAMES ...

Page 5: ...ile 1 2 4 3 5 REMOTE CONTROL OPERATIONS OPERATIONS DE TELECOMMANDE L unité de télécommande peut être utilisée dans un rayon d action d environ 7 m à partir du capteur de télécommande avec des angles allant jusqu à environ 30 REMARQUE Si le capteur reçoit une lumière forte comme des rayons de soleil ou une lumière fluorescente le fonctionnement de la télécommande peut être entravé 1 2 3 1 Open the ...

Page 6: ...ix one non skid pad to each of the bottom corners of the speakers 3 Connect the speaker cords to the FRONT SPEAKERS terminals Connect the gray cords to the red terminals and the white cords to the black terminals 1 Open the tab and insert the cord into the terminal 2 Close the tab Be sure to tighten the cords firmly 7 Mettez l appareil hors tension et retirez le cordon d alimentation de la prise d...

Page 7: ...minals or to come into contact with other conductors A breakdown or failure may occur when conductors touch Combine S A3700 together with XR A370 only These speaker systems are not magnetically shielded and may cause color noise or distortion when placed very near a television set If this occurs place the speakers farther away from the television set Precaution for S A670 Do not place any items on...

Page 8: ...ion du son ou des dysfonctionnements Raccordement sur prise jack pour entrée optique numérique Le modèle XR A370 ne possède pas de prise optique pour signaux numériques par conséquence ce raccordement ne peut pas être effectué Raccordement à un composant DAT MD etc sans entrée optique numérique Raccordez la sortie optique de l appareil à l entrée optique du composant à raccorder avec un câble en f...

Page 9: ...tenne cadre AM branchée lors de l utilisation d une antenne AM intérieure ou extérieure Le symbole masse signal contribue à réduire le bruit quand on a raccordé une antenne Il ne s agit pas d une mise à la masse pour la sécurité AM loop antenna Antenne cadre AM ANTENNE AM a b c AM LOOP ANTENNA FM UNBAL 75Ω AM LOOP ANTENNA FM UNBAL 75Ω A B The antenna should be placed at a distance from the unit an...

Page 10: ...e trademarks of Dolby Laboratories Licensing Corporation 1 DISC 1 select button indicator 2 DISC 2 select button indicator 3 DISC 3 select button indicator 4 Display 5 CD disc tray 6 STANDBY ON switch TURNING ON THE POWER When the power plug is connected to an AC wall outlet the unit entersthedemonstrationmode PressthePowerbuttontocancel the demonstration mode Press the STANDBY ON switch To switch...

Page 11: ... sélection TUNER BAND Met aussi l appareil sous tension s il est en attente Touche de sélection TAPE I II Met aussi l appareil sous tension s il est en attente XR A370 Touche REPEAT XR A670 Touche Dolby 2 NR marche arrêt ON OFF Touche FREQ STATION Touche PRESET Touche d éjection TAPE I 0 Touche enregistrement arrêt REC STOP _ Touche ASES COPY Volet cassette TAPE I Touche EQUALIZER Touche ZOOM SURR...

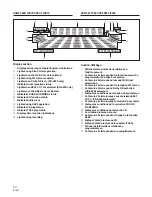
Page 12: ...ecteur de CD Ceci indique le niveau sonore Ce témoin s éclaire pendant l usage de la fonction ASES Indique l état de lecture du CD Indique l état de lecture de la cassette TAPE Affiche les informations relatives au programmateur Ce témoin s éclaire pendant un enregistrement Display section 1 Displays a wide range of operation status indications 2 Lights during Sleep Timer operation 3 Lights when t...

Page 13: ...e ouvrir fermer OPEN CLOSE 4 Touches numériques 1 9 10 0 10 5 Touche BAND Pour faire commuter les bandes FM et AM 6 Touche de fonction TAPE I II 7 Touche RDM 8 Touche répétition RPT 9 Touche MONO 0 Touche affichage DISP Touche mise sous tension STANDBY ON Touche minuterie arrêt automatique SLEEP Touche programme PGM Touche effacer CLEAR Touche de fonction AUX Touche de fonction CD Touchesd opérati...

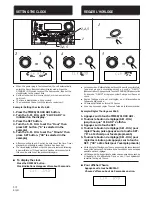
Page 14: ... appareil passe automatiquement en mode DEMO démonstration AppuyezsurlaToucheSTANDBY ONpourmettre fin au mode DEMO et réglez ensuite l horloge sur l heure en cours Réglez l horloge si elle est mal réglée ou si l alimentation de l appareil a été coupée L heure est affichée au format 24 heures Vous ne pouvez pas régler l heure à l aide de la télécommande Exemple Régler l horloge sur 6h40 1 Appuyez s...

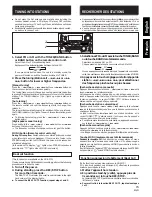
Page 15: ...ption Broadcastreceptionisnotpossibleunlessanantennaisconnected so be sure to connect one 1 Select FM or AM with the TUNER BAND button or BAND button on the remote control unit Select the AM or FM broadcasting band Each press of the button alternates between AM and FM If you press this button when the unit is in standby mode the power will switch on and the function switches to TUNER 2 Press the t...

Page 16: ...y you can change the FM frequency step to 100 kHz and the AM frequency step to 10 kHz 1 Turn off the power 2 Press the FREQ STATION button for more than 3 seconds To reset the frequency step repeat steps 1 and 2 L incrément de fréquence est de 50 kHz en FM et de 9 kHz en AM Lecaséchéant vouspouvezutiliserlesincrémentsde100kHzenFM et 10 kHz en AM 1 Mettez l appareil hors tension 2 Appuyez sur la to...

Page 17: ...ppuyez sur la touche de fonction TUNE BAND 2 Appuyez sur le numéro de la station mémorisée exemple ST 3 ST 10 ST 24 Appel de station 2 3 SOUND MORPHING JOG 1 3 This operation is not necessary when the remote control unit is used 1 Press the TUNER BAND function button to select the tuner input The band and frequency being received are displayed If you press this button when the unit is in standby m...

Page 18: ...HER FINANCE CHILDREN Children s entertainment SOCIAL A Social Affairs RELIGION PHONE IN TRAVEL Holiday type travel rather than traffic announcements etc LEISURE Leisure interests and hobbies JAZZ COUNTRY Country Music NATION M Popular music in a language other than English OLDIES Popular music from the 50s FOLK M Folk Music DCUMENT Documentaries TEST Alarm Test You can t search for this it s only ...

Page 19: ...is case when you switch to the RT mode only some of the PS data will be displayed so switch to the PS mode En mode RT certains caractères peuvent temporairement être mal affichés s il y des parasites pendant l affichage de défilement RT S iln ypasdedonnéesRTdiffuséesenmodeRT lemessage NO RADIO TEXT DATA apparaît Pendant la réception d une émission RDS en mode PTY NO TYPE pourrait apparaître à l éc...

Page 20: ...Sélectionnez FM avec la touche de fonction TUNER BAND 2 Appuyez sur la touche DISPLAY de manière que l indication RDS s affiche 3 Tournez S M JOG jusqu à ce que l indication SEARCH s affichepoursélectionnerlemodede recherche PTY 4 Appuyez sur la touche SET 5 Tournez S M JOG pour sélectionner le type d émission PTY souhaité puis appuyez sur la touche SET La fonction de recherche commence à chercher...

Page 21: ...2 Appuyez sur la touche OPEN CLOSE 3 Appuyez sur la touche DISC CHANGE Retirez le disque 4 Appuyez sur la touche OPEN CLOSE REMARQUES La pression de la touche OPEN CLOSE permet d ouvrir le plateau même pendant la lecture d un disque Vous pouvez remplacer les autres disques sur le plateau pendant la lecture mais le disque en cours de lecture ne peut pas l être Pour remplacer le disque lu appuyez su...

Page 22: ... tray the position of the discs 1 2 3 don t change even after the power is switched off Blinks LISTENING TO COMPACT DISCS Arrêter la lecture Fonction Arrêter la lecture A r r ê t e r temporairement la lecture Recommencer la lecture Touches REMARQUE Si vous laissez les disques sur le plateau la position des disques 1 2 et 3 ne changera pas même après la mise hors tension Clignote ECOUTER DES DISQUE...

Page 23: ...n 3 discs 1 Start or pause CD play 2 Press the RPT button on the remote control Each time you press it the repeat mode changes as follows If the RPT button is pressed in programmed playback mode the program will be played repeatedly Even in the stop mode the REPEAT function still can be set To stop repeat playback press the RPT button again The marks disappear You can also use the REPEAT button on...

Page 24: ...re tous les disques et toutes les pistes dans un ordre aléatoire Random Playback OPERATIONS DIVERSES SUR LE LECTEUR DE CD Normal display mode playback mode Mode d affichage normal mode lecture C To play all discs and all tracks in random order Random playback In either play or stop mode press the RDM button on the remote control unit to have the unit play all tracks on all the discs loaded in rand...

Page 25: ...ture appuyez sur la touche STOP 7 ou appuyez sur la touche Stop de la télécommande A chaque appui sur la touche CLEAR de la télécommande la dernière étape programmée sera effacée Appuyez sur la touche OPEN CLOSE 2 5 A 2 3 Programmed playback To program tracks in desired order 9 2 5 7 1 9 3 Up to 32 steps can be programmed 1 In the stop mode press the PGM button on the remote control unit The PGM i...

Page 26: ...en même temps N utilisez pas de cassette de TYPE IV métal Le XR A370 peut seulement lire enregistrer sur cassette de TYPE I normal Le XR A670 peut en plus lire enregistrer sur cassette de TYPE II High Chrome 1 Appuyez sur la touche Eject 0 introduisez une cassette enregistrée et poussez sur le volet pour le fermer 2 Réglez Dolby NR sur la même position que celle qui a été utilisée lors de l enregi...

Page 27: ...de lorsque la fin de la bande a été atteinte lors d une avance rapide ou d un rembobinage avec 4 1 ou Lecture par relais Pour la lecture par relais il faut introduire des cassettes dans TAPE I et dans TAPEII Lalectureparrelaisestrépétéecommesuit 32facesaumaximum Si seulement un lecteur est pourvu d une cassette ce lecteur lit sans arrêt les deux faces de la cassette 16 faces au maximum 2 3 3 TAPE ...

Page 28: ...ction is not available on the XR A370 When there is 4 seconds or more of blank tape between two songs it is possible to return to the beginning of the song that is being played or search for the next song 1 Push the fast forward button to search for the next song during playback 2 Push the rewind button 4 1 to return to the beginning of the song that is being played back Use Music Search by pressi...

Page 29: ...rée La fonction de manipulation de son est désactivée pendant l enregistrement Cet appareil règle automatiquement le niveau d enregistrement avec la fonction ALC Automatic Level Control 5 6 Only if you select CD Seulement si vous sélectionnez CD SOUND MORPING JOG XR A670 1 3 2 4 5 6 1 2 ON OFF 2 3 ON OFF 2 3 3 4 1 Press the TAPE I II function button 2 Insert the tape to be recorded in TAPE I Wind ...

Page 30: ...tisée 2 Appuyez sur la touche DOLBY NR pour mettre la fonction DOLBY NR sur ON ou sur OFF Cette fonction n est pas disponible sur le XR A370 DOLBY NR commute entre ON et OFF à chaque pression de la touche 3 Ouvrez le plateau et introduisez les disques 4 Sélectionnez le disque à enregistrer en appuyant sur une touche de sélection DISC 1 2 ou 3 3 3 ON OFF2 1 Insert the recording tape in TAPE I Make ...

Page 31: ...sans utiliser A S E S à partir de cette piste 5 Avant de commencer la lecture à l étape 4 appuyez sur la touche STOP 7 Si vous voulez enregistrer dans un certain ordre programmez cet ordre à l avance Si un numéro de piste du CD a été sélectionné à l aide de la touche 4 1 ou l enregistrement commence à partir de cette piste et continue par les pistes suivantes Si aucune piste n est sélectionnée ici...

Page 32: ...haitez copier seulement une face brisez la languette de protection contre l enregistrement de la face sur laquelle vous ne souhaitez pas enregistrer et insérez la cassette avec la face à enregistrer tournée vers l extérieur Use TAPE I to record The copy begins from the forward side 3 1 Press the TAPE I II function button to select the cassette tape input function 2 Insert the tape to be copied int...

Page 33: ...LL DOME 3 3 USER 1 2 USER 2 2 USER 3 2 2 2 3 3 3 2 ALL FLAT 2 3 SOUND MORPHING JOG 2 3 2 3 This function does not operate during tape recording Cette fonction n est pas disponible pendant un enregistrement sur cassette 3 EQUALIZER 3 ZOOM SURROUND 2 2 PRESET P BASS 3 CLUB HALL DOME 3 3 USER 1 2 USER 2 2 USER 3 2 2 2 3 3 3 2 ALL FLAT 2 3 1 Switching the sound morphing The sound morphing mode can be ...

Page 34: ...NEAR 5 2 NEAR 4 2 3 FAR 5 2 FAR 4 2 3 NEAR 3 2 3 FAR 32 3 NEAR 2 2 3 FAR 2 2 3 NEAR 12 3 FAR 1 2 3 OFF 2 2 2 EQUALIZER MODE You can press the EQUALIZER button on the main unit to switch directly to this mode Turning the S M JOG will change the sound mode in the following order 2 3 FLAT SOUL TECHNO ROCK HIP HOP SOUND MORPHING JOG 2 3 4 2 3 4 FLAT The original uneffected sound TECHNO Emphasizes the ...

Page 35: ...es seront encore plus accentuées EntournantleBoutonderéglage S M JOG lemodechangecommesuit LapressionrépétéedelatoucheP BASSdupanneauavantcommutera le mode P BASS comme suit 4 P BASS MODE You can press the P BASS button on the main unit to switch directly to this mode In this mode turning the S M JOG will enhance low sounds even more Turning the S M JOG will switch the mode as follows Memorising d...

Page 36: ...nt Durée totale du disque fonction CD seulement Ceci indique le niveau sonore Il y a 6 types d affichage de niveau audio A chaque rotation de S M JOG le mode d affichage change comme suit DISP 1 ÔDISP 2 Ô DISP 3 DISP 6 ÔDISP 5 Ô DISP 4 Indicates elapsed play time Clock display Indicates TOTAL CD function only Total disc time CD function only Audio level display type There are 6 types of audio leve...

Page 37: ...ateur destiné au nettoyage Diluant Benzène NETTOYER LA LENTILLE La lentille du lecteur ne devrait pas s encrasser en usage normal Si pour une raison ou une autre elle devrait mal fonctionner à cause d une souillure consultez votre service après vente PIONEER agréé Nous déconseillons fortement l usage de disques nettoyants En effet ceux ci peuvent endommager la lentille et certains sont impossibles...

Page 38: ... benzène des vaporisateurs d insecticide ou d autres produits chimiques sur ou à proximité de cet appareil car ils détériorent les surfaces Démagnétiser les têtes du lecteur de cassettes Les têtes du lecteur de cassettes peuvent se magnétiser après une période d usage prolongée ou si un aimant ou un autre objet magnétisé tournevis etc s est trouvé à proximité des têtes La magnétisation des têtes a...

Page 39: ...est détendue ou si une partie de la bande dépasse de la cassette Cela peut endommager la bande Introduisez un crayon dans l axe de la bobine et tournez doucement afin de supprimer le jeu Fig A Stockage Remettez la cassette dans sa boîte et rangez la à un endroit à l abri de tout champ magnétique non exposé à l humidité la poussière ou l huile Fig B CONSEILS POUR L EMPLOI L amorce au début de la ba...

Page 40: ...les minute Réglez les minutes avec S M JOG Exemple Faire fonctionner l appareil de 7h30 à 8h00 Mettre le réveil WAKE UP LECTURE MINUTEE ENREGISTREMENT MINUTE SOUND MORPHING JOG 5 1 9 3 Assurez vous que l horloge est à l heure avant de régler le programmateur Reportez vous à la page 14 SOUND MORPHING JOG SOUND MORPHING JOG Example Using TIMER from 7 30 to 8 00 Besuretosetthecorrectclocktimebeforepe...

Page 41: ...rêt automatique SLEEP pendant le fonctionnement du réveil l heure de fin OFF arrivant en premier aura priorité Lesfonctionsréveiletenregistrementminuténepeuventpasêtre utilisées en même temps SOUND MORPHING JOG SOUND MORPHING JOG SOUND MORPHING JOG 8 Press the SET button and the set time is automatically confirmed After a few seconds when confirmation is completed and the display returns to its or...

Page 42: ...XR A670 1 11 7 8 9 13 4 5 3 7 8 9 10 13 2 2 3 4 5 6 LECTURE MINUTEE ENREGISTREMENT MINUTE Réglage de l enregistrement minuté L enregistrement minuté n est possible qu à partir du tuner Exemple enregistrer de 7h30 à 8h00 1 Mettez l appareil sous tension 2 Chargez la cassette pour l enregistrement dans TAPE I L enregistrement démarre dans le sens en avant 3 3 Mettez DOLBY NR sur ON ou OFF comme requ...

Page 43: ...NUTEE ENREGISTREMENT MINUTE Changer les réglages de la minuterie Pour changer tous les réglages de la minuterie recommencez à zéro et entrez les nouveaux réglages Si vous faites une erreur en réglant la minuterie Passez à l article suivant et continuez les réglages jusqu à la fin Puis utilisez Changer les réglages de la minuterie pour modifier le réglage erroné REMARQUES Une fois l heure réglée su...

Page 44: ...ge du temps restant Sinon les réglages changeront et l arrêt automatique ne fonctionnera pas correctement L arrêt automatique AUTO SLEEP ne fonctionne pas pendant la lecture répétée d un CD ARRET AUTOMATIQUE 3 3 3 2 AUTO SLEEP SLEEP 90 SLEEP 60 SLEEP 30 2 SLEEP 0 Eteint Power turns off automatically after the specified time has elapsed Each time the SLEEP button is pressed the setting changes in t...

Page 45: ...g source on the receiver Power cord has been unplugged while the tape was running Broken erasure prevention tabs Dirty heads Tape recorded with DOLBY NR but played without The blank interval between two songs is shorter than 4 seconds The fast forward or rewind operation has been started from stop mode Disc is loaded upside down Dirt smear etc on the disc Disc is warped or has a bad scratch Antenn...

Page 46: ...e pas La télécommande ne fonctionne pas Cause Cordon d alimentation déconnecté Touslescordonsnesontpasbienraccordés La fonction n est pas réglée sur la bonne source d écoute sur le récepteur La cordon d alimentation a été débranché pendant le défilement de la bande Languettes de protection contre l enregistrement brisées Têtes encrassées Cassette enregistrée avec DOLBY NR mais lue sans L intervall...

Page 47: ...e plug Do not pull out the plug by tugging the cord and never touch the power cord when your hands are wet as this could cause a short circuit or electric shock Do not place the unit a piece of furniture etc on the power cord or pinch the cord Never make a knot in the cord or tie it with other cords The power cords should be routed such that they are not likely to be stepped on A damaged power cor...

Page 48: ...bande XR A370 TYPE I Normal tape XR A670 TYPE I Normal tape TYPE II HIGH CrO2 tape Divers Alimentation requise Secteur 220 230 V 50 60 Hz Puissance consommée XR A370 150 W XR A670 170 W Consommation en veille 1 W Dimensions 270 L x 320 P x 336 H mm Poids sans l emballage XR A370 8 3 kg XR A670 8 8 kg ENCEINTES ACOUSTIQUES S A3700 Enceinte type étagère bass reflex Système 16 cm système 3 voies Haut...

Reviews: