Additional information
13
116
En
Chapter 13:
Additional information
Speaker Setting Guide
In o
r
de
r
to achieve an even bette
r
su
rr
ound effect, it is
impo
r
tant to accu
r
ately position the speake
r
s and make
thei
r
volume and tone cha
r
acte
r
istics unifo
r
m so as to
finely focus the multi-channel sound.
The th
r
ee majo
r
elements in positioning the speake
r
s a
r
e
distance
,
angle
and
orientation
(the di
r
ection in which
the speake
r
s a
r
e pointing).
Distance
: The distance of all the speake
r
s should be
equal.
Angle
: The speake
r
s should be ho
r
izontally symmet
r
ical.
Orientation
: The o
r
ientation should be ho
r
izontally
symmet
r
ical.
In most homes, howeve
r
, it is not possible to achieve this
envi
r
onment. Fo
r
the distance, on this
r
eceive
r
it is
possible to automatically co
rr
ect the speake
r
distance
elect
r
ically to a p
r
ecision of 1 cm using the Full Auto
MCACC Setup function (page 43).
SC-LX83 only:
Fo
r
the volume and sound quality as well,
accu
r
ate sound field co
rr
ection using the equalize
r
and
speake
r
phase cha
r
acte
r
istic co
rr
ection using the Full
Band Phase Cont
r
ol function (page 59) togethe
r
make it
possible to achieve the ideal listening envi
r
onment.
Step 1: Speaker layout and distance adjustment
Use speake
r
stands o
r
the like to make su
r
e the speake
r
s
a
r
e steady, and leave at least 10 cm f
r
om the su
rr
ounding
walls. Position the speake
r
s attentively so that the
speake
r
s on the left and
r
ight a
r
e at equal angles f
r
om the
listening position (cente
r
of the adjustments). (We
r
ecommend using co
r
ds, etc., when adjusting the
layout.) Ideally all the speake
r
s should be equidistant
f
r
om the listening position.
Tip
• If the speake
r
s cannot be set at equal distances (on a
ci
r
cle), use the Auto MCACC Setup speake
r
distance
co
rr
ection and Fine Speake
r
Distance (o
r
P
r
ecision
Distance
– SC-LX83 only
) functions to make them
equalize the distance a
r
tificially.
Step 2: Adjusting the speaker height
Adjust the heights (angles) of the diffe
r
ent speake
r
s.
Adjust so that the f
r
ont speake
r
units
r
ep
r
oducing mid-
and high f
r
equencies is
r
oughly at the height of the ea
r
s.
If the cente
r
speake
r
cannot be set at the same height as
the f
r
ont speake
r
s, adjust its angle of elevation to point it
to the listening position.
Set su
rr
ound speake
r
1 so that it is not unde
r
the height
of the ea
r
s.
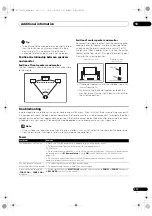
Step 3: Adjusting the speaker orientation
If the left and
r
ight speake
r
s a
r
e not pointing in the same
di
r
ection, the tone will not be the same on the
r
ight and
left, and as a
r
esult the sound field will not be
r
ep
r
oduced
p
r
ope
r
ly. Howeve
r
, if all the speake
r
s a
r
e pointed towa
r
ds
the listening position, the sound field will seem c
r
amped.
Testing by the Pionee
r
Multi-channel Resea
r
ch G
r
oup
has shown that a good sense of sound positioning can be
achieved by pointing all the speake
r
s towa
r
ds an a
r
ea
30 cm to 80 cm behind the listening position (between
the su
rr
ound speake
r
s and the listening position).
Howeve
r
, the sense of sound positioning can diffe
r
acco
r
ding to the conditions in the
r
oom and the speake
r
s
being used. In smalle
r
envi
r
onments in pa
r
ticula
r
(when
the f
r
ont speake
r
s a
r
e close to the listening position),
with this method the speake
r
s will be pointed too inwa
r
d.
We suggest you use this example of installation as
r
efe
r
ence when t
r
ying out diffe
r
ent installation methods.
Step 4: Positioning and adjusting the subwoofer
Placing the subwoofe
r
between the cente
r
and f
r
ont
speake
r
s makes even music sou
r
ces sound mo
r
e natu
r
al
(if the
r
e is only one subwoofe
r
, it doesn’t matte
r
if it is
placed on the left o
r
r
ight side). The low bass sound
output f
r
om the subwoofe
r
is not di
r
ectional and the
r
e is
no need to adjust the height. No
r
mally the subwoofe
r
is
placed on the floo
r
. Put it in a position at which it will not
cancel out the bass sound output f
r
om the othe
r
speake
r
s. Also note that placing it nea
r
a wall may
r
esult
in sympathetic vib
r
ations with the building that could
excessively amplify the bass sound.
If the subwoofe
r
must be installed nea
r
a wall, place it at
an angle so that it is not pa
r
allel to the wall su
r
face. This
can help
r
educe any sympathetic vib
r
ations, but
depending on the shape of the
r
oom this could
r
esult in
standing waves. Howeve
r
, even if standing waves a
r
e
gene
r
ated, thei
r
influence on the sound quality can be
p
r
evented using the Auto MCACC’s standing wave
cont
r
ol function (page 106).
Step 5: Default settings with the Auto MCACC
Setup (auto sound field correction) function
It is mo
r
e effective to pe
r
fo
r
m the Full Auto MCACC Setup
(page 43) and P
r
ecision Distance
(SC-LX83 only)
(page 105) p
r
ocedu
r
e once the adjustments desc
r
ibed
above have been completed.
SC-LX83_73_DLPW.book 116 ページ 2010年5月19日 水曜日 午後2時7分

