background image

42

En

Basic Playback

ACTION

This mode is designed for action movies, which generally use lots of sound effects. The mode enriches the
sound to make it more realistic and extends the parameters to pick up high and low sound effects.

5/7-D THEATER

This mode is  especially designed to give sound depth to stereo sources. The overall effect builds a
dynamic and broad sound space, allowing two-channel (stereo) signals to faithfully imitate a five speaker
sound. The mode should be used in conjunction with Dolby Pro Logic for sources bearing the

DOLBY SURROUND

 mark.

When a Dolby Digital soundtrack is played back the Dialog Normalization function of the receiver acti-
vates automatically. Dialog Normalization is a Dolby Digital function that establishes the average dialog
level for the program source being played. If the amplifier's level does not match the average dialog
level, first you see "DIAL NORM" flash in the amplifier's display and next "4 dB" (as an ex-
ample) will appear. In this example, the 4 dB is the difference between the receiver's gain
structure and the Dolby Digital average dialog level. To match the average dialog level, subtract or add
the OFFSET level. For example, if the OFFSET level is +4 dB, the amplifier's output is 4 dB over the
average recorded level.

memo

ADVANCED THEATER modes

The Advanced Theater mode is a newly designed system for enhancing movie soundtracks and other audio-
visual sources. It incorporates the use of  DTS as well as Dolby Digital into its sound processing. These
functions switch on automatically when the source you are playing is encoded with DTS or Dolby Digital. There
are four Advanced Theater settings that use DSP (Digital Signal Processing) to create different types of sound
environments. If you have SURROUND BACK speakers or (even just one) speaker switched on (see p.32-33)
then 7.1 will appear after the name of all of these modes in the display on the amplifier. 

The display will show

you what kind of source (Dolby Digital, DTS, etc.) is being played.

MUSICAL

This mode is primarily for music and adds a spacious feeling to the sound. A long delay time of reflected
sounds, provides resonant tones which emulate a concert hall.

DRAMA

This mode is designed for movies with a lot of dialog. The  elements of dialog are enhanced, making the
characters seem more real. The mode also compresses the dynamic range somewhat so loud sounds do
not overpower softer ones (compare this with the MIDNIGHT LISTENING mode explained on p.


48).

HOME THX CINEMA modes

THX is a set of technical standards created by Lucasfilm, Ltd. These standards were designed to emulate a film
sound stage and thus reproduce, with the greatest possible accuracy, the soundtrack intended by the filmmakers.
To get THX sound use one the three modes explained below. You will only be able to access the second two
modes if you have hooked up SURROUND BACK speakers. For more detailed information see p.18,20,32-33.

This mode is best if you are unsure which of the above THX modes to use. The display will show you what kind
of source (Dolby Digital, DTS, etc.) is being played.

THX CINEMA

Use this mode to get THX sound with sources that do not have SURROUND BACK channels. If you don't
have SURROUND BACK speaker(s) switched on (see p.32-33) this is the only THX mode you will be able to
select on the amplifier.

THX SURROUND EX

This mode is specifically for using your SURROUND BACK channels with either 

SURROUND

 EX sources or

5.1 channel sources. You will only be able to access this mode if you have set the SURROUND BACK
speakers in the SPEAKER SETTING procedure (see p.

32-33

). If the source you are using is a 5.1 source then

this mode will route some of the sound to the SURROUND BACK channel(s). If the source you are using
does not have a 

SURROUND EX marker or is not a 5.1 source then the display will automatically change to

THX CINEMA.

THX AUTO

In this mode the receiver will automatically select the appropriate THX mode and use it to play the
soundtrack. You will only be able to access this mode if you have set the SURROUND BACK speakers in the
SPEAKER SETUP procedure (see p.32-33). 

If the source has a Surround EX marker then the amplifier will

automatically go into THX SURROUND EX mode. This mode is best if you are unsure which of the above
THX modes to use.

Summary of Contents for VSA-E08

Page 1: ...Operating Instructions AUDIO VIDEO MULTI CHANNEL AMPLIFIER VSA E08 ...

Page 2: ...a risk of electric shock to persons Thank you for buying this Pioneer product Please read through these operating instructions so you will know how to operate your model prop erly After you have finished reading the instruc tions put them away in a safe place for future ref erence In some countries or regions the shape of the power plug and power outlet may sometimes dif fer from that shown in the...

Page 3: ...se a regular composite RCA video cords as shown below It is important that you hook up your TV or monitor in order to see a video image as well as the on screen displays OSDs shown by this amplifier for more on p 16 17 We also recommend hooking up your all your digital components to analog audio jacks For this you can use regular RCA stereo cords Coaxial Digital Connection If your DVD player has a...

Page 4: ...hear any dialog Use the instructions on page 32 33 in order to do this Follow the diagram below to hook up an additional amplifier in order to use surround back speakers These speakers are important to hear all the sound channels on new eight channel home theater DVDs The diagram below also explains how to hook up a subwoofer which provides realistic bass sounds Make sure you connect the speaker o...

Page 5: ...ITAL IN 3 button which should correspond to the digital in jack you hooked your DVD up to as in the optical digital connection diagram on p III 6 At the bottom of the remote control the functions available will appear Press the DVD LD button 7 Press the SETUP OK button Hold the remote control pointed towards the amplifier until you see the RECEIVED display on the amplifier If ERROR flashes in the ...

Page 6: ...mplifier see p 14 you won t have to assign any more digital inputs but many other adjustments will improve the sound tremendously 2 Experiment with the different sound settings offered with the 2 DTS MPEG and DSP buttons For more information see p 41 45 3 As mentioned above you should go through the speaker setup instructions on pages 30 39 to set up your speakers properly If you don t do this you...

Page 7: ...Basic Playback 41 Sound Modes 41 STANDARD modes 41 HOME THX CINEMA modes 41 ADVANCED THEATER modes 42 DSP modes 43 STEREO mode 43 Selecting a Sound Mode 44 Using surround sound 44 Playing Sources with Dolby Digital MPEG or DTS Sound 45 Playing Sources with Stereo Sound 46 Switching ANALOG DIGITAL Signal Input 47 Reducing Noise During Playback 48 Listening in MIDNIGHT Mode 48 Listening in LOUDNESS ...

Page 8: ...he ability to decode Dolby Digital Dolby Pro Logic and DTS Digital Theater Systems sources which are the standards of home theater today It also offers component video terminals for the sharpest video transmission available to the consumer Advanced Theater Modes DSP Surround Modes Advanced Theater modes enhance the sound of either film or music so a more dramatic effect can be achieved The four mo...

Page 9: ...tor or display Indicates a steadily lit button indicator or display Before You Start Checking the Supplied Accessories Please check that you have received all of the following supplied accessories How to Use This Manual Preparing the Remote Control Loading the batteries Load the batteries into the remote control as shown below The remote control uses a lot of power due to the LCD display so please...

Page 10: ...n t use the buttons on the remote control This is helpful to prevent you from mistakenly pushing a button For normal use keep the switch set in USE Remote Control Cushions Apply the cushions to the feet of the remote control as shown in the diagram right Operating range of remote control unit The area in which you can use the remote control to operate the VSA E08 is fairly large To use point the r...

Page 11: ...Start The PIONEER SR System Operating other PIONEER components Connecting an optional control cord allows you to operate other PIONEER components simply by pointing the amplifier s remote control at the remote sensor on the front panel of the amplifier The amplifier then sends the remote control signals to the other devices via the CONTROL OUT terminal You can also control PIONEER components and t...

Page 12: ... audio cords not supplied to connect the audio components Connect red plugs to R right and white plugs to L left Be sure to insert completely Cassette deck placement Depending on where the cassette deck is placed noise may occur during playback of your cassette deck which is caused by leakage flux from the transformer in the amplifier If you experience noise move the cassette deck farther away fro...

Page 13: ...cted to one in the diagram below If you connect this to the optical input on a digital recorder currently these include MD DAT and CD R you can make direct digital recordings with this unit Before making or changing the connections switch off the power and disconnect the power cord from the AC outlet The arrows indicate the direction of the audio signal 7 Coaxial cords Optical cables Commercially ...

Page 14: ... OUT AC 3 LD RF OUT 2 COMPO NENT VIDEO OUT VIDEO S VIDEO PB Y PR STEREO L R ANALOG Digital Input Assignment Unlike analog connections the jacks for digital connections are not dedicated to one type of component they can be used freely Thus you must tell the amplifier what digital component in which jack so your components will be in sync with the names on the remote control buttons and the like To...

Page 15: ...ITAL IN 5 IN 4 IN 3 2 RF IN AC 3 IN 2 IN 1 LINE TUNER IN AUDIO OUT OUT 2 1 DVD LD player COMPO NENT VIDEO OUT L VIDEO STEREO L R DIGITAL ANALOG PCM 2 DTS DIGITAL S VIDEO Y PB PR 2 RF OUT CD IN R L R L MD TAPE1 CD R PLAY REC TAPE2 MONITOR PLAY REC IN PHONO MONITOR OUT 2 MONITOR OUT 1 SURR OUND SUB WOOFER CENTER FRONT MULTI CH IN SURR OUND FRONT SUB WOOFER PRE OUT CENTER R L L R R L R L R R L L Song...

Page 16: ...ee the picture For the audio signal order to use digital soundtracks sometimes broadcast over digital satellite TV you must hook up a digital input Use either a coaxial or optical cables it doesn t matter which you don t need to use both It s also a good idea to hook up your audio with analog cables see below This connection is called STEREO AUDIO OUT in the diagram Before making or changing the c...

Page 17: ...al Decoder In some cases you may want to have your source material DVD etc decoded externally If you find you need a multi channel external decoder hook one up as shown below but for most people this component is unnecessary for more on this see p 50 Before making or changing the connections switch off the power and disconnect the power cord from the AC outlet CD IN R L R L MD TAPE1 CD R PLAY REC ...

Page 18: ...K speakers These speakers add even great realism in movie sound effects and new discs with soundtracks in Dolby Digital or DTS incorporates these channels In order to be able to use these channels you must hook your SURROUND BACK speakers up to an external amplifier and then connect that to the VSA E08 as shown in the diagram below If you only have one SURROUND BACK speaker hook it up the SURROUND...

Page 19: ...t possible interference such as distortion in the color of the TV screen If you do not have magnetically shielded speakers and notice discoloration of the TV screen place the speakers farther away from the TV Install the center speaker above or below the TV so that the sound of the center channel is localized at the TV screen CAUTION When installing the center speaker on top of the TV be sure to s...

Page 20: ...UT ANALOG INPUT ANALOG Plugging In Except for the UK model Up to three components can be powered from this amplifier Two of the outlets are switched which means that power is switched on and off with the amplifier The third is unswitched which means that power is delivered so long as the amplifier is plugged in Before making or changing the connections switch off the power and disconnect the power...

Page 21: ...E indication Displays current volume level 13 TAPE 2 indicator Lights when the TAPE 2 monitor is on 14 Character display Displays sound modes general information 1 SIGNAL SELECT indicators Light to indicate the input signal you selected of the source signal ANALOG Lights when analog signals are assigned DIGITAL Lights when digital audio signals are selected AC 3 RF Lights when AC 3 RF signals are ...

Page 22: ... 2 5 7 CH STEREO Use these modes to produce surround sound from standard two channel stereo sources and create different listening environments STEREO DIRECT button See p 43 46 51 Switches the amplifier into STEREO mode if it was in a different sound mode like DSP MODE or toggles between DIRECT and STEREO mode For more on STEREO mode see p 43 DIRECT playback bypasses the tone controls DIGITAL NR L...

Page 23: ...t panel VCR1 DVR Video cassette recorder connect ed to VCR1 DVR inputs VCR 2 Video cassette recorder or other component connected to VCR 2 inputs 10 PHONES jack Connect headphones for private listening no sound will be heard through the speakers 11 VIDEO INPUT jacks See p 15 S VIDEO Video input for connecting a video camera etc that has an S Video out VIDEO AUDIO L R Video input for connect ing a ...

Page 24: ...the remote control itself See Remote Control of Other Components starting on p 52 6 LOCK switch Use to lock the remote control so it doesn t turn on by accident For normal use keep it set in USE 7 TV CONTROL buttons The following buttons are used to control the TV only and can be used once they are preset to control your TV STANDBY ON Press to turn the power of the TV on off FUNCTION Press TV FUNC...

Page 25: ...except THX and MULTI CH IN 8 2 dts MPEG buttons See p 41 45 73 74 Press these buttons to put the amplifier in the selected surround sound mode For more information on the modes see p 41 45 9 SIGNAL SELECT button See p 47 Press SIGNAL SELECT repeatedly to select one of the following ANALOG To select an analog signal DIGITAL To select a digital signal DVD LD TV SAT CD MD TAPE 1 VCR 1 VCR 2 AC 3 RF T...

Page 26: ...ont speakers of both the A B systems and the sub woofer Multi channel sources will be down mixed to these speakers so no sound will be lost B setting only plays the front speakers connected to the B system and multi channel sources will be down mixed to these two speakers The button cycles through the speaker systems as follows A B A B off 6 CH LEVEL button See 35 36 Use this feature to adjust the...

Page 27: ...hook up this amplifier to your TV This arrangement would still NOT let you see the on screen displays from this amplifier on your TV The best idea is just to use one type of video cord for all your video component and TV hook ups Switching video system between PAL and NTSC This amplifier is able to use two types of video systems for its OSD on screen display either PAL or NTSC If you don t match t...

Page 28: ...ust first align the touch panel to make sure the remote control responds properly when you touch it press the TOUCH PANEL ADJUSTMENT button 4 Press each cross point in the middle to align the remote control touch panel with the LCD panel underneath This adjustment will make sure your remote control is calibrated correctly When you ve touched all four cross points the screen will show the word COMP...

Page 29: ...ting SYSTEM SETUP screens and REMOTE SETUP screens as well as the screens within those operations are all fixed to stay on 60 seconds If no command is entered they will turn off after 60 seconds BEEP When you have sent a command pushed a button the remote control will beep once You can choose the sound of the beep from three different possibilities here by pushing the appropriate button 1 2 3 You ...

Page 30: ...h the numbered digital input buttons with the numbered digital jacks used by your digital components SPEAKER SETTING See p 32 33 Use to specify the type and number of speakers you connected CHANNEL DELAY See p 34 You must add distance settings to all your speakers for the most realistic surround sound Adding a slight delay to some speakers enhances sound separation and is particularly important fo...

Page 31: ... will get the function and the old one will automatically turn to OFF This is because one function cannot be assigned twice If a digital jack has nothing connected to it set the corresponding button to OFF 4 Repeat step 2 3 until all the digital in buttons correspond to the components you connected 5 If you hooked up a component to the AC 3 RF channel use steps 2 3 to assign a function to it 6 Pre...

Page 32: ...nd ing on whether or not you hooked them up Also choose large or small and one or two Depending on your choices the sound will be routed differently For more information see below FRONT default setting is LARGE Select small to send bass frequencies to the subwoofer Select large if your speakers will reproduce bass frequencies effectively or if you did not connect a subwoofer If you select small fo...

Page 33: ...iagram will appear empty as shown on the left If the FRONT speakers or the SURROUND speakers are set to SMALL the SURROUND BACK speakers will automatically be set to SMALL If you choose THX in step 2 then the SURROUND BACK speakers can only be set to small or off SUBWOOFER default setting is YES Leave it selected if you connected a subwoofer If you did not connect a subwoofer deselect it In this c...

Page 34: ... TV Channel Delay 2 0m 2 0m 2 0m 2 0m 2 0m 2 0m 2 0m 2 0m Front L Center Front Surround SurrBack SurrBack Surround Subwoofer L R R L R L Next proceed to CHANNEL LEVEL below If you want to change a setting before proceeding Start over from step one You can use the 5 buttons at the bottom of the remote control instead of the buttons CHANNEL DELAY Adding a slight delay to some speakers is necessary t...

Page 35: ...you touch one of the speaker but tons by accident the TEST TONE will automati cally sound from each speaker If your subwoofer has a volume control set it to the middle position before doing these operations A test tone will be output from the SURROUND BACK speakers but your external amplifier must be turned up at least a little in order to hear it Be careful that it is not turned up too much be ca...

Page 36: ...weighted slow model You can use the 5 buttons at the bottom of the remote control instead of the buttons 4 When all the speaker levels have been set select SETUP OK to return to the SYSTEM SETUP MENU The display on the amplifier will say RESUME and the MASTER VOLUME will return to its original position dB STEREO SIGNAL SELECT ANALOG SP A AUTO VOLUME Next proceed to CROSSOVER NETWORK below Note tha...

Page 37: ...r 150 Hz The default setting is 80Hz 80 Hz Sends bass frequencies below 80 Hz to the subwoofer or LARGE speakers 100 Hz Sends bass frequencies below 100 Hz to the subwoofer or LARGE speakers 150 Hz Sends bass frequencies below 150 Hz to the subwoofer or LARGE speakers As noted on the LCD screen the THX setting is 80 Select this setting if you have THX approved SMALL speakers Experiment with the di...

Page 38: ... A AUTO VOLUME dB STEREO SIGNAL SELECT ANALOG SP A AUTO VOLUME 5 Press the SETUP OK button You may need to experiment with different Dolby Digital sources before you can get the BASS PEAK LEVEL set correctly If you want to change a setting before proceeding Start over from step one BASS PEAK LEVEL MANAGER The LFE Low Frequency Effect channel in Dolby Digital DTS or MPEG program sources can produce...

Page 39: ...ault setting is OFF 3 Press the SETUP OK button Hold the remote control pointed towards the amplifier until you see the RECEIVED display on the amplifier If ERROR flashes in the display perform the setup operations from the first step again dB SIGNAL SELECT ANALOG SP A VOLUME This information will be displayed on your TV Dynamic Range Control Select Mode MID For Dolby Digital If you want to change...

Page 40: ...T button press the STANDBY ON button on the front panel 3 You will see DUAL in the display for about five seconds During this time use the STEREO DIRECT button to cycle through the different DUAL MONO settings to find the one you want The different settings are DUAL ch1 where you only hear channel 1 DUAL ch2 where you only hear channel 2 and DUAL ch1 ch2 where you hear both channels but independen...

Page 41: ...he receiver will automatically go into MPEG audio For more detailed information see p 74 You will only be able to access the second two modes if you have hooked up SURROUND BACK speakers For more detailed information see p 18 20 32 33 The display will show you what kind of source Dolby Digital DTS etc is being played STANDARD Use this mode with sources that do not have SURROUND BACK channels If yo...

Page 42: ...arily for music and adds a spacious feeling to the sound A long delay time of reflected sounds provides resonant tones which emulate a concert hall DRAMA This mode is designed for movies with a lot of dialog The elements of dialog are enhanced making the characters seem more real The mode also compresses the dynamic range somewhat so loud sounds do not overpower softer ones compare this with the M...

Page 43: ... powerful orchestral performances HALL 2 Simulates the acoustic environment of a very resonant concert hall Rich reverberation and a full sound create the impression of a lively performance space JAZZ Simulates the acoustic effects of a jazz club Reflected sound is virtually below 100 msec so that the listener can enjoy a live band effect DANCE Simulates the acoustic effects of a dance club Featur...

Page 44: ...tched on the above two modes will appear as 5 D THEATER and 5CH STEREO The effects of ADVANCED THEATER mode can be adjusted in the range of 10 to 90 by pressing EFFECT The default setting is 70 Also the effect level can be set in each ADVANCED THEATER mode by pressing the EFFECT button The amount of effect of each DSP mode can be adjusted in the range of 10 to 90 the default setting value is 70 by...

Page 45: ...DVD 8 Adjust the volume by using the MASTER VOLUME buttons on the remote control or the MASTER VOLUME on the front panel Return to the AMPLIFIER screens by pressing to AMP button and SUB if needed to make other sound adjustments like bass treble loudness etc memo Basic Playback 4 VOL ENTER AMP DVD LD TV SAT VCR1 VCR2 REMOTE SETUP MD TAPE1 CD LINE TUNER TV CONTROL FUNCTION TV CONTROL MUTING MASTER ...

Page 46: ...he proper signal will be selected See Switching ANALOG DIGITAL Signal Input on p 47 7 Start playback of the component you selected in step 1 8 Adjust the volume by using the MASTER VOLUME buttons on the remote control or the MASTER VOLUME on the front panel Return to the AMPLIFIER screens by pressing to AMP button and SUB if needed to make other sound adjustments like bass treble loudness etc If y...

Page 47: ...SIGNAL SELECT chooses the signal based on availability in the following order AC 3 RF DIGITAL ANALOG If all the DIGITAL INPUT SELECT see p 31 choices are set to OFF the SIGNAL SELECT will default to ANALOG Because the audio from a karaoke microphone and LDs recorded with analog audio only is not output from the digital output set SIGNAL SELECT to ANALOG to listen to these formats This amplifier ca...

Page 48: ...L SELECT SP A DIGITAL AUTO VOLUME Basic Playback memo J 1 1 Amplifier MAIN SUB DSP STEREO THX ADVANCED THEATER EFFECT STANDARD MIDNIGHT LOUDNESS MULTI CH IN SIGNAL SELECT DIGITAL NR dts MPEG 1 Press the DIGITAL NR button on the remote control s Receiver MAIN screen or on the front panel Each press switches DIGITAL NR on or off dB STEREO SIGNAL SELECT SP A DIGITAL VOLUME dB STEREO SIGNAL SELECT SP ...

Page 49: ...he tone control can be adjusted in a range of 6 dB The tone control cannot be adjusted in THX MULTI CH IN If the amplifier is in DIRECT mode and you press the TONE button TONE BYPASS will appear in the display letting you know that you can t change the tone in DIERCT mode Another press cancels DIRECT mode LOUDNESS CH SELECT TONE SPEAKER A B Amplifier MAIN SUB TREBLE SYSTEM SETUP CH LEVEL INPUT ATT...

Page 50: ...T Use the ADJUST setting when you want to be able to control each channel level individually BYPASS This setting is good for getting the cleanest possible signal In this setting you won t be able to change each channel individually We recommend using BYPASS and the default setting is BYPASS MULTI CH INPUT STANDBY ON dB STEREO SIGNAL SELECT SP A DIGITAL AUTO VOLUME memo 96 kHz 24 bit Performance Th...

Page 51: ...layback Direct Playback Use the STEREO button on the remote control or the STEREO DIRECT button on the front panel to alternate between STEREO and DIRECT mode The DIRECT mode will give you the most accurate reproduction of two channel stereo sources but won t let you add any effects to the sound dB STEREO SIGNAL SELECT ANALOG SP A VOLUME None of the tone controls or other sound modes can be used w...

Page 52: ... of Other Components Setting Up the Remote Control to Control Other Components In addition to controlling the amplifier the supplied remote control can operate your other components VCR TV LD CD etc after you program it to do so In this way instead of fumbling with many different controls and buttons you only need to use one remote control If your component s are listed in the remote control s mem...

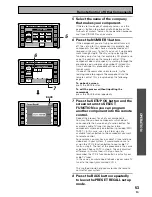
Page 53: ...for all of your components You may find you have components which do not correspond to the name on any function button for example a cable TV tuner or you have two components where only one button is provided MD TAPE 1 In this case use step 3 to assign any available function button to the component you want to remote control For example you may have a cable TV tuner and one video deck in your syst...

Page 54: ...he remote control screen For example choose the 3 play button to program this remote control to play your DVD player The TV POWER TV FUNC TV CH and VOL buttons are only available for learning when programming TV CONTROL operations Pressing BACK cancels the process You can also program the 5 2 3 and ENTER cursor buttons with the LEARNING mode Remote Control of Other Components ENTER VCR1 VCR2 STAND...

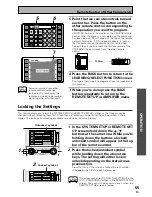
Page 55: ...K will appear at the top of the remote control LCD display If NG no good appears it means that for some reason the command was not learned Repeat steps 4 and 5 to teach the remote control of the VSA E08 all the commands from the other remote control 6 Press the BACK button to return to the LEARNING SELECT FUNCTION screen Start again from step 3 to program all your components in this manner 7 When ...

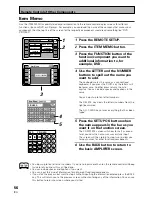
Page 56: ...nt it on the function screen The COMPLETE screen will show for half a second to let you kow the name was successfully input The screen will then return to step two to allow you to input names for other functions components 6 Use the BACK button to return to the basic AMPLIFIER screen AMP DVD LD TV SAT VCR1 VCR2 REMOTE SETUP MD TAPE1 CD LINE TUNER TV CONTROL KEY RENAME ITEM MEMO Remote Setup LCD CO...

Page 57: ... previous name after you ve input a new one press either the ALL CLEAR or DELETE buttons 6 Press the SETUP OK button when the name appears in the bar as you want it on the function screen The COMPLETE screen will show for half a second to let you know the name was successfully input The screen will then return to step four to allow you to input names for other functions components 7 Use the BACK b...

Page 58: ...P Use to set the DVD player mode available on some DVD players TOP MENU Press to call up the menu programed on the DVD MENU Use to display or close the title menu screen 5 2 3 ENTER 5 2 3 Use to navigate through options on menu screens and to change settings ENTER Use to implement settings selected with the cursor buttons or to set items highlighted in a menu 1 Press to switch the LD player on or ...

Page 59: ...the beginning of the next track Press repeatedly to advance to the beginning of following tracks 3 1 1 Hold down for fast reverse playback Hold down for fast forward playback 4 DISC Use to switch between discs with file type disc players 5 7 Press to stop playback 6 3 Press to start playback 7 8 Press to pause playback 8 Number buttons Use to select tracks 9 C Use to clear tracks or programmed sel...

Page 60: ...ning of previous tracks Press to advance to the beginning of the next track Press repeatedly to advance to the beginning of following tracks 3 1 1 Hold down for fast reverse playback Hold down for fast forward playback 4 REC Press to start recording may put some decks in REC PAUSE mode 5 7 Press to stop playback or recording 6 3 Press to start playback 7 8 Press to pause playback or recording 8 Nu...

Page 61: ... Press to control the volume of the TV 6 CH Use these buttons to change the channel of the TV 7 Number buttons Use to select a specific TV channel 8 SUB CH Use these buttons to change the sub channel of the TV 9 L1 L2 A freely assignable key where you can enter any command you like refer to p 54 55 for more on this 0 TV FUNCTION Press TV FUNCTION to select the TV s input 5 2 3 ENTER 5 2 3 Use to s...

Page 62: ...l models require this step memo STB CATV 1 2 4 7 8 9 5 6 3 CH ENTER GUIDE MUTE MENU 0 PAGE PAGE L1 L2 L3 L4 7 6 5 1 2 4 3 STB satellite tuner operations The following operations are available from the amplifier s remote control after you program your satellite tuner into it but some operations may need to be learned separately by the amplifier see Setting Up the Remote Control to Control Other Com...

Page 63: ...equency 7 L1 Use to program selections not possible with all models 8 DIRECT ACCESS Allows you to input a frequency directly 9 CLASS Use to select the class A B or C that a preset station is in 0 DISP MODE Use this to switch between display modes RF ATT Press to turn the RF attenuator on when receiving strong FM signals nearby stations to reduce sound distortion Tuner operations The following oper...

Page 64: ...t possible with all models especially those without a standby mode 2 1 Press to rewind the tape 3 7 Press to stop playback or recording 4 2 Press to start reverse playback for auto reverse decks 5 3 Press to start playback of the side of the cassette which has been loaded as the front 6 Press to fast forward the tape 7 8 Press to pause playback or recording 1 Press to switch the cassette deck on o...

Page 65: ... with remote control screens to deal with a variety of cutting edge technologies and components that may or may not have appeared on the market yet These include CD R CD write once discs deck CD RW CD rewritable discs deck and the latest innovation DVD video recorder If you have one of these components you can access the preset screen by going to the preset recall section of this manual p 52 55 an...

Page 66: ...2 MONITOR to switch between the sound of the recording TAPE 2 indicator on and the sound of the source component TAPE 2 indicator off Using Other Functions Recording from Video Components The following operations show you how to record audio and video to the video tape recorder connected to the VCR 1 DVR or VCR 2 jacks Note that all signals coming out of these jacks will be analog and it is not po...

Page 67: ...lay on the amplifier will show that input for about 5 seconds and then revert to showing the sound mode the amplifier is in The VIDEO SELECT remains set to the input you chose until you change the audio input If you change audio functions the amplifier will reset itself to make the video and audio inputs correspond Also if you switch the power of the amplifier OFF when you turn it back on the vide...

Page 68: ...process To go back to the REMOTE SETUP screen Press the BACK button 4 Next you should select the command number you want the process to start with Of course it s logical to start with 1 so press command 1 the box the 1 with inside it This tells the amplifier this will be the first command To erase a command Press the command button you want to erase and press the CLEAR button To go back one step P...

Page 69: ...e multi operation set up mode You don t need to program power on for PIONEER components except for the first generation of Pio neer DVRs they will go on automatically if a command for that unit is entered in the MULTI OPERATIONS settings Also your TV will go on automatically if a TV related command is entered in the MULTI OPERATIONS Performing multi operations Do the following to use the MULTI OPE...

Page 70: ...ress the BACK button 4 Next you should select the command number you want the process to start with Of course it s logical to start with 1 so press command 1 button the box the 1 with inside it This tells the amplifier this will be the first command The number will become shaded To go back one step Press the BACK button To go back to the REMOTE SETUP screen Press the BACK button repeatedly 5 Selec...

Page 71: ...formation 9 Press the BACK button repeatedly to leave the multi operation set up mode Using SYSTEM OFF Do the following to use the SYSTEM OFF function 1 Press the SYSTEM OFF button The remote control must be on to be able to use this command but it can be in any mode All the components programmed into the SYSYTEM OFF mode will stop and or go off The amplifier will go off as well 1 ENTER VCR2 TV CO...

Page 72: ...FF by pressing on the ON OFF button A triangular arrow points from the ON OFF button towards a small nub next to the function names DVD LD CD etc that can be turned ON OFF This nub will disappear if that DIRECT FUNCTION is turned OFF Subsequently the nub will not appear on any remote control screen if the DIRECT FUNCTION is OFF 4 To leave the Direct Function mode press the BACK button The default ...

Page 73: ...s on laser discs record signals using the space of one analog audio channel so it will maintain compatibility with existing discs and players As shown in the following figure the digital audio sounds of Dolby Digital discs can be played back as currently done Analog sounds are played back by using the other channel without the Dolby Digital signals for monaural audio signals Comparison with Dolby ...

Page 74: ...Timbre Matching When recording a sound track it is very important that the surround sounds move smoothly and seamlessly around the theater It is very distracting when sounds seem to jump from speaker to speaker Timbre Matching helps to smooth the movement of the surround sounds even though you are using only two speakers Bass Peak Level Manager Some Dolby Digital sound tracks can produce bass peak...

Page 75: ... selected Subwoofer output is very low When playing an LD the SIGNAL SELECT is on AC 3 RF but there is still no sound When playing a Dolby Digital DTS MPEG source the 5 1 Channel indicator doesn t light You can t get DIGITAL to come up when using the SIGNAL SELECT button When using THX AUTO mode the receiver is not playing in the EX mode The Dolby Digital DTS MPEG indicator doesn t light up even w...

Page 76: ...put settings correctly see p 31 Make digital connections see p 13 and set SIGNAL SELECT to AUTO see p 47 Refer to the instruction manual supplied with the DVD player Set the digital volume level of the player to full or to the neutral position Turn the speakers ON Use the STANDARD mode to get the best results see memo p 41 44 This is not a malfunction but be sure to turn the volume down to prevent...

Page 77: ...re applicable when the power supply is 230V Input Sensitivity Impedance PHONO MM 4 7 mV 47 kΩ VCR 1 DVR VCR 2 DVD LD TV SAT VIDEO CD LINE TUNER MD TAPE 1 CD R TAPE 2 335 mV 47 kΩ Phono Overload Level THD 0 1 1 kHz PHONO MM 120 mV Frequency Response PHONO MM 20 Hz to 20 000 Hz 0 3 dB VCR 1 DVR VCR 2 DVD LD TV SAT VIDEO CD LINE TUNER MD TAPE 1 CD R TAPE 2 5 Hz to 100 000 Hz dB Output Level Impedance...

Page 78: ...anada PIONEER EUROPE NV Haven 1087 Keetberglaan 1 B 9120 Melsele Belgium TEL 03 570 05 11 PIONEER ELECTRONICS AUSTRALIA PTY LTD 178 184 Boundary Road Braeside Victoria 3195 Australia TEL 03 9586 6300 PIONEER ELECTRONICS DE MEXICO S A DE C V San Lorenzo 1009 3er Piso Desp 302 Col Del Valle Mexico D F C P 03100 TEL 5 688 52 90 00K00ZF0L00 Printed in Japan Published by Pioneer Corporation Copyright 2...

Reviews: