Connecting up
03
18
En
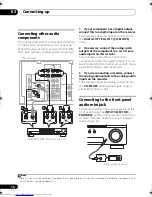
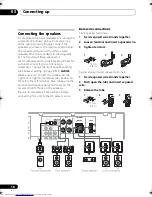
Connecting the speakers
A com
p
lete setu
p
of six s
p
eake
r
s (including the
subwoofe
r
) is shown below, but eve
r
yone’s
home setu
p
will va
r
y. Sim
p
ly connect the
s
p
eake
r
s you have in the manne
r
shown below.
The
r
eceive
r
will wo
r
k with just two ste
r
eo
s
p
eake
r
s (the f
r
ont s
p
eake
r
s in the diag
r
am)
but using at least th
r
ee s
p
eake
r
s is
r
ecommended, and a com
p
lete setu
p
is best fo
r
su
rr
ound sound. If you’
r
e not using a
subwoofe
r
, change the f
r
ont s
p
eake
r
setting
(see
Speaker setting
on
p
age 35) to
LARGE
.
Make su
r
e you connect the s
p
eake
r
on the
r
ight to the
r
ight te
r
minal and the s
p
eake
r
on
the left to the left te
r
minal. Also make su
r
e the
p
ositive and negative (
+
/
–
) te
r
minals on the
r
eceive
r
match those on the s
p
eake
r
s.
Be sure to complete all connections before
connecting this unit to the AC power source.
Bare wire connections
Front speaker terminals:
1
Twist exposed wire strands together.
2
Loosen terminal and insert exposed wire.
3
Tighten terminal.
Center and surround speaker terminals:
1
Twist exposed wire strands together.
2
Push open the tabs and insert exposed
wire.
3
Release the tabs.
1
2
3
10 mm
(3/8 in.)
1
2
10 mm
(3/8 in.)
3
AUDIO
ANTENNA
FM
L
R
Class 2 Wiring
SPEAKERS
A
OUT
Y
P
B
P
R
FRONT
ZONE2 OUT
MONITOR OUT BD/DVD IN TV/SAT IN
R
L
SURROUND
CENTER
SUBWOOFER
PRE OUT
L
R
T
OUT
IN
DVR/VCR
VIDEO
L
R
IN
IN
R
L
SPEAKERS
A
SURROUND
CENTER
R
L
FRONT
R
L
SUBWOOFER
PRE OUT
VSX_519V_KU.book Page 18 Wednesday, December 24, 2008 4:38 PM

