background image

Operating Instructions

AUDIO/VIDEO

MULTI-CHANNEL RECEIVER

VSX-909RDS

VSX-909RDS-G

Summary of Contents for VSX-909RDS

Page 1: ...Operating Instructions AUDIO VIDEO MULTI CHANNEL RECEIVER VSX 909RDS VSX 909RDS G ...

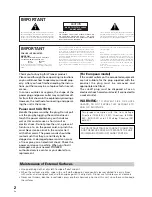
Page 2: ... since these will corrode the surfaces RISK OF ELECTRIC SHOCK DO NOT OPEN CAUTION IMPORTANT CAUTION TO PREVENT THE RISK OF ELECTRIC SHOCK DO NOT REMOVE COVER OR BACK NO USER SERVICEABLE PARTS INSIDE REFER SERVICING TO QUALIFIED SERVICE PERSONNEL The exclamation point within an equilateral triangle is intended to alert the user to the presence of important operating and maintenance servicing instru...

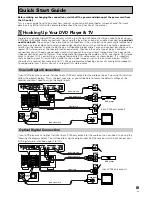
Page 3: ... regular composite RCA video cords as shown below It is important that you hook up your TV or monitor in order to see a video image as well as the on screen displays OSDs shown by this receiver for more on p 16 17 We also recommend hooking up your all your digital components to analog audio jacks For this you can use regular RCA stereo cords Coaxial Digital Connection If your DVD player has a coax...

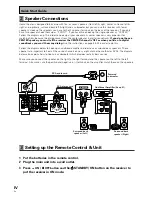
Page 4: ...e the instructions on page 33 34 in order to do this Follow the diagram below to hook up an additional amplifier in order to use surround back speakers These speakers are important to hear all the sound channels on new eight channel home theater DVDs The diagram below also explains how to hook up a subwoofer which provides realistic bass sounds Make sure you connect the speaker on the right to the...

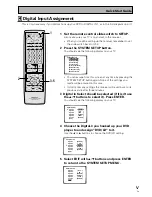
Page 5: ...R You should see the following display on your TV Digital In Select Digital 1 Digital 2 Digital 3 Digital 4 Digital 5 AC 3 RF EXIT L DVD LD CD MD TV SAT VCR1 DVD LD 4 Choose the Digital 3 you hooked up your DVD player to and assign DVD LD to it Use the 2 or 3 buttons to choose the DVD LD setting 5 Select EXIT with 5 buttons and press ENTER to return to the SYSTEM SETUP MENU AV PRE PROGRAMMED AND L...

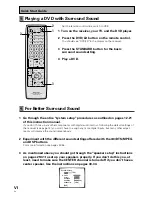
Page 6: ...ter speaker Use the instructions on pages 30 34 Speaker Setting FREE THX LARGE LARGE LARGE LARGEx2 YES Front L Center Surround SurrBack Subwoofer EXIT 5 5 5 5 5 Playing a DVD with Surround Sound AV PRE PROGRAMMED AND LEARNING REMOTE CONTROL UNIT 1 2 3 2 DTS MPEG S0URCE DVD LD TV SAT VCR1 VCR2 CD TV VOL TV FUNC MENU ENTER STEREO DIRECT DSP THX LIGHT MUTE TV VOLUME MD TAPE1 TUNER TVCONT RECEIVER USE...

Page 7: ...ning in Midnight Mode 50 Using the Loudness Mode 50 Adjusting Bass and Treble 51 MULTI CHANNEL IN Playback 52 96kHz 24bit Performance 52 Direct Playback 53 Adjusting the Brightness of the Display 53 DUAL MONO Setting 54 Using the Tuner 55 Automatic and Manual Tuning 55 MPX mode 55 RF ATT mode 55 Direct Access Tuning 56 Memorizing Frequently Used Stations 57 Recalling Memorized Stations 58 Using th...

Page 8: ...s which employ special processing to allow you to enjoy movie soundtracks with the same level of power and realism you experience in well designed movie theaters The THX SURROUND EX mode has been especially designed to incorporate surround back channels that some new source material uses This receiver has the ability to decode Dolby Digital Dolby Pro Logic MPEG and DTS Digital Theater Systems sour...

Page 9: ...ons in Remote Control of Other Components p 65 is highly recommended so you can use this unit s remote control for all your components Using Other Functions p 76 explain the other possibilities of the receiver Techno Tidbits Problem solving p 85 provide detailed technical information and a troubleshooting guide The following marks and symbols are used throughout the manual Provides additional info...

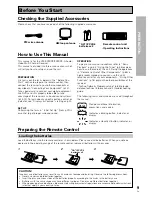
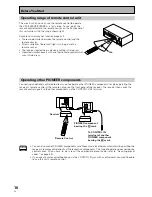
Page 10: ...he Î mark Remote Control To CONTROL IN terminal of another PIONEER component bearing the Î mark Receiver You can also control PIONEER components and those made by other manufacturers by pointing the receiver s remote control directly at the respective components This type of operation does not require control cords All you have to do is recall the appropriate preset code refer to Recalling preset ...

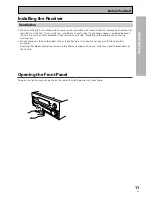
Page 11: ...ovided between the unit and walls or other equipment heat will build up inside interfering with performance or causing malfunctions Do not place on a thick carpet bed sofa or fabric having a thick pile Do not cover with fabric or other covering Anything that blocks ventilation will cause the internal temperature to rise which may lead to breakdown or fire hazard Opening the Front Panel To open the...

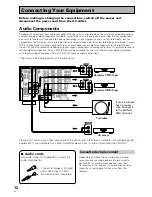
Page 12: ...puts see p 13 We also recommend hooking up your digital components to analog audio jacks If you want to record to from digital components like an MD to from analog components you must hook up your digital equipment with these analog connections See p 13 14 for more on digital connections The arrows indicate the direction of the audio signal If your turntable has a ground wire connect it to the SIG...

Page 13: ...connect this to the optical input on a digital recorder currently these include MD DAT and CD R you can make direct digital recordings with this unit Before making or changing the connections switch off the power and disconnect the power cord from the AC outlet The arrows indicate the direction of the audio signal CD IN SURR OUND SUB WOOFER CENTER FRONT MULTI CH IN SURR OUND R L R L R L R L R L Si...

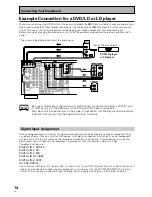
Page 14: ...nect the power cord from the AC outlet The arrows indicate the direction of the audio signal Be sure to make either a digital coaxial or digital optical connection pictured as DIGITAL jack 1 or DIGITAL jack 3 in this diagram as well but you DON T need to make both Also be sure to assign the jacks to the proper component s with the Digital In Select procedure see p 32 if necessary See the explanati...

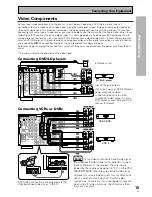
Page 15: ... Components Connect your video components to the jacks as shown below Regarding a DVD there are two types of connections to make Hook up your video signal with either component video S video or composite video cords the quality descends in this order but remember the video component you are watching and your TV must be hooked up with same type of video cord or you won t be able to see the picture ...

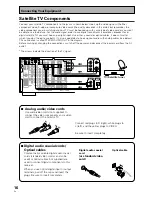
Page 16: ...al audio coaxial cords standard video cords can also be used or optical cables not supplied are used to connect digital components to this receiver When you use optical digital input or output terminals pull off the caps and insert the plugs Be sure to insert completely Digital audio coaxial cord or standard video cord Optical cable L R VIDEO Satellite TV Components Connect your satellite TV compo...

Page 17: ... 3 IN 2 IN 1 IN PHONO FM UNBAL 75 FM ANTENNA AM LOOP ANTENNA OUT OUT 2 1 SUB WOOFER Components equipped with 7 1 5 1 channel analog output jack SUB WOOFER SURR OUND BACK L R CENTER SURR OUND L R FRONT L R ANALOG Connecting Your Equipment TV Connect your TV to the jacks as shown below Hook up the signal with either component video S video or composite video cords the quality descends in this order ...

Page 18: ...LAY REC TAPE2 MONITOR PLAY REC PCM 2 DTS MPEG DIGITAL IN 5 IN 4 IN 3 2 RF IN AC 3 IN 2 IN 1 IN PHONO FM UNBAL 75 FM ANTENNA AM LOOP ANTENNA OUT OUT 2 1 SUB WOOFER FM wire antenna AM loop antenna 7 AM loop antenna 1 Assemble the antenna 2 Twist exposed wire strands together and insert 3 Attach to a wall etc if desired and face toward the direction providing the best reception Using external antenna...

Page 19: ...ers add even greater realism in movie sound effects and new discs with soundtracks in Dolby Digital or DTS incorporates these channels In order to be able to use these channels you must hook your SURROUND BACK speakers up to an external amplifier and then connect that to the VSX 909RDS 909RDS G as shown in the diagram below If you only have one SURROUND BACK speaker hook it up to the SURROUND BACK...

Page 20: ... Be sure to consult your speaker manuals for the best placement of the speakers Some speakers are designed to be floor standing but others benefit greatly from speakers stands which raise them off the floor memo Surround Left Surround Back Left Surround Right Surround Back Right Listening Position Front Left Front Right Center Sub Woofer Connecting Your Equipment Speaker impedance You can change t...

Page 21: ...itional amplifiers to every channel of your system Make the connections shown below to add amplifiers to power your speakers Before making or changing the connections switch off the power and disconnect the power cord from the AC outlet You can use the additional amplifier on the surround back channels for a single speaker as well In this case plug the amplifier into the L SINGLE terminal only We ...

Page 22: ...you selected ANALOG Lights when analog signals are assigned DIGITAL Lights when digital audio signals are selected AC 3 RF Lights when AC 3 RF signals are assigned AUTO Lights when the receiver is set to select the input signal automatically 2 Program Format indicators AC 3 Lights when a source with Dolby Digital signals is played DTS Lights when a source with DTS audio signals is played MPEG Ligh...

Page 23: ... is set to receive FM broadcasts and when selected MPX mode STEREO Lights when a FM stereo broadcast is received in the auto stereo mode TUNED Lights when a broadcast is received AM FM Light to indicate the current band FM or AM EON Lights when an RDS stations transmitting the EON data service is being received RF ATT Lights when the RF attenuator is on RDS Lights when RDS broadcast is being recei...

Page 24: ... functions 4 Component Control buttons Use to control specific components like a CD player or DVD player after you have programmed the remote control to do these operations see pages 65 68 and the remote is put in that operation mode 5 Number buttons These buttons can perform a variety of different functions depending on the remote operation mode They are most useful for CD and tuner operations 6 ...

Page 25: ...on or off 10 LIGHT button Press to light the remote control buttons 7 MASTER VOLUME buttons Use to raise or lower the volume of the receiver 8 INPUT ATT button when USE mode is selected Use to lower the input level of an analog signal that is too powerful thus causing the sound to distort the OVERLOAD indicator will light REMOTE SETUP button when SETUP mode is selected Use to customize the remote ...

Page 26: ...l level for the most accurate reproduc tion of a program source 2 DTS MPEG buttons See p 42 46 85 86 THX CINEMA Cycles through the THX CINEMA THX SURROUND EX or THX AUTO sound modes If you have THX certified speaker setup or want to re create a THX style sound environment It is also appropriate for Dolby Digital Dolby Pro Logic DTS or MPEG sources Those with surround back speakers can use all thre...

Page 27: ...o select the EON mode in the FM mode see Setting EON on page 64 The indicator lights when the EON mode is selected 9 FL DIMMER button See p 53 Use to adjust the brightness of the main display 10 INPUT SELECTOR dial Turn to select a source component DVD LD DVD player or Laser Disc player TV SAT TV or satellite tuner CD Compact Disc player MD TAPE1 CD R Tape deck Mini Disc recorder or CD recorder co...

Page 28: ...n does not affect AM reception BAND button Press to select the AM or FM band TUNING button Use to manually tune to radio stations CHARACTER SEARCH button Press to select the character input mode or initiate an RDS PTY search see Memorizing a broadcast station name on p 59 and Searching for a program by program type PTY on p 63 MEMORY button Press to start the memori zation of a preset station STAT...

Page 29: ...ll not allow you to use the on screen display of this unit To avoid this you simply need to keep the following rules 1 Always use the same type of video cords to hook up your video components to the receiver as you use to hook up the receiver to your TV For example if you use composite video cords to hook up your DVD player to the receiver use composite video cords to hook up the receiver to your ...

Page 30: ...eiver will revert back to its previous state after three minutes 3 Press the 5 or arrow buttons to move the hand to the mode you want Then press the ENTER button In each mode the current settings are displayed automatically We suggest you adjust all these settings when you first hook up the receiver That gets them out of the way and you won t need to return to this setting mode unless you change y...

Page 31: ... lets you hook up a multi channel external decoder that may give a higher quality when decoding discs 4 Go on to the next page to continue set up If you don t want to make any settings go can exit this setup To exit the SYSTEM SETUP MENU and on screen display press SYSTEM SETUP button again After you complete one of the SYSTEM SETUP menus and return to the basic SYSTEM SETUP screen the receiver au...

Page 32: ...member if you have a DVD LD player or LD player you should hook it up to the analog and digital jacks in addition to the 2 RF connection described here Digital In Select In order to be able to use your digital equipment properly you need to assign digital inputs for each of the digital components you connected Match the Digital 1 5 settings with the digital jacks 1 5 in accordance with what is con...

Page 33: ...the hand to LARGE or LARGE X2 SMALL or SMALL X2 or NO you can t select NO for the FRONT speakers For the subwoofer you can select YES NO or PLUS See below for a detailed explanation of every speaker choice 2 Press 3 Repeat 1 and 2 for each speaker Depending on your choices the sound will be routed differently as explained here FRONT default setting is LARGE Select SMALL to send bass frequencies to...

Page 34: ...ose one speaker two or none If the FRONT speakers or the SURROUND speakers are set to SMALL the SURROUND BACK speakers will automatical ly be set to SMALL If you chose THX in step 2 then the SURROUND BACK speakers can only be set to SMALL or NO Select LARGE if your speakers will reproduce bass frequen cies effectively Select SMALL to send bass frequencies to the other speakers or subwoofer If you ...

Page 35: ...roceeding simply use the arrow buttons to go back Channel Delay Adding a slight delay to some speakers is necessary to achieve a surround sound effect You need to figure out the distance from your listening position to your speakers to add the proper delay The following steps show you how to set the delay time for each channel by specifying the distances from your listening position to each speake...

Page 36: ... with the button press ENTER button Test tone will be output These settings will be displayed on your TV 0 0dB 0 0dB 0 0dB 0 0dB 0 0dB 0 0dB 0 0dB 0 0dB Channel Level Front L Center Front Surround Surr Back Surr Back Surround Subwoofer L R R R L L Test Tone AUTO Setting OK It takes a moment for the machine to set itself MASTER VOLUME rotates to the reference position 0dB and the test tone is outpu...

Page 37: ...TUP MENU Next proceed to CROSSOVER NETWORK on the next page If you want to change a setting before proceeding simply use the arrow buttons to go back memo AV PRE PROGRAMMED AND LEARNING REMOTE CONTROL UNIT 4 6 DTS MPEG S0URCE DVD LD TV SAT VCR1 VCR2 CD TV VOL TV FUNC MENU ENTER STEREO DIRECT DSP THX LIGHT MUTE TV VOLUME MD TAPE1 TUNER TVCONT RECEIVER USE SETUP MULTI OPERATION CLASS MPX DIRECT ACCE...

Page 38: ...resent function lets you determine which frequencies will be sent to the subwoofer or LARGE speakers 1 Use the 2 or 3 button to select 80 Hz 100 Hz or 150 Hz 2 Press the button 80Hz Sends bass frequencies below 80 Hz to the subwoofer or LARGE speakers 100 Hz Sends bass frequencies below 100 Hz to the subwoofer or LARGE speakers 150 Hz Sends bass frequencies below 150 Hz to the subwoofer or LARGE s...

Page 39: ... ENTER button 3 Select EXIT and press the ENTER button to return to the SYSTEM SETUP MENU This completes the speaker setup Bass Peak Level The LFE Low Frequency Effect channel in Dolby Digital DTS or MPEG program sources can produce heavy ultra low bass tones that may exceed the capabilities of your speaker system The following steps show you how to set a maximum output level for the LFE channel I...

Page 40: ...low volumes It does this by compressing the dynamic range Dynamic range is the difference between the loudest and the softest sounds in any given signal Compressing the range plays sounds so the quieter ones are audible and the louder ones don t get distorted or become overpowering This feature only applies to Dolby Digital sources but the MIDNIGHT LISTENING mode accomplishes the same end for a va...

Page 41: ...lly We recommend using BYPASS and the default setting is BYPASS 3 Use the 5 buttons to select EXIT Press the ENTER button You wil return to the SYTEM SETUP mode Multi Channel In Setting Using the Main Unit You can also use the main unit to change the sound level of the MULTI CH IN Folow the step below 1 Put receiver in the STANDBY mode 2 While holding down the MULTI CH INPUT button press the STAND...

Page 42: ...tion see p 85 86 You will only be able to access the second two modes if you have hooked up SURROUND BACK speaker s For more detailed information see p 19 33 34 The display will show you what kind of source Dolby Digital DTS etc is being played STANDARD Use this mode with sources that do not have SURROUND BACK channels If you don t have SURROUND BACK speaker s switched on see p 33 34 this is the o...

Page 43: ...lly when the source you are playing is encoded with DTS Dolby Digital or MPEG There are four Advanced Theater settings that use DSP Digital Signal Processing to create different types of sound environments If you have SURROUND BACK speakers or even just one speaker switched on see p 33 34 then 7 1 will appear after the name of all of these modes in the display on the receiver The display will show...

Page 44: ...ec for the listener to enjoy the visceral power of dance music THEATER 1 Reproduces theater sound field effects without losing the localization of each channel Theater effects can be enjoyed without losing Dolby Digital Pro Logic effects when used in combination those formats with movies bearing the DOLBY SURROUND trademark THEATER 2 Simulates the acoustic environment of a theater while maintainin...

Page 45: ...ODE _ON OFF button STEREO DIRECT STANDARD THX CINEMA ADVANCED Basic Playback 1 Put the remote control slide switch in USE 2 Select the sound mode For STANDARD Press STANDARD Each press changes the STANDARD mode as follows STANDARD STANDARD 7 1 STANDARD auto For HOME THX CINEMA Press THX THX CINEMA Each press changes the THX mode as follows THX CINEMA THX SURROUND EX THX AUTO For ADVANCED THEATER P...

Page 46: ...watching movies the STANDARD THX or ADVANCED THEATER setting should provide the best results For listening to music the STANDARD DIRECT STEREO or DSP modes should serve the listener best Make sure you connect your DVD LD or LD players using the 2 RF jack If your player has an 2 RF output this will ensure you can use all LDs Refer to p 14 memo Basic Playback Playing Sources with Dolby Digital DTS o...

Page 47: ...nd Digital Signal Input on page 48 7 Start playback of the component you selected in step 1 8 Adjust the volume by using the VOLUME buttons on the remote control or the MASTER VOLUME on the front panel If you are not able to get sound from the receiver the problem may well lie with the SIGNAL SELECT switch You need to make sure the input is set to the appropriate ANALOG or DIGITAL setting Refer to...

Page 48: ...h analog audio only is not output from the digital output set SIGNAL SELECT to ANALOG to listen to these formats This receiver can only play back Dolby Digital PCM 32kHz 44kHz 48kHz and 96kHz and DTS and MPEG digital signal formats It cannot play back digital signals other than these so for those kinds of formats you ll have to play them back in an analog manner making sure your equipment is hooke...

Page 49: ...ay not be a noticeable improvement in the quality of the sound Reducing Noise During Playback To reduce extraneous noise switch on DIGITAL NR This noise reduction can be used with every mode except THX and MULTI CH IN AV PRE PROGRAMMED AND LEARNING REMOTE CONTROL UNIT DTS MPEG S0URCE DVD LD TV SAT VCR1 VCR2 CD TV VOL TV FUNC MENU ENTER STEREO DIRECT DSP THX LIGHT MUTE TV VOLUME MD TAPE1 TUNER TVCO...

Page 50: ... It does this by bringing all the sounds in a given soundtrack closer together in volume Compare this feature with the D Range Control only for Dolby Digital sources on page 40 1 Put the remote control slide switch in USE 2 Press the MIDNIGHT button Each press switches MIDNIGHT LISTENING mode on or off The effect adjusts itself automatically in accordance with the volume level You can t use the MI...

Page 51: ...nel to cycle through the different tone adjust modes The button cycles though the possibilities in the following order TONE Front TONE Center TONE SurBack TONE Surr 3 Use the BASS or TREBLE buttons to adjust the low or high frequencies of each channel dB STEREO SIGNAL SELECT ANALOG SP A VOLUME A few seconds after you finish adjusting the tone the receiver will revert to the sound mode it was in at...

Page 52: ...f course the SIGNAL SELECT will have to set to AUTO or DIGITAL to read the DVD soundtrack When the receiver plays a 96 kHz disc 96 kHz and whatever mode you re using for example STEREO DIRECT or DNR will appear in the display dB STEREO SIGNAL SELECT SP A DIGITAL AUTO VOLUME memo When a 96 kHz 24 bit disc is played back the volume may be louder than that of a normal disc Some DVD players cannot pla...

Page 53: ...switch in USE 2 Use the STEREO DIRECT button to alternate between STEREO or DIRECT mode you can also use the STEREO DIRECT button on the front panel The DIRECT mode will give you the most accurate reproduction of two channel stereo sources but won t let you add any effects to the sound None of the tone controls or other sound modes can be used with DIRECT playback If the receiver is in a different...

Page 54: ...tton press the STANDBY ON button on the front panel 3 You will see DUAL in the display for about five seconds During this time use the STEREO DIRECT button to cycle through the different DUAL MONO settings to find the one you want The different settings are DUAL ch1 where you only hear channel 1 DUAL ch2 where you only hear channel 2 and DUAL ch1 ch2 where you hear both channels but independently ...

Page 55: ...he frequency you desire 5 Adjust the MASTER VOLUME buttons on the remote control or the MASTER VOLUME on the front panel MPX Mode If the TUNED or STEREO indicators do not light when tuning an FM station because the station is too far away or the broadcast signal is weak press MPX button on the remote control to switch to MONO reception This should improve reception enough for you to enjoy the broa...

Page 56: ...e station you want Example To tune station 106 00 FM press 1 0 6 0 0 dB STEREO SIGNAL SELECT ANALOG SP A STEREO TUNED VOLUME To cancel before inputting the frequency Press DIRECT ACCESS button and enter the frequency again 6 Adjust the MASTER VOLUME buttons on the remote control or the MASTER VOLUME on the front panel AV PRE PROGRAMMED AND LEARNING REMOTE CONTROL UNIT DTS MPEG S0URCE DVD LD TV SAT...

Page 57: ...he MEMORY button to activate the memory function dB STEREO SIGNAL SELECT ANALOG SP A STEREO TUNED VOLUME 3 Press the CLASS button repeatedly to select a class number Each press switches the display CLASS A CLASS B CLASS C 4 Press the STATION buttons repeatedly to select a channel 0 9 within the respective class dB STEREO SIGNAL SELECT ANALOG SP A STEREO TUNED VOLUME The station is memorized automa...

Page 58: ...REO TUNED VOLUME To skip through each channel in order Press STATION repeatedly Using the front panel 1 Select the TUNER function 2 Press the CLASS button repeatedly to select a class number 3 Press the STATION buttons repeatedly to select the channel you want AV PRE PROGRAMMED AND LEARNING REMOTE CONTROL UNIT DTS MPEG S0URCE DVD LD TV SAT VCR1 VCR2 CD TV VOL TV FUNC MENU ENTER STEREO DIRECT DSP T...

Page 59: ...er the broadcast station name dB STEREO SIGNAL SELECT ANALOG SP A STEREO TUNED VOLUME Refer to Character display used for station name input on p 87 6 Press MEMORY to input the first of four characters After four characters have been entered the character input mode is exited Repeat steps 2 to 4 to memorize up to 30 broadcast station names When it is set to OFF frequency being received will be dis...

Page 60: ...n search automatically by type of program So if you felt like listening to jazz you could search for a station that s broadcasting a show with the program type JAZZ There are around 30 such program types including various genres of music news sport talk shows financial information and so on The VSX 909RDS 909RDS G receiver lets you display three different kinds of RDS information Radio Text Progra...

Page 61: ...nal function will be restored The EON function will not operate however when the tuner is on AM The receiver s internal Program Identification function PI Programma Identification This is an identifying marker the tuner automatically attaches to stations stored in your preset memory classes see p 59 The marker distinguishes between stations which transmit RDS data and those that don t so that the ...

Page 62: ...Press the DISPLAY button to select a mode Each press changes the display as follows FREQ PS RT PTY In the RT mode should any noise be picked up while displaying the RT scroll some characters may temporarily be incorrectly displayed In the RT mode when no RT data is transmitted from a broadcast station NO RADIO TEXT DATA is displayed once and after that the PS data is displayed In the PTY mode ther...

Page 63: ...UME 4 Press the MEMORY button to search for the selected program type This will search the preset stations for a station broadcasting the selected program type Press the MEMORY button within 5 seconds after a program has been found If the MEMORY button is not pressed the function will begin to search for another station automatically This function searches RDS station preset in the 30ch memory If ...

Page 64: ...EON Start once again after you return to FM reception Simultaneous requests for Traffic Information TA and News programs is not possible You cannot operate the MEMORY and CHARACTER SEARCH buttons while the EON MODE indicator on the button lights Functions other than TUNER cannot be changed while the EON MODE indicator on the button blinks while receiving EON broadcast If you want to change to a so...

Page 65: ...d of fumbling with many different controls and buttons you only need to use one remote control If your component s are listed in the remote control s memory simply follow the steps below If your component s are not listed or if you want the remote to learn additional operations you can use the learning mode to input the information from the remote controls supplied with your other components Recal...

Page 66: ... ve set it up properly work through step 7 Then try using selecting the function you just set up for example a CD player and using the controls on this remote control If the component does not respond try working through the procedure again and pressing number 2 instead this time Continue this procedure until one of the commands works 7 Press the REMOTE SETUP button to exit the preset recall setup...

Page 67: ...utton Learning Setup 1Place both commanders pointing at each other 2Select the item from the Multi control buttons that should be duplicated ex DVD Multi control button starts blinking EXIT Remote Setup 4 Press the MULTI CONTROL button for the component you want to control Each button can be set to control one of the following compo nents The selected button continues to blink Learning Setup 3Pres...

Page 68: ...ional operations for the current component repeat steps 5 and 6 To program operations for another component repeat steps 4 through 6 7 Press the REMOTE SETUP button to exit the learning setup mode The remote control and TV return to their previous operation modes When you re done setting up remember to set the slide switch back to USE AV PRE PROGRAMMED AND LEARNING REMOTE CONTROL UNIT DTS MPEG S0U...

Page 69: ...NTER 5 2 3 Use to navigate through options on menu screens and to change settings ENTER Use to implement settings selected with the cursor buttons or to set items highlighted in a menu for DVD only 8 3 Press to start playback 9 8 Press to pause playback 0 4 4 Press to return to the beginning of the current chapter track Press repeatedly to return to the beginning of previous chapters tracks Press ...

Page 70: ...rder only 7 5 2 3 ENTER 5 2 3 Use to navigate through options on menu screens and to change settings ENTER Use to implement settings selected with the cursor buttons or to set items highlighted in a menu for DVD video recorder only 8 3 Press to start playback 9 8 Press to pause playback 0 CHANNEL Use to change channels on the VCR s tuner DISC TV VCR Use this button to switch the VCR between its tu...

Page 71: ...e to select channels 6 10 Use when selecting chapter track numbers higher than 10 7 3 Press to start playback 8 8 Press to pause playback 9 4 4 Press to return to the beginning of the current track Press repeatedly to return to the beginning of previous tracks Press to advance to the beginning of the next track Press repeatedly to advance to the beginning of following tracks 0 DISC Use to switch b...

Page 72: ... can also use this button when selecting track numbers higher than 10 It s especially used for track numbers 11 19 7 3 Press to start playback 8 8 Press to pause playback 9 4 4 Press to return to the beginning of the current track Press repeatedly to return to the beginning of previous tracks Press to advance to the beginning of the next track Press repeatedly to advance to the beginning of follow...

Page 73: ...tuner s or cable TV s preset code but some operations may need to be learned by the receiver see Setting Up the Remote Control to Control Other Components on pages 65 68 To perform these operations press the TV SAT button to set the remote to the SAT operation mode For more information on individual commands consult the manual that came with the component AV PRE PROGRAMMED AND LEARNING REMOTE CONT...

Page 74: ...menu screen ENTER Press to activate the selected function 5 CHANNEL Use to select a TV channel 6 DISC CH ENTER Use to select the channel specified with the number buttons not all models require this step 7 MENU Press to select the TV menu For Digital TVs 8 7 3 8 1 BLUE GREEN RED YELLOW Use to make selections from the DTV menu 9 1 1 Press to DTV mode on or off Press to select the DTV menu AV PRE PR...

Page 75: ... though with some models the functions may differ The following operations are available from the receiver s remote control after you recall a cassette deck s preset code but some operations may need to be learned by the receiver see Setting Up the Remote Control to Control Other Components on pages 65 68 To perform these operations press the MD TAPE 1 button to set the remote to the TAPE operatio...

Page 76: ...n an analog manner 1 Select the source component Set SIGNAL SELECT according to the source component s signal ANALOG or DIGITAL Press the SIGNAL SELECT button on the remote control or use the button on the front panel and choose ANALOG 2 Start recording with a recorder 3 Playback the source to be recorded Record monitor TAPE 2 MONITOR If you connect a cassette deck with a record monitor function t...

Page 77: ...ct digital recordings with this unit Of course the digital components you want to record all need to be connected to the receiver with digital inputs as well See p 13 if you have not made these connections The receiver s volume channel level tone BASS TREBLE and LOUDNESS and surround effects have no effect on the recorded signal 1 Prepare the source you want to record and put the receiver in that ...

Page 78: ...ration 1Select an item from the Multi Contorol buttons ex DVD 2Select the operation button ex DVD MENU 3First command has been learned 4You can repeat this proccess for 5 commands EXIT Remote Setup To cancel here press REMOTE SETUP 3 Select a MULTI CONTROL button for this MULTI OPERATION Each MULTI CONTROL button can be used for one Multi Operation If a Multi Operation relates to using a DVD playe...

Page 79: ...ton then POWER to turn on your DVD player if it is not a PIONEER product 3 Press the DVD LD button then 3 play to start playing the DVD player 4 Press the ADVANCED button to put the receiver in that sound mode When you employ MULTI OPERATIONs see below these four tasks will be performed in the same order 7 Press the REMOTE SETUP button to exit the Multi operation setup mode The remote control and ...

Page 80: ...he SYSTEM OFF button The SYSTEM OFF button will blink 4 Press the MULTI CONTROL button for the component whose operation you want to start SYSTEM OFF with for example TV CONT button The selected button will light steadily 5 Press the operation for example TV POWER you want to input 6 Repeat steps 3 and 4 to program a sequence of up to five stop or power off commands you want to input You can repea...

Page 81: ...ng its MULTI CONTROL button 4 Set the DIRECT FUNCTION of each external source to NO by pressing 2 5 Press the REMOTE SETUP button to exit the DIRECT FUNCTION mode When you re done setting up remember to set the slide switch back to USE The default setting is all YES If you have turned a DIRECT FUNCTION to NO and want to turn it back to YES follow the directions above and press 1 in step 3 memo Usi...

Page 82: ...control slide switch to SETUP 2 Press and hold both the REMOTE SETUP INPUT ATT button and 8 for more than 3 seconds The MULTI CONTROL buttons will blink 3 times and all multi operation settings will be erased When you re done setting up remember to set the slide switch back to USE S0URCE DVD LD TV SAT VCR1 VCR2 CD TV VOL TV FUNC MENU MUTE TV VOLUME MD TAPE1 TUNER TVCONT RECEIVER USE SETUP MULTI OP...

Page 83: ...als which have been learned from other remote controls will be erased When you re done setting up remember to set the slide switch back to USE S0URCE DVD LD TV SAT VCR1 VCR2 CD TV VOL TV FUNC MENU ENTER MUTE TV VOLUME MD TAPE1 TUNER TVCONT RECEIVER USE SETUP MULTI OPERATION CLASS MPX DIRECT ACCESS CHANNEL STATION TUNING DISPLAY RF ATT TV CONTROL FUNCTION REMOTE SETUP SYSTEM SETUP INPUT ATT EFFECT ...

Page 84: ... will show that input for about 5 seconds and then revert to showing the sound mode the receiver is in The VIDEO SELECT remains set to the input you chose until you change the audio input If you change audio functions the receiver will reset itself to make the video and audio inputs correspond Also if you switch the power of the receiver OFF when you turn it back on the video and audio inputs will...

Page 85: ... record signals using the space of one analog audio channel so it will maintain compatibility with existing discs and players As shown in the following figure the digital audio sounds of Dolby Digital discs can be played back as currently done Analog sounds are played back by using the other channel without the Dolby Digital signals for monaural audio signals Comparison with Dolby Pro Logic Surrou...

Page 86: ...uracy Timbre Matching When recording a sound track it is very important that the surround sounds move smoothly and seamlessly around the theater It is very distracting when sounds seem to jump from speaker to speaker Timbre Matching helps to smooth the movement of the surround sounds even though you are using only two speakers Bass Peak Level Manager Some Dolby Digital sound tracks can produce bas...

Page 87: ...NEER repairmen to test the DTS sound quality You will never need to access this mode Rather you should be careful NOT to put the receiver in this mode because doing so will erase all your setup parameters like speaker settings delay settings channel settings etc In STANDBY mode holding the TAPE 2 MONITOR button and pressing the STANDBY ON button will put the receiver in DTS test mode Be careful NO...

Page 88: ...TSUI MEMOREX MEMPHIS METZ MINERVA MULTITECH MURPHY NBC NECKERMANN NESCO NORDMENDE OCEANIC OSAKI OTTO VERSAND PALLADIUM PATHE MARCONI PENTAX PERDIO Code 448 452 453 448 452 453 406 414 441 417 444 414 441 453 441 444 414 406 444 414 441 405 409 411 424 453 444 452 441 414 452 411 411 448 441 452 453 444 417 444 414 441 411 441 453 453 454 445 446 453 454 453 441 414 442 444 417 428 411 448 453 444 ...

Page 89: ... 813 821 802 804 807 822 815 821 825 829 816 817 819 821 824 818 814 823 820 803 826 828 811 822 800 825 Device CD CD R TV Manufacturer AKAI ARCAM ASUKA AUDIO TON BUSH CALIFORNIA AUDIO LAB CYRUS DENON DUAL FISHER GOLDSTAR GRUNDIG HITACHI INTERSOUND JVC KENWOOD KODAK LINN LUXMAN M ELECTRONIC MARANTZ MATSUI MCS MEMOREX MERIDIAN MITSUBISHI NAD NAIM ONKYO PANASONIC PHILIPS QUAD QUASER ROADSTAR ROTEL S...

Page 90: ...644 642 607 635 643 655 632 607 645 648 653 654 655 640 644 632 635 638 645 Device TV Manufacturer FORMENTI FRONTECH FRONTECH PROTECH FUJITSU FUNAI GBC GEC GELOSO GENEXXA GOODMANS GORENJE GPM GRAETZ GRANADA GRANDIENTE GRANDIN HANSEATIC HCM HINARI HISAWA HUANYU HYPSON ICE IMPERIAL INDIANA INGELEN INTERFUNK INTERVISION ISUKAI ITC ITT JEC KAISUI KAPSCH KENDO KENNEDY KORPEL KOYODA LEYCO LIESENK TTER L...

Page 91: ... 646 631 632 642 643 649 607 634 642 642 646 632 640 649 631 642 632 649 632 639 640 649 643 631 607 644 Device TV MD TUNER Manufacturer SONOLOR SONTEC SOUNDWAVE STANDARD STERN SUSUMU SYSLINE TANDY TASHIKO TATUNG TEC TELEAVIA TELETECH TENSAI THORN TOMASHI TOWADA ULTRAVOX UNIVERSUM VESTEL VOXSON WALTHAM WATSON WATT RADIO WHITE WESTINGHOUSE YOKO PIONEER SONY KENWOOD SHARP TEAC ONKYO DENON PIONEER PI...

Page 92: ...ut when a function is selected Considerable noise in radio broadcasts Broadcast stations cannot be selected automatically Subwoofer output is very low When playing an LD the SIGNAL SELECT is on 2 RF but there is still no sound When playing a Dolby Digital DTS source the 5 1 Channel indicator doesn t light Remedy Connect the power plug to the wall outlet Disconnect the power plug from the outlet an...

Page 93: ... Connect the speakers see p 19 Set SIGNAL SELECT to AUTO or according to the type of connections made see p 48 Set the digital input settings correctly see p 32 Make digital connections see p 13 and set SIGNAL SELECT to AUTO see p 48 Refer to the instruction manual supplied with the DVD player Set the digital volume level of the player to full or to the neutral position Turn the speakers ON Use th...

Page 94: ...into the OFF setting There is no problem with your receiver but if you want to hear 7 channel sound use an Surround EX source Play the source Fix the audio settings check the manual that came with your DVD player There is no problem The indicator won t light when the track is not a Dolby Digital DTS track Symptom You can t get DIGITAL to come up when using the SIGNAL SELECT button When using THX A...

Page 95: ... Amplifier Section Continuous Power Output STEREO MODE FRONT 110 W 110 W DIN 1 kHz THD 1 8Ω Continuous Power Output SURROUND MODE FRONT 110 W 110 W DIN 1 kHz THD 1 8Ω CENTER 110 W DIN 1 kHz THD 1 8Ω SURROUND 110 W 110 W DIN 1 kHz THD 1 8Ω Rated Power Output 100 W 100 W 20 Hz to 20 kHz THD 0 09 8Ω Above specifications are applicable when the power supply is 230V Audio Section Input Sensitivity Impe...

Page 96: ...ng Beach California 90801 1540 U S A PIONEER ELECTRONICS OF CANADA INC 300 Allstate Parkway Markham Ontario L3R OP2 Canada PIONEER EUROPE NV Haven 1087 Keetberglaan 1 B 9120 Melsele Belgium TEL 03 570 05 11 PIONEER ELECTRONICS AUSTRALIA PTY LTD 178 184 Boundary Road Braeside Victoria 3195 Australia TEL 03 9586 6300 PIONEER ELECTRONICS DE MEXICO S A DE C V San Lorenzo 1009 3er Piso Desp 302 Col Del...

Reviews: