11-94. INSTALLATION OF OIL PRESSURE SENSOR.
a.
Seal sensor unit pipe threads with thread sealant tape (3M Teflon No. 48 x 1/4”).
b. Screw the sensor unit into the bulkhead fitting.
c.
Reconnect the two electrical leads.
d. Perform operational check.
11-95. REMOVAL OF VACUUM SENSOR. Access to the sensor unit is gained by reaching up under the
instrument panel to the vacuum regulator. Removal is accomplished by the following:
a.
Disconnect the two electrical leads.
b. Unscrew the sensor unit from the vacuum regulator.
c.
Cover hole to prevent foreign matter from entering regulator.
11-96. INSTALLATION OF VACUUM SENSOR.
a.
Screw sensor unit into vacuum regulator.
b. Reconnect the two electrical leads.
c.
Perform operational check.
NOTE
In the past, aluminum cable has been used in the wiring of the battery
circuit: battery to ground, battery to master relay, master relay to starter
solenoid, starter solenoid to starter, and the ground wire to airframe. If
during inspection, a fault is found with any aluminum cable or wiring,
Piper considers it mandatory that it be replaced with copper wire with
suitable terminals.
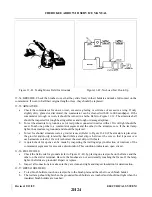
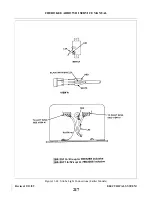
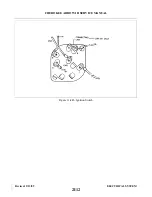
11-97. IGNITION SWITCH. (Refer to Figure 11-44b.)
11-98. REMOVAL OF IGNITION SWITCH. Access to the ignition switch is gained by reaching up under the
instrument panel.
a.
Ensure the ignition switch is in the OFF position.
b. Disconnect the power lead from the battery.
c.
Remove the retaining nut from the ignition switch on the front side of the instrument panel.
d. Pull the switch from the back side of the instrument panel and remove wires.
11-99. INSTALLATION OF IGNITION SWITCH. (Refer to Figure 11-44b.)
a.
Using the illustration as a reference, attach the wires to the ignition switch.
b. Before proceeding, check for proper operation of the ignition switch as follows:
1. Remove the P-lead from the right magneto.
2. Attach the P-lead of the right magneto to an ohmmeter and to airframe ground.
3. With the switch in the OFF, L or START positions, the ohmmeter should indicate a closed circuit.
4. With the switch in the R or BOTH position, the ohmmeter should indicate an open circuit.
5. Reconnect the P-lead to the magneto.
c.
Position the ignition switch in the instrument panel and secure with the retaining nut.
d. Reconnect the power lead to the battery.
Revised: 2/13/89
2I11
CHEROKEE ARROW III SERVICE MANUAL
ELECTRICAL SYSTEM
Summary of Contents for ARROW III
Page 4: ...THIS PAGE INTENTIONALLY LEFT BLANK 1A4...
Page 12: ...THIS PAGE INTENTIONALLY LEFT BLANK 1A12...
Page 94: ...Figure 4 2 Wing Installation Revised 2 13 89 1D22 CHEROKEE ARROW III SERVICE MANUAL STRUCTURES...
Page 171: ...lH3 INTENTIONALLY LEFT BLANK...
Page 172: ...lH4 INTENTIONALLY LEFT BLANK...
Page 286: ...THIS PAGE INTENTIONALLY LEFT BLANK Revised 2 13 89 2A8...
Page 528: ...INTENTIONALLY LEFT BLANK 2K10 THRU 2L24 2K10...

