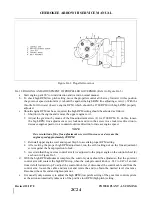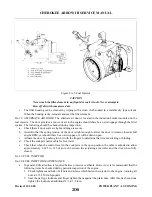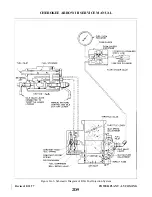
3. Check all fuel lines for tightness and evidence of leakage. A slight fuel stain adjacent to the air
bleed nozzles is not cause for concern.
4. Check throttle and mixture control rod ends and levers for tightness and lock.
5. Remove and clean the injector inlet strainer at the first 25 hours of operation and each 50 hour
inspection thereafter. Check the screen for distortion or openings in the strainer. Replace for either
of these conditions. Clean screen assembly in solvent and dry with compressed air. Damaged
strainer “O” rings should be replaced. To install the screen assembly, place the gasket on the
screen assembly and install the assembly in the throttle body and tighten to 35-40 inch-pounds
torque.
8A-21. ADJUSTMENT OF IDLE SPEED AND MIXTURE.
a. Start the engine and warm up in the usual manner until oil and cylinder head temperatures are normal.
b. Check magnetos. If the “mag-drop” is normal, proceed with idle adjustment.
c. Set throttle stop screw so that the engine idles at 550-600 RPM. If the RPM changes appreciable after
making the mixture adjustment during the succeeding steps, readjust the idle speed to the desired
RPM.
d. When the idling speed has been stabilized, move the cockpit mixture control lever with a smooth,
steady pull toward the “Idle-Cut-Off” position and observe the tachometer for any change during the
leaning process. Caution must be exercised to return the mixture control to the “Full Rich” position
before the RPM can drop to a point where the engine cuts out. An increase of more than 10 RPM
while “leaning out” indicates an excessively rich idle mixture. An immediate decrease in RPM (if not
preceded by a momentary increase) indicates the idle mixture is too lean.
e. If the above indicates that the idle adjustment is too rich or too lean, turn the idle mixture adjustment
in the direction required for correction, and check this new position by repeating the above procedure.
Make additional adjustments as necessary until a check results in a momentary pick-up of
approximately 5 (never more than 10) RPM. Each time the adjustment is changed, the engine should
be run up to 2000 RPM to clear the engine before proceeding with the RPM check. Make final
adjustment of the idle speed adjustment to obtain the desired idling RPM with closed throttle. The
above method aims at a setting that will obtain maximum RPM with minimum manifold pressure. In
case the setting does not remain stable, check the idle linkage; any looseness in this linkage would
cause erratic idling. In all cases, allowance should be made for the effect of weather conditions and
field altitude upon idling adjustment.
8A-22. FUEL-AIR BLEED NOZZLE.
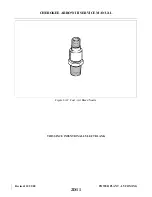
8A-23. REMOVAL OF FUEL-AIR BLEED NOZZLE. The nozzles must be carefully removed as they or the
cylinders may be damaged.
a. Remove the lower engine cowl.
b. Disconnect the fuel line from the nozzle.
c. Carefully remove the nozzle, using the correct size deep socket.
d. Clean and inspect the nozzle as given in Paragraph 8A-24.
8A-24. CLEANING AND INSPECTION OF FUEL-AIR BLEED NOZZLE.
a. Clean the nozzle with acetone or equivalent and blow out all foreign particles with compressed air in
the direction opposite that of fuel flow. Do not use wire or other hard objects to clean orifices. (Refer
to latest revision Lycoming Service Instruction No. 1275.)
b. Inspect the nozzle and cylinder threads for nicks, stripping or cross-threading.
c. Inspect for battered or rounded hexagons.
d. A test procedure for air bleed nozzles is described in latest revision Lycoming Service Instruction
No. 1275.
Revised: 8/31/77
2D10
CHEROKEE ARROW III SERVICE MANUAL
POWER PLANT - LYCOMING
Summary of Contents for ARROW III
Page 4: ...THIS PAGE INTENTIONALLY LEFT BLANK 1A4...
Page 12: ...THIS PAGE INTENTIONALLY LEFT BLANK 1A12...
Page 94: ...Figure 4 2 Wing Installation Revised 2 13 89 1D22 CHEROKEE ARROW III SERVICE MANUAL STRUCTURES...
Page 171: ...lH3 INTENTIONALLY LEFT BLANK...
Page 172: ...lH4 INTENTIONALLY LEFT BLANK...
Page 286: ...THIS PAGE INTENTIONALLY LEFT BLANK Revised 2 13 89 2A8...
Page 528: ...INTENTIONALLY LEFT BLANK 2K10 THRU 2L24 2K10...

