2. Method II.
a.
For tubing, flush with naphtha per specifications TT-N-95.
b. Blow clean and dry off all solvent with clean, dry, filtered air.
c.
Flush with isopropyl alcohol.
d. Rinse thoroughly with fresh water.
e.
Dry with air or by heating at temperature 250 to 300 degrees F° for one-half hour.
3. Method III.
a.
Flush with hot inhibited alkaline cleaner until free from oil and grease.
b. Rinse thoroughly with fresh water.
c.
Dry thoroughly with a stream of clean air or by heating 250 to 300 degrees F° for one-half hour
minimum.
CAUTION
Do not use adhesive tape on oxygen components for attaching or securing
protective coverings. Use waxed lacing twine or tie wraps.
4. After cleaning, all tubing must be protected by caps, plugs, and/or plastic bags.
5. Before reinstallation, make sure that the fitting, tube, and fixture threads are in good condition and that
the cones do not exhibit or disfigurement.
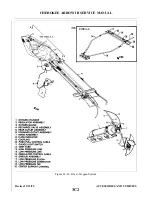
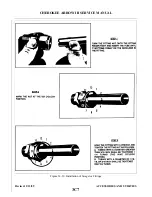
14-59. SWAGELOC FITTING INSTALLATION. (Refer to Figure 14-19.)
CAUTION
The high pressure line fitting at the regulator should be tightened until it
bottoms. Ensure that Teflon thread tape is applied on all male pipe threads.
1. For swageloc fittings not preswaged or for in-aircraft installation, proceed as follows:
a.
Turn the fitting nut onto the fitting finger tight and insert the tube until it bottoms firmly on the
shoulder in the fitting.
b. Tighten nut with a wrench until the tube will not turn by hand.
c.
Mark the nut at the six o’clock position.
d. Hold the fitting body steady with a backup wrench and tighten as follows:
(1) On tubing with a diameter bigger than 3/16 inch, tighten 1 1/4 turns (to the nine o’clock
position).
(2) On tubing of 1/16, 1/8, and 3/16 inch diameter, tighten only 3/4 turn.
e.
If nut and tube must be disconnected from the fitting, reconnect by seating the tube on the
shoulder of the fitting and tightening the nut finger tight. Follow up by tightening the nut with a
wrench.
2. Preswaged swageloc fittings are fabricated and installed as follows:
a.
Assemble the nut and ferrules finger tight on the pre-swaging tool and insert tube until it firmly
bottoms on the shoulder in the tool. The pre-swaging tool can be attained from Crawford Fitting
Company, refer to List of Consumable Materials of this manual.
b. Tighten nut on fitting just enough that tube within the fitting will not turn by hand.
c.
With a wrench, tighten the nut as follows:
(1) On tubing with diameters over 3/16 inch, tighten 1 1/4 turns.
(2) On tubing with 1/16, 1/8, or 3/16 inch diameter, tighten 3/4 of a turn.
d. Unscrew the nut to release the ferrule tube assembly for the tool.
e.
The assembly is installed on the fitting as follows:
Revised: 2/13/89
3C6
CHEROKEE ARROW III SERVICE MANUAL
ACCESSORIES AND UTILITIES
Summary of Contents for ARROW III
Page 4: ...THIS PAGE INTENTIONALLY LEFT BLANK 1A4...
Page 12: ...THIS PAGE INTENTIONALLY LEFT BLANK 1A12...
Page 94: ...Figure 4 2 Wing Installation Revised 2 13 89 1D22 CHEROKEE ARROW III SERVICE MANUAL STRUCTURES...
Page 171: ...lH3 INTENTIONALLY LEFT BLANK...
Page 172: ...lH4 INTENTIONALLY LEFT BLANK...
Page 286: ...THIS PAGE INTENTIONALLY LEFT BLANK Revised 2 13 89 2A8...
Page 528: ...INTENTIONALLY LEFT BLANK 2K10 THRU 2L24 2K10...

