G.
Pull the lead back into the cover to wedge the braid between the tapers of the cover and ferrule.
H.
Provide a back up support for the cover and seat the ferrule using the 11-7074 Ferrule Seating Tool
(refer to Figure 74-27) and a mallet. Ferrule must be driven straight into the cover and fully seated.
I.
Thread the pre-stripped end of conductor through grommet. Place a new eyelet on conductor and
Crimp per instructions given in second paragraph of Maintenance of Harness.
6.
When lead being replaced is of the elbow type, salvage the used elbow and compression springs for
installation on replacement lead. Install these and new sleeve and contact spring (refer to Figures 74-28 and
74-29) furnished with replacement lead per instructions given in Steps I thru 4.
7.
Reposition clamps and brackets and replace cable ties removed earlier. Clean the grommets, sleeves and the
inside of the cover with methylethylketone or denatured alcohol.
8.
Spray grommets and sleeves with Fluorocarbon Spray, such as MS 122, supplied by Miller- S t e p h e n s o n
Chemical Co. Inc., 16 Sugar Hollow Road, Danbury, Connecticut 06810, or equivalent.
9.
Prior to seating spark plug lead terminal in plug barrel use fluorocarbon spray on spark plug terminal
insulating sleeve (refer to Figure 74-30) to prevent heat from sticking sleeve to spark plug barrel. Lightly
lubricate the shoulder of ferrule to minimize twisting of ferrule. (Refer to Figure 74-31 .) Use GO-JO NO
LOK manufactured by GO-JO Inc., Akron, Ohio 44309.
10. Check cam securing screw. Screw must be torqued to 16-20 inch-pounds.
11. With all high tension terminal grommets seated against the ferrules in the cover, attach the bottom capacitor
lead to the right main breaker and then the top capacitor lead to the left main breaker. Position the cover on
the magneto and secure. Torque cover screws to 30-35 inch-pounds.
12. Carefully route the high tension spark plug leads away from any hot spots such as manifolds and sharp
edges which might cause heat damage or chafing. Check leads for proper location in clamps so when
clamps are tightened the leads will not be crushed. Leads should be taut to prevent chafing due to vibration,
but not so taut as to produce undue strain on leads.
13. After all leads have been properly routed and secured to the engine, recheck all clamp securing screws for
tightness. Fasten coupling nuts to proper spark plugs and torque as specified in Chart 7402. Do not allow
ferrules to turn while torqueing nuts.
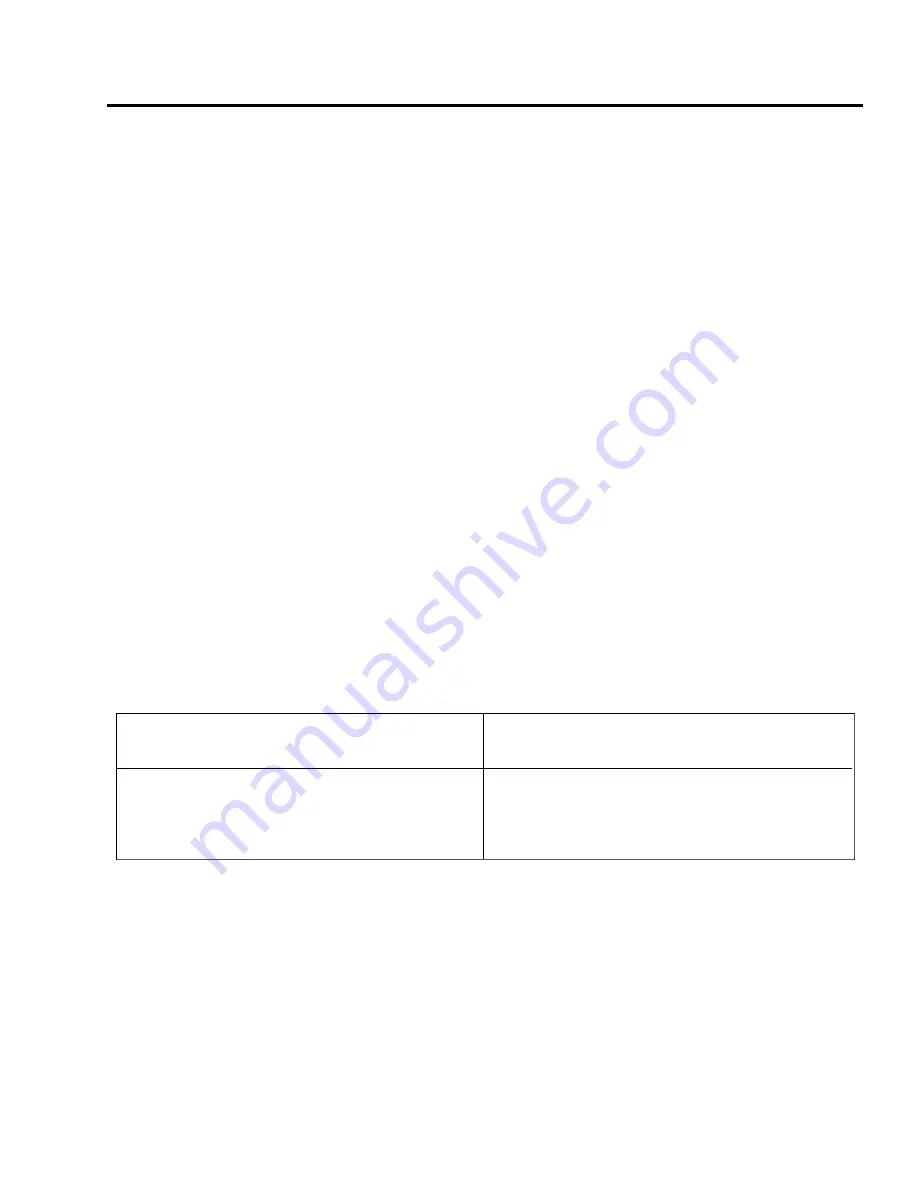
CHART 7402. COUPLING TORQUES
SPARK PLUGS.
REMOVAL OF SPARK PLUGS.
1.
Loosen the coupling nut on the harness lead and remove the terminal insulator from the spark plug barrel
well.
Spark Plug
Torque
Coupling Threads
(Ib.-in.)
5/8-24
90 - 95
3/4-20
110 - 120
PA - 4 4 - 1 8 0 / 1 8 0 T
AIRPLANE MAINTENANCE MANUAL
7 4 - 2 2 - 0 1
Page 74-25
Revised: May 15, 1989
3G18
PIPER AIRCRAFT
Summary of Contents for SEMINOLE PA-44-180
Page 38: ...CHAPTER DIMENSIONS AND AREAS 1B14...
Page 49: ...CHAPTER LIFTING AND SHORING 1C1...
Page 53: ...CHAPTER LEVELING AND WEIGHING 1C5...
Page 58: ...CHAPTER TOWING AND TAXIING 1C10...
Page 62: ...CHAPTER PARKING AND MOORING 1C14...
Page 65: ...CHAPTER REQUIRED PLACARDS 1C17...
Page 70: ...CHAPTER SERVICING 1C22...
Page 98: ...CHAPTER STANDARD PRACTICES AIRFRAME 1E2...
Page 108: ...CHAPTER ENVIRONMENTAL SYSTEM 1E12...
Page 189: ...CHAPTER AUTOFLIGHT 1H21...
Page 192: ...CHAPTER COMMUNICATIONS 1H24...
Page 202: ...CHAPTER ELECTRICAL POWER 1I10...
Page 228: ...CHAPTER EQUIPMENT FURNISHINGS 1J12...
Page 233: ...CHAPTER FIRE PROTECTION 1J17...
Page 238: ...CHAPTER FLIGHT CONTROLS 1J24...
Page 304: ...2A18 CHAPTER FUEL...
Page 325: ...2B17 CHAPTER HYDRAULIC POWER...
Page 357: ...2D1 CHAPTER ICE AND RAIN PROTECTION...
Page 414: ...CHAPTER LANDING GEAR 2F13...
Page 479: ...2I6 CHAPTER LIGHTS...
Page 488: ...2I16 CHAPTER NAVIGATION AND PITOT STATIC...
Page 503: ...2J7 CHAPTER OXYGEN...
Page 524: ...2K6 CHAPTER VACUUM...
Page 535: ...2K19 CHAPTER ELECTRICAL ELECTRONIC PANELS AND MULTIPURPOSE PARTS...
Page 546: ...INTENTIONALLY LEFT BLANK PA 44 180 180T AIRPLANE MAINTENANCE MANUAL 2L6 PIPER AIRCRAFT...
Page 547: ...2L7 CHAPTER STRUCTURES...
Page 582: ...CHAPTER DOORS 3A18...
Page 593: ...CHAPTER STABILIZERS 3B8...
Page 604: ...CHAPTER WINDOWS 3B22...
Page 611: ...CHAPTER WINGS 3C10...
Page 624: ...CHAPTER PROPELLER 3D1...
Page 643: ...CHAPTER POWER PLANT 3D21...
Page 667: ...CHAPTER ENGINE FUEL SYSTEM 3F1...
Page 681: ...CHAPTER IGNITION 3F16...
Page 712: ...CHAPTER ENGINE INDICATING 3H1...
Page 730: ...CHAPTER EXHAUST 3H19...
Page 734: ...CHAPTER OIL 3I1...
Page 743: ...CHAPTER STARTING 3I11...
Page 755: ...CHAPTER TURBINES 3J1...


