MAINTENANCE
Sept-2018
104
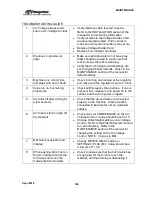
TROUBLESHOOTING GUIDE
1
Arc Voltage always reads
zero on Arc Voltage Control
•
Verify interface cable is wired correctly.
Refer to the INSTALLATION section of the
manual for correct wiring information.
•
Verify all wires to the Voltage Divider Card
are securely terminated. Pull on wires to
make sure crimped connections are secure.
•
Replace Voltage Divider Card
•
Replace Torch Height Controller
2
Waviness in plasma cut
edge
•
Make sure all table slats do not have play.
Slats should be curved to make sure that
tension keeps them from vibrating.
•
Verify that torch height control settings are
set to original factory defaults. Refer to the
MAINTENANCE section of the manual for
default settings
3
Machine runs a short time
and stops with an Air Fault
•
Check incoming air pressure at the regulator
and make sure the regulator is set to 4.5 bar.
4
Screen is on, but nothing
else works
•
Check all Emergency Stop buttons. If one is
pressed, then release it, turn power off to the
control, and then turn power on again.
5
Arc turns off after cutting for
a few seconds
•
Check that the ground clamp is connected
properly to the machine. Clamp must be
connected to bare metal, not on a painted
surface.
6
Arc tries to start too high off
the material
•
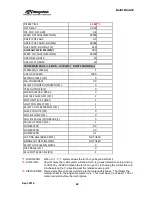
Check value for COMPENSATE on the Arc
Voltage Control. Value should be set to 10
•
Change Initial Height setting on Arc Voltage
Control. Refer to the Plasma System manual
for correct setting. Refer to the
MAINTENANCE section of the manual for
changing the setting on the Arc Voltage
Control. NOTE: Value is in MM
7
Machine moves before arc
initiates
•
Change PIERCE DELAY setting in
SETTINGS / PLAS [F4]. Value should be a
minimum of 1.100
8
When pushing Zero Test on
the Arc Voltage Control, the
torch does not touch the
material before it retracts
•
Check to make sure that the torch cable has
enough play for the torch to reach the
material, and that nothing is obstructing it.
Summary of Contents for CNC Plasma Cutting Table
Page 2: ......
Page 4: ...TABLE OF CONTENTS Sept 2018 4...
Page 22: ...SAFETY Sept 2018 22...
Page 24: ...INSTALLATION Sept 2018 24...
Page 88: ...PROGRAMMING Sept 2018 88...
Page 117: ...PIPE CUTTING ATTACHMENT Sept 2018 117 Pipe Supports Pipe Cutter Base...
Page 124: ...PIPE CUTTING ATTACHMENT Sept 2018 124...
Page 128: ...PIPE CUTTING ATTACHMENT Sept 2018 128 j Then press F2 SYSTEM to see the following...
Page 136: ...PIPE CUTTING ATTACHMENT Sept 2018 136...
Page 140: ...WATER MIST CHILLER Sept 2018 140...
Page 144: ...APPENDIX A FastCAM SETUP Sept 2018 144 4 Choose the functions you need and Enter...
Page 154: ...APPENDIX A FastCAM SETUP Sept 2018 154...
Page 159: ...APPENDIX A FastCAM SETUP Sept 2018 159...
Page 164: ...APPENDIX A FastCAM SETUP Sept 2018 164...
Page 170: ...APPENDIX B Parametric Shape Library Sept 2018 170 9 Fla X 10 Lad 11 Rec 12 Rec8...
Page 172: ...APPENDIX B Parametric Shape Library Sept 2018 172 19 Rec 20 Rec c 21 Circle4 22 Rec...
Page 174: ...APPENDIX B Parametric Shape Library Sept 2018 174...

