INSTALLATION
Sept-2018
37
3.4. Leveling
Before starting to level the machine, place your machine firmly on the
ground with leveling pads already installed to the designated area where it
will be seated permanently for operation.
Procedure:
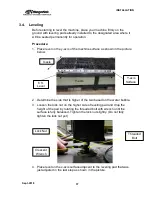
1. Place level on the y-axis of the machine surface as shown in the picture
below.
2. Determine the side that is higher of the two based on the water bubble.
3. Loosen the lock nut on the higher side of leveling pad and drop the
height of the pad by rotating the threaded bolt with wrench until the
surface is fully balanced. Tighten the lock nut slightly. (Do not fully
tighten the lock nut yet)
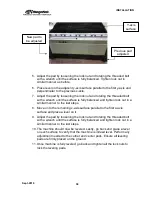
4. Place level on the x-axis surface adjacent to the leveling pad that was
just adjusted in the last step as shown in the picture.
Y-axis
Surface
6 ft.
Level
Crescent
Wrench
Lock Nut
Threaded
Bolt
Y-axis
X-axis
Summary of Contents for CNC Plasma Cutting Table
Page 2: ......
Page 4: ...TABLE OF CONTENTS Sept 2018 4...
Page 22: ...SAFETY Sept 2018 22...
Page 24: ...INSTALLATION Sept 2018 24...
Page 88: ...PROGRAMMING Sept 2018 88...
Page 117: ...PIPE CUTTING ATTACHMENT Sept 2018 117 Pipe Supports Pipe Cutter Base...
Page 124: ...PIPE CUTTING ATTACHMENT Sept 2018 124...
Page 128: ...PIPE CUTTING ATTACHMENT Sept 2018 128 j Then press F2 SYSTEM to see the following...
Page 136: ...PIPE CUTTING ATTACHMENT Sept 2018 136...
Page 140: ...WATER MIST CHILLER Sept 2018 140...
Page 144: ...APPENDIX A FastCAM SETUP Sept 2018 144 4 Choose the functions you need and Enter...
Page 154: ...APPENDIX A FastCAM SETUP Sept 2018 154...
Page 159: ...APPENDIX A FastCAM SETUP Sept 2018 159...
Page 164: ...APPENDIX A FastCAM SETUP Sept 2018 164...
Page 170: ...APPENDIX B Parametric Shape Library Sept 2018 170 9 Fla X 10 Lad 11 Rec 12 Rec8...
Page 172: ...APPENDIX B Parametric Shape Library Sept 2018 172 19 Rec 20 Rec c 21 Circle4 22 Rec...
Page 174: ...APPENDIX B Parametric Shape Library Sept 2018 174...


