No Diving or Jumping. Observe all Safety Rules
GENERAL INSTRUCTIONS - BRACELESS OVAL POOLS
ASSEMBLING THE POOL WALL
Section
3
1. Make the cove
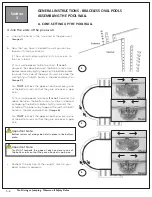
a. If you are using sand, bank the sand against the
wall to form a cove of 3” to 6” (7.5cm to 15cm) high
and 8” to 12” (20cm to 30cm) wide at ground level.
This will prevent the liner from creeping under the
wall, and it will also protect the liner from any metal
edges of the pool framework.
THIS STEP IS NOT
OPTIONAL, IT MUST BE DONE.
(Image 9)
NOTE: If a smaller cove (less than 3” (7.5cm)) is made
along with using a very tight liner, this will buckle
the wall.
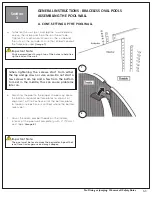
b. Water the sand to compact it and use a trowel to
spread it evenly.
IMPORTANT: You must ensure that
the sand is very well compacted.
(Image 10)
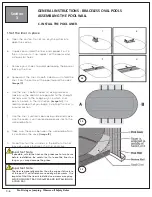
c. Since earth containing chemicals can cause
discoloration or corrosion, it is suggested that you
place
polyethylene plastic sheeting
under the cove
around the perimeter of the wall, so no earth comes
in contact with the metal. Since the presence
of such chemicals is beyond the control of the
manufacturer, such damage is not covered under
warranty.
(Image 11)
d. If you are using styrofoam cove pieces instead of
sand, insert them in the bottom rail and refer to
the installation instructions that are provided with
them.
B. ASSEMBLING THE COVE
9
10
11
Important Note:
The cove is an important part of the pool structure. Take
your time to make a complete, full-size cove.
3-4
MUST be well
compacted

