No Diving or Jumping. Observe all Safety Rules
2-1
GENERAL INSTRUCTIONS - ROUND POOLS
ASSEMBLING THE POOL BASE
Section
2
A. LAY OUT THE BOTTOM PLATES AND BOTTOM RAILS
1. Lay out the bottom plates and bottom rails
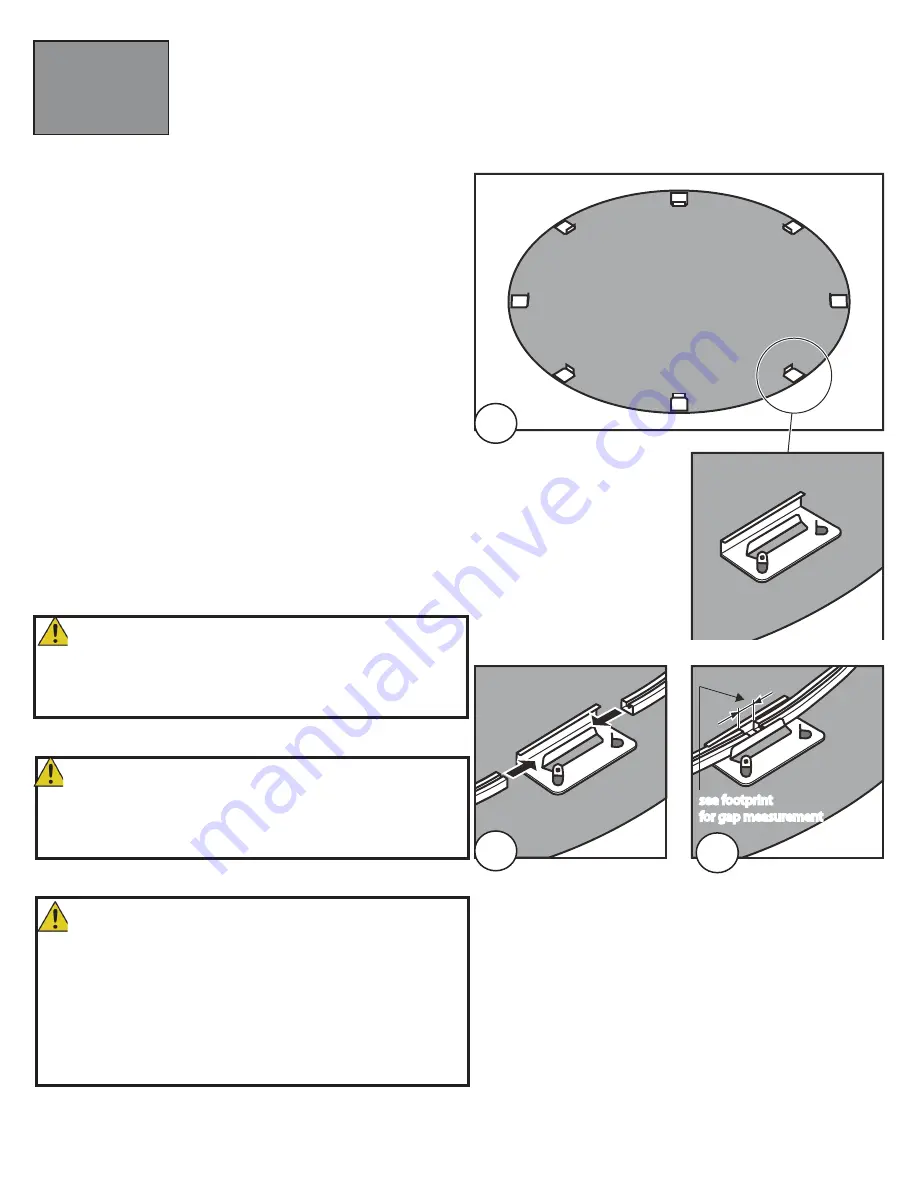
a. Place the bottom plates equally spaced around the
perimeter of your foundation. If you are using the
optional patio stones, depending on your model place
one bottom plate on each stone.
(Image 1)
2. Assemble the bottom plates and bottom rail
a. Insert the end of each bottom rail into a bottom plate.
Leave a gap between the ends of the bottom rails, be
sure to check your pool
'
s footprint for gap measurement.
(Images 2 & 3)
b. Measure the diameter of your pool all around the circle
and make sure it is correct.
NOTE: this measurement should be taken from centre
to centre of the bottom plate. When the circumference
is perfectly round, hammer nails into the ground to keep
the bottom rails into place.
These nails are to be removed only at the last step when
filling up the the pool.
Important Note:
Be sure to refer to your pool footprint (at the end of Section 1),
in order to recognize where each bottom rail should be placed.
see footprint
for gap measurement
see footprint
for gap measurement
1
2
3
Important Note:
Use a soft measuring tape to measure around the perimeter
of the pool. Measure from the inside of the bottom rail, the
measurement should equal the wall length.
HINT:
Bend the first 1/8” (3 mm) of the end of the bottom rail slightly
with a pair of pliers to make sure the rail doesn’t slide out of
the base plate when the pool wall is installed.
Cut several small pieces of wood approximately
1/2” x 3/8”
(1.5cm x .9cm)square and place one between the two bottom
rails located at each base plate. this will keep the bottom rails
from closing while the wall is installed. Be sure to remove the
blocksof wood later, before installing the uprights in Section 4.


