background image

MODEL / MODÈLE : PB1230SP

PART / PIÈCE : 10568, 10533

300522

WOOD PELLET & GAS COMBO

IMPORTANT, READ CAREFULLY, RETAIN FOR FUTURE 

REFERENCE. MANUAL MUST BE READ BEFORE OPERATING!

COMBINETTE DE BOIS ET GAS

IMPORTANT, PRENEZ CONNAISSANCE DE CE DOCUMENT ET 

CONSERVEZ-LE POUR RÉFÉRENCE ULTÉRIEURE. VOUS DEVEZ  

LIRE CE GUIDE AVANT D’UTILISER LE BARBECUE!

For outdoor and household use only.  Not for commercial use. 

R

é

serv

é

 à l'usage ext

é

rieur et r

é

sidentiel uniquement.  Non destin

é

 à un usage commercial. 

WARNING:

 Please read the entire manual 

before installation and use of this electric, 

pellet fuel-burning appliance. Failure to 

follow these instructions could result 

in property damage, bodily injury or 

even death. Contact local building or fire 

officials about restrictions and installation 

inspection requirements in your area.

AVERTISSEMENT :

 Veuillez lire l’intégralité 

du manuel avant l’installation et 

l’utilisation de cet appareil électronique à 

granules. Le non-respect de ces instructions 

peut entraîner des dommages aux 

biens, des blessures ou même la mort. 

Communiquez avec les autorités locales 

en matière d’incendie et de bâtiment 

concernant les restrictions et les exigences 

d’installation dans votre région.

ASSEMBLY GUIDE

GUIDE DE MONTAGE

Summary of Contents for 10533

Page 1: ...anual before installation and use of this electric pellet fuel burning appliance Failure to follow these instructions could result in property damage bodily injury or even death Contact local building or fire officials about restrictions and installation inspection requirements in your area AVERTISSEMENT Veuillez lire l intégralité du manuel avant l installation et l utilisation de cet appareil él...

Page 2: ... 1 877 303 3134 Fax 1 877 303 3135 Parts Specs 3 Assembly Preparation 5 Assembly Instructions Connecting the Wheel To The Support Leg 5 Installing The Bottom Shelf 6 Securing Cart Front Back Panel 6 Securing Cart Bar Cylinder Support Bracket 6 Installing The Hopper Handle 7 Securing The Lid Stopper 7 Mounting The Cart To The Main Barrel 7 Installing The Cooking Components 8 Securing The Chimney 9 ...

Page 3: ...ray Handle x2 25 Heat Tent x3 26 Chimney Stack x1 27 Chimney Cap x1 28 Meat Probe x2 Part Description A Screw x34 B Washer x38 C Locking Washer x38 D Nut x3 E Wheel Cotter Pin x2 F Wheel Washer x2 G Wheel Axle Pin x2 H Screw x8 I Screw x4 J AA Battery x1 NOTE Due to ongoing product development parts are subject to change without notice Contact Customer Service if parts are missing when assembling ...

Page 4: ...ENGLISH 4 PARTS SPECS D C B E A H F G I J 1 2 5 4 12 14 16 19 18 20 25 26 24 21 7 8 11 27 3 15 23 1 2 9 10 13 2 13 1 6 2 6 1 17 2 17 1 22 28 ...

Page 5: ... hole then secure using the Wheel Cotter Pin Repeat installation for the other Wheel on same side ASSEMBLY PREPARATION Parts are located throughout the shipping carton including underneath the grill Inspect the grill parts and hardware blister pack after removing from the protective shipping carton Discard all packaging materials from inside and outside of the grill before assembly then review and...

Page 6: ...into an upright position 3 SECURING CART FRONT BACK PANEL Parts Required 2 x Cart Front Back Panel 21 8 x Screw H Installation Install one Long Cart Plate to the front two Support Legs of the unit Secure using two screws on each side Ensure the flat side of the Support Plate is facing outwards Repeat the same installation to mount the other long Support Plate to the other Support Legs 4 SECURING C...

Page 7: ... Barrel to be mounted to the Cart Position the Cart next to the Main Barrel with both facing the same direction Lock the Caster Wheels on the Cart Using a second person prepare to lift the Main Barrel onto the Cart With one person lifting from the hopper side and the other person lifting from the opposing barrel end carefully lift the Main Barrel and slowly lower onto the Cart Next open the Main B...

Page 8: ...d tab is on the left and the two pins at the bottom of the Flame Broiler Slider place into the holes of the Flame Broiler Main Plate To Easily adjust for direct or indirect flame when cooking Both Flame Broiler parts are lightly coated with oil to avoid rusting when shipped Note illustration 8B NOTE When the flame broiler slider is open and direct flame is used while cooking do not leave the grill...

Page 9: ...TING THE SIDE SHELF HANDLE SERVING TRAY Parts Required 2 x Serving Tray Handle 24 1 x Serving Tray 23 1 x Side Shelf Handle 22 4 x Screw A 4 x Locking Washer C 4 x Washer B Installation Mount the Side Shelf Handle onto the Main Barrel using four screws locking washers and washers Mount Serving Tray Handles to Serving Tray using the two pre installed screwsoneachhandle PlacetheServingTrayontotheSid...

Page 10: ...e side of the Hopper Hang the Spice Box on the step screw below the Hopper then use the two screws just removed to lock the Spice Box to the Hopper Note illustration 14A Remove the two pre mounted screws for the Bottle Opener on the side of the Hopper Install the Bottle Opener in the same location using the two screws previouisly removed Note illustration 14B 15 INSTALLING THE BATTERY Parts Requir...

Page 11: ...power surges it will likely trip during the start up phase of operation During the start up phase the igniter draws 200 700 watts of electricity which can be too much power for a GFCI outlet to handle Each time it trips it increases in sensitivity If the GFCI keeps tripping replace the outlet or change to a non GFCI outlet ON THE ROAD Disconnect the igniter from the main wiring harness Use the man...

Page 12: ... seau à graisse du plateau 20 Fixation de la retenue de fil de cylindre 20 Installation de la grille de cuisson supérieure 20 Installation de la boîte à épices ouvre bouteille 20 Installation de la batterie 21 Connexion à une source d alimentation 21 AVIS SUR LES DROITS D AUTEUR Droit d auteur 2020 Tous droits réservés Nulle partie de ce manuel ne peut être reproduite transmises transcrite ou stoc...

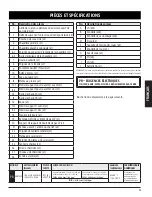
Page 13: ...de service x2 25 Tente de chaleur x3 26 Pile de cheminée x1 27 Chapeau de cheminée x1 28 Sonde à viande x2 No Description des pièces A Vis x34 B Rondelle x38 C Rondelle de verrouillage x38 D Écrou x3 E Goupille de l essieu des roues x2 F Rondelle de roue x2 G Axe de roue x2 H Vis x8 I Vis x4 J Batterie AA x1 REMARQUE En raison du développement continu du produit les pièces peuvent être modifiées s...

Page 14: ...FRANÇAIS 14 PIÈCES ET SPÉCIFICATIONS D C B E A H F G I J 1 2 5 4 12 14 16 19 18 20 25 26 24 21 7 8 11 27 3 15 23 1 2 9 10 13 2 13 1 6 2 6 1 17 2 17 1 22 28 ...

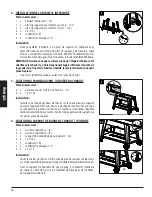
Page 15: ... fixez la à l aide d une roudelle de roue puis la goupille de l essieu des roue Répétez l installation pour l autre roue du même côté PRÉPARATION DE L ASSEMBLAGE Les pièces sont situées dans tout le carton d expédition y compris sous le gril Inspectez la grille les pièces et l emballage de matériel après avoir retiré de l emballage de protection en carton Avant l assemblage du produit examinez tou...

Page 16: ...NEAU AVANT ARRIÈRE DU CHARIOT Pièces nécessaires 2 x panneau avant arrière du chariot n 21 8 x vis n H Installation Installez une longue panneau de chariot sur les deux pieds de support avant de l appareil Fixez avec deux vis de chaque côté Assurez vous que le côté plat de la panneu du chariot est tourné vers l extérieur Répétez la même installation pour monter l autre longue panneau de support su...

Page 17: ...acez le chariot à côté du baril principal avec les deux faisant face à la même direction Verrouillez les roulettes sur le chariot En utilisant une deuxième personne préparez vous à soulever le baril principal sur le chariot Avec une personne soulevant du côté de la trémie et l autre personne soulevant du côté opposé du baril principal soulevez avec précaution le baril principal et descendez lentem...

Page 18: ... au bas du glissière de la chaudière sont placées dans les trous de la plaque principale du gril flamme Pour régler facilement les flammes directes ou indirectes lors de la cuisson Les deux pièces de la chaudière sont légèrement enduites d huile pour éviter la rouille lors de l expédition Remarque illustration 8B REMARQUE Lorsque le glissière de la chaudière est ouvert et qu une flamme directe est...

Page 19: ...empérature maintenez le capuchon plus ouvert Assurez vous que le chapeau de cheminée laisse l air s échapper 10 MONTAGE DE LA POIGNÉE DE LA TABLETTE LATÉRALE PLATEAU DE SERVICE Pièces nécessaires 2 x poignée de plateau n 24 1 x plateau n 23 1 x poignée de tablette latérale n 22 4 x vis n A 4 x rondelles de blocage n C 4 x rondelles n B Installation Montez la poignée de tablette latérale sur le cor...

Page 20: ...eure sur le rebord supérieur à l intérieur du gril principal La grille de cuisson se verrouille en place 14 INSTALLATION DE LA BOÎTE À ÉPICES OUVRE BOUTEILLE Pièces nécessaires 1 x boîte à épices n 10 1 x ouvre bouteille n 7 Installation Retirez les deux vis pré serrées supérieures de la position de montage de la boîte à épices sur le côté de la trémie Accrochez la boîte à épices à la vis de fixat...

Page 21: ...r la plupart des prises GFCI avec une taille recommandée de 15 ampères Si votre prise GFI est très sensible aux surtensions elle sera probablement touchée par un court circuit pendant la phase d allumage Pendant la phase d allumage l allumeur nécessite entre 200 et 700 watts de tension ce qui peut représenter trop de puissance pour une prise GFI Chaque fois qu il y a une surtension il augmente sa ...

Page 22: ... l état de la californie comme causant des anomalies congénitales ou autres effets nocifs sur la reproduction Pour accéder à d autres informations rendez vous à WWW P65WARNINGS CA GOV MADE IN CHINA FABRIQUÉ EN CHINE IMPORTANT NE RETOURNEZ PAS LE PRODUIT AU MAGASIN Pour toute questions commentaires ou demandes de renseignements veuillez communiquer avec Dansons directement Le service à la clientèle...

Reviews: