


Appendix A • Control Panel Menus
A-14
Pitney Bowes DA500/DA550 Operator Guide
4. Barcode
F. Outline
Use this option to print only the outline or the edge of the
font’s shape. All records printed using Outline will appear
as hollow text.
To select the font options:
1. Press the + or – buttons to scroll through the Main
Menu options until the “FONT” option displays on
the LCD panel.
2. Press the + or – buttons to scroll through the Font
options until the desired option appears on the
LCD panel.
3. Press the Enter button to select the desired
option (A, B, C, D, E or F).
4. After making your selections, press the Menu
button several times to back out of the Menu until
the printer displays OFF LINE . Then, press the
ON LINE button to enable the printer.o select the
font options:
Use this option to include a USPS-certified barcode on
your mailpieces. The DA500/DA550 can print a 5- or 11-
digit barcode. If you select Off, it means that if the com-
puter sends a 5-digit ZIP Code, it won’t print a barcode;
only the 9-digit ZIP Codes and Delivery Points will print.
The options on the barcode menu are:
•
Location,
•
5-Digit On/Off
•
9-Digit On/Off.
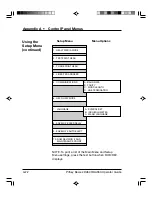
3. Font
Selection
(continued)


